Gladiolus flower (lat. Gladiolus), or swordsman is a long-standing and beloved decoration of our flower beds and gardens, although 300 years BC, in Ancient Greece, it was considered a weed of wheat fields. But in ancient Rome, majestic gladioli flowers already decorated the gardens of the patricians. Nowadays, there are more and more people who want to grow them. In this article we will introduce those who are just planning to grow gladioli with the rules and features of caring for these amazingly beautiful flowers.
Listen to the article
Planting and caring for gladiolus (in brief)
- Bloom: from the beginning of summer (early varieties) to the beginning of autumn.
- Landing: in the spring.
- Excavation: first half of autumn.
- Storage: at a temperature of 5-10˚C.
- Lighting: bright light.
- The soil: slightly acidic (pH 6.5-6.8), structural chernozem, sandy loam or light loam.
- Watering: very abundant (10-12 l/m²), frequent (once a week).
- Feeding: liquid, organic and mineral. Root: 1st - during the period of appearance of 1-2 leaves, 2nd - at the stage of development of 5-6 leaves, 3rd - before the formation of buds. Foliar: at the beginning of growth and during budding.
- Reproduction: seeds, buds, corms.
- Pests: thrips, meadow mites, cabbage cutworms, wireworms, mole crickets, slugs.
- Diseases: fusarium, gray mold, sclerotinia, septoria, bacterial scab, cancer, penicillosis, curvularia, smut, viral diseases.
Read more about growing gladioli below.
Features of growing gladioli
First, learn eleven mandatory rules, without which it will be difficult for you to succeed in such a matter as growing and caring for gladioli.
- Firstly, do not grow gladioli in one place for more than two years, transplant them to another place in the third year, observing the golden rule of the gardener - crop rotation.
- Secondly When replanting gladioli, choose a garden area with a different soil composition. For example, if at first gladioli grew in sandy loam soil, replant them after a couple of years in light alumina.
- Third, buy planting material adapted to your climate zone, since gladioli do not like to move from warm climates to cool and rainy ones. When buying bulbs from Holland, be prepared for the fact that they will decorate your flowerbed with flowering only once, but it will be a wonderful sight.
- Fourthly, do not plant children and large bulbs next to each other, because the large ones will oppress the small ones. Plant in order from small to large. It is better to plant the largest bulbs separately.
- Fifthly, maintain the correct planting depth: in light soils - to a depth equal to four bulb diameters, in heavy soils - equal to three. If you plant it not deep enough, you will have to tie up the shoot; if you plant it too deep, the gladiolus may not bloom at all.
- At sixth, three to five days before planting, clean the daughter bulb from dense scales, otherwise it may not germinate, and after planting, water it every other day.
- Seventh, the gladiolus plant loves light, so late varieties may not bloom at all in the shade. Only early varieties can be planted in shade and partial shade, but then do not expect early flowering.
- Eighth, the area with gladioli must be ventilated, otherwise fungal diseases may occur.
- Ninth, if your gladioli grow in sandy loam, practice foliar feeding, that is, spraying the leaves with fertilizers.
- Tenth In summer, gladioli are watered once a week, but very generously. If the heat lasts, then in order to combat overheating of the soil, water them every evening, followed by loosening the soil, hilling and removing weeds.
- Eleventh, cleaning and storing corms is a very important point, treat it responsibly.
Preparing to plant gladiolus bulbs
3-4 weeks before planting you need to be careful clean the corms Remove all diseased or partially damaged bulbs from dense covering scales without damaging the sprouts. You can leave only the bulbs that are slightly affected by sclerotinia or scab, cutting out the lesion and treating the sore spot with brilliant green.
After cleaning the scales and processing the cuts, the gladiolus bulbs are laid out in one layer with the sprout facing up and kept in a warm, bright room for the shoot to germinate.
Before planting, the corms are treated with chemicals to neutralize thrips and fungi, immersing them for 1-2 hours in a 0.3% solution of potassium permanganate or for 1 hour in a 0.3% solution of foundationazole. If the treatment is carried out immediately before planting, then soak the bulbs in a solution (0.5 g of potassium permanganate per 1 liter of water) for half an hour and then, without rinsing, plant immediately.
 In the photo: Processing bulbs in potassium permanganate
Children of gladioli also need to be prepared for planting. 10-15 days before planting, select buds with a diameter of 7-8 mm (if the gladiolus variety is not large, you can take smaller ones) with noticeable root tubercles and remove the hard shell from them. Then place them in a single layer in boxes and place them in diffused light. To disinfect the sprouted children, keep them in a solution of potassium permanganate (1 g per 1 liter of water) for 9 hours.
Growing gladioli requires the gardener to follow the rules determined by the biological characteristics of the plant. Since gladioli are light- and heat-loving, the site for planting them must be selected in accordance with these requirements.
So, selection and preparation of a site for planting gladioli: Light, draft-free areas with well-drained soil are preferred. The further north the area, the lighter the area should be, since even barely noticeable shading retards the growth and flowering of gladiolus. In addition, it is unacceptable to plant gladioli in areas with high groundwater levels. In southern regions, shading at midday is acceptable. The area should be horizontal or slightly inclined (5°) to the south so that excess water can drain.
 In the photo: Planted gladioli
Soil acidity- also the most important component of success in growing gladioli. Slightly acidic soil, pH 6.5-6.8, is considered optimal. With higher acidity, the tips of the leaves of the plant darken and wither, and the flowers open poorly, fusarium appears. In an alkaline environment, the iron contained in the soil becomes insoluble and inaccessible to the roots of the gladiolus, therefore the formation of chlorophyll in the leaves of the plant slows down and they begin to turn yellow. To neutralize acidic soil, chalk, dolomite flour or eggshells are used, which are added to the soil at a rate of 150-200 g per 1 m2 when digging.
The best soil structure for gladiolus, except for structural chernozem, there is light loam or sandy loam. Such a structure can be created by adding sand to heavy loam, clay to sandy soil and adding humus and rotted compost. If the area warms up well, it needs to be dug up immediately before planting the bulbs. In arid areas, in order to retain moisture in the soil, the main digging is done in the fall, and before planting the bulbs, the ground is only slightly loosened. It is good if vegetables, legumes or perennial herbs grew on the site before the gladioli, but it is not recommended to plant flowers in the place where root crops or asters grew. The width of the ridge is approximately 1-1.2 m.
If you already know in the fall where you will plant gladioli in the spring, add dry phosphorus (100 g of superphosphate per m 2) and potassium (30-40 g of potassium chloride per m 2) to the soil of this area. fertilizers and dig up the area. It is better to apply chlorine-free potassium fertilizers (potassium sulfate or potassium magnesia) after winter before spring digging. Autumn digging should be ten centimeters deeper than spring digging.
 Gladioli are planted from late April to mid-May., although you always need to make allowances for climate and weather. We have already written about the depth of placement of bulbs in the soil, but let us remind you: large gladiolus bulb deepened by 10-15 cm, small ones - by 8-10 cm. Large ones are planted at a distance of 15 cm from each other, small ones - after 7-8 cm. The distance between rows is 20-25 cm.
We spill the furrow for planting with water or Fitosporin solution, pour a two-centimeter layer of river sand on the bottom or, which is much better, put a layer of sphagnum moss in the furrow, lay out the corms and dig them in. Moss prevents rot and retains moisture in the soil, preventing it from drying out even in extreme heat.
Gladioli care
You need to carefully care for planted gladioli. When the seedlings reach ten centimeters in height, try mulch cover the bed with a layer of humus, 5 cm thick: it will protect the soil from dehydration and overheating and, when watering, will feed the bulbs.
Watering gladioli you need once a week early in the morning or late in the evening, very generously - 10-12 liters per m 2. It is better to pour water into inter-row furrows 3-5 cm deep to prevent drops from getting on the leaves of plants, followed by loosening the soil to a depth of 5-6 cm so that a crust does not form on it, and hilling the gladioli.
Loosen the soil preferably at least once a decade, regardless of the presence or absence of precipitation. In the hottest weather, water the gladioli every 3-4 days, otherwise the peduncle will become sluggish and the last flowers will dry out without blooming. When buds appear on the shoots, tie the flower stalks to the pegs, if necessary, and do not forget to remove dried flowers so that the plants do not waste nutrients on the process of ripening seeds that you will not need.

Caring for gladioli includes: weeding, also as needed, which on average occurs 3-4 times during the summer. Make sure that weeds do not choke out the seedlings, otherwise the flowering of gladioli may be at risk. In addition, in areas overgrown with weeds, there is a greater risk of disease and damage to gladioli by slugs.
 Feeding gladioli with mineral fertilizers carried out at different stages of growth. First feeding nitrogenous, produced during the appearance of the first 2-3 leaves. To do this, 25 g of ammonium sulfate or 25-35 g of ammonium nitrate, or 25 g of urea are added per 1 m2 of dry soil. As a result of a lack of nitrogen, the plant has pale leaves; an excess, on the contrary, gives powerful growth and rich color to the plants, but, unfortunately, leads to a delay in flowering and reduces resistance to fungal diseases.
Second feeding nitrogen-potassium-phosphorus, should be produced after the appearance of 5-6 leaves by adding 15-20g of superphosphate, 10-20g of ammonium sulfate and 10-20g of potassium sulfate per 1 m 2 of soil.
Third feeding potassium-phosphorus, given to plants before budding, immediately after the appearance of the peduncle: per 1 m 2 - 30-40 g of superphosphate and 15-20 g of potassium chloride.
Gladioli also need organic fertilizers., which are best applied in liquid form, as this allows fertilizers to be delivered directly to the root system. At the beginning of plant growth, you can use an infusion of bird droppings (3 buckets of droppings are infused in 4-5 buckets of water for 10-12 days, then one liter of this infusion is diluted in 10 liters of water and the inter-row furrow is watered, followed by loosening the soil and hilling). Liquid mineral fertilizing is carried out every 2-3 weeks, but after August 15 you need to stop feeding gladioli. Do not use horse manure as fertilizer.
Gives good results foliar feeding, that is, spraying plant leaves with a solution of mineral substances, which accelerates the flowering of gladioli and increases their decorative value. It is best to use solutions of boric acid (0.15 g per 1 liter of water), copper sulfate (0.2 g per 1 liter of water) or 0.15% solution of potassium permanganate. Feed the leaves 2-3 times during the summer at the beginning of growth and during budding, adding a little soap to the solution and trying to ensure that the composition gets on both sides of the leaf.
It is very important to get it right cut gladioli. This should be done with a sharp knife early in the morning or evening so that the remainder of the peduncle is deeply hidden between the remaining leaves, of which there must be at least four on the plant, and which should ensure the further growth and development of the corm.
When to dig up gladioli
Timely cleaning and storage of gladioli. You need to dig up gladioli in the fall, from mid-September, when 35-45 days have passed after flowering. Corms that are ripe for digging have root covering scales, the babies are also covered with dense scales and are easily separated from the mother bulb. You need to dig in dry weather, first the earlier varieties, then the later ones. Plantings of small bulbs and children are dug last. If you notice that the corms are damaged by black or brown spotting, digging up the corms should be done earlier to save them from being damaged by other diseases.

You can mow the stems before digging, or you can trim them with pruning shears after removing the corms from the soil. The roots also need to be pruned. Then you need to carefully shake off the soil and separate the children. The corms are placed in boxes with a fine mesh or mesh bottom, each variety separately from the other, and washed under running water. Then they are disinfected by immersing for 20-30 minutes in a one percent solution of foundationazole, washed again with water, treated with a three percent solution of potassium permanganate, laid out for three days to dry, then transferred to boxes lined with paper and stored at a temperature of 25-30 ° C, from turning over time. After 10-15 days, the temperature is reduced to 18-22 °C. After 30-40 days, the corms can be cleaned and sorted.
- Back
- Forward
After this article they usually read
With the onset of autumn and the first cold weather, all summer residents dig up, cover or transfer flowering plants to a warm place. When to dig up gladioli? How to save them until spring? Storing gladioli after digging is an important stage that affects their health and flowering next year. Gladiolus is a heat-loving flower that reacts poorly to cold and wind, so its bulbs must be removed from the ground before frost sets in.
Gladioli just dug up, photo:
Experienced gardeners recommend first digging up gladioli with dark shades of flowers. Purple, dark burgundy, cherry, black, and blue varieties should be given attention first. The reason for this division lies in the weak immunity of dark species and their insufficient protection against fungal diseases. Those representatives that were grown from baby bulbs, on the contrary, are dug up last.
Beginning flower growers or simply interested hobbyists often ask the question: do gladioli need to be dug up for the winter? The answer will be positive and non-negotiable - yes, it is necessary.
It is advisable to devote a sunny and dry day to this process, since digging up the bulbs after rain will be associated with inconvenience (washing the seed, drying, etc.). It is better to choose an ordinary garden fork as an auxiliary tool; the bush should be carefully pryed from below and removed from the ground along with the earthen lump. There is no need to pull the gladiolus by the stems or pull it like carrots or beets, as you can damage the tubers and lose the baby bulbs.
When to dig up gladioli in the fall
For this event, gardeners in the middle zone most often choose the end of September or the beginning of October, and in the south this can be done later. According to popular belief, the first cold snap is a signal to dig up gladioli. If you miss this time and wait until the first frost, the bulbs will inevitably die. A temperature of -1 °C is sufficient for planting material to deteriorate.
In any case, always take into account the individual weather conditions of your region. A folk “gardening” sign says: dig up gladioli after you have harvested the potatoes, but do it before harvesting the late cabbage.
In Kuban, potatoes begin to be dug in July, and late cabbage is harvested in November. So southerners, rather, need to focus on the timing of cabbage harvesting.
There is also an important point - harvesting gladioli in the fall should be done after at least a month has passed since the end of flowering. It takes approximately 30-35 days for the plant to form a replacement corm and tubers (baby bulbs). Thus, if your favorite gladiolus bloomed on August 5, then around September 5-8 you can start digging up the tubers. By the way, for the same reason, it is better to immediately remove faded stems (cut from the bush) so that the plant does not waste extra energy and nutritional components on already “used” material. After flowering, gladiolus must accumulate its potential and direct it to the formation of a tuber, and not the ground part. If you did not cut off the top on time, then the digging period should be extended by about three weeks.
Dug up and washed bulbs, photo:

If for some reason the harvesting of gladioli for the winter is done a little earlier than scheduled, in principle there is nothing to worry about. If the tuber is not fully ripe, it will “reach” the desired condition during storage, but for baby bulbs this situation is even favorable. Unripe children are tightly attached to the tuber, therefore they are better removed from the soil, are not lost during sampling, and have a light gray tint (it is easier to notice in the ground). The ripe baby is brown in color, it is easily separated from the bulb, but it can not be seen in the ground and can be “lost” when dug up.
Sometimes the summer is too rainy or the owner did not take care of the flower garden, because of this (due to excess moisture) brown marks may appear on the leaves of the plant. These spots are the fungus Botrytis gray, sometimes called “gray clay.” To preserve the tubers and save the seed, the bulbs are dug up ahead of time. After this, the gladioli must undergo appropriate processing. But this will be discussed a little later.
Gladioli - how to dig them up and how to store them?
A more detailed description of the process looks like this: we calculate approximately 10-15 cm from the center of the intended location of the bulb, carefully plunge the fork into the soil and, as it were, dig around the bush in a circle, then press the handle of the fork and remove the root of the plant (corm) along with the soil. Next, we select the tubers and children and put them in a suitable container. By the way, you can also use two garden scoops for these purposes; they are very convenient to work with two hands, the process is better controlled and goes faster.
Bulbs with babies, photo:

Harvesting gladioli for the winter necessarily involves radical pruning of the remaining fragments of the above-ground part of the plant. The stems should be cut as close to the bulb as possible.
Stem trimming, photo:

Next, you need to separate the new tuber from the mother one. But it is better to perform this action after drying, when approximately 20 days have passed. After these manipulations, the seed should be washed. It is most convenient to do this in a construction sieve under running water. Processing (treating) the bulbs is the next, no less important stage of preparation for wintering.
How to treat gladioli before storage? The biggest “fan” of gladioli is thrips, so that it doesn’t remind you of itself while the tubers are waiting for the new sowing season, stock up on Karbofos in advance. Give the bulbs a 15-minute bath from a solution of this drug, then immerse them in potassium permanganate (aqueous, slightly pink solution) for about 10 minutes. Instead of Karbofos, you can use a product with a similar effect - “Decis”, “Fitoverm”, “Inta-Vir”. After processing, the tubers do not need to be rinsed with water, but immediately sent to dry.
Storing gladioli after digging is a responsible process that requires constant monitoring, and sometimes reinsurance. For your own peace of mind and confidence, you can carry out a control, re-dressing of the tubers after 5 days after the first treatment. This procedure is not mandatory, but cases are different; as they say, it’s better to be “over safe than under safe.” In this case, the bulbs are immersed in a solution of the fungicide “Maxim” (4 ml/2 l of water) or “Fundazol” for 30 minutes. This procedure prevents the appearance of fungi and helps prevent such dangerous diseases as fusarium.
The room where the bulbs will dry should be warm (approximately +25..+30 °C); storing gladioli after digging (the first period) takes about three weeks. Seed material should be laid out in one layer in cardboard boxes or wooden trays. After the specified period, it is necessary to carry out a control inspection of the tubers, reject doubtful specimens, remove scales and remaining root fragments.
If you suddenly find traces of rot, then, if they are insignificant, cut off the affected areas with a sharp knife and disinfect the cut area. For these purposes, ordinary brilliant green, a solution of potassium permanganate, or well-proven fungicides (Vitaros, Maxim) are suitable.
Removing the husk is an additional safety net against thrips, which can hide their eggs in it.

This is followed by the second stage of storage, in which the tubers are transferred to a dry room with a lower temperature (cellar, garage, barn). Storing gladioli bulbs is carried out in any way convenient for you - the main thing is that everything is in accordance with the rules.
In addition to wooden or cardboard boxes, you can use the old and reliable “grandmother’s” storage method - a thick nylon stocking in which the tubers are placed and then hung from the ceiling or shelves in the cellar. It is important to periodically inspect the tubers from time to time and remove defective specimens if there is any suspicion. It is best to stop any disease at the initial stage, rather than later saving the remaining seed and wasting time and effort. In order not to confuse the varieties, it is better to label or mark the storage containers in some way.
Storing gladioli in a city apartment
Cellars, basements, garages are excellent places for wintering tubers, but what should flower growers who live in an apartment do? Wooden or plastic trays with wide ventilation holes and cardboard shoe boxes will come to their aid. It is better to wrap each tuber in natural cotton fabric or newspaper; toilet paper, by the way, is also suitable. The most important thing is that in the storage location the temperature column should not exceed +5..+10 °C, otherwise the bulbs will begin to deteriorate or sprout.
It is unacceptable to store gladioli in plastic bags or solid plastic trays in winter - this is taboo. Under such conditions, seed material will inevitably deteriorate.
Suitable plastic storage container, photo:

Each of us has a refrigerator at home, and in the refrigerator there is a compartment for storing vegetables, where the temperature is always higher than in other compartments. This place is also good for gladiolus tubers. A box placed on a windowsill can also serve as storage, but the temperature in this area must be appropriate so that the tubers do not “wake up” ahead of time. Make sure that the bulbs do not come into contact with the glass, as this may cause them to freeze and soften. Remember that storing gladioli bulbs involves inspecting them monthly, regardless of their wintering location.
A little tip - throw garlic cloves, cut into 2 or 3 parts, into a container with tubers. Its phytoncides have a detrimental effect on various fungi and microbes and disinfect the air.
Some experienced gardeners advise sprinkling the tubers with dried mint. In fact, this is a very effective, although not widespread, method by which you can stop the germination of bulbs. Essential oils of the plant help slow down this process.
I would also like to focus on an even more rare method of storing valuable tubers - waxing. Paraffin is heated in a microwave or in a water bath, each tuber is dipped into the warm mass, the scales must first be removed. When the time comes for planting, such bulbs are buried in the soil directly in a paraffin shell.
Knowing when to dig up gladioli, how to do it correctly, as well as how and where to store winter gladioli bulbs is the key to future lush flowering in the summer, a worthy decoration of your site, as well as aesthetic pleasure from contemplating the bright beauty.

Elena
Gladioli have faded, what to do next?
The handsome gladiolus is magnificent in any flower bed. And all because he is tall, slender and capable of charming with lilac, powder, lemon, pink, purple and other shades. But many novice flower growers do not know what to do when the gladioli have faded. Dig up the bulbs and put them away for the winter? Leave as is until frost? We'll tell you what to do with the flower next here!
Working with faded gladiolus: TOP 5 important rules
There may be different flowering periods in the garden. Caring for each of them after the flowers on the stem have faded is the same. It should be noted that simple rules apply to both those plants that are planted in the spring for admiration and those that are grown for cutting.
Proper care of the flower after flowering is necessary so that you can get abundant flowering in subsequent years. With gladioli, everything happens almost the same as with varietal ones - their tubers are dug up every year. But first things first!
So, the flower stalk has faded. What to do? Necessary:
- Carefully cut off the peduncle with pruning shears or a sharp knife. It is better to carry out the procedure in the evening, so that during the cool night the plant can rest from the heat and humidity and be able to carefully heal the wound. When cutting off the peduncle, you should leave a stump of 3-5 cm.

Pruning the peduncle
- Trim the plant so that all the leaves are at the same level. For large-flowered varieties, it is enough to leave 20 cm of the stem, for dwarf varieties - 10 cm.
- Reduce watering. It is no secret that during flowering the soil around the flower should always be moist. This is the only way to achieve a dense arrangement of buds on the peduncle and abundant flowering (some varieties are in a hurry to please gardeners with a stem of 36-48 buds). But after the plant has flowered, abundant watering is not needed: 1 watering every 10 days is enough. However, if autumn is hot and dry, you can water the plants more often.
- Apply 2 feedings to enrich the bulb with nutrients. Usually it takes 35-40 days from flowering to digging up the bulbs, so this amount of fertilizing is quite enough. Top dressing: for 7 liters of water you need 1 tablespoon of superphosphate + 150 g of wood ash. Potassium and phosphorus will help the bulb develop healthy buds, which will delight you with abundant flowering next year!
- A couple of days before digging up the bulbs, the plants should be treated (for prevention) with any means against diseases and pests. This way you will be sure that dry, brown, black rot, as well as rust and scab, are not harmful to the bulb.
These simple steps will make it possible to dig up a healthy and strong onion at the appointed time. One that will delight you with friendly and abundant flowering, bright shade, and maximum stem height.
Attention! Many people do not consider it necessary to cut flower stalks on time. In this case, nutrients are spent on maintaining life in the peduncle, and the bulb does not receive nutrients. And the next year this affects both the general appearance and development of the plant and its flowering.
Digging bulbs: a couple of important points
If you have provided proper care for your gladiolus after flowering, you just have to wait until the end of September or beginning of October. It is at this time that it is necessary to dig up the bulbs, separate the replacement bulbs from the children, inspect them for mechanical damage or diseases, process and dry them.

Digging up bulbs
After this, the bulbs can be stored in the cellar if the air temperature is +5+6C, humidity is about 70%. The main thing here is a box with a mesh, shelf or tray, inside of which air will easily circulate. A good option is the bottom shelf of modern refrigerators. And you will definitely have gladioli next year!
In fact, caring for a gladiolus that has bloomed is not difficult. The main thing is desire and patience - and the result will surprise all the neighbors around!
How to dig and store gladioli: video
Astrakhan tomatoes ripen remarkably well lying on the ground, but this experience should not be repeated in the Moscow region. Our tomatoes need support, support, garter. My neighbors use all sorts of stakes, tie-downs, loops, ready-made plant supports and mesh fencing. Each method of fixing a plant in a vertical position has its own advantages and “side effects”. I'll tell you how I place tomato bushes on trellises and what comes out of it.
Flies are a sign of unsanitary conditions and carriers of infectious diseases that are dangerous to both people and animals. People are constantly looking for ways to get rid of unpleasant insects. In this article we will talk about the Zlobny TED brand, which specializes in fly repellents and knows a lot about them. The manufacturer has developed a specialized line of products to get rid of flying insects anywhere quickly, safely and at no extra cost.
The summer months are the time for hydrangeas to bloom. This beautiful deciduous shrub produces luxuriously fragrant flowers from June to September. Florists readily use large inflorescences for wedding decorations and bouquets. To admire the beauty of a flowering hydrangea bush in your garden, you should take care of the proper conditions for it. Unfortunately, some hydrangeas do not bloom year after year, despite the care and efforts of gardeners. We will explain why this happens in the article.
Every summer resident knows that plants need nitrogen, phosphorus and potassium for full development. These are three main macronutrients, the deficiency of which significantly affects the appearance and yield of plants, and in advanced cases can lead to their death. But not everyone understands the importance of other macro- and microelements for plant health. And they are important not only in themselves, but also for the effective absorption of nitrogen, phosphorus and potassium.
Garden strawberries, or strawberries, as we used to call them, are one of the early aromatic berries that summer generously gifts us with. How happy we are about this harvest! In order for the “berry boom” to repeat every year, we need to take care of the berry bushes in the summer (after the end of fruiting). The laying of flower buds, from which ovaries will form in the spring and berries in the summer, begins approximately 30 days after the end of fruiting.
Spicy pickled watermelon is a savory appetizer for fatty meat. Watermelons and watermelon rinds have been pickled since time immemorial, but this process is labor-intensive and time-consuming. According to my recipe, you can simply prepare pickled watermelon in 10 minutes, and by the evening the spicy appetizer will be ready. Watermelon marinated with spices and chili can be stored in the refrigerator for several days. Be sure to keep the jar in the refrigerator, not only for the sake of safety - when chilled, this snack is simply licking your fingers!
Among the variety of species and hybrids of philodendrons, there are many plants, both gigantic and compact. But not a single species competes in unpretentiousness with the main modest one - the blushing philodendron. True, his modesty does not concern the appearance of the plant. Blushing stems and cuttings, huge leaves, long shoots, forming, although very large, but also a strikingly elegant silhouette, look very elegant. Philodendron blushing requires only one thing - at least minimal care.
Thick chickpea soup with vegetables and egg is a simple recipe for a hearty first course, inspired by oriental cuisine. Similar thick soups are prepared in India, Morocco, and Southeast Asian countries. The tone is set by spices and seasonings - garlic, chili, ginger and a bouquet of spicy spices, which can be assembled to your taste. It is better to fry vegetables and spices in clarified butter (ghee) or mix olive and butter in a pan; this, of course, is not the same, but it tastes similar.
Plum - well, who isn’t familiar with it?! She is loved by many gardeners. And all because it has an impressive list of varieties, surprises with excellent yields, pleases with its diversity in terms of ripening and a huge selection of color, shape and taste of fruits. Yes, in some places it feels better, in others it feels worse, but almost no summer resident gives up the pleasure of growing it on his plot. Today it can be found not only in the south, in the middle zone, but also in the Urals and Siberia.
Many ornamental and fruit crops, except drought-resistant ones, suffer from the scorching sun, and conifers in the winter-spring period suffer from sunlight, enhanced by reflection from the snow. In this article we will tell you about a unique product for protecting plants from sunburn and drought - Sunshet Agrosuccess. The problem is relevant for most regions of Russia. In February and early March, the sun's rays become more active, and the plants are not yet ready for new conditions.
“Every vegetable has its own time,” and every plant has its own optimal time for planting. Anyone who has dealt with planting is well aware that the hot season for planting is spring and autumn. This is due to several factors: in the spring the plants have not yet begun to grow rapidly, there is no sweltering heat and precipitation often falls. However, no matter how hard we try, circumstances often develop such that planting has to be carried out in the midst of summer.
Chili con carne translated from Spanish means chili with meat. This is a Texas and Mexican dish whose main ingredients are chili peppers and shredded beef. In addition to the main products there are onions, carrots, tomatoes, and beans. This red lentil chili recipe is delicious! The dish is fiery, scalding, very filling and amazingly tasty! You can make a big pot, put it in containers and freeze - you'll have a delicious dinner for a whole week.
Cucumber is one of the most favorite garden crops of our summer residents. However, not all and not always gardeners manage to get a really good harvest. And although growing cucumbers requires regular attention and care, there is a little secret that will significantly increase their yield. We are talking about pinching cucumbers. Why, how and when to pinch cucumbers, we will tell you in the article. An important point in the agricultural technology of cucumbers is their formation, or type of growth.
Now every gardener has the opportunity to grow absolutely environmentally friendly, healthy fruits and vegetables in their own garden. Atlant microbiological fertilizer will help with this. It contains helper bacteria that settle in the root system area and begin to work for the benefit of the plant, allowing it to actively grow, remain healthy and produce high yields. Typically, many microorganisms coexist around the root system of plants.
Summer is associated with beautiful flowers. Both in the garden and in the rooms you want to admire the luxurious inflorescences and touching flowers. And for this it is not at all necessary to use cut bouquets. The assortment of the best indoor plants includes many beautifully flowering species. In the summer, when they receive the brightest lighting and optimal daylight hours, they can outshine any bouquet. Short-lived or just annual crops also look like living bouquets.
Gladioli or swords have been decorating our flower beds and gardens since ancient times. I can’t even believe that once in Ancient Greece this beautiful flower was classified as a weed. But even then, for example, in the Roman Empire it was cultivated in gardens. And now it’s rare for a garden to be complete without gladioli. And there are more and more gladioli lovers. A beautiful and proudly standing flower has won the hearts of many flower garden lovers. This article is intended for those who have only recently started planting these amazing plants in their garden and do not know all the subtleties that are required to properly care for gladioli after flowering.
Description
This representative of the flora belongs to the iris family. It has iris-like leaves. But their shape is a little sharper, reminiscent of a sword blade. This is where the second name came from: swordsman. Its homeland is the tropics and subtropics of Africa and Eurasia. These plants are perennial.
The stems of the skewer are vertical. They do not branch and grow solitarily. Their height varies: from 50 to 150 centimeters. The leaves wrap their sheath around the trunk, adding strength to it. Flowers are collected on the peduncle in one-sided or two-sided inflorescences, but spiral ones composed of large flowers are also often found. Inflorescences sometimes reach 80 centimeters in length. Flowers in the inflorescences of swords are always sessile. Their perianths are funnel-shaped and divided into six lobes of unequal size and shape, which are fused at bases of different shapes.
The plant also has fruits, which look like tricuspid small boxes with many seeds, round or oval in appearance, and brown in color. Their tuberous bulbs are round, slightly flattened, covered in scaly films.
About gladioli hybrids
As a result of many years of breeding work, many types of gladioli have appeared, which are called hybrids. Today these plants are being selected. Thanks to this, varieties appeared, more hardy and strong varieties with large corrugated flowers of a wide variety of colors.
Hybrids can support large, often two-row inflorescences with flowers up to 12-14 cm in diameter.
This fact has led to the spread of hybrid species of gladioli. They are preferred by most gardeners.
Preparing for landing
The bulbs are prepared for planting for about two to three weeks, i.e. from mid-April.
Experienced gardeners prefer to clear the bulbs of last year's scales before planting, then they will be able to germinate faster. Before planting, they also check the condition of the bulbs to see if they are diseased. Diseased corms are removed and then destroyed if they can no longer be cured. But in any case, they should never be planted in a flower garden. Clean, healthy bulbs are laid out on a sunny windowsill, where they first hatch and take root. Only then can they be planted. But first they need to be kept in a weak solution of manganese or garlic for about an hour.
Read also: What types of carnations can be grown in the garden?
What you need to know about care
- These members of the iris family love a lot of light. Moreover, they should be illuminated by sunlight all day. There should be no shading, because in this case the gladiolus will bloom later and the flowering time will be shortened. If the shading is strong, the flower will never bloom.
- Gladioli do not like to grow in the same place for several seasons in a row. It is advisable to change the place where they grow in the flower garden every year.
- The best soils for swords are sandy loam soils or light, slightly acidic loams.
- It is necessary to begin preparing the place for planting bulbs in the autumn. For each m2 you need to add humus in an amount of no more than one and a half buckets, to which ash is added (approximately 100 g added to the humus and mixed), superphosphate (50 g also added to the humus) and potassium sulfate (sprinkled no more than 30 g on the surface of the soil) . After applying the fertilizer, dig the area deeply, breaking up all the lumps.
- Before planting, the bulbs are kept in a garlic solution for about three hours to disinfect and stimulate good growth.
- Organic fertilizers cause rapid development of leaves. And gladioli will bloom poorly in this case, so it is better to refuse such fertilizers for gladioli.
- Powerful varieties of swords bend in the wind, and the flower stalks lie on the ground. Therefore, after about 5 leaves appear on the stem of the peduncle, the plant is spudded and sometimes tied in several places.
- The bulbs are planted in the spring, when the soil in the garden bed warms up to 10 C.
Caring for iris representatives after planting consists of regular watering, loosening the soil and removing weeds. Plants also need to be fed with nitrogen during the period when the second leaf appears. Then they are fertilized during the development of the flower bud and then again when the plant blooms, with potassium, phosphorus and nitrogen. After flowering, the plants are fertilized with the same fertilizer.
How to protect against diseases and various pests
Gladioli are very susceptible to all sorts of diseases, so they need to be protected from infections. This requires preventive spraying treatments. Then pests and diseases will not affect these representatives of the flora. For prevention, flowers are sprayed with dissolved green soap, tincture of shag or garlic, etc. You can also use products offered in stores. Such spraying is carried out once or twice a month.
Read also: Growing Alocasia Polly and features of its reproduction and care
If preventive measures are not taken, gladioli may get sick. Most often, they are affected by the same diseases as all other bulbous and tuberous plants. They are affected by viruses, fungi and bacteria. Moreover, many diseases cannot be cured, and flowers have to be destroyed. And crowds of mites can destroy not only gladiolus, but almost the entire flower garden.
The cause of most of the diseases of this plant is improperly carried out agrotechnical work in the flower garden. To avoid the spread of fungi and other flower diseases, you need to think about planting plants so that they have good ventilation. There should not be an excess of nitrogen fertilizers in the soil, especially at the end of the season. Too much of this type of fertilizer will cause vigorous leaf growth, which will weaken the bulbs. Weakened onions are a tasty morsel for all sorts of harmful mites and insects. The resistance of gladioli to infections and pests is increased by potassium, manganese, zinc and other elements. Moreover, all these substances increase the resistance of swords to the weather.
The gladioli have faded, what next...
Many people believe that it is necessary to care for gladioli only when they bloom or when they are just blooming. However, this is not at all true. And what to do in the gladioli garden after flowering? Do these plants need to be watered after they bloom? Yes, but less than during the period of growth and flowering. 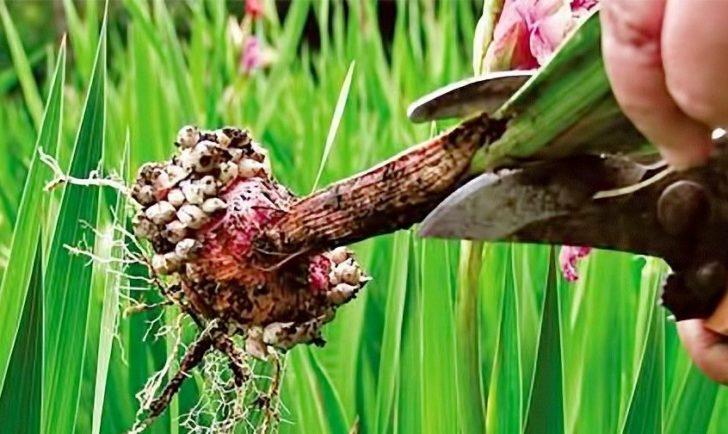 Immediately after the last flowers of the inflorescence on the peduncles have faded, it is better to cut them off so as not to spoil the appearance of the flowerbed. After all, these flowers are propagated by “children” of bulbs.
When to dig up gladioli? 40-50 days after the swords have finished flowering, they are dug up for storage for the winter. They will not survive the winter in soil. But dampness and cold can destroy the bulbs even before severe frosts, and therefore you should not delay harvesting them. And first of all, corms of the varieties that bloom first are dug up.
In order to injure the onions as little as possible, they are dug up and pryed with a pitchfork, and then picked out of the ground with their hands, the remaining soil is cleaned off and placed on something dry to dry. If there are diseased or damaged bulbs, they are selected separately. Diseased nodules are burned.
The stem is cut off completely. Only a small stump of about 0.5 cm is left. Care after this consists only of preserving the bulbs until spring.
In order to preserve all the harvested corms, they are dried for three days in the sun, then they are kept in a weak solution of manganese for an hour. Then they are dried again, put in nylon or gauze bags, and placed in a warm, not necessarily lit, but well-ventilated place. After about a month, the bulbs are removed from the bags and stored in the room, or on the windowsill, for about a month. After that, they put it in the refrigerator or basement and take it out to dry every month. When drying, check again for damage. The temperature in the place where planting bulbs are stored should not be lower than +5 C.
About gladioli and their use
What flowers do you prefer to grow in flower beds and gardens? As a rule, they are those that do not require much care and are resistant to the vagaries of the weather. And flower bed designers love ornamental plants that do not disturb the structure of the flower bed for the entire period from spring to autumn. Gladioli do not meet these requirements. And winter anxiety (whether they will survive or not), followed by spring anxiety (they will germinate or not), and then summer anxiety (they will bloom or not), costs so much nerves! But, nevertheless, they are in many flower beds.