The article “Flashlight Brightness Control,” published in Radio, No. 7, 1986, talked about an electronic device for controlling the brightness of a flashlight. Today, the author of this article offers an improved version of the device, which makes it possible to give the flashlight the additional function of a light beacon.
You can, of course, adjust the brightness of a flashlight lamp with a variable resistor connected in series with it. But, unfortunately, significant power is uselessly lost on the resistor and the efficiency of such a regulator will be low. A key regulator is more economical; its operating principle is based on the fact that the load is connected to the power source (battery) not constantly, but periodically - for periods of time that can be smoothly changed. As a result, the average current through the incandescent lamp will change, and therefore its brightness.
The proposed regulator (Fig. 1), like the one mentioned above, is built into the body of the flashlight and allows you not only to adjust the brightness of the incandescent lamp from maximum to low glow. With its help, you can easily turn a lantern into a light beacon.

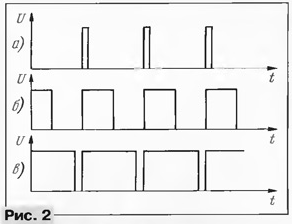
The basis of such a regulator is the integral timer DD1. It contains a pulse generator. Their repetition frequency (from 200 to 400 Hz) and duty cycle can be changed. Transistor VT1 acts as an electronic key - its operation is controlled by the generator. The operating principle of the regulator is illustrated by the oscillograms shown in Fig. 2.
In brightness control mode, the contacts of switch SA1, combined with variable resistor R3, are closed. By moving the resistor slider, the duration of charging and discharging capacitor C1 is changed, and charging is carried out through the diode VD2, and discharging through VD3. Resistors R1 and R2 of relatively high resistance have practically no effect on the operation of the generator.
In one of the extreme positions of the resistor slider, short voltage pulses are formed at the output of the generator (pin 4), opening the transistor switch (Fig. 2, a). In this case, the lamp is connected to the battery for a short time, the brightness of its glow is minimal.
In the middle position of the resistor slider, the duration of time while the lamp is connected to the battery is equal to the duration of the pause (Fig. 2b). As a result, the lamp releases power equal to approximately half the maximum, i.e. the lamp will burn at full intensity.
In the other extreme position of the engine, most of the time the lamp remains connected to the battery and turns off only for a short time (Fig. 2, c). Therefore, the lamp will shine at almost maximum brightness.
When the transistor switch is open, the voltage drop is approximately 0.2 V, which indicates a fairly high efficiency of such a regulator.
In the light beacon mode, the contacts of switch SA1 are open, and capacitor C1 is charged mainly through resistor R2 and diode VD1, and discharged through resistor R1. In this mode, the lamp is connected to the battery for a few tenths of a second at intervals of several seconds.
Switch SA2 is the flashlight's own switch, capacitor C2 acts as a buffer energy storage device, facilitating the operation of battery GB1.
Tests of the regulator have shown that it works normally when the supply voltage is reduced to 2.2...2.1 V, so it can be used in flashlights even with batteries of two galvanic cells. For the transistor indicated in the diagram, an incandescent lamp can have a current of up to 400 mA.
The device can use the KR1006VI1 timer, KD103A, KD103B, KD104A, KD522B diodes, as well as a transistor specially designed for operation in switching or pulse circuits - with a collector-emitter voltage in saturation mode of 0.2...0.3 V, the maximum collector current is not less than the current consumed by an incandescent lamp, and the current transfer coefficient is not less than 40. For an incandescent lamp with a current of up to 300 mA, in addition to those indicated in the diagram, transistors KT630A - KT630E, KT815A - KT815G, KT817A - KT817G are suitable. It is advisable to use small-sized oxide capacitors, for example, the K52, K53, K50 - 16 series, a variable resistor - SPZ - 3 with a switch, constant - MLT, C2 - 33. Resistor R3 can also be used with a value several times higher, for example 10, 22 , 33, 47 kOhm, but in this case it will be necessary to proportionally reduce the capacitance of capacitor C1 so that the generator frequency remains practically the same.
Structurally, the regulator is easier to install in a flashlight with a so-called “square” body, designed to use batteries 3336, “Rubin” and their foreign analogues, as well as in a “round” flashlight with collapsible halves of a plastic housing. In this case, resistor R3 is first mounted on the housing, and then the remaining parts are placed. Moreover, in any embodiment, it is more convenient to install them using the hinged mounting method: diodes and resistors R1, R2 can be soldered to the terminals of resistor R3 and switch SA1. After installation and inspection, the parts must be secured and insulated, for example, with epoxy glue.
If the beacon mode is not required, the regulator can be simplified by eliminating elements R1, R2, VD1 and using resistor R3 without switch SA1.
Setting up the device comes down to selecting resistors R1, R2, R5. In beacon mode, selecting resistor R1 sets the duration of the pause between flashes, and resistor R2 - the duration of the flash. The value of resistor R5 depends on the type and parameters of the transistor, as well as the voltage of the power source. To select it, you need to apply a supply voltage approximately two times less than the maximum or the minimum at which the regulator operates stably. After this, resistor R3 is set to the maximum brightness position and a voltmeter is connected to the collector and emitter terminals of the transistor. Between the base of the transistor and pin 4 of the microcircuit, a chain of a series-connected constant resistor with a resistance of 30 Ohms and an alternating resistor of 2.2 kOhms is temporarily installed. By changing the resistance of the variable resistor from maximum to minimum, the voltage at the collector of the transistor is controlled. Note the position of the slider at which a further decrease in the resistance of the resistor does not lead to a noticeable decrease in the voltage on the collector. After this, the resulting total resistance of the chain is measured, and a constant resistor of the same value is installed.
In order for the regulator to work with powerful incandescent lamps consuming a current of 1 A or more with a supply voltage of up to 10...15 V, it is enough to use a powerful composite transistor with a current transfer coefficient of several hundred as VT1 (from small-sized ones, KT829A - KT829G KT973A, KT973B are suitable ). It is only necessary that the supply voltage does not exceed the maximum permissible for the microcircuit. You will, of course, have to use oxide capacitors with the appropriate rated voltage.
Every radio amateur is familiar with the NE555 microcircuit (analogous to KR1006). Its versatility allows you to design a wide variety of homemade products: from a simple single-vibrator pulse with two elements in the harness to a multi-component modulator. This article will discuss the circuit for switching on a timer in the mode of a rectangular pulse generator with pulse-width adjustment.
Scheme and principle of its operation
With the development of high-power LEDs, NE555 again entered the arena as a dimmer, recalling its undeniable advantages. Devices based on it do not require deep knowledge of electronics, are assembled quickly and work reliably.
It is known that the brightness of an LED can be controlled in two ways: analog and pulse. The first method involves changing the amplitude value of the direct current through the LED. This method has one significant drawback - low efficiency. The second method involves changing the pulse width (duty factor) of the current with a frequency from 200 Hz to several kilohertz. At such frequencies, the flickering of LEDs is invisible to the human eye. The circuit of a PWM regulator with a powerful output transistor is shown in the figure. It is capable of operating from 4.5 to 18 V, which indicates the ability to control the brightness of both one powerful LED and an entire LED strip. The brightness adjustment range ranges from 5 to 95%. The device is a modified version of a rectangular pulse generator. The frequency of these pulses depends on the capacitance C1 and resistances R1, R2 and is determined by the formula: f=1/(ln2*(R1+2*R2)*C1), Hz
The operating principle of the electronic brightness control is as follows. At the moment the supply voltage is applied, the capacitor begins to charge through the circuit: +Usupply – R2 – VD1 –R1 –C1 – -Usupply. As soon as the voltage on it reaches the level of 2/3U, the internal timer transistor will open and the discharge process will begin. The discharge begins from the top plate C1 and further along the circuit: R1 – VD2 –7 IC pin – -U supply. Having reached the 1/3U mark, the timer power transistor will close and C1 will again begin to gain capacity. Subsequently, the process is repeated cyclically, forming rectangular pulses at pin 3.
Changing the resistance of the trimming resistor leads to a decrease (increase) in the pulse time at the timer output (pin 3), and as a result, the average value of the output signal decreases (increases). The generated sequence of pulses is supplied through the current-limiting resistor R3 to the gate VT1, which is connected according to a circuit with a common source. The load in the form of an LED strip or sequentially connected high-power LEDs is connected to the open drain circuit VT1.
In this case, a powerful MOSFET transistor with a maximum drain current of 13A is installed. This allows you to control the glow of an LED strip several meters long. But the transistor may require a heat sink.
Blocking capacitor C2 eliminates the influence of interference that may occur along the power circuit when the timer is switched. The value of its capacitance can be any within the range of 0.01-0.1 µF.
Board and assembly parts of the brightness control
 The single-sided printed circuit board has dimensions of 22x24 mm. As you can see from the picture, there is nothing superfluous on it that could raise questions.
After assembly, the PWM dimmer circuit does not require adjustment, and the printed circuit board is easy to make with your own hands. The board, in addition to the tuning resistor, uses SMD elements.
- DA1 – IC NE555;
- VT1 – field effect transistor IRF7413;
- VD1,VD2 – 1N4007;
- R1 – 50 kOhm, trim;
- R2, R3 – 1 kOhm;
- C1 – 0.1 µF;
- C2 – 0.01 µF.
Transistor VT1 should be selected depending on the load power. For example, to change the brightness of a one-watt LED, a bipolar transistor with a maximum permissible collector current of 500 mA will be sufficient.
The brightness of the LED strip must be controlled from a +12 V voltage source and match its supply voltage. Ideally, the regulator should be powered by a stabilized power supply specifically designed for tape.
The load in the form of individual high-power LEDs is powered differently. In this case, the dimmer's power source is a current stabilizer (also called an LED driver). Its rated output current must match the current of the LEDs connected in series.
Read also
I bring to your attention a simple LED flashlight circuit with a PWM brightness control. The creation of this design was inspired by the need to adjust the brightness on a Chinese headlamp. Since LEDs are controlled not by voltage, but by current, it was impossible to simply connect a variable resistor to the power line break, so the choice fell on PWM. I didn’t like the option of a PWM regulator on an integrated timer, and I decided to use CMOS logic. The circuit is based on the simplest PWM generator on the K561LE5 microcircuit. It does not differ much from a conventional generator, only two diodes and a variable resistor. It is these three elements that determine the duty cycle of the pulses. As a power amplifier, I used an emitter follower on a KT315 transistor. It is successfully enough, since it works in pulse mode (in my case, low-power LEDs were used; when using powerful ones, you need to take a more powerful transistor, for example a field-effect one).
Here is the diagram of my regulator:
The printed circuit board was developed for SMD components (except for the microcircuit, transistor and variable resistor). Here is a drawing of the regulator circuit board:

As for the details, they are not critical in the selection: any transistor can be used, n-p-n structures (with the exception of low-frequency ones), diodes - any silicon SMD, a capacitor in the 0805 package, a resistor also in the 0805. To save space, the microcircuit can be taken in the SMD version, but then you will have to redo the printed circuit board.

List of radioelements
| Designation | Type | Denomination | Quantity | Note | Shop | My notepad |
|---|---|---|---|---|---|---|
| U1 | Valve | CD4001B | 1 | K561LE5 | To notepad | |
| T1 | Bipolar transistor | KT315A | 1 | To notepad | ||
| D1-D2 | Rectifier diode | 1N4148 | 2 | 1N4007 | To notepad | |
| C1 | Capacitor | 100 nF | 1 | To notepad | ||
| R1 | Variable resistor | 1 kOhm | 1 | To notepad | ||
| R2 | Resistor | 1 kOhm | 1 | To notepad | ||
| LED-LED4 | Light-emitting diode | 30 mA | 4 | Select the quantity you need |
The diagram of such a regulator is shown in Fig. 80, a. A rectangular pulse generator with a repetition frequency of 100... 200 Hz is assembled on elements DD1.1, DD1.2. Resistor R1 regulates the duty cycle of the pulses from approximately 1.05 to 20. The generator pulses are supplied to the matching stage assembled on elements DD1.3, DD1.4, and from its output to the electronic switch VT1, in the collector circuit of which an ELI incandescent lamp is switched on.
The electronic regulator is turned on by switch SA1 combined with resistor R1. Using switch SA2 of the flashlight itself, you can supply voltage from battery GB1 directly to the incandescent lamp, bypassing the regulator.
The regulator circuit board (Fig. 81) is fixed on the side wall of the lamp next to the reflector. A rectangular hole was cut into the back wall of the lantern for the handle of the variable resistor. Capacitor G2 is placed in any free space, preferably closer to the printed circuit board.
Rice. 80. Diagram of the flashlight brightness control (a) and a version of its output stage (b)
The regulator is designed to work together with an incandescent lamp consuming a current of no more than 160 mA. For a lamp consuming current up to 400 mA, the electronic regulator switch is supplemented with a second transistor, as shown in Fig. 80.6.
Diagram of another version of the flashlight brightness control ( touch lamp circuit) is shown in Fig. 82. In it, the function of the regulating element is performed by a two-contact sensor element, which is placed on the body of the flashlight. A generator is assembled on elements DD1.1, DD1.2, producing square oscillations with a duty cycle of approximately 1.05, this means that almost constantly the output of element DD1.2 will have a high level voltage, and only in very short periods of time a low level voltage. These pulses are sent through capacitor C2 to the sensor element El, E2, and the input of element DD1.3. If the resistance between the contacts of the sensor element is high, then at the input of element DD1.3 there will be pulses similar to the output of the generator.

Rice. 81. Printed circuit board (a) and placement of flashlight dimmer elements (b)

Rice. 82. Scheme of the touch control of the brightness of the flashlight

Rice. 83. Circuit board (b) and sensor element design
Therefore, most of the time the output of element DD1.3 will have a low voltage level, i.e. the transistors are closed most of the time and the ELI incandescent lamp does not light. If you now touch the sensor element, the resistance between its contacts will decrease and capacitor C 2 will begin to charge through this resistance. The lower this resistance, the faster the charge is carried out and the longer the time interval at the input of element DDil.3 the voltage will be low, and at its output, on the contrary, high, i.e., the longer transistors VT1, VT2 will be open, which means more brightness of an incandescent lamp. By pressing the contacts of the sensor element with your finger, you can change the resistance between them, i.e., adjust the brightness of the flashlight lamp.
Literature: I. A. Nechaev, Mass Radio Library (MRB), Issue 1172, 1992.
The advantage of this flashlight is that it does not have these stupid strobes, etc. He doesn't need to remember the previous regime. Turn it on right away... and off you go. Brightness (among other things) can be adjusted
They sent it in the usual paper bag, “pimpled” on the inside. Cardboard packaging inside. 
The box is clearly too big. The flashlight came without instructions. And useful information is sometimes written on the box. As we can see from the photo, it is not written anywhere on the box that it allows use at a depth of up to 80m. 
Let's look at the store page. 
This is a photo of the order with the delivery price to Russia. In other countries the price is different.
Characteristics from the seller's page: 
The flashlight was additionally packed in a bubble wrap. 
Here's everything that was included in the package. 
Flashlight, charger (with our plug), battery and lanyard.
You can compare it with another flashlight. 
The hero of the review is on the right. Looks more solid. And there is more metal, and the weight accordingly. 
209g without battery.
The flashlight body is made of painted aluminum. I didn't take it apart. I was afraid to break the tightness of the connections. I prefer not to take actions whose results I have doubts about correcting.
Glass lens. More precisely, ordinary glass, not a lens. But it’s very transparent. 
There is no usual (or rather very inconvenient) on/off button on the tail of the flashlight.
The power button (brightness control lever) is located in a more familiar place. 
The flashlight can be used with one hand. Everything is located very conveniently. This is definitely a plus. But there is also a minus. When being carried, spontaneous activation may occur upon contact with foreign objects. To do this, in the stowed position, I recommend unscrewing the tail section a little. A quarter turn is enough.
The adjustment principle is clear from the video (look at the oscilloscope):
There are rubber seals on the threads of the tail section.

They should protect the lantern from water getting inside. 
I highly doubt that this flashlight will withstand being submerged in 80m of water. But it will definitely last half a meter. There is no way to check at greater depths.
It fits comfortably in the hand. 
There is one operating mode, but with smooth brightness adjustment. 
I took pictures from different lighting angles. 
Due to the lack of a lens, the glow is uneven. This is a minus. He does not have “police” qualities, because no focus.
You can see how it shines in life in the video. He climbed the stairs of the dark entrance. The glow characteristics are well understood.
I tested the flashlight using the included battery (residual voltage 3.67V without load, under load it will be even lower). The one that arrived was the one I inserted without charging it.

Battery with protection.

This is a photo of a house located 70 meters away.

The ABB of the camera makes it difficult to take correct pictures.
Color temperature - WARM WHITE.
On a freshly charged battery, the brightness will be noticeably higher.
The kit came with a charger.

Maximum voltage 4.45V (without battery).

When charging, the LED lights up red. When fully charged - green.
Of course, I took the charger apart.

And I saw the microcircuit.

And at the end of the drowning video:
That's all. I hope it helped at least someone.
There should be enough information for correct output.
Good luck everyone!
The product was provided for writing a review by the store. The review was published in accordance with clause 18 of the Site Rules.
I'm planning to buy +7 Add to favorites I liked the review +2 +16