Autumn is the time when you want to bring a little more heat and comfort. And even little things like handmade fakes help with this. Straw fakes are some of the most unusual, original and beautiful. Straw is a light and pliable material that is interesting to work with.

What can be made from straw?
You can come up with many ideas for crafts, starting from simple bouquets with the addition of autumn flowers and straw dolls, which used to be always woven for the harvest festival in Rus', and ending with complex paintings, some animals that you can make together with children, decor flower pots, mirrors and photo frames and other crafts for the home.

DIY straw bouquets
Flower bouquets made from this will look very impressive. natural material. In order to make one such flower, you will need fabric of a color you like and discreet threads, wire, paper or cardboard, glue, scissors, ammonia, hydroperite (several tablets) and water.

How to do it?
First, you should make a solution of water, ammonia and hydroperite. Leave the straw stalks in this mixture for 6-8 hours, depending on the saturation of your solution. Then wash the straw tubes thoroughly and cut them along the grain. Carefully glue the resulting ribbons onto the paper, pressing them carefully so that there are no bent ends. Then take a second sheet of paper, preferably a thicker one, and, having previously drawn a stencil on it, press it onto the resulting layer of straw stems.


From the back side, cut out several neat leaves and glue scraps of fabric to them. Finish the edges of the leaves with threads, gluing them with glue. After the resulting product has dried, cut it out. Then make 6 more leaves and prepare a circle of cardboard. Glue the leaves to the circle on both sides, then pierce the flower in two places and connect all the elements into one composition using wire. The flower can be decorated with ribbons or beads. To create a bouquet, make several of these flowers.
Here master class on how to make a bell flower from straw:
DIY straw paintings
One of the most popular techniques is the production of simultaneously flat and visually three-dimensional paintings from straw. It’s not difficult to master it yourself, just figure out how it’s done, although it’s a rather labor-intensive process.
How to do it?

To create a neat and beautiful picture from straw you will need, again, scissors, thick sheets of paper (or cardboard), glue, brushes, pencils and, of course, the straw itself. First of all, you need to figure out what you will depict on your “canvas”. Next, lightly draw the main details on paper or take as a basis, for example, pictures from coloring books, books and magazines. Please note that we draw the basics of your picture not on the paper that will be the basis of the fake, but on any other.


Then prepare the straw according to the method mentioned above: dip it in an ammonia solution, cut the straw with scissors, iron it. Glue the straw onto the drawn parts, let them dry, then carefully cut them out. After all this, you can safely take the sheet of paper or cardboard you prepared for the base. Glue the resulting pieces of the painting directly onto the “canvas” and press gently. The picture is ready! If you want to make it a little brighter, color it with paints or ribbons.
DIY straw dolls
Making straw dolls is an activity that our ancestors loved to do. To make one of these dolls or amulets, you will need toothpicks, wire, scissors and fabric.


IN in this case There is no need to straighten or smooth the straw. You just need to trim it so that all the straws are the same length. Fold them in half to keep the ends straight. Determine where your doll's head will end and then carefully mark it with wire. Next, shape the waist, again tying it with wire. If the doll breaks, insert a toothpick into the knot between the “head” and “body” like a spine. Hands can be made either by regular braiding of straw or with the help of toothpicks - in this case, the straw should be wrapped around the rod. Using wire, attach the resulting arms to the doll. This will be the final touch - the toy is ready!
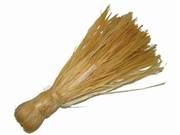
DIY straw houses
Miniature houses made of straw look interesting and fabulous. And, most importantly, it is quite simple to carry out such a fake. To make it you will need thick paper (or cardboard), glue, scissors, pencils, beads or ribbons for decoration and straws. First you need to make the “frame” of the house, its walls. To do this, you need to take sheets of cardboard or thick paper and draw them out so that when glued together they form a box.


Mark the door and windows of your house, then carefully cut them out. We glue the resulting walls into a rectangular box. Then you can proceed to the next part of the work - pasting the house with straw. To do this, measure the length of its walls so that the straws do not turn out longer or shorter. After you have covered the walls of the house, you need to make a roof according to the same principle as a box - you should make a triangle from thick paper or cardboard. Next, we cover the roof with tufts of straw. We connect the roof with the walls - we get a house. In order to make it more beautiful, you can use paints and brushes, additional decorations in the form of feathers that could “peek out” from under the roof straws. Door and window openings can be decorated with fabric or thin wooden plates.
DIY straw crafts: photo gallery

There is a lot of scope for imagination in making toys and dolls from straw. This material has one unique property– easy to bend and maintain a new shape. Therefore, using it, you can create sculptures and figures of people, as well as funny animals - dogs, birds.
Certain rules are followed when creating straw sculptures. They are not complicated, so everyone can easily learn them. This will make it possible to create a wide variety of toys.
The first step is to prepare the material from which the toys will be made - straw. It is soaked in water for 5-6 hours. And then it steams. This will make it soft, it will acquire the necessary flexibility. Then you need to sort out the raw materials. You need to remove the leaves from the straw stalks. If there are spoiled or uneven straws among the straws, then you need to get rid of them too.
Work on the product should begin with the manufacture of the base of the figure. The base itself consists of a frame, the elements of which are bundles of straw or wire. Depending on who you are going to make, you need to give it the shape of a person or an animal. After that the frame is braided with straw. Very tight dressings must be done in the right places. This will give the product its finished shape. If the straw is connected, then it contracts. And the straw coming from the dressing will make the product look like a fan. If the straw is tied when it is wet, then after drying it will retain its shape well. When making doll arms and legs, this property is used quite often. It is also used when clothing items are created for dolls and toys.
Basic doll
The design of this doll can serve as a basis for creating many other crafts. That’s why mastering how to work with it is so important.
You will need the following materials when creating a basic doll: wheat or barley straw. The tools you will need are: strong threads, a knife, scissors, as well as a “goat” device for straw crafts.
Progress
You need to take a bunch of 60–70 pieces. After this, bend it in half so that there are no thickened knots in the middle of the bundle. This can be achieved by moving the knees up and down, preparing the place where the doll’s head will be located. If the bend of the straw is at the bend, it will break. And this will lead to the fact that appearance the dolls will be spoiled. The ends of the straw bundle after this sorting will be uneven. But this doesn’t matter, they will have to be cut off at the end of the work. Note that when selecting stems, you must try to ensure that a beautiful, evenly colored straw ends up on the front side of the product.

Now you can proceed to manufacturing doll heads and torsos. To do this, you need to twist a special thick tourniquet in several steps:
– with both hands you need to take the bunch so that there is a section without knees between the palms;
– repeat this action again, trying to make the tourniquet even and smooth;
– at the end, you need to twist the bun the same way you wring out laundry.
Straw is a simple and affordable material from which you can make various crafts. Making products from straw is an ancient occupation. folk art. It was used to make toys, baskets, boxes, paintings, appliqués, kitchen utensils and much more. Currently, straw crafts are very popular among handmade lovers.
Straw crafts: preparation
The raw materials for the work are straight sections of the middle part of the stems. The leaves will help you create the background of the product, and the knees are cut off. The stems are used to form straw ribbons, which are used for crafts. The material can be dyed in any color using aniline fabric dyes.
Using folk remedies you can give the material noble shades. So, using a hot iron you can easily change the color of the straw to brown, and hydrogen peroxide will add a silvery-white tint. When boiled in potassium permanganate, the material will become soft pink color, and the solution baking soda makes it yellow-golden.
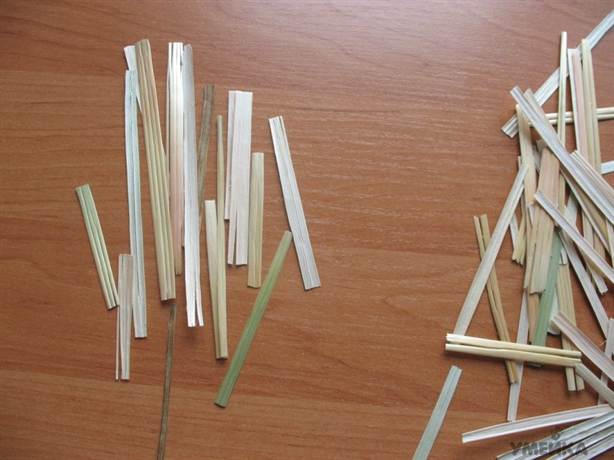
There are 2 ways to make straw ribbons: hot and cold. If you use the cold method, just cut the stems lengthwise and smooth them with the rings of scissors. Cold way helps the strips remain shiny and elastic for a long time.
The hot method involves pre-steaming the straw stems at a temperature of 80 degrees. After boiling, the stems are cut lengthwise and ironed with a hot iron. The ribbons turn out wide and shiny, completely ready for use.
What can be made from straw?
Flower

You will need:
- Straw;
- Fabric of purple or other color;
- Threads to match the fabric;
- Yellow ribbon;
- Wire;
- Thin paper;
- Thin cardboard;
- PVA glue;
- Scissors;
- Wide capacity;
- Ammonia 10 percent - 1 tsp.
- Hydroperit - 9 tablets;
- Water - 500 ml.
Instructions for weaving a flower from straw:
- Prepare a solution by mixing hydroperite, ammonia and water in a container. Place the straw in a wide container and fill with the prepared mixture. Leave for 6 hours: stir the material several times to bleach evenly.
- After bleaching, rinse thoroughly. For the flower you will need 10 straws. Cut them along the grain with scissors and unfold them with your hands. Using a hot iron, iron the strips from the inside to straighten.
- Glue the strips onto thin paper using PVA. Press firmly so that no gaps are visible. Using a rolling pin, roll the prepared layer.
- Make a stencil out of cardboard and place it on the layer. WITH reverse side draw 12 leaves and cut them out.
- Apply glue to each cut out leaf and glue the fabric to it. Take the threads, treat them with glue and glue them to the edges of each leaf. Let the composition dry, then cut it out.
- Cut a circle out of cardboard with a diameter of 1 cm and glue 6 leaves to it. Let dry. Glue the remaining leaves on the back side and wait until dry again.
- Pierce the middle of the flower in two places and tie it to the wire. Wrap the ribbon around the wire. The flower is ready! To create a bouquet, make several flowers, tie them with a beautiful ribbon and place them in a vase.
Straw doll

Cut the straws into equal lengths. Fold in half. Use wire or twine to form a head, not forgetting to insert a toothpick or skewer into the knot.
Divide the body into 2 parts, tie it with rope and insert straw arms. Braid your hands or wrap them with straw.
The ends of the arms can be tied to the belt, defining the waist of the straw doll, or left free. The straw doll is ready.
Straw weaving
Golden-maned horse
To work, you only need straw, twine and wire.

- The horse is assembled from 3 straw sheaves. Twist one sheaf tightly near the end cut, securing with wire. Leave the two long ends free. Bend the straws through the wire ring in the opposite direction. Make sure the ends are inside the straw bundle. Tie the bun with twine and bend the upper part into an arc - this will be the basis for the head and neck.
- Now start doing the mane. It is collected from individual straws. Go around the horse's neck with each one and intertwine it with a rope made of straw. When the mane is completely ready, take a new bun and bend it around the horse’s body, tying it with twine.
- Step back a short distance, pull the bundle again with twine, marking the body of the horse. Divide the remaining part of the straw strand into 3 parts - these will be the hind legs and tail. Bend the 2 parts of the tourniquet at right angles to the body and tie with twine near the end cuts.
- Divide the first bundle of straw in half so that the ends of the wire are in the middle of each half - these will be the front legs. The knees are marked by twisting the middle of the legs with twine and strips of straw. Cut or bend the protruding ends of the wire so that they are not visible. Gently bend your legs to create the impression of movement.
- Take some straws and twist them using scissors or a screwdriver. Attach the tail to the horse's body.
- The final stage of the product is finishing the figurine: tie the places with twine with straw strips. The golden-maned horse is ready! You can give it to a child or friend who appreciates handmade items.
Straw paintings
Paintings made from straw are especially beautiful and original. It’s not difficult to make such work, the main thing is to follow the basic rules.

You will need:
- Straw;
- Scissors;
- Cardboard;
- Glue;
- Iron;
- Brush.
Instructions for making paintings from straw:
- To make any painting you need a sketch. Take colored pencils and sketch out a sample of your future craft on a sketchbook sheet.
- Before painting, prepare the straw using hot or cold methods. Prepare cardboard - this will be the basis of the picture. Using a pencil, draw the outlines of the parts on the cardboard.
- Cut out the necessary pieces of straw according to the size of the parts of the picture. Cover the back of the straw with glue and press it tightly to the cardboard in the desired location. The main thing is not to rush, so as not to spoil the product. Wait until the part sticks well to the cardboard. Do this with each detail until you get the intended picture. Now decorate it with paints and place it behind the glass.
Painting "Butterfly"
Cut out the wings, body of the butterfly and details of the pattern on the wings from a straw plate. Make sure that the pair of wings is symmetrical. Cut the head and antennae from one wide strip of straw.
Draw a picture on cardboard and glue each straw piece to to the right place. First, it is better to glue the wings, placing patterns on them. Place the body, head and antennae on top. Using paints, decorate your butterfly.
Painting "Squirrel"
Cut out the squirrel parts from a straw plate: head (circle), body (triangle), tail (large oval), ears (small triangles). Glue the parts to the cardboard, creating a squirrel: first the body, then the tail, head and ears. Cut out the eyes and mouth from a wide plate.
Straw is an ideal material for creating crafts. You will not only get a lot of fun, but also beautiful original products. Create paintings, baskets, boxes, toys, bags, etc. from straw. You can decorate your home with straw figurines or give them to your family or friends for some holiday. Surely they will appreciate such an unusual gift!
Only straw harvested by hand is suitable for weaving, and it must be harvested in different terms- then it will be of various shades: from green to bright yellow. The stems are cut close to the ground and immediately tied into sheaves.
If the harvested straw is green, it must be dried in a closed, ventilated area. If such straw is dried in the sun, the golden hue will intensify. After drying, the straw must be cleaned. First, remove the nodes; the leaves can be useful. Cut and peeled straws are sorted by length and thickness and tied into bundles. Some of the straw is left uncut - it will be needed when making a sculpture or for spiral weaving.
Before starting work, straws 10–30 cm long are poured with boiling water and kept for a while until they become soft and elastic. Do not soak more than the daily amount of material. If straw remains at the end of the work, it must be dried. The soaked straw is wrapped in cellophane or thick, damp cloth. 
In order for the straw to acquire a silvery tint or a brighter and purer color, as well as better coloring, it must be bleached. But you should pay attention to safety rules when working with bleach solution. First of all, make sure that the solution does not get into your eyes; wear rubber gloves to protect your hands.
For whitening, you can use hydropyrite tablets (6 tablets per 1 liter of water) or hydrogen peroxide with ammonia (150 g of 15% hydrogen peroxide and 20 g of ammonia per 1 liter of water (or ammonia). The straw intended for bleaching is placed on the bottom of an enamel or glassware, pour the solution and press on top. After 6 hours, wash the straw several times with clean water to remove all bleach particles.
Bleached straw becomes softer and evenly colored. But if you bleach it to white, softness and decorativeness, on the contrary, will be lost. 
In order to increase color palette Straw material is dyed using natural, aniline dyes, or by calcining it.
Brown and dark brown shades of straw are obtained as a result of fairly long aging of straw ribbons under a hot iron. This is done as follows: straw ribbons are laid out on a large stack of newspapers, and a hot iron is placed on them (or you can take thick cardboard, put a straw ribbon on it and simply iron it with an iron). The saturation of the shades depends on the heating temperature of the iron and on how long the straw ribbons are heated in this way. You can also heat the straw in a stove or oven, but you must be careful to ensure that it does not come into contact with the fire and does not catch fire.
The silvery-white hue of straw is obtained by dipping it in bleach (hydrogen peroxide or persalt). Persalt solution can be boiled. Boiling straw in a solution of baking soda will give it a yellow-golden color, and in potassium permanganate it will give it a pinkish tint. To give the straw a golden brown color, it needs to be boiled in a decoction of onion scales; Beetroot broth will give it a burgundy color. You can give the straws brown, burgundy, red or another color. A decoction of rhubarb will give it a brown-green color, and bedstraw will give it a red-burgundy color. Although vegetable paints have soft, muted tones, they are distinguished by their natural beauty and high light fastness.
When dyeing straws, you can also use aniline dyes intended for fabrics. The straws painted with them have a bright, rich color that enhances the shine of the natural material. But unlike vegetable dyes, aniline dyes fade strongly in the open rays of the sun, so products dyed with aniline cannot be placed in a place exposed to direct rays of the sun.
After dyeing, the straws are thoroughly washed cold water and dry.
Beautiful dark golden and brown shades of straw can be obtained by calcining it in a stove or oven. The straws, spread out into a ribbon, just need to be heated with a hot iron.
Tools for working with straws
For crafts with straw you will need the following tools and equipment:
1. PVA glue or wallpaper glue for gluing parts.
2. A brush for gluing large parts, a thin plastic (no more than a millimeter in diameter) stick or knitting needle for applying a small amount of glue.
3. A simple pencil and felt-tip pens.
4. Aniline dyes.
5. Plasticine.
6. Thread and needle, fishing line, ribbons.
7. Scissors different types: not tight and with straight ends, semicircular.
8. A knife with a short, angled blade.
9. Two rags. One is completely dry, and the other is slightly damp.
10. Tracing paper for gluing straw ribbons.
11. Cones and seeds.
12. Tweezers for picking up and holding small parts.
13. Buttons.
14. Wire for making a frame.
15. Press for leveling products.
When working with straws, you must adhere to the following simple rules: rules:
1. It is best to work at a low table (at knee level), since most of the work is carried out in weight.
2. Workplace should be clean and well lit.
3. The workplace can be equipped with shelves or boxes for storing tools, materials, and workpieces.
4. Only the essentials should be on the table: on the left - a box with straws, a block, drawings, templates; on the right - a scalpel, a knife, brushes, a jar of varnish, a bath with a sponge soaked in water, a pencil, a ruler, a square, a compass, a surface planer.
The light at work should fall from the left side.
If you want to create beautiful crafts with your own hands, then straw weaving for beginners will help you make your dream come true. How often do you want to do something interesting that can attract attention and interest others! And many people dream of changing the design of their house or apartment, adding a new twist, a “zest”. Often simple paintings do not always bring as much pleasure as household items made by yourself. Straw is perfect solution interior problems. Firstly, working with the material is useful and pleasant. Secondly, it is an opportunity to transform a room and is suitable for all styles!
Old product
Straw is an affordable material that is suitable for a variety of works. Historians believe that needlework is the first folk art activity. What is made from straw? Baskets, hats, boxes, boxes, kitchen utensils, applications. If in ancient times it was a means of livelihood, part of the home, now for many it is a hobby. In addition to this, many craftswomen make custom-made products, which are quite expensive on the modern market.

Before work, the material needs to be prepared. Rye straw is the main material because it is the tallest and hardest. The stem reaches sizes from 40 to 50 cm.
To create appliqués, you need to use oat or barley straws because the stems are short and not suitable for weaving. But this material is very soft with a beautiful shade.
Professionals prepare rye straw during the waxy ripeness of the grain. They suggest cutting the material with a knife near the root, and then laying it out in the sun to acquire a golden color.
In order to understand the main stages of work, you need to watch various video tutorials and read educational books. They will help you remember the movements, teach you how to choose the right tools and prepare the material.
Straw makes flowers especially beautiful. This is a case where color doesn't matter. Of course, they do not look like real ones, but they become a wonderful decoration for any apartment.

To work you will need:
- rye straw;
- ribbon;
- fabric of any color, thread;
- wire;
- paper and cardboard (take thin);
- PVA glue (not pencil);
- knife and scissors;
- large capacity;
- for the solution - ammonia (10%, 1 tsp), hydroperite (9 tablets) and water (500 ml).
We start the master class with the main one.
- First, make a solution by mixing all the ingredients.
- After pouring the solution into a container, put a straw in it. Remember that the straw should take about 6 hours to “cook”. Stir the material to bleach the straw. After marinating, we wash the straws and start working.
- Take 10 tubes and cut them. Advice - you need to cut along the grain. Unfold the material with your hands.
- Iron the strips, do it from the inside. This procedure is necessary for straightening.
- Glue the stripes onto the paper with glue. Press firmly, but not too hard, so as not to deform the straw. Roll the layer with a rolling pin.
- After the previous steps, we make a stencil out of cardboard. Place it on the layer, drawing 12 leaves on the back side. Cut out carefully. Tip - use gloves to avoid getting hurt. And remember that the knife must be sharp.
- Glue each leaf to the fabric. Take the threads, coat them with glue and glue them to the edges of the leaves. Leave the craft for a while to allow the material to dry.
- Cut out the piece. Draw a circle (diameter 1 cm) on the cardboard, also cut out and glue 6 leaves.
- We glue the leaves on the reverse side. Remember that when using glue, leave the craft to dry.
- We pierce the centers of the flowers in two places and tie them to the wire.
- Wrap the tape around the wire. And voila - the flower is ready.
- For the bouquet, repeat all steps. Such a plant can be placed in a vase so that it pleases the eye.
This is the result:

World of canvases
Screw weaving is used for edging crafts. To work, you need to use wet straws of the same size and thickness. The diagram shows the stages of work:
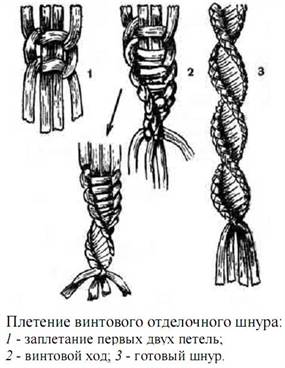
Masters believe that difficulties with weaving may arise during the work. Therefore, you need to turn the whip over, continuing to work inside out.

There are many MKs for creating. The cord must be braided until required size. This option is suitable for the edges of frames, bags, accessories, and caskets. It is often found for eyelets and buttons. For screw weaving crafts, you need to use first-grade straws so that the crafts are of high quality and durable.
In addition to plants, you can make beautiful hats.

They will complement any look. According to new fashion trends, such an accessory is becoming more and more popular. It’s easy to create a craft, but you need to use detailed diagram that are available on the Internet. A ribbon or elastic band can complement the headdress. Everything is left to the imagination, so the craftswoman herself decides how to improve the work.