When your apartment hasn’t been renovated for a long time, you really want to change something. This is quite simple to do - you just need to re-glue the wallpaper. And even against a new background old furniture will seem something interesting and original.
After the materials have been selected and the walls have been prepared, the question arises: “What tools are needed for wallpapering?”
Nothing too expensive or special, suitable only for a certain type of wallpaper or related to the characteristics of the room (unless, of course, you buy a special table). And this is where the gluing tool compares favorably with tools for others. finishing works in the house.
Set of tools for gluing
So what you might need:
1. Hand tools:
- construction bucket for glue (10-12 l);
- rectangular bathtub for non- large quantities glue;
- low stepladder;
- a wide flat brush for the edges and a round one for the main canvas, where a roller cannot be used;
- tape measure (5 m) for measuring and cutting wallpaper, measuring the length of walls, ceiling height;
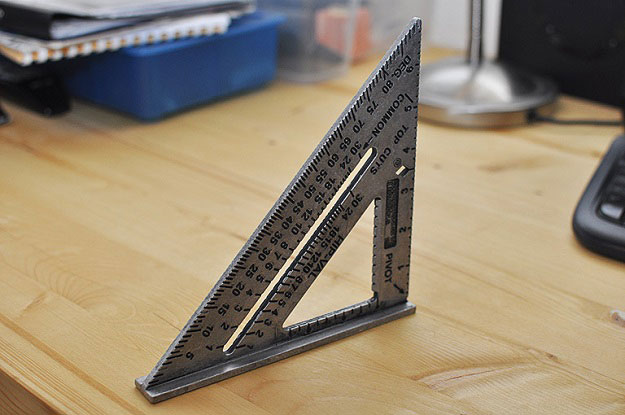
- square and protractor for correct design corners;
- plumb line and construction level for gluing the first strip and checking verticality after passing the corners;
- wallpaper knife with replaceable blades for cutting strips;
- scissors for cutting or making a shaped cutout in the wallpaper;
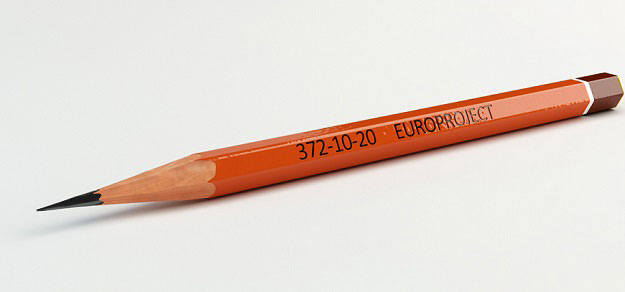
- pencil for marking walls;
- a screwdriver for unscrewing sockets and switches;
- metal spatula;
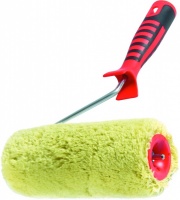
- fur roller with medium length pile;
- pressure roller for joints;
- large rubber roller for smoothing wallpaper;
- plastic spatula for final smoothing;
- wide metal spatula for even cuts when removing unnecessary parts of the canvas;
- hammer with nail puller;
- pliers;
- sponge for removing excess glue;
- masking tape to protect the ceiling and floor coverings.
2. Electrical tools:
- drill with a mixer attachment for mixing glue or putty;
- hammer drill for installing skirting boards.
In the video you can see in detail the set of tools for wallpapering:
How to choose the right roller for gluing

Previously, wallpaper glue was applied with a rag, which distributed the glue unevenly, leaving lumps. And they smoothed it out with their hands or a dry cloth. Now there are special rollers for both procedures.

Why a roller? Because it is very convenient to work with:
- the glue is rolled out in a special tray evenly over its entire cylindrical surface;
- You don’t have to wash the attachment on the roller after work, but simply replace it with a new and clean one;
- when working carefully with the roller, your hands remain clean;
- the work gets done much faster.
Advice! Use a brush when applying glue in the corners of the room and when applying a small amount of glue.
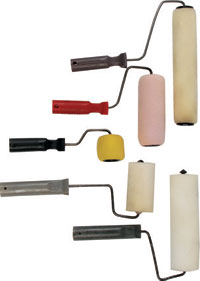
There are several types of rollers:
- for applying glue;
- for processing joints;
- for corners.
There are also several types of roller attachments:
- polyamide or perlon;
- fur with different lengths of pile;
- foam rubber.
What kind of roller is needed for wallpapering? You need to use three rollers (or one with three attachments):
- a fur roller with medium pile for applying glue to the canvas;
- foam or rubber roller to expel air and smooth the surface;
- plastic narrow for processing joints.
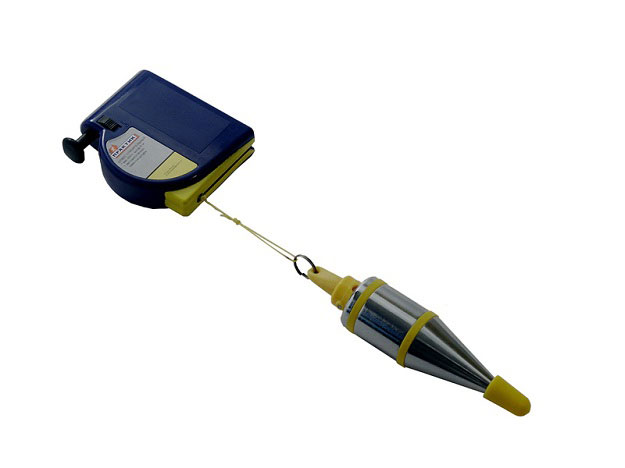
Plumb for wallpapering
Before starting gluing, very few people think about whether they have everything necessary tools. And the lack of equipment makes itself felt only during work that has already begun. What is not obvious to a professional is the presence of a plumb line or a laser level when gluing wallpaper. How is a plumb line used?
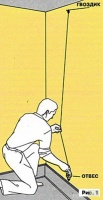
You will need a plumb line at the very beginning of work and after passing corners. It is needed in order to draw a strictly vertical line on the wall, which is needed for gluing the first canvas.

It’s great if you have a laser level at hand, but rarely does anyone have one. Therefore, you can use a self-made plumb line. Follow the instructions to make it.
Instructions for self-production plumb:
- You need to take a cord equal to the height of the ceiling and tie a weight to it.
- The load must hang freely.
- Rub the cord with chalk.
To draw a vertical line, we retreat from the corner a distance of 5 cm less than the width of the wallpaper. We fix the cord near the ceiling and give it time for it to take a vertical position. We press the load against the wall, pulling the cord. Pull the cord and release it. It turns out a straight vertical line, which you need to focus on when gluing the first sheet. We repeat the same procedure after passing the corner.
Warning! Evenly pasting the first sheet of wallpaper will allow you to evenly paste the remaining sheets. Possible errors will only be in the corners of the room, where they are not so noticeable.
Instructions for wallpapering a room
For work, prepare:
- wallpaper;
- glue;
- wallpapering tools;
- film or cardboard to protect floors and furniture from glue;
- clothes, hats that you don’t mind;
- work gloves.
Comment! It is better to hang wallpaper together. Then there will be control over both the upper and lower parts of the glued canvas.
The surface of the walls must be freed from old wallpaper, leveled and dried.
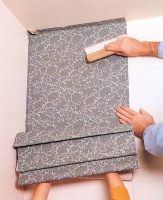
Depending on the type of wallpaper, glue is applied to the wall if non-woven wallpaper is used, or directly to the wrong side of the canvas in all other cases.
Make sure that before applying the next sheet of paper, all the glue is removed from the surface on which it will lie. The surface for coating is usually the floor or a wide table.
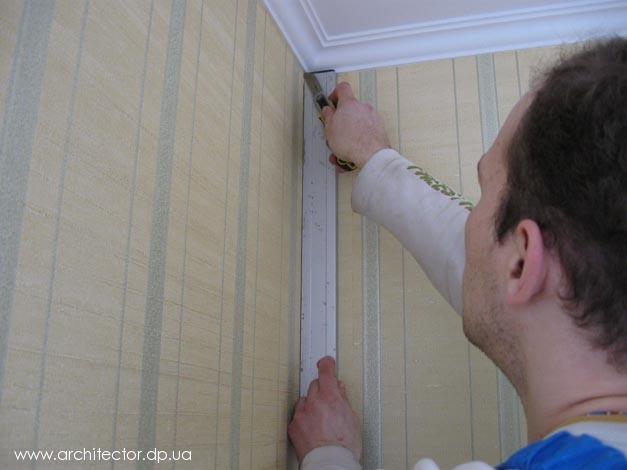
The height of the ceiling and the length of the wallpaper strip are measured with a tape measure, respectively. The fabric is cut to the required length and laid face down.
Using a plumb line or laser level, a vertical line is drawn from which work begins.
The line is marked and you can begin applying glue to the underside of the wallpaper sheet using a fur roller with medium pile.
Now there is colored glue that makes it easy to track uncoated areas:

Advice! The greatest attention should be paid to wallpapering corners.
Usually, the canvas is glued in the corner so that part of it, about 5 cm in size, extends onto the next wall. Then draw a vertical line with a plumb line near the corner. The next sheet of wallpaper is pasted vertically, overlapping the previous one, as close to the corner as possible.
In places where previously removed sockets and switches are located, holes are made directly on the wet wallpaper.
If it is impossible to remove the trim and baseboards, the edges of the canvas are carefully coated with glue and brought inside with a spatula.
After work, all tools are washed and dried.
When your apartment hasn’t been renovated for a long time, you really want to change something. This is quite simple to do - you just need to re-glue the wallpaper. And against a new background, even old furniture will seem something interesting and original.
After the materials have been selected and the walls have been prepared, the question arises: “What tools are needed for wallpapering?”
Nothing too expensive or special, suitable only for a certain type of wallpaper or related to the characteristics of the room (unless, of course, you buy a special table). And this is why the pasting tool compares favorably with tools for other finishing work in the house.
Set of tools for gluing
So what you might need:
1. Hand tools:
- construction bucket for glue (10-12 l);
- rectangular tray for a small amount of glue;
- low stepladder;
- a wide flat brush for the edges and a round one for the main canvas, where a roller cannot be used;
- tape measure (5 m) for measuring and cutting wallpaper, measuring the length of walls, ceiling height;
- a square and a protractor for the correct design of angles;
- plumb line and construction level for gluing the first strip and checking verticality after passing the corners;
- wallpaper knife with replaceable blades for cutting strips;
- scissors for cutting or making a shaped cutout in the wallpaper;
- pencil for marking walls;
- a screwdriver for unscrewing sockets and switches;
- metal spatula;
- fur roller with medium length pile;
- pressure roller for joints;
- large rubber roller for smoothing wallpaper;
- plastic spatula for final smoothing;
- wide metal spatula for even cuts when removing unnecessary parts of the canvas;
- hammer with nail puller;
- pliers;
- sponge for removing excess glue;
- masking tape to protect the ceiling and floor coverings.
2. Electrical tools:
- drill with a mixer attachment for mixing glue or putty;
- hammer drill for installing skirting boards.
In the video you can see in detail the set of tools for wallpapering:
How to choose the right roller for gluing
Previously, wallpaper glue was applied with a rag, which distributed the glue unevenly, leaving lumps. And they smoothed it out with their hands or a dry cloth. Now there are special rollers for both procedures.
Why a roller? Because it is very convenient to work with:
- the glue is rolled out in a special tray evenly over its entire cylindrical surface;
- You don’t have to wash the attachment on the roller after work, but simply replace it with a new and clean one;
- when working carefully with the roller, your hands remain clean;
- the work gets done much faster.
Advice! Use a brush when applying glue in the corners of the room and when applying a small amount of glue.
There are several types of rollers:
- for applying glue;
- for processing joints;
- for corners.
There are also several types of roller attachments:
- polyamide or perlon;
- fur with different lengths of pile;
- foam rubber.
What kind of roller is needed for wallpapering? You need to use three rollers (or one with three attachments):
- a fur roller with medium pile for applying glue to the canvas;
- foam or rubber roller to expel air and smooth the surface;
- plastic narrow for processing joints.
Plumb for wallpapering
Before starting gluing, very few people think about whether they have all the necessary tools. And the lack of equipment makes itself felt only during work that has already begun. What is not obvious to a professional is the presence of a plumb line or a laser level when gluing wallpaper. How is a plumb line used?
You will need a plumb line at the very beginning of work and after passing corners. It is needed in order to draw a strictly vertical line on the wall, which is needed for gluing the first canvas.
It’s great if you have a laser level at hand, but rarely does anyone have one. Therefore, you can use a self-made plumb line. Follow the instructions to make it.
Instructions for making your own plumb line:
- You need to take a cord equal to the height of the ceiling and tie a weight to it.
- The load must hang freely.
- Rub the cord with chalk.
To draw a vertical line, we retreat from the corner a distance of 5 cm less than the width of the wallpaper. We fix the cord near the ceiling and give it time for it to take a vertical position. We press the load against the wall, pulling the cord. Pull the cord and release it. It turns out a straight vertical line, which you need to focus on when gluing the first sheet. We repeat the same procedure after passing the corner.
Warning! Evenly pasting the first sheet of wallpaper will allow you to evenly paste the remaining sheets. Possible errors will only be in the corners of the room, where they are not so noticeable.
Instructions for wallpapering a room
For work, prepare:
- wallpaper;
- glue;
- wallpapering tools;
- film or cardboard to protect floors and furniture from glue;
- clothes, hats that you don’t mind;
- work gloves.
Comment! It is better to hang wallpaper together. Then there will be control over both the upper and lower parts of the glued canvas.
The surface of the walls must be freed from old wallpaper, leveled and dried.
Depending on the type of wallpaper, glue is applied to the wall if non-woven wallpaper is used, or directly to the wrong side of the canvas in all other cases.
Make sure that before applying the next sheet of paper, all the glue is removed from the surface on which it will lie. The surface for coating is usually the floor or a wide table.
The height of the ceiling and the length of the wallpaper strip are measured with a tape measure, respectively. The fabric is cut to the required length and laid face down.
Using a plumb line or laser level, a vertical line is drawn from which work begins.
The line is marked and you can begin applying glue to the underside of the wallpaper sheet using a fur roller with medium pile.
Now there is colored glue that makes it easy to track uncoated areas:
Advice! The greatest attention should be paid to wallpapering corners.
Usually, the canvas is glued in the corner so that part of it, about 5 cm in size, extends onto the next wall. Then draw a vertical line with a plumb line near the corner. The next sheet of wallpaper is pasted vertically, overlapping the previous one, as close to the corner as possible.
In places where previously removed sockets and switches are located, holes are made directly on the wet wallpaper.
If it is impossible to remove the trim and baseboards, the edges of the canvas are carefully coated with glue and brought inside with a spatula.
After work, all tools are washed and dried.
The article will help you avoid situations when, in the process of gluing wallpaper on a wall, or you encounter unforeseen moments that force you to “take off” and go to a hardware store to buy the same narrower spatula, or run around the floors and beg your neighbors for a shaped screwdriver. Read our article and select the necessary tools for yourself.
List of all possible tools
When you make the list necessary materials and tools, take into account the fact that in the process preparatory stage you may need not only tools related to applying glue, etc., but also improvised means for tearing wallpaper off the walls (or removing old paint), and for filling various holes with putty.
First, let's list all the tools for gluing wallpaper:
- paint roller,
- wallpaper roller,
- wallpaper roller for corners,
- painting bath,
- bucket,
- sponge,
- drill,
- insulating tape,
- pencil,
- brush,
- ruler,
- stationery knife,
- scissors,
- screwdriver,
- plumb line,
- construction tape,
- construction mixer,
- rag,
- square,
- level,
- cord,
- painting spatula,
- wallpaper spatula,
- wallpaper brush,
Please note that this list of tools is not mandatory. So, you can apply glue with one roller (rather than several). You can cut the canvas either only with scissors, or only with a stationery knife.
Wallpaper rollers come in different varieties. Let's look at painting first. When choosing a paint roller at a hardware store, ask the sales consultant to bring you a roller with medium length villi. This tool is used to apply diluted glue to the surface of the cut fabric or directly, depending on the type of wallpaper chosen.

The purpose of this roller is not to apply an adhesive solution to the surface to be glued or rolls, but to smooth out the cut canvas that is already glued to the wall. Thus, thin wallpaper is not intended for use with a spatula, as it can damage it. This tool will come to the rescue and help you get rid of bubbles and excess glue between the wall and the canvas. Wallpaper roller comes in two colors – yellow and black. The first is used if your wallpaper has a raised pattern and you don’t want to “crush” it, and the second is for a more even surface when there is no fear of ruining anything.

Wallpaper roller for corners
Thanks to its conical shape, it allows you to give required pressure in certain areas of the canvas - namely in the corners.

After you dilute the glue in a randomly selected container, you should choose a good tray that will allow you to distribute the glue evenly over the entire working area of the roller. The bath consists of two parts - there is a flat surface and there is a smooth surface. The roller needs to be rolled precisely on an uneven surface with ribs. The size of the paint bath directly depends on the size of the roller (its width should be slightly larger than the width of the roller).

Bucket
You will need a bucket to dilute the glue solution in. At the same time, if you expect to use glue the next day, then it is best to choose a bucket (or any other container) with a tightly closed lid. This is the only way to store glue! Of course, do not forget to place the container in a cool place, out of reach of sunlight. If you are interested in the question of how to glue wallpaper, then we suggest that you read another article on our website.

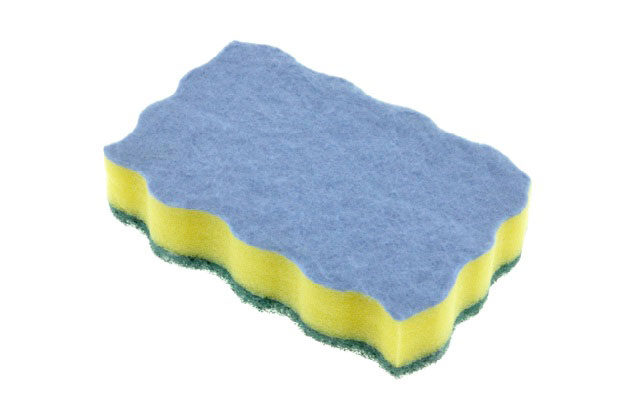
Sponge
It will be useful for wiping off excess glue along the edges of the canvas glued to the wall. Choose a sponge that is as soft as possible, and if its side has a more ribbed surface, then do not even think about wiping it with it, as you can easily damage them.
Drill
This tool can come in handy if you don't have a construction mixer. Select a nozzle so that you can stir the glue solution.

Insulating tape
It is quite natural to have at least one switch and one socket in any room. After you unscrew them and take out the boxes, you should be sure to insulate all the wires, otherwise you will expose yourself to danger. And electrical tape will help you with this.

Pencil
You will need a pencil to mark the walls. Choose a pencil that will be visible on concrete wall. Thus, construction stores offer everyone who wants to buy a construction pencil.
Brush
Here we will not consider each brush option in detail. They differ in width, elasticity of the fibers (soft or harder) and their length. If you do not use rollers, which, if you have already understood, can have different purposes (for canvases, for corners and for joints), then be sure to buy one wide and one narrow brush. A wide brush will help apply a layer of glue to the canvas or the surface of the wall, and with a narrow brush you can coat the walls at the joints and corners between the wall - ceiling and wall - floor.

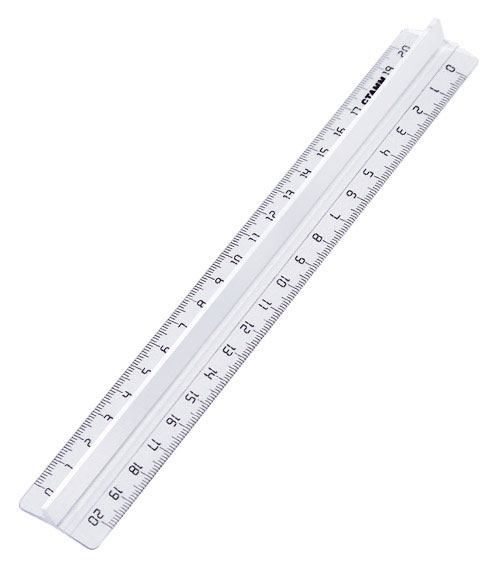
Ruler
If you don’t have a construction tape at home (like any other), you’ll have to use what you have. A ruler will help you measure the height of your walls and determine the length of the wallpaper. Do not forget that you need to add about 5 cm to the resulting wall height for adjusting the canvases to each other.
Stationery knife
You will need a utility knife to cut the canvas to the specified length. It is very convenient if you want to trim corners. A knife is also used to trim the fabric along the baseboard or ceiling. In addition, during the process of wallpapering walls, bubbles may appear under the canvas, which cannot be removed with a roller or spatula. In this case, you can try to make a small cut in the wallpaper. True, it is best to use a thin needle for these purposes. It is better to make 3-5 small holes with a needle and spend a little more time than one large and conspicuous “hole”.

By the way, if the knife blade becomes dull, do not rush to buy a new one. Drive the blade inside the knife so that one part remains outside (until the last notch). Take a pair of pliers and break off a piece. So, you can use a new sharp blade on the edge of the knife. In addition, you can protect yourself from unnecessary injuries by hiding your eyes under construction glasses.
Scissors
They will suit you for cutting fabric the right size. But, unlike the same stationery knife, it seems to us that cutting off the corners, and even more sharply a thin line under the ceiling, will be much more difficult and inconvenient with scissors.

Screwdriver
A screwdriver is useful for removing boxes from sockets and switches. Do not forget to insulate the wires after this, as described above.
Plumb
Very the right tool, because from its presence and correct operation It depends on how smoothly you glue the canvas to the wall. Attach the top to the top so that the weight “dangles” at the bottom. Now draw a straight line along the hanging thread with a pencil or felt-tip pen. A plumb line allows you to apply even vertical markings.
Construction tape
I think there is nothing to explain here - a tape measure will help you measure the height of the walls, their width, and also cut out the wallpaper correctly.

The mixer is designed for stirring the adhesive solution. If you don't have a construction mixer, don't despair! In any case, even if you use a clean wooden stick, this process will not affect the properties of your glue for the worse. You just have to devote a little more time and effort to the stage of bringing the glue to the desired concentration, plus you will have to add the dry mixture in smaller portions than using a mixer. But if you are the happy owner of this tool, then pick up a construction mixer, turn on low speed and gradually pour out small portions of glue into a bucket of cool water ( hot water Not recommended).

Rag
Using a rag soaked in water (be careful: it should be wet, but not to the point that water drips from it), wipe the surface of the glued canvas, getting rid of excess stains and stains. It is best that it is soft - it will not damage the wallpaper.

The tool will be useful to you if you need to cut out various geometric shapes from a roll of wallpaper. Use a square to draw a right angle.
A level is required in order to stick the canvas in a straight, vertical position. A level and plumb line are important tools for wallpaper work!

Cord
You can make a plumb line out of it by attaching a small weight. On the other hand, the cord can be used to mark walls horizontally.

To cut wallpaper near the ceiling or floor, place a spatula there and draw a straight line with a utility knife.
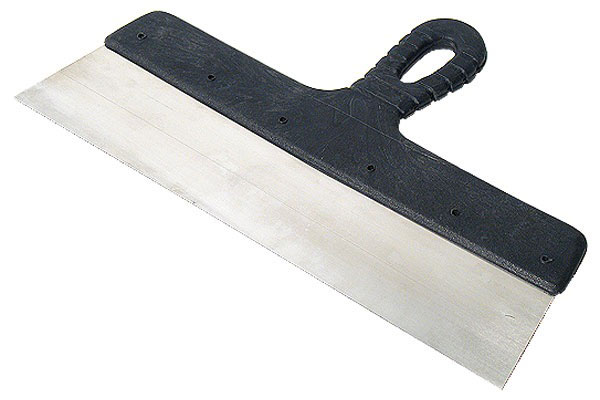
The working surface of such a spatula is not metal, but plastic or rubber. The fact is that it is necessary to smooth the canvas, which will allow you to expel excess glue and bubbles. Plastic and rubber won't hurt. But remember that if your wallpaper is very thin, best choice For this stage of pasting you will use a wallpaper roller.

If you don’t have a roller or brush, you can use a brush to apply glue to the canvas or wall surface. But its main purpose is the same smoothing of the canvas glued to the wall. The brush is especially convenient when used when gluing not walls, but the ceiling.

Conclusion
We tried to tell you about all the wallpaper tools. Which of them will be useful to you is up to you. The article provides interchangeable tools. This means that you can apply glue to the canvas either with a roller or brush, or with a regular brush for smoothing the wallpaper. If you are interested in a description of any other tool, then leave your wishes in the comments below.
Before we start renovating the house, we go to the store finishing materials to buy everything to implement plans for decorating your home. And I want to immediately stock up on everything I need consumables and tools so that you don’t have to waste precious time later. It’s a shame if you don’t have enough wallpaper, wallpaper glue, paint or nails. But it’s even more disappointing when the tool we purchased for repair turns out to be of poor quality or simply unsuitable for the type of finish we had in mind.
When the surface to be treated is large enough and the brush can no longer cope, a roller comes to its aid. It would seem that everything is simple: we go to a hardware store, buy a brush and roller. But everything is just at first glance, this becomes clear at the moment when a huge assortment of these same rollers appears to our eyes! What kind of rollers are not offered to us today by domestic and foreign manufacturers: different colors and sizes, “shaggy” and “short-haired”, foam and even rubber rollers. Which one do you need?
Which roller should I use to paint the ceiling and walls?
The choice of paint roller for painting ceilings and walls depends on what kind of paint you bought for this and which oneexactly the surface you are going to paint (meaning the surface structure).
For enamels and oil paints
Rollers with a fur coat made of fur, velor or polyamide are suitable.
Fur can be either natural or artificial. Which is better? - of course, natural. He is much  longer lasting than its artificial brother.
Velor The roller paints evenly and smoothly, but you will have to dip it in paint often, because... he takes little paint.
Thread roller - a roller made of polyamide, its coat is made of fabric covered with many threads. It is, perhaps, preferable to others, because it does not leave lint and can be used repeatedly, the main thing is to wash it thoroughly. You need to work with such a tool carefully, it “likes to splash.”
Now about the “hairiness”. The rule is simple - the more prominent the surface, the longer the roller should be. This is explained by the fact that it is easier for such a roller to penetrate into uneven areas; accordingly, it will better paint a rough wall or ceiling.
For primers and paints on water based
In addition to those listed above, you can use foam rollers. But, apart from low cost, the foam roller has no advantages. This tool will not last long (God grant that it will last at least once), it splatters paint and distributes it unevenly over the surface.
Which roller should I use to apply wallpaper glue?
Wallpapering is exactly the case when you don’t have to spend money on an expensive tool. Wallpaper is glued to a flat surface, so you can use a foam roller to apply both wallpaper and walls, although others will also work.
 One at a timemeasures
There are three groups of paint rollers:
One at a timemeasures
There are three groups of paint rollers:
- mini rollers- they are used to work with small and hard-to-reach areas;
- midi rollers - optimal size for non-professional home repairs;
- maxi rollers- despite the fact that due to their size they cover a large surface area, working with such rollers is not easy: you need to be a professional to evenly apply paint (varnish, glue, etc.) with them. In addition, soaked in paint, they weigh a lot. Therefore, do not try to buy a large roller; it is unlikely to speed up your repair.
In addition to those listed, there are other types of rollers: rubber (used when gluing wallpaper to remove air bubbles and excess glue); textured (sort of rollers with holes) - with their help, the surface is given a three-dimensional pattern; and other rollers. But you don’t need any unnecessary information; it is more for finishing craftsmen than for amateurs.
Roller quality.
Before you buy a paint roller, take a good look at it. It should look secure, with no loose threads or unfinished edges. The seam is not crooked or rough (otherwise it will leave streaks). Pay attention to the markings. The more stripes there are, the more resistant the fur coat material is to chemical influences.
The quality of the roller is also indicated by its price. A good, high-quality roller cannot cost three pennies.
If you still have doubts about the correctness of your choice, contact a finishing store consultant. Let him advise you which roller to paint, smear and varnish with exactly yours walls or ceiling, as well as
Good luck with your renovation!
Modern joint rollers are a convenient and common tool that is used for painting wallpaper, walls and other surfaces. A special feature of this tool is the ability to work at joints. With this roller you can easily paint wallpaper.
 The selected roller for joints will ensure good wallpapering
 The main purpose of such a tool is to roll wallpaper joints. Because of its characteristic appearance, the device was called “barrel”.
Externally, the tool is a conical roller equipped with a handle. It is very convenient for rolling the junction of two wallpaper towels. This allows you to hide the junction of the sheets so that it is not visible. This tool is also used for applying glue and painting at the joints of wallpaper or drywall.
Features of working with the tool
To paint wallpaper or apply glue to a wall, you must either dip the roller completely into the paint, or simply paint one side. Next, the substance should be rolled out in a special tray. This is necessary so that the paint and varnish material is evenly distributed over the cylindrical surface of the device.
Next you should start or the wall. It is best to use a rubber roller for this purpose. After finishing the painting process or applying wallpaper glue, the roller can be washed, or it is better to simply replace the nozzle and install a clean one in its place.
It is important to ensure that the tool is as well tuned as possible. To do this, you need to regularly clean the wallpaper roller so that it rotates evenly without jamming. It is recommended to accurately center the tool along the axis of the inner rod. If you do not take care of this, the paint will be applied in stripes. Accordingly, the quality of painting will decrease.
 Advantages
 - Ease of use. This type of roller is an indispensable tool in many situations. In particular, it is used for or under wallpaper. It is especially useful when you need to carry out work in hard-to-reach places where it is difficult to approach within the distance of a bent limb. This tool has a long handle, which makes it convenient for use in these situations. Therefore, in general, it is much more convenient to work with a roller than with a brush.
- Safety of use. No matter how much you protect your hands when working with a brush, paint can still get on them. At the same time, if you work carefully with the roller, contact with the skin of paints and varnishes or glue is practically excluded. This is also a clear advantage of the tool.
- Speed of painting and air removal. Working with a roller is faster than with other tools. To apply wallpaper glue or paint, you just need to swipe a surface more than a meter long and more than 0.3 m wide a couple of times and it will be ready.
- Ability to work at joints. Unlike other tools, a joint roller can be used to work on the inside corners of a wall. Then, when finishing one wall, you will not touch the adjacent one.
Flaws
- Difficulty working with soft surfaces. For fiberglass wallpaper or other embossed materials, a regular roller will not work. Although, if you choose a tool with soft attachments, this will allow you to control the level of pressure on the surface to be painted and will be good for painting embossed materials. True, this procedure requires gentle handling of the instrument and a certain professionalism. Therefore, if you do not feel confident, it is better to take a rag or a softer tool to paint the wallpaper efficiently.
- High paint consumption. It is believed that the roller results in the consumption of a large amount of glue or paint. Indeed, control consumption paint and varnish materials It's not easy when working with a roller. This is especially true for people who have little experience in painting wallpaper. Therefore, if you do not have too much paint, it is better to take a brush.
Strengthening the joint between sheets of drywall
Using a specialized roller, you can strengthen the joint between sheets of drywall. How to do this is up to you. Here is the most effective and simple method. Initially, this area should be primed. Next, a reinforced mesh or paper tape is applied to this area. However, you should not wait for the primer to dry completely. To press them along their entire length, use a conical roller.
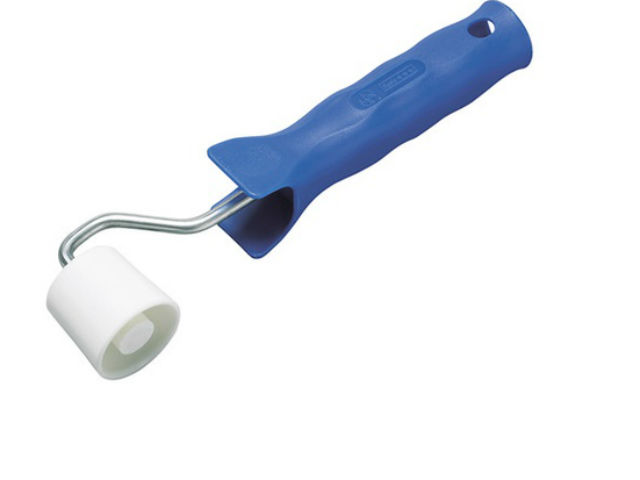 The conical roller can become an indispensable assistant for the builder
 If you use a regular tool for this purpose, the tape will stick to it and come off. In addition, to prevent this from happening, you can wait until the primer dries. Of course, you can work manually, but use a specialized roller.