Today I'll show you how to quickly create a color palette in Sketch. This is a cool trick that he taught me Mark Edwards a few years ago.
First, let's create three squares with a side length that is a multiple of three. In our example, these are squares 240pt high and 240pt wide.
Let's change the names of these layers to Red, Green and Blue. Let's fill the Red layer with #FF6161, the Green layer with #4F953B, and the Blue layer with #0076FF. Select these layers and press the “A” key to select the “Artboard” tool. Now select the “Around Selection” option from the “Inspector” panel on the right. Let's change the name of our artboard: let's call it “Color Palette”.

Now we will add different shades to the squares, dividing them vertically into three equal parts. To do this, create two rectangles above the squares, the width of the entire artboard. The height of the rectangles should be ⅓ the height of the squares — that is, in our case, 80pt.
Align one rectangle with the top edge of the artboard and fill it with white, and the second one with the bottom edge and fill it with black. Now set the opacity of the rectangles to 20%. We got three different shades red, green and blue. Let's rename these two layers so we don't get confused about them later.

Now we will divide the squares again — this time horizontally. Create a rectangle the same height as the square. The width of this rectangle is ⅓ the width of the square itself. Align the rectangle to the center of the red square. Now let's duplicate this rectangle and align the new rectangle to the right edge of the red square.
Now the fun begins. Fill these two layers with some cheerful color. We will use yellow (#FFE200). Set the transparency of the center rectangle to 40% and the right one to 80%. Finally, change the blending mode to overlay.

Now we need to divide the main rectangle into nine equal parts. Essentially, you can simply duplicate the last two vertical rectangles and move them into the green and blue squares to create a complete color palette.

Final result
How to use colors in Sketch
Sketch has a hidden feature that can help you identify frequently used colors in a document. This feature can be found in the Inspector panel when selecting a fill color. On the right, just above the alpha value, there is a color box. When we click on this window, a panel opens that displays frequently used colors.

Saving colors in Sketch is quite easy. When you select a color, you will see two panels: Global Colors and Document Colors. Common colors are colors that are saved for all documents. Document colors appear only for the document you are working on.

Tip: To quickly select a color, press “Control + C” and click on desired color. This is a hotkey for the eyedropper tool.
Sketch Palettes plugin
When you're working on a large project with many files, it's not necessary to manually create document colors.
This is where the Sketch Palettes plugin comes in handy. It allows you to save palettes to a file, which you can later import into another document. This way you can quickly add brand colors to any new document.
This article is about how to get a set of samples color shades from a specific image to create your own collection of the required colors. Considering that many Photoshop users have to work with different clients and each of them prefers a certain design in specific color shades, this article will help you make your own set of colors quite easily and quickly.
An example of a picture for a future color palette
Nothing can combine colors as harmoniously as nature. At any time of the year, various landscapes are full of the most unique shades that not every person will be able to convey. Therefore, to create your own color palette, you can use an ordinary photograph of a landscape and take color samples from it. This lesson will also provide step-by-step instructions on how you can restore the standard set of default colors and how you can use the created palette with pre-selected shades.
10 steps to creating your own set with the color tones you need
First of all, you need to decide on the photo from which you want to take the shades, and then launch Photoshop.
Swatches panel
The standard set of colors presented in the Swatches panel needs to be cleared so that you can easily create your own palette. However, there is no reason to doubt, since the deleted set can be easily returned back. The area of interest to us with samples is located next to the “Color” and “Styles” panels.
To delete a set, you will have to work with each sample separately; the program does not have such a function as “clear all samples”. Therefore, to delete one color, you need to press the Alt (Win) or Option (Mac) button and, with the mouse cursor hovering over it, delete it with a simple click. There are 122 samples in total, you will have to click the same number of times. Ultimately, after the operation is completed, the panel should remain empty.
Eyedropper tool
First, let’s load a pre-selected image from which we decided to take the color shades. Next, go back to the work panel and select the Eyedropper tool. There are more quick way To go to this element: just press the I key.
First color swatch taken from image
As soon as you select the eyedropper, move the mouse cursor to the image element from which you need a color sample and click on this area. The selected color is displayed in the toolbar, so you can see exactly what shade is obtained, and it will be considered the main one.
It should be noted that to simplify the color selection procedure, you can hold down the left mouse button and smoothly move the cursor over the image area. When you hover your cursor, you can see each color individually in the toolbar, allowing you to get a closer look at a color shade before selecting the one you want. As soon as the required color is found, release the mouse button.
Selecting the desired color for the palette using a pipette
Add color to the Swatches panel
At this stage, having received the first color sample, it must be placed in the “Swatches” panel. To do this, move the cursor to an empty area inside the panel with future shades, as a result of which it will take the form of a bucket of paint, and when clicked, the previously selected color will be converted into a sample. After this operation, the program will display a dialog box where you will need to enter a name for the resulting color. In principle, you don’t have to enter the name, since the program itself installs them by default. After you name a color, it immediately appears in the Swatches panel.
Creating a set with color shades
To collect the full palette of necessary colors, you should repeat the previous couple of steps several times:
Select the desired color and click on the empty area in the swatches panel;
We save the color as a sample, giving it a name if necessary.
The number of saved samples can be unlimited, it all depends on your desire. Ultimately, after the steps taken, a set with the necessary color shades will be assembled on the panel with samples.
Ready new palette
Saving samples in a separate set
Once the required colors have been added, the resulting set must be saved so that it can be used in the future. To do this, click the button in the upper right corner located on the samples panel to go to the context menu, where from the presented list of commands you should select the “Save samples” item. When saving, you will need to give the set a name. After these steps, the set will be saved in the same folder as the others created by default, which makes it much easier to find the set if necessary.
Restore default color swatches
If you need to return the standard palette of color shades after you have cleared all the colors, go back to the context menu of the swatches panel and select the “Restore Swatches” command. In the dialog box that appears, the program will ask you whether to replace the current set with a standard one. Here you can either replace color shades or simply add to current samples without deleting them. With this simple method you can restore the standard set with color samples.
Loading a color set
We return to the created set of samples to see how to apply the specified colors. To do this, you need to go back to the Swatches panel menu. In its lower part there is a list of sets with samples; they can also be used, since they are initially included in the program. Since all new sets created are saved in the same place as the standard swatches, a previously created set of shades can be easily found in this list. All sets in the program are arranged in alphabetical order, which greatly simplifies the search. After this, a dialog box will pop up again asking you to replace existing samples with new ones. IN in this case Click the button with the “Replace” command. The selected color palette will be immediately loaded onto the work panel, and color samples can be used.
Palettes and color samples
Selecting a foreground color in the Swatches panel
The main positive thing about using color swatches is that there is no need to periodically refer to the color palette specified by the program to find the right color. After all, they are all displayed on the panel with samples, making it very convenient to find the desired color. To select a specific shade, just hover the mouse cursor over it, which will immediately take on the appearance of an eyedropper, and left-click. The desired color is selected. An icon with a primary color will appear on the tool area.
Setting the background
To set the background, you need to decide on a color. Then press and hold the Ctrl (Win) or Command (Mac) key and click on the desired color in the panel. As a result, the entire working area of the program will acquire a background. Next, all the selected colors from your own set can be used at your discretion, it all depends on your imagination. Taking advantage Photoshop tools, you can design posters in a certain color scheme.
Thus, this article allows you to create your own set with the necessary color shades in Photoshop. If you follow the presented step by step instructions, this operation will not take too much time.
Product mockup using a previously created custom color palette
06/07/16 13.6KColor selection - one of the most important stages in the process of creating good design.
To make your task easier, we decided to compile a selection consisting of best services for creating color schemes. They will help you save time and still get decent results.
01. Adobe Color CC
Adobe renamed its Kuler project to Color
You may be familiar with this tool by its former name - Adobe Kuler. However, Adobe just recently renamed one of its popular web applications to Adobe Color CC.
It allows you to select, create and save different color schemes, each of which can contain up to five colors. The tool is available in both browser and desktop versions. If you're using the desktop version, you'll be able to export your color scheme directly into Photoshop, Illustrator, and InDesign.
02. Mudcube Color Sphere

If you're unsure about your color scheme, Mudcude has its own gallery of ready-made assets
Mudcube Color Sphere is a very handy miniature resource for designers that not only offers hex codes for selected colors, but also allows you to create color schemes for your own projects. It's also worth noting that Mudcube has its own gallery of ready-made resources that can also be used.
03. Check my Colors

Check my Colors is designed specifically to evaluate and select the background and foreground color combination for all DOM elements. And also in order to find out whether the elements are sufficiently harmonious with each other. All tests are based on algorithms recommended by the World Wide Web Consortium ( W3C).
04. The Color App

The application will help you find out the RGB, HEX, and HSLA values of the selected colors
iOS tool The Color App will allow you to easily and simply determine colors using a large color palette. It allows you to find out the RGB, HEX and HSLA values of colors, as well as create your own color schemes for the site.
05. Color Hunter

Color Hunter generates a color scheme based on the selected image
This is very handy tool, especially if you need to find a specific color. Select an image and upload it to Color Hunter. The tool will create a color palette based on the selected image. This is a great method for creating your own color schemes.
06.TinEye

If you need to get a specific color, just enter the HEX value in the URL
This site uses a database of 10 million images, available free under a Creative Commons license, which the creators have carefully curated from Flickr. These can be used to generate appropriate color schemes.
07. Color

Convenient miniature web application. Hover your mouse over the screen and select the color you want, then scroll a little to select the shade. After which the tool will produce all the necessary HEX codes, which you can use in your own projects. One of the easiest tools to use.
08. SpyColor.com

Free color scheme generator that provides color information and also allows you to convert it to any scheme ( RGB, CMYK and others ). There are a variety of color scheme formats available here, including process, monochrome, and more.
09.Design inspiration

On Designspiration, you can choose up to five shades with a convenient full-page palette that makes it easy to find exactly the HTML color schemes you're looking for. The site will then generate a page with all the images in the database that use a similar color combination. HEX values will also be provided which you can use in your own projects. And images can be saved in collections on the site.
10.ColorExplorer

One of the most sophisticated web tools that offers many features related to design, customization and color scheme analytics. Here are some tools to help you determine WCAG validity of color schemes, and also generate your own color palettes.
11. Hex Color Scheme Generator

A handy little tool for generating a color combination based on one selected hue. Insert the Hex value of the color, and the tool will provide a set of matching colors that you can use along with the main one.
12. COLOURlovers

COLOURlovers is a community for sharing color schemes. Here you can get inspiration from other users' color sets, as well as create and share your own.
13. Color Scheme Designer

This online tool offers interesting ways generating color schemes, allowing you to adjust their brightness and adjust contrast. Here you can create several popular mathematical models of color schemes, including monochrome.
14. COPASO

One of the tools from the COLOURlovers website. But COPASO is worthy of special attention, as it is an incredible all-in-one solution, and allows you to easily generate ready-made color schemes for the site. There are many color selection tools available here, all housed in a user-friendly and simple interface. In addition, you can add notes to the palettes, upload images, etc.
15. Colourmod

Colourmod is software that allows you to select individual colors from a widget area, whether you're using a Mac or Konfabulator on Windows. This is not a very simple tool for working with color palettes, but it will help you quickly and easily determine colors without having to download heavy programs.
16. ColorZilla

ColorZilla is available for both Chrome and Firefox
This project started as a plugin for Firefox, but today it is also available for Google Chrome. ColorZilla is an extension that includes several tools designed to work with color, including a palette, a CSS gradient generator, and an eyedropper.
17. Colormunki

A convenient online tool for selecting color schemes from the creators of Colormunki. It allows you to easily create eye-catching color palettes from Pantone-based swatches using multiple techniques.
18.colr.org

Colr.org allows you to set the color range of any image
This tool allows for detailed analysis of image colors, which is usually automated in other tools. This will allow you to choose the most suitable color. We recommend getting familiar with this tool, although its interface is not as sophisticated as other apps.
19. ColourGrab

This handy tool creates color palettes from any image. Insert the URL of the image you want to analyze, and the service will automatically generate a 3D graph with information on the colors used. Although this application is not entirely suitable for choosing a color scheme for a website, it can be used to study images and their color characteristics.
20.ColorBlender

ColorBlender generates a palette of five matching colors
One of the simplest tools that allows you to adjust color and get five colors that combine with each other in real time. The generated palette can be downloaded in Photoshop or Illustrator as an EPS file.
21. GrayBit

GrayBit allows you to analyze websites to understand what they would look like in grayscale
This tool will help you see how your site looks in gray tones. An excellent service that will help identify problematic areas in contrast.
22. COLRD

A tool that can be used as a source of inspiration or to share color schemes. Of course, this resource will not help with generating schemes, but you should definitely take note of it.
23. Shutterstock Spectrum

Images can be filtered by color balance and brightness
Sometimes the easiest way to check if a color scheme will go together is to look at stock images. Almost all major stock sites offer similar tools, but Shutterstock Spectrum has a very user-friendly interface. After using the slider to define colors, you can specify keywords that will help determine the theme of the photos. In addition, you can filter images by color balance and brightness.
24. Stripe Generator 2.0

It may seem that this tool has been outdated for a long time. However, you can still use it effectively to create ready-made website color schemes and attractive patterns.
25. Colors on the Web

Colors on the Web accepts individual colors in HEX or RGB, and produces color schemes based on various mathematical calculations. A similar mechanism is used in Kuler. This web tool will not work on iPad or iPhone due to the use of Flash technology.
26. Pictaculous

This tool allows you to upload images and generate color schemes from the colors used in them. The project combines other tools, offering both the functionality of Kuler and Colourlovers.
27. Contrast-A

An unusual tool for creating WCAG compliant color schemes. The service allows you to simulate color blindness, poor vision, and clinical blindness. In addition, there are many links to very useful resources and instructions. from
Good bad
When creating a web design, perhaps the most important thing is the ability to choose the right colors. This can be difficult and sometimes time consuming, so today we have prepared a small selection of resources that will make this task easier.
A little theory
Colors for the web are made using combinations of red, green and blue, this method of combining colors is called RGB (Red Green Blue).
Each color is represented by an integer from 0 to 255, and each color has a value for red, green, and blue. Black, for example, has no hue, and in RGB it is designated as 0, 0, 0. The first number always means the value of red, the second - green and the third - blue.
Since there are 256 varieties of each shade, there are 16 million different shades. color combinations RGB. Most computers today can accurately display all 16 million colors. There are so-called “safe colors”; we have already written about the need to use them.
When specifying a color, you can use the RGB value or the hexadecimal HEX system. HEX colors are represented by six digits preceded by a # sign. HEX consists of a combination of numbers and letters; 0 is the smallest value, FF (255) is the highest. Each of these six characters in HEX corresponds to numbers in RGB encoding. Black color has the value HEX #000000.
147 colors are defined by name for HTML and CSS according to w3schools.com. There are 17 standard colors - aqua, black, blue, fuchsia, gray, grey, green, lime, dark burgundy ( maroon), dark blue (navy), olive (olive), purple (purple), red (red), silver (silver), blue-green (teal), white (white) and yellow (yellow). Each color has its own specific RGB and HEX value. Dark burgundy, for example, has an RGB value of 128, 0, 0 and a HEX value of #800000; for silver - 192, 192, 192 or #C0C0C0.
Creating a palette
Sometimes creating a palette seems easier than it actually is. Some experienced designers can create a palette from scratch; others get inspiration from other sites or external sources (looking at the colors on a bag of chips at the hardware store or finding the right solutions in nature).
Palettes are being developed different ways, it all depends on the designer's thought process. Some people have such a keen eye that they can match colors on the fly while looking through a color book or looking at a photograph. When creating a palette, make sure to make color combinations for each element of your website.
![]()
To use colors you found elsewhere, take a digital photo and open it in a photo editor, such as Adobe Photoshop. Zoom in until the pixels are clearly visible and use the Eyedropper tool to select the shades you like, then write down their values.
Useful Resources
You don't have to reinvent the wheel. There are many free online tools that allow users to create, download and import color palettes within minutes. Palettes can be created based on a single color or by using a photograph or other image. Here are some simple services for this purpose.

A tool for creating a palette of six colors, which designers can download in .atc format for Photoshop, .epc for Illustrator, or send by email. Set the hue for each color using the slider or specify its value yourself.

We have a large library of ready-made color combinations from five color systems. You can use the Eyedropper tool to define a color. There are many possibilities (preview colors along with text, generate website templates with selected colors, etc.). Using this service you can also determine the colors of the website you like (just enter its url).
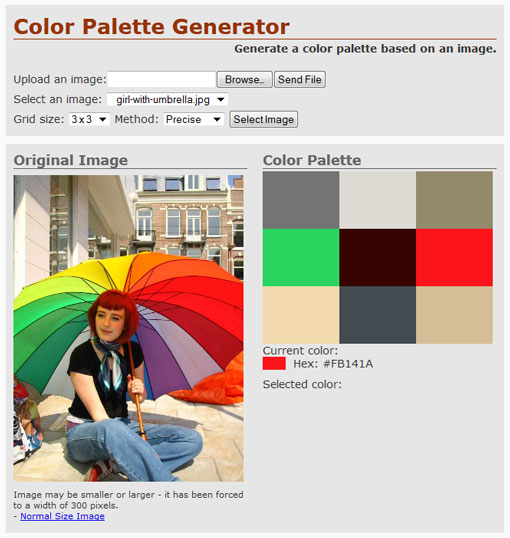
Color Palette Generator
Comments
- Serg
February 24, 2012 at 9:33 pmExcellent and useful collection. On my own behalf, I can mention colorschemedesigner.com, which, among other things, has various presentation modes for people with color perception disorders. You can check, for example, how people with tritanopia will see your work)
- Konstantin
February 25, 2012 at 8:47 amA typo at the very beginning - RGB (Read Green Blue) - Read Green Blue)))
Elena17 Answer:
February 25, 2012 at 3:30 pmThanks;), already fixed it.
- Irina
February 25, 2012 at 10:55 pmTo the creators of the site!
I really love your site and constantly read new posts..
For some reason, recently Kaspersky (license) began to swear and block your page!
I draw your attention to this..
Im Answer:
February 26, 2012 at 7:51 pmThank you, we'll figure it out))
- Elena
February 26, 2012 at 11:50
In this tutorial, we'll explore how to sample color shades from an image and create sets from them that you can later use, especially when you're working with different clients who each prefer certain colors for their project or when you simply want to create your own collection color shades.
One of my favorite things to do is photograph landscapes and then save the individual colors in the photos as sets of colors. After all, it's almost impossible to beat Mother Nature when it comes to harmonious color combinations. In this tutorial we will do everything exactly as I just described - take color swatches from a photo, place them in the color picker and then save them as a separate set of color swatches. We'll also look at how to restore the program's original default colors when we're done, and how to load the created set when we need it!
Below is a photo from which I will be taking individual color shades. I want to create a set of color swatches called " Autumn leaves", so this photo is perfect:
Image of colorful autumn foliage
At the end of the tutorial, we'll look at an example of how you can use the colors from the set we created to create a completely different look. Let's start.
Step 1: Remove existing color tones from the Swatches panel
To create your own set of color tints, let's first remove all the color tint swatches presented in the Swatches panel. Don't worry, they won't be deleted permanently, as we'll cover later. Switch to the Swatches panel, which by default is grouped together with the Color and Styles panels. Unless you have previously loaded other color sets, the Swatches panel will display the colors that were originally set in the program by default:

The Swatches panel displays a selection of default color swatches
Unfortunately, the program Photoshop There is no Remove All Color Swatches command, so in order to remove all color swatches displayed in the Swatches panel, we will need to delete each color swatch manually. To do this, hold down Alt (Win) / Option (Mac) and hover over the color swatch in the upper left corner (“RGB red”). You will see how the cursor will take the form of scissors:

Alt key pressed(Win)/Option(Mac) Hover your mouse over the red color swatch in the top left corner. Cursormiceatthiswill acceptformscissors
Then, still holding down the Alt/Option key, click on the color swatch to delete it. Continue clicking on other color swatches to remove them. You will need to click the mouse button a total of 122 times to remove all the samples, but depending on how quickly you click the mouse button, this should not take you long. When you're done deleting shade swatches, your Swatches panel will be completely empty:

After deleting all the default color swatches, the Swatches panel is empty
Step 2: Select the Eyedropper Tool
Open the image in Photoshop where you want to sample color (if it's not already open), then select the Eyedropper Tool from the Tools panel, or press I for a quick tool selection:
Choosetool « Pipette»
Step 3: Get the first color swatch from the image
After selecting the Eyedropper tool, move your mouse cursor over the area where you want to sample the color, then click to sample the color. I want to sample the bright yellow color from one of the leaves at the top of my image as the first color of my future set:

Take a sample of bright yellow color from one of the leaves
You can tell exactly what color you got from an image by looking at the primary color swatch icon in the toolbar:
The resulting color is displayed in the toolbar as the primary color
Note: You may find it easier to collect colors by holding down the mouse button as you move your cursor inside the image (with the Eyedropper Tool selected). The color your cursor lands on will appear in the toolbar as a base color and will continuously change as you move your mouse, giving you a preview of the color before swatching it. This method seems to me more convenient than the method of clicking the mouse button and only then seeing what sample we received. Release the mouse button when you find a color that suits your color swatch set.
Step 4: Add Color to the Swatches Panel
Once you have your first color swatched, move your mouse cursor to an empty area inside the Swatches panel. You will see the cursor change to the shape of a paint bucket. Click anywhere in the empty area to convert the resulting color into a color swatch. This action will open a dialog box asking you to enter a name for your color swatch. If you are creating a set of color swatches for a client who uses and therefore requires specific Pantone colors, it is a good idea to name your color swatch a color that matches the Pantone color chart (for example, Pantone Yellow 012 C). If you are creating a set of color swatches for your own use, then give the swatch a name of your choice. I'll call my color swatch “Yellow”:

Give your new color swatch a meaningful name, or you can choose not to name it at all.
In fact, it is not necessary to name the color swatches, so if the names of the swatches do not matter to you, then leave the names that the program offers by default. Click OK to close the dialog box once you've given the color swatch a name. If I look at the Swatches panel now, I can see that my first color swatch has been added there:

My created Yellow color swatch appears in the Swatches panel.
Step 5: Continue to collect colors and create color samples from them
Continue collecting colors from your image and then clicking in an empty area of the Swatches panel to save them as color swatches, giving them names if necessary. I collected 10 more colors from the image and ended up with 11 new swatches in the Swatches panel. You can create as many color swatches as you like:

Step 6: Save the Color Swatches as a Separate Set
When you're done adding colors to the Swatches panel and are ready to save them as a separate set of swatches, click on the small right-hand arrow in the upper right corner of the Swatches panel to bring up the panel menu:

Click on the small right-hand arrow to bring up the Swatches panel menu
Then from the menu that appears, select “Save Swatches”:


Enter a name for the new set of samples
Next, click the “Save” button » (Save) to save a set of samples. The program will save the color swatch set in the same location as the other swatch sets loaded into the program by default, so you won't have to search all over your computer for the right folder the next time you want to access any of the created swatch sets, which we and consider further.
Step 7: Restore Default Color Swatches
We took a few colors from an image, created color swatches from them, and saved those swatches as a separate new swatch set. But what if we want to reuse the default color swatches that we removed at the beginning of the tutorial? All we need to do is click on the small right-hand arrow in the upper right corner of the Swatches panel again to bring up the panel menu again and select the Restore Swatches command from the list that appears » ( Reset Swatches):

In order to return the default color swatches to the panel, select the “Restore Swatches” command
In the corresponding dialog box, the program will ask you if you need to replace the current color samples with the default ones. You can either confirm that you want to replace the current color swatches with the default ones by clicking OK, or you can add the default swatches to the current swatches without deleting them by clicking the Append button. I'll click OK and replace my Autumn Leaves swatch set with the default color swatches:

Click OK to restore default color samples
After this action, the default color swatches again appeared in the Swatches panel:

Default color swatches are back in the Swatches panel
Step 8: Upload Your Own Color Swatch Set
The next time you want to use the color swatch set you created, all you have to do is click the right-hand arrow again to bring up the Swatches panel menu. If you look at the bottom of the menu, you'll see a list of additional color swatch sets that are currently available for download. Most of these kits come with Photoshop program, but since our sample set is saved in the same place as the other sets, you will also be able to see it in the list of sets. You just need to click on the name of your set to select it. The program places sets of color swatches in alphabetical order, so my Autumn Leaves set is second from the top:

You'll find all color swatch sets, including yours, in the Swatches panel menu. ClickonNamerecruitmentForhischoice
Once again, the program will ask you if you want to replace existing sets with new ones or add new color swatches to the swatches already located in the panel. I'll click OK to replace the default swatches with the created swatches from the Autumn Leaves set:

Click the Replace button to replace the default swatches in the panel with new color swatches
This action will load my new color swatches from the Autumn Leaves set into the Swatches panel, ready for further use:

My own set of color swatches loaded into the Swatches panel
Step 9: Select a New Primary Color from the Swatches Panel
The big advantage of using color swatches is that they are preset colors. This means that these are the colors we've already chosen (or the colors the program has chosen for us, if you're working with the default swatches), and we don't have to select those colors from the color picker every time we need them. To select any of the colors in the Swatches panel, simply hover your mouse over the desired color swatch. You will see the cursor change to the shape of an eyedropper. After that, click on the color to select it. In my case, I will choose Orange color, second from left:

To select the color you want, click on its swatch in the Swatches panel.
After clicking on the desired color, you can see that this color was indeed selected by us and was displayed on the primary color sample icon on the toolbar:
The color you clicked in the Swatches panel appears in the primary color swatch icon in the toolbar
Step 10: Select a New Background Color from the Swatches Panel
To select a specific color as the background color, press and hold the key Ctrl(Win) / Command(Mac) and at the same time click on the desired color in the Swatches panel. In my case, when the key is pressed Ctrl/Command I'll click on the dark red color:

With the Ctrl key pressed(Win)/Command(Mac) Click the color you want in the Swatches panel to make it your background color
Now, if I look at the toolbar again, I can see that the background color swatch icon now has the dark red color I just selected:
The color you selected in the Swatches panel appears in the background color swatch icon in the toolbar
Now I can use the colors from my Autumn Leaves set however I want, whenever I want! Below are the lines of the poem that I styled using colors from my created color swatch set and the default Scattered Maple Leaves brush in Photoshop:

A poem designed using colors from my created Autumn Leaves color swatch set.
And now we're done! We've learned how to easily create your own color swatches and entire sets of swatches in Photoshop!
Translation: Ksenia Rudenko