For painting wallpaper, water-dispersion paints are most often used, which are divided into facade paints for exterior use and interior paints for interior use. Interior paints are available for painting ceilings, wallpaper, wood and metal surfaces, washable and paints for wet rooms. To paint wallpaper we need highly specialized wallpaper paints. Interior wallpaper paints have high light fastness, abrasion resistance and excellent hiding power. And washable wallpaper paints and paints for wet rooms have not only mechanical and atmospheric resistance, but also allow wet cleaning with weak alkaline solutions.
Wallpaper paints are intended for high-quality painting of all types of wallpaper inside residential premises: paper, non-woven, glass wallpaper. The high elasticity of the film allows you to perfectly convey the structure of the wallpaper. Before painting, the surface must be as clean as possible from contaminants such as dust, grease and oil stains. If desired, water-dispersion paint can be given any shade by adding acrylic color. According to the degree of gloss, paints are divided into 6 groups: completely matte - for ceilings and plastered facades; matte - for walls, furniture, wooden facades; semi-gloss - for walls, furniture, metal; glossy - for floors, furniture, metal; completely glossy - for furniture, metal.
The more matte the surface, the more porous it is and the easier it becomes dirty. At the same time, matte paint is vapor-permeable, it better hides surface unevenness and absorbs light better. Glossy paints, on the contrary, are denser and more resistant to abrasion. They provide a more durable finish than matte finishes. They are also reflective. Their color is brighter than matte paints.
Semi-gloss and glossy paints are often moisture-resistant, washable and abrasion-resistant, so they are best used in kitchens, bathrooms and hallways. Matte paints that are more easily soiled and less resistant to water are used in living rooms.
Waterborne paints are usually sold white, in addition to them you need to buy a color (color pigment) and dilute the paint to obtain desired color. You can do computer tinting right in the store using color tables. This tinting will allow you to purchase additional paint of the same shade. If you mixed the paints manually at home, then the likelihood that you will select the color of the desired shade tends to zero. For the same reason, before you start painting the walls, you need to tint the entire volume of paint and under no circumstances do this in portions, of course, unless you specifically intended the different colors of the walls to be painted.
There are different techniques for painting wallpaper (Fig. 113), depending on the effect achieved, the time spent and the creative approach.
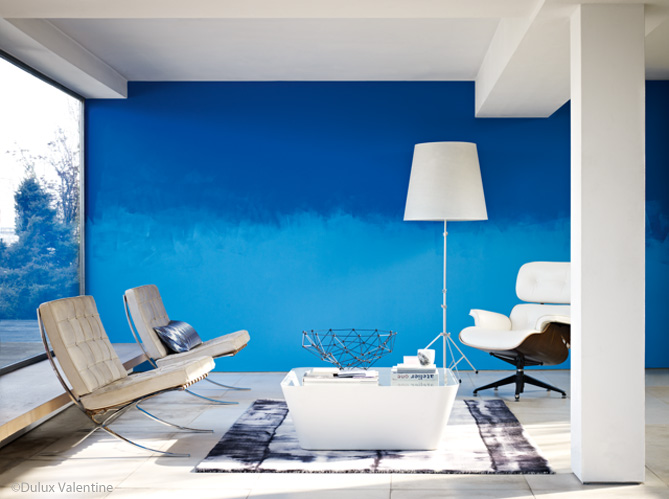
Rice. 113. Example of wallpaper coloring
Method 1, for any wallpaper to be painted. Paintable wallpaper is pasted onto a previously prepared surface and painted after the 48 hours required for the glue to dry. Any paint on the water based(emulsion, dispersion, etc.). The paint is applied with a fleecy roller to the entire surface of the wallpaper. Use a roller with a pile length deeper than the texture of the wallpaper pattern. As a result of painting wallpaper with such a roller, the paint covers both the background of the wallpaper and the convex texture. This is the simplest and quick way wallpaper coloring.
Method 2, for any wallpaper to be painted. Wallpaper painted using the first method is painted a second time after the paint has completely dried. For this, a velor roller is used, which allows you to apply paint only to the relief surface of the wallpaper. In this case, the lower level of the picture remains in its original color. As a result, we get a two-tone wallpaper.
Method 3, For vinyl wallpaper on a non-woven basis. Before drying, the paint applied using the first method is wiped with a cloth along the relief pattern, resulting in a non-uniform color of the surface. The non-woven base absorbs the paint, and on the vinyl “foam” (on the pattern) the paint still remains liquid; it can be carefully wiped off with a clean rag or blotted with a sponge. Quite a labor-intensive method of painting.
Method 4, for vinyl wallpaper on non-woven backing. The dye is applied from the inside of the wallpaper directly to the non-woven base. Different moisture capacities of the non-woven base and vinyl foam (pattern) are used. The paint, absorbed into the non-woven base, emphasizes the convex pattern of the wallpaper. Water-based paint or water-soluble color is used as a dye. The wallpaper must be dry before applying. It is worth testing wallpaper glue and paint tinting in advance by gluing a test piece. When drying, the color of the paint becomes several shades lighter, and ordinary glue for non-woven wallpaper may not hold thickly painted wallpaper and you need to use glue for vinyl wallpaper, coating both the walls and the wallpaper with it.
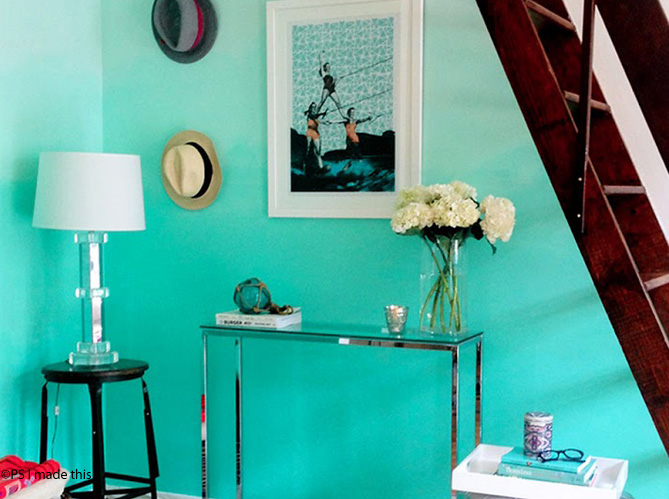
Painting walls using the ombre technique is a new trend in interior design. It looks, without a doubt, very impressive. But the best part is that you can create gradient wall painting yourself! We offer you step-by-step instructions.
Ombre, or gradient, is a smooth flow different shades one color from light to dark and vice versa. Ombre dyeing was popular in the 1970s. Then you can often come across a lamp, bedspread or pillowcase made using the gradient technique. In 2014, ombre fashion returned. Now this technique is increasingly being used on walls. If you can't find it, buy paint and create a gradient effect yourself.
So, to paint the walls with your own hands using the ombre technique, you will need:
- 3 buckets of paint in different tones (for example, if you want a pink ombre, use fuchsia, strawberries and cream, and marshmallow paint)
- Roller and spacious bath for it
- 2 brushes (with hard bristles and softer ones)
- Self-adhesive paper tape
Ready? Let's get inspired and start painting!
Step 1: Protect your walls and floors
Use adhesive paper tape to protect the floor, ceiling and adjacent walls from paint drips. Be sure to cover surrounding furniture with plastic. Cover flooring newspapers.
Step 2. Apply the lightest shade

Dip the roller into the lightest paint and spread the color evenly across the entire surface of the wall, from floor to ceiling. Create a dense coating by applying several layers at a time. A light shade guarantees the necessary base: even if other colors create streaks, it’s not the bare wall that will be visible underneath, but pastel tone, providing a “cloud” effect.
Step 3. Darkest tone

Visually divide the wall into 4 parts. Apply your darkest shade of paint to the bottom quarter of the wall. Don't be afraid to get the color too saturated and don't try to make the borders perfectly smooth.
Step 4. Make a transition from dark to medium shade

The next step is to combine dark and light paint. Mix them in a bath, dip a roller into the paint and draw a line on the second lower quarter of the wall, slightly overlapping the first quarter.
Step 5: Medium Color

The third quarter of the wall should be occupied by a color of medium brightness. Usually this color is the richest, it is it that determines the overall impression of the coloring.
Step 6. Smooth the transition from medium to light
So, only one strip remained untouched, already painted with the base in a light tone. Designers don't recommend mixing light and medium tones in the same way as dark and medium in the stripes below. Simply, making the roller touch softer, slightly smooth out the transition from medium to light shades. You can just leave everything as it is - it will look very unusual.
Step 7. Making it perfect

Examine the resulting wall with a critical eye. Does it seem to you that there is too much dark shade on it or, conversely, too little color of medium brightness? Now you have the opportunity to add any color to create the perfect ombre coloring for you.
Step 8. Sanding and blurring the edges

The transitions still do not look smooth enough, so you should blur the boundaries by running a soft brush over the still fresh, not dry paint. When the paint is completely dry, take a stiffer brush and sand the paint again, as if you were brushing paper over a pencil drawing.
That's it - the ombre wall is ready! You can choose various options execution of this kind of coloring, based on your preferences and mood.
Bonus: unusual ideas for ombre coloring
Instead of building up the intensity of the color from top to bottom, you can invert the gradient by placing the darkest shade close to the ceiling and lightening it as it approaches the floor.
You can also use ombre horizontally, creating a flow of tones from right to left or from left to right. Do you want something more interesting? Combine several different colors at once, for example, pink and yellow.
![]()
If you're afraid you won't be able to achieve a smooth transition, leave distinct stripes of different shades, making their edges wavy.

Having mastered painting walls using the ombre technique, you will be able to apply gradient coloring to anything - furniture, fabric and your own paintings.

You like ? Would you dare to create such an image in your apartment?
At first glance, painting the ceiling looks like a simple and quick task. If you want to make a really high-quality ceiling by painting, you will have to comply with a number of necessary preparatory work. If you simply apply paint to an existing surface, then there can be no question of quality work.
Premises preparation stage
Before painting, it is necessary to completely insulate the interior, walls, floor, windows and window sill, heating radiators, furniture, all this should be covered with film, paper or other materials, and the edges tightly sealed with masking tape. This kind of tape is good because it doesn’t even damage it when peeled off. paper wallpaper. Particular attention should be paid to the cornices along the ceiling perimeter.
Considering that when painting the ceiling, as a rule, they remove lighting, then you will have to separately create high-quality lighting, because even daylight is not always enough for painting. 15-watt energy-saving lamps are ideal; the artificial carrier should be mounted on an improvised tripod, which can be moved as needed.
Preparing the surface
Cleaning the ceiling from old coating - the first and mandatory stage, this will reveal to you all the flaws and defects of the ceiling. Methods for removing the coating depend on what was previously on the ceiling. The wallpaper is easily soaked and removed, the whitewash is also washed off with water and a sponge. Concerning old paint, then if the ceiling is smooth and you are happy with it, it will be enough to wash it with soda, degrease it and paint the top. If there are obvious defects and unevenness on the ceiling, then it is necessary to putty, which means cleaning the ceiling of old paint manually or using equipment.

After this, the entire ceiling is puttied, or spots are selectively repaired; sometimes it is much more convenient to putty the entire surface. For perfect evenness, it is recommended to apply a second layer of putty after the first layer and, after drying, treat it with fine sandpaper. It is better to put the skin on a special stripping block; with its help you can achieve perfect evenness.

Thoroughly clean and inspect the condition of the ceiling. When everything is ready, you must remove the entire layer of putty dust from the ceiling; this is done with an ordinary slightly damp brush or broom. The putty surface must be primed, then the adhesion of the putty to the ceiling will be maximum.
Primer
The primer composition must be applied in accordance with the recommendations specified by the manufacturer. Along the edges of the perimeter, the primer is applied using brushes, do not be afraid to grab ceiling cornice, it is covered with tape. Carefully coat corners and hard-to-reach places near pipes; in short, all spaces where a roller cannot reach should be primed with a brush.
For priming, you need to use a wide brush to cover large spans. You should not stop during the priming process; the entire ceiling must be primed within 20-25 minutes. The next strip of primer should overlap the previous one, then there will be no gaps left.
Methods of painting the ceiling
You can paint the ceiling using several methods: using a roller, a brush (mostly just for moving corners) and using a spray gun.
First of all, you need to say a few words about the paint itself. Today, the choice of paints is very wide; water-based and water-dispersion paints are optimal for ceilings. Paint oil paint It’s not worth it, because subsequent repairs will bring a lot of trouble.
Water-based paint has its advantages: it applies well to the surface and dries quickly, but such a ceiling cannot be washed, otherwise it will immediately be erased.
Waterborne paint has wide range, there is acrylic, acrylic-latex, latex with an acrylic base, etc. Actually, for a person this means little, and most likely these are the tricks of marketers, there are paints with super and luxury effects all around, but no one can really explain which is better , and what's worse. Just when buying paint, read the composition on the can and what the paint is intended for. Understand how much karski is needed per square meter whether it retains moisture and that will be enough.

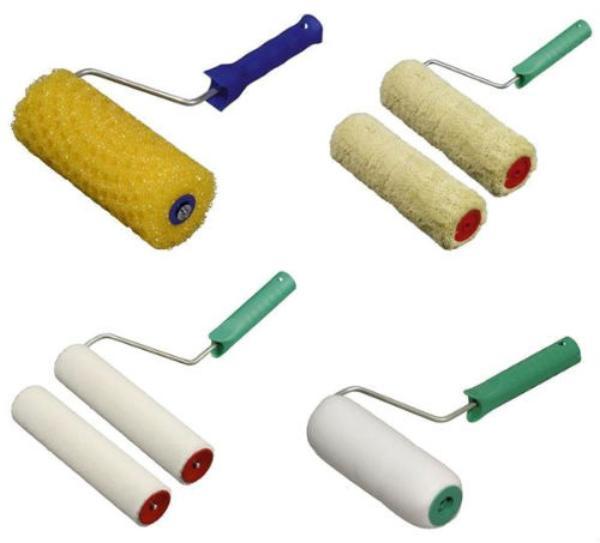
Painting with a roller is extremely simple; for high-quality dyeing you need to purchase a roller; you can use a fur coat or foam rubber coating, without a pattern or with a relief pattern. You will also need a paint tray into which the paint is poured; it has a special edge for rolling out the roller and removing excess paint. Never use a primer roller; paint needs to be clean and dry. The roller is dipped into the bath, and then several movements are made along the mesh, the paint evenly saturates the roller, and the excess is rolled out. A thick layer of paint on a roller will produce a lot of splatter.
You need to roll the paint across the ceiling in even stripes across the entire width of the roller, the strip is made lengthwise from one wall to the other, and the next strip should overlap the previous one. When rolling out the paint, you should try not to lift the roller from the surface, then the layer will look evenly; as the paint is used, you need to increase the pressure on the roller. Having painted a certain section of the ceiling, look at it from several sides and good lighting, then possible places of gaps will be visible.
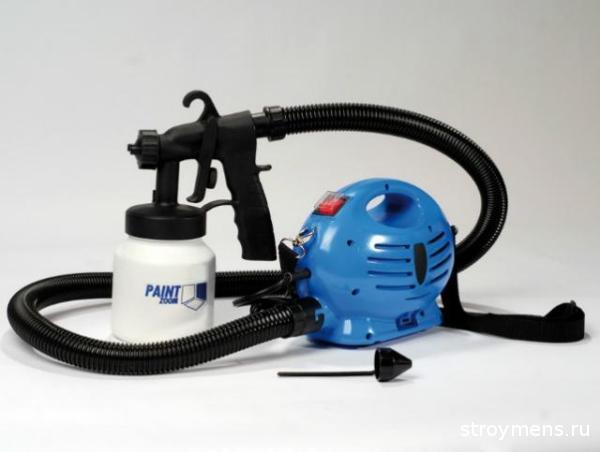
If you have a spray gun, the painting process is much simpler, the quality of painting will be much higher, and you will spend much less time. The spray gun reduces paint consumption to a minimum, plus the coating layer turns out to be the same and correct thickness, there are no gaps or drips left. It is necessary to adjust the spray gun once to the thickness of your paint so that the jet is at least 70 cm and slowly, but without stopping in place, move it along the ceiling.
Metal structures are widely used in a variety of fields due to excellent properties material: durability, resistance to high loads and ease of maintenance. But still, to ensure best protection and to prevent the development of corrosion processes, the surface is better protected.
Painting metal with your own hands will not cause any difficulties if you know all the nuances of preparing the surface and choosing the compositions for the job.
In the photo - painting helps not only protect the metal, but also make the surface much more attractive
Main stages of work
Painting metal structures must be carried out in accordance with the technology, otherwise in a year the work will have to be redone. To provide high quality, you should follow several recommendations, then the result will be excellent, and the work will be completed without wasting time and money.
Purchase of materials and tools
To carry out work efficiently, you must have a certain range of devices:
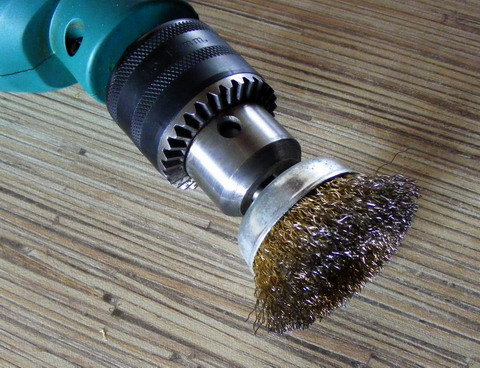
- If there are layers of corrosion on the surface, called scale, they must be removed. The easiest way to do this is with a metal brush or a grinding machine with a special wire cup; you can also use a drill, the main thing is to find the appropriate brush for it. An automated method is preferable in cases where processing is to be done large structures or surfaces.
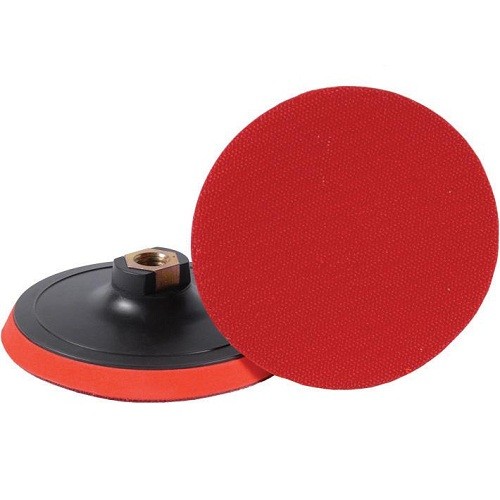
- For more fine cleaning and sanding the surface you will need sandpaper. Again, if the amount of work is large, it is better to use a sander with a flap sanding disc. Another great option– a special cup with Velcro on which you can attach replaceable sanding discs, this is very convenient, because you can use abrasives of different coarsness depending on the characteristics of the surface.
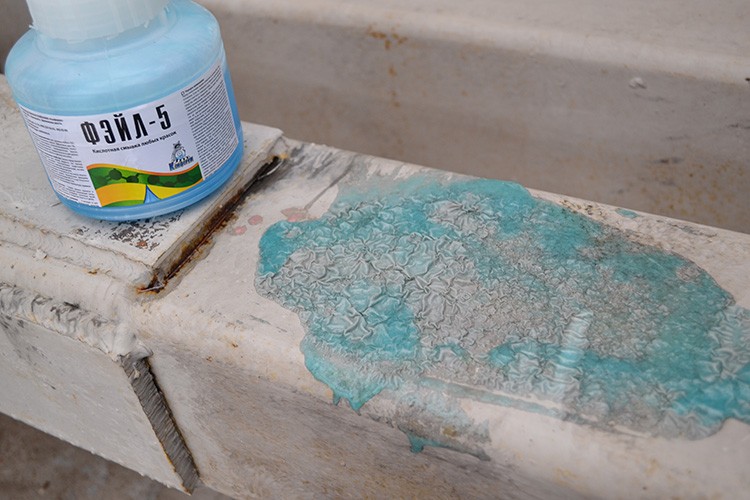
- If you need to remove the old coating, and it holds quite firmly, it is better to use a special paint remover, with the help of this solution the work will go much faster.
- Exist various ways metal painting, depending on the chosen option, as the main working tool for or a spray gun.
Materials you will need:
- In general, if the composition contains anti-corrosion components, this will increase the reliability of the protective coating.
- Paint, there may be several options: alkyd-based compositions, powder paints(the so-called painting for metal, when the result is a so-called hammer coating) or the 3 in 1 option, when the solution includes a primer, an anti-corrosion additive and a decorative composition.
Surface preparation
This stage is very important, since it directly determines how well the composition will fit on the base.
As part of this stage, the following work is carried out:
- First, all areas of corrosion are removed with a brush or power tool; this should be done carefully, without missing a single area. After this, the surface is wiped with a rag, and the entire base is once again checked for rust.

- If more thorough preparation is required, it is necessary to process it with sandpaper or a sanding disc. This type of work is also used and for glossy ones it works much better if they are treated with sandpaper.

- As noted above, if it is necessary to remove all the old coating, the surface is treated with paint remover, and several applications of the solution may be necessary if the paint layer is too thick. The price of the composition is considerable, but the effect is excellent. It is important to do everything as prescribed by the instructions.
- If the surface is clean, it should be wiped with a rag to remove dust, and you can begin degreasing. This is best done with white spirit or a solvent compatible with the paint that will be applied to the surface.

Advice!
Even if you use paint with anti-corrosion additives, it is better to prepare the surface, so the coating is guaranteed to serve you for many years.
- The last stage is the application of primer; it will not only improve adhesion, but will also serve as an additional barrier to corrosion.
Applying paint
The following methods of painting metal can be distinguished:
- The brush works well on small objects and complex shaped structures.
- Painting sheet metal much easier with a roller.

- For large volumes of work and to achieve best result It's better to use a spray gun.
Painting is done in 2-3 layers, each subsequent one is applied after the previous one has completely dried.
Advice!
Do not apply the composition in too thick a layer.
Remember that two thin layers are much stronger and more durable than one thick one.
Painting metal is not much different from working with other types of materials; it is important to do all the work carefully and carry out preparatory measures efficiently.
Conclusion
We looked at how to paint metal without outside help and achieve a good result. Watch the video in this article, it clearly shows some points technological process with detailed comments from experts.