Parents who have small children often have to visit playgrounds so that the child can swing on a swing, play in the sandbox, or go down the slide. But adults don’t always have enough time for such events, especially if the site is far away. Having your own plot, you can make this kind of entertainment for your child at home. This will solve many problems for parents, and the child will always play under supervision. Today we will talk about how to make a children's slide with your own hands from scrap materials.
A metal slide is a common structure dating back to Soviet times. It was installed on the playground along with a sandbox. Metal is the strongest and most durable material. But under the influence of external negative factors it is subject to corrosion, so it is better to use stainless steel or galvanized metal to make the slide. At self-production slides at home, be sure to have a drawing at hand.

Materials and tools you will need:
- metal pipes with a diameter of 15-25 mm, rods;
- corners with a section of 50x50 mm, 20x20 mm;
- galvanized sheet metal;
- multi-colored paints, cement, crushed stone;
- welding machine, grinder, crowbar, hammer.
Having prepared necessary materials, at the site of future installation, you begin to manufacture the structure according to the drawing:
- Start manufacturing with the frame. For the upper platform from the corner, weld a square measuring 1.5 x 1.5 m. Place stiffening ribs crosswise inside it. Weld a metal sheet of at least 1 mm thick of the same size on top of the square to the corners. If possible, use corrugated iron; it will provide stability and the child will not slip on the playground.
- Weld the finished platform to the racks. To make them, you will need a pipe with a diameter of 25 mm and a length of 3 m. Weld heels from any metal scraps to the ends of the racks, the lower part of which will be concreted.
- Under the welded frame, mark and dig 4 holes about 1 m deep with a drill. Compact the bottom with small stones or crushed stone. Lower the frame posts into the holes, aligning the structure with a plumb line. Knead cement mortar with crushed stone and fill the holes. After about a week, the solution will completely harden and construction can continue.
- From a 20 mm pipe for stability, weld the frame frame crosswise between the posts. From the edge of the platform down to the ground at an angle of 45°, weld a descent of 2 corners with a section of 50x50 mm parallel to each other. Weld across the corners, at a distance of 20 cm from each other, strips for steps from corners with a section of 20x20 mm. Sew up the plane of the steps wooden planks or corrugated iron.
- Weld handrails from 15 mm pipe on both sides of the stepped descent. Sew up the openings between the handrails and the descent metal mesh or thin rods.
- The chute is made from 2 pipes with a diameter of 20 mm. Bend the lower part of the pipes with a pipe bender or by heating it with a cutter. You should end up with a design of a steep slope that smoothly turns into a horizontal plane. Weld the upper part of the gutter to the other edge of the platform. Fix the stiffeners between the gutter pipes. Weld galvanized sheet metal on top with a thickness of at least 1 mm. If you can’t make a descent from solid galvanized steel, then weld smaller sheets overlapping along the descent.
- Bent the sides of the gutter guard from a 15 mm pipe. They need to be welded parallel to the bottom at a height of 30 cm, and the sides should be sewn up with galvanized sheet metal. In several places, weld supports for the gutter from any remaining pipes.
- The metal structure is ready. All that remains is to process it with a grinding machine to remove all sharp protrusions. The design can be decorated with multi-colored paints to make it attractive to the child. There is no need to paint the bottom of the slide, otherwise the coating will reduce slipping.

Wooden slide
It’s easier to make wooden slides at home yourself; there’s no need for welding work. Wooden structures are less durable than metal ones, but wood can be used to make a beautiful playground with a sandbox, a house, rope ladders and other equipment. For DIY construction, it is better to use coniferous wood. Materials and tools you will need:
- 4 beams with a section of 100 x 100 mm, timber with a section of 50 x 50 mm, edged board with a section of 25 x 150 mm;
- galvanized iron 1 mm thick or linoleum;
- screws, nails, antiseptic, varnish or multi-colored paints;
- cement, crushed stone;
- electric planer, grinder, screwdriver, hammer, sandpaper.
As always, start your work by drawing up a design drawing. Decide whether there will be a slide with or without a house, and draw its diagram. This will make it possible to calculate the material consumption, and will also facilitate further construction.

Everything is ready, you can start carpentry work:


From the remaining material, make wooden benches or a sandbox near the slide. They will decorate the playground, bringing joy to children.
Plastic slides
You won’t be able to make a plastic structure yourself; you can only buy it in a store. Such slides are produced in one piece and in collapsible ones. The owner can only install the slide on the site. Collapsible models are better suited for dachas. They are convenient to disassemble for storage in winter period. This will prevent theft and vandalism while the dachas are left unattended by the owners.

Plastic models use different gutters, which children really like. They come in screw, tubular, straight and other shapes. If the child still wants an unusual descent, and the parents do not have enough money to buy it, you can make it for the dacha or at home combined option slides. The fact is that gutters are sold separately. They are also made to order in any shape. All you have to do is make a metal one or wooden frame and attach a plastic trigger to it.
A children's playground built independently for a dacha or at home will decorate the yard and provide children with entertainment in the summer.
In contact with
Children have always loved and still love to ride on carousels and swings. Now these children's structures are manufactured on an industrial scale. They can be purchased at many retail outlets. But some of them can be built on our own. In this article we will look at how to make a children's slide.
Construction requirements
Territory country house is a great place to install a children's slide. Making one for children is not very difficult if you follow certain rules:
- The age of the children does not at all affect the fact that the design should provide for such required elements like fencing and railings. While playing, the child becomes inattentive and may fall from a height, and these elements will help him maintain his balance.
- For the construction of the building, you need to use only environmentally friendly materials that will be harmless to children's health. It is prohibited to use structural elements that are easily flammable.
- When building a children's slide for a summer residence, it is preferable wooden materials. Metal constructions in general, they are no worse than wooden ones, but they have some disadvantages. We must not forget that for children the most active time of the year is summer with the burning rays of the sun. To prevent children from getting burned on very hot metal, a structure made of this material will have to be placed in a shaded area. The wooden structure can be placed in any convenient place. There are also plastic slides, but their material is not very durable and can crack at any time. In addition, such designs are widely presented in stores, so it makes no sense to make them yourself.
The slide must be designed in such a way that it is primarily safe for children. The children's structure should have no slotted partitions or dangerous gaps, since children, in the heat of play, can insert any part of their body into the existing hole and be seriously injured when descending. All details must be calculated down to the smallest detail, otherwise unforeseen troubles may occur.
Manufacturing process

- To build a children's slide, the first thing you need to do is build a slide. It is made from several boards, which must be the same in width and length. The wooden base must be carefully sanded so that children can descend comfortably and safely. The boards are connected to each other with several bars on the bottom side.
- After the descent is constructed, it is time to attach the side structural parts to it. As work progresses, it is necessary to determine the height of the structure that children will climb and the angle of inclination of the ramp. Factory-made slides have standard sizes: 1.3 m – height, 55º – angle of inclination. These parameters must also be adhered to when building a homemade structure. The side boards should be of such length that their ends extend to the top of the platform and serve as a kind of handrail for grasping before descending. The side boards are attached on both sides to the base of the slope using self-tapping screws. The sides, as well as the escapement, must be well sanded, sharp corners cut off and smoothed with sandpaper or an angle grinder grinding wheel. These safety measures will prevent children from getting injured while playing.
- After the descent is ready, markings are made for the children's structure. Using a garden drill, holes are made in the ground into which beams are installed, the ends of which are coated with mastic on the bottom side. It will not allow the tree to rot quickly. After this, the installation site of the beams is filled with concrete.
- Using a saw, grooves of such depth and width are cut in the upper part of the beams so that strapping strips can be inserted into the racks without any problems. These wooden elements are connected to the beams using self-tapping screws. The strapping strips will perform 2 functions simultaneously. Firstly, they will make the structure of the children's slide more rigid and stable. Secondly, they will play a role protective fence. Children will feel safe on the playground.
- 2 more wooden crossbars are attached to the resulting frame structure. A ladder will be attached to them on one side, and a ready-made descent on the other. Then comes the turn of installing a wooden floor, which is constructed from boards using self-tapping screws. Small gaps are left between the floor boards to allow water to escape during and after rainfall. For greater strength, the joints of wooden structures are fastened with metal corners.
The children's slide has been completed, and children will now be able to enjoy their free time.
All photos from the article
All children love to play open areas equipped with swings and sandboxes, but perhaps the most favorite attraction is metal, plastic and wooden slides. And if you have your own Vacation home, and also have children, then you have probably thought about purchasing such an exterior item.
We hasten to please you - you can make a slide yourself, while saving on builders.

Independent production and installation of children's slides made of wood
Nowadays, municipal services are everywhere setting up children's playgrounds in parks, squares, and local areas. For installation, they use small forms ready-made from the manufacturer, forming them into play complexes.
Many people remember how activists and local craftsmen in every yard made homemade wooden children's slides and other simple devices for local children.
Of course, it would be reasonable to argue that there are a myriad of options for children's play equipment on sale in a wide range:
- From a wide variety of materials.
- Various configurations.
- Play complexes with age restrictions.
- Individual elements (swings, slides, etc.).
But still, someone will be attracted by the option of a do-it-yourself wooden children's slide. This article is aimed at them.

General requirements for gaming equipment
Having decided to set up a children’s island for playing outdoors on your own, first take ready-made drawings of a wooden slide - copied with your own hands or downloaded from the Internet. The basic conditions for creating children's attractions will help you avoid mistakes when developing a project.
Attention! Whatever the manufacturer’s plan for the playground, the main requirement for it is safety.
The instructions for constructing any equipment and devices for children, including children’s slides made of wood, are based on this basic condition:
- Regardless of the age of the child for whom the slide is designed, it must be equipped with railings and fences. A child who is carried away by a game weakens his attention and may lose his balance. The enclosing elements of the slide will come to his aid.
- The structure of the building should not contain partitions with cracks or any kind of gaps.. This can lead to serious injuries if parts of the child’s body get into them while running or descending. All elements of the structure must be calculated down to the smallest detail.
Now to the question of why wooden outdoor slides are best suited:
- The main time spent on the playground is spent in the hot summer, so metal slide less preferable. When its parts become very hot in the sun, they can cause burns in children. IN cold season the metal will freeze, which is also unpleasant.

- Execute wooden product Almost anyone can do it on their own. Moreover, at the numerous modern sawmills you can order the production of individual elements of any complexity. All that remains is to assemble and install the structure.
- The materials from which it is planned to build a play structure are subject to no less stringent requirements:
- Environmentally friendly.
- Fire safety, etc.
- The price of lumber is quite affordable.
Assembling a wooden slide
You can start building the slide when everything preparatory stages passed:
- The drawing was created according to all the rules.
- All structural parts and fasteners have been prepared.
- The necessary tools have been collected.
Now directly step-by-step assembly according to the drawing:
- The descent element is assembled first. It is made from several boards of the same length and width. Of course, the wood base should be carefully sanded for better and safe sliding. The boards are sewn together from below using connecting bars.

Advice! Optimal parameters descent: angle of inclination -55 degrees, length - 1300 mm. This is exactly what factory-made slides are like.
- We attach the side structural elements to the assembled descent. The side boards are secured on both sides of the descent with self-tapping screws. They should have a slight allowance in length; this allowance extends to the platform for gripping by hand before lowering. The width of the board should provide a kind of sides along the entire length, directing the descent only downwards, preventing the child from falling down the slide halfway.
- The side parts, as well as the descent, are carefully polished with preliminary cutting (rounding) of all sharp corners and parts. This will protect the hands of children holding onto the sides during the descent.

Depending on the project, the slide is stabilized in several ways:
- If the structure is collapsible and portable (to a more convenient place at the moment, for storage during the cold season), then it is a complex of spacers and racks.
- Stationary winter wooden slides are installed on supports fixed in the ground, backfilled or even with a light foundation (it all depends on the type of soil).
The slide can be a simple structure, equipped only with a staircase and a platform with fences and railings, or it can have additional structures in the form of:
- House.
- Pavilion.
- A bridge with a whole complex of loopholes, slides, swings, etc.

It’s up to the master to decide what kind of children’s wooden slide it will be like.
And of course, the scope of the imagination of a private manufacturer depends on:
- The area that can be used for a children's playground.
- Financial opportunities, etc.
Finishing work
It is very important to implement a set of protection measures wooden structure from:
- Impacts environment(precipitation, temperature changes, etc.). A primer and coating will do the job. paint and varnish materials(LMB).
- Damage and mold, fungus - for these purposes it is first treated with antiseptic compounds.
- Possible fire. It is good that the final coating layer is non-flammable, you can impregnate the wood with fire retardants before treating the paintwork.
- Since the product will be located outdoors, choose Decoration Materials with high levels of protection from all external influencing factors.
Conclusion
As you can see, making wooden slides for children on your own site does not require any special construction skills from you. As for tools, you can rent everything you need from a hardware store. If you are confused by a drawing you drew yourself, then the easiest way is to copy from a finished drawing or take our version () as a basis.
In the video presented in this article you will find additional information on this topic.
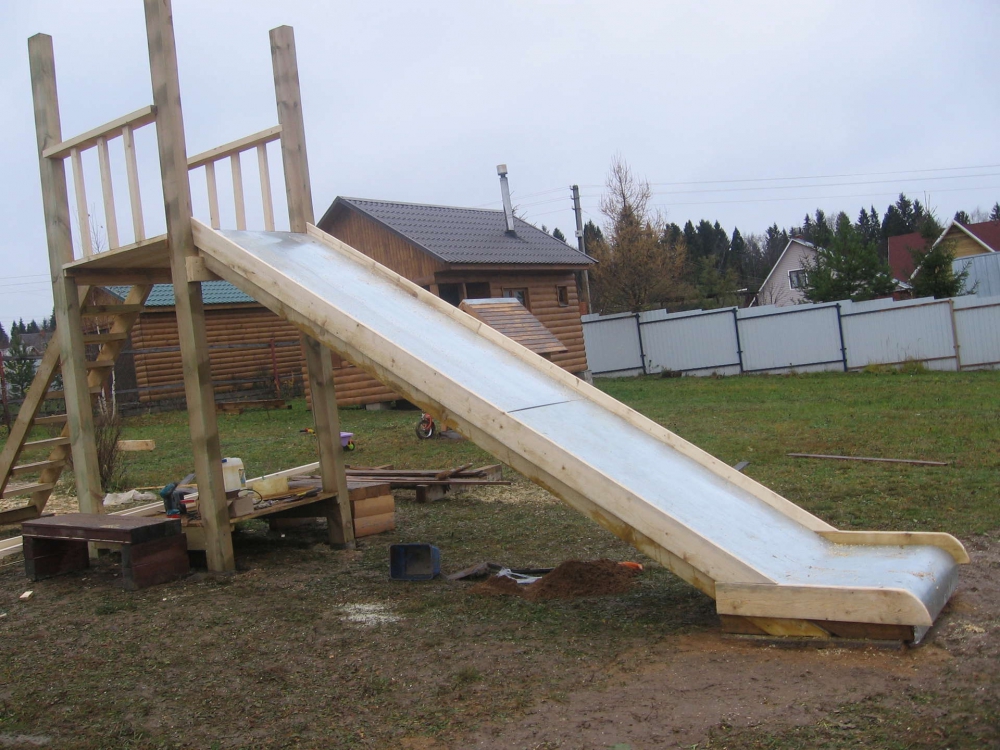
Today we'll talk abouthow to do winter DIY children's slide.Let's consider detailed drawing and construction schemes, we will discuss the material and tools for the construction of this object.
The slide is the most interesting equipment for active games on the playground. You don’t have to buy expensive ones to please your child. ready-made solutions, of which there are many on the market. Today you have the opportunity to create a slide yourself. I hope the article will give you a good hint and be useful during construction.
So let's get started. Tools: miter saw, or hand saw, screwdriver, tape measure, pencil. To fasten the parts together, use wood screws.
Material - dry planed board with a thickness of at least 25 mm, or, in our case, a floor board 28 mm thick and 133 mm wide (without tenons). Our drawing is made for a board of exactly this size.
Scheme of construction of a children's slide.
Let's divide the construction of the slide into 3 stages: pedestal, ramp, stairs.
First of all, we assemble the pedestal, to which the ramp and staircase will later be attached.
We start with the side frames. If you are using a floor board, cut off the tenon.

We attach the guide for the flooring according to the dimensions indicated in the diagram.

We twist the sides together and we astil the floor.

At the second stage, we build the slide slope.
First we make the flooring for the slope. We cut boards 2000 mm long, connect them to each other - tenon into groove. We take into account the size of the pedestal opening for further fastening the ramp; in our case it is 900 mm. We lay the transverse boards for the bundle, retreating 200 mm from the edges of the slope, and twist the structure.

We prepare the sides. If you are using a floor board, it is advisable to cut off the tenon and turn the groove of the board so that it faces down. We make cuts for attaching to the pedestal.

 We connect the sides with the slope

 We screw the ramp to the pedestal.

 The third stage - we install the stairs. First, we prepare 2 guides for the stairs.

We fix the guides on the pedestal.

We screw the thresholds. Threshold height 200 mm, quantity 4 pcs.
On your suburban area There’s a lot of space, but there’s not much for the kids to do? This is not the point. If not playground, then at first DIY slide for a child must be built. And this is within the power of any dad who can hold an instrument in his hands in the slightest degree.
What kind of slide should a child have?
First of all, a do-it-yourself slide for a child should be safe. Take care of the stability of the structure. Several children can climb the slide at once, and the structure needs to support their weight without shaking.
No sharp corners, protruding fasteners, rough edges, or gaps that could cause injury - this should be taken very seriously. The surface of the descent should be especially smooth.
Be sure to provide curbs along the edges of the gutter, a parapet at the top, and a railing on the stairs.
Think about where the child will land after sliding down the slide - it is better if it is sand, a lawn, densely overgrown with grass; you can even put mats on the kids to make them feel comfortable and safe.
Which material is preferable to use? First of all, harmless to the child, high-quality wood is best. We will consider the option of a design made of wooden building materials, and the slope can be finished with plastic or metal coating.
Slide for a child - stages of construction
So, the task for dad or grandfather is clear - a do-it-yourself slide for a child. Where to begin? First of all, decide on the location for the structure and its design, select materials and tools.
The place where the slide will be located should be clearly visible so that you can always see how your children ride and play.

It’s good if during hot hours a shadow falls on the hill from nearby trees. The structure should not be located near outbuildings or a garage.
Installation of supports
In order for a homemade slide for a child to be reliable, it is important to install stable supports.
Level the downhill area and make markings in the form of a square or rectangle. Using a garden auger, make indentations (optimally from 40 to 60 centimeters). Before installing the support bars, lubricate their ends with mastic. Concrete the installation site.

Using a level, level the supports and fasten them at an average height of 1.3-1.5 meters using cross beams, which you will pull anchor bolts.
Making the escapement
Make a slope from the cross beams, the bottom of which must be driven into the ground and secured with metal brackets. The width of the slope is from 60 to 80 centimeters, and the angle of inclination is 55º.
Cover it with boards, build sides on the side, the height of which should be at least 30 centimeters. The finished frame of the ramp can be sanded and painted. And if you want a different coating, then sheets of plastic, galvanized steel, plywood, or linoleum will do.
The slope will be more slippery, and a slide made with your own hands will delight your child.
Construction of the stairs
In order for the staircase to be reliable, it is important to build the stringers correctly. A cross beam or 50mm edged board is suitable for this.
Secure the folded boards together using self-tapping screws. Using a hand saw, make cuts for the steps according to the marks. Insert and secure the steps of the stairs, tighten the stringers with anchor bolts and locknuts.

The angle of inclination of the stairs depends on the age of the child. Older children are not afraid of steeper climbs. But in any case, railings on the stairs are required.
Mounting the upper platform
The top flooring is made of timber (the so-called stiffeners), which should be laid out parallel to each other and attached to the frame of the structure, and boards should be laid on top. You should leave a gap of 5 mm between them to allow water to drain when it rains.
Be sure to make a parapet on top platform from slats and cover it with plywood. Adjust the height of the fence depending on the height of the child.
Each structural element must be securely fastened so that a do-it-yourself slide for a child is safe and durable.
In this video, the author will share his experience of building a children's slide with his own hands:
We deliver to all regions of Russia buy a winter slide.