Summary: Crafts vases. How to make a vase with your own hands. Homemade flower vases with your own hands photo. Vases from plastic bottles. Paper vase. Decoupage vase. How to make a vase from threads.
Spring is the time of the first greenery and flowers. That is why in our section “Do-it-yourself spring crafts for children” we have devoted several articles to making flowers with our own hands. See articles on our website:
But homemade or fresh flowers need to be placed in something. Of course, you can use a store-bought vase, but it is much more useful and interesting to make a vase with your child yourself. This exclusive item will become a bright detail in the interior of a child’s room, and you can also give it to a loved one. The do-it-yourself vases that we would like to invite you to make are made from glass or plastic bottles, as well as tin or glass jars, using various materials: corrugated paper, colored yarn, ribbons, felt, wooden clothespins, as well as tree branches and birch bark (birch bark).
1. DIY paper vase. How to make a vase out of paper
Any glass container can be turned into beautiful vase, pasting it with multi-colored pieces of corrugated paper. In this case, the glass jar or bottle must be made of transparent glass. To work, use a special glue for decoupage or PVA glue diluted with water in a ratio of 1:1.

Work plan:
Tear or cut corrugated paper different colors in pieces.
- Apply glue to a small area of the glass vessel, glue pieces of paper, then cover the paper with another layer of glue. After drying, the glue becomes colorless.
- The finished product can be varnished.
2. DIY vase. Crafts paper vase
Corrugated paper can also be cut into strips of different thicknesses and pasted over them glass jar or a bottle. Choose beautiful spring color combinations. When you glue the paper strips, let them overlap each other a little.

3. Vase from a bottle. Vase from a jar

4. Vases made from bottles. DIY bottle vase
If you don't have crepe paper, you can try covering a glass bottle with pieces of magazine pages. Choose a bright, colorful magazine and cut it into pieces. For each vase, select paper scraps in the same color scheme. Just like for previous crafts, use special decoupage glue or PVA glue diluted with water in a 1:1 ratio. The finished vase can be varnished and decorated with colored buttons glued with a glue gun.


5. Crafts vases. Decoupage vase
You can cut out a design you like from a magazine, from an old postcard, etc. and stick it on a purchased vase.

6. DIY vases. Vases made from plastic bottles
You can make it from plastic bottles a large number of DIY children's crafts. We will tell you about one of them - a vase made from plastic bottles - in this article. The easiest way to make a vase from a plastic bottle is to simply cut off the top of the bottle, and decorate what is left with various materials. We would like to invite you to make a creative vase craft. To make it you will need several plastic bottles. You can use one big bottle(1.5 liters) and 4 small bottles (0.5 liters). To make a vase from plastic bottles you will need plastic glue or a glue gun. For instructions on making a vase from bottles, see the link >>>>

7. DIY vase. How to make a vase with your own hands
The site Krokotak.com suggests making an original vase for one flower. To make it you will need a glass cup and a balloon. Even a preschooler can make such a vase as a gift for mom on March 8th. The balloon must be cut in half at its widest point, after which the upper part of the balloon must be pulled from above onto the glass. The “pump” of the ball must be tucked inside. That's all, the vase craft for March 8 is ready! Detailed instructions with photos, see the link.

8. DIY crafts for children. Craft vase
If you cover a jar or bottle with plasticine and then decorate it with plant seeds, cereals or beads, you will get a very nice handmade vase. This craft can be done even by children 2-4 years old.

9. How to make a vase with your own hands. How to make a vase from threads
From glass bottle and colored yarn, you can make a beautiful spring craft - a flower vase with your own hands. To work, use special glue for decoupage or universal PVA glue.

Apply glue only to a small part of the surface of the bottle, because... it dries quickly. You need to wrap the yarn tightly around the bottle; make sure that there are no empty spaces between the threads.

To make a thread vase, you can use yarn of the same color or different colors.

Instead of threads, you can take colored ribbons. By gluing them onto a regular tin can, you will end up with a beautiful vase from a can.

How else can you make a vase from a jar? Very simple! All you need are wooden clothespins (new) and a tin can, nothing else. It is probably undesirable to pour water into such a vase. It’s better to pour it into a small glass and put flowers in it. And the glass, in turn, is inserted into a homemade vase.
10. DIY flower vase. Homemade vases
You can make a vase with your own hands from a jar if you wrap it in strips of colored felt and decorate it with colored ribbons and buttons. When making this vase craft, a glue gun will come in very handy.
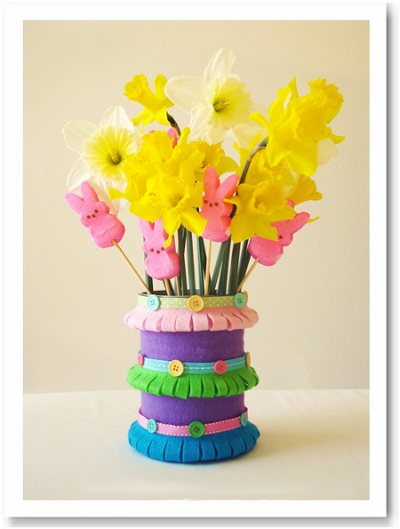
For detailed instructions on how to make a vase with your own hands, see the link
How to make a beautiful and original vase?Attractive and unusual home decor has always been distinguished by one important feature - it requires considerable financial investment. Everyone knows what is being created beautiful furniture vases, chandeliers, lamps and other important decorative details, many specialists always work there; they invest not only their physical efforts, but also imagination, various ideas, which, by the way, are not so easy to come up with.

However, few people think about the fact that original and unusual ideas can be implemented independently, and for this it is not necessary to have a specific education, a penchant for art or great financial resources. It is enough just to notice the main thing in small things and details, to be able to make something extraordinary out of simple and ordinary things.
Moreover, for this you will not need much: desire and enthusiasm, a little free time, and also a few necessary materials, which you either already have at home or are sold in any nearby store.
Vase is always necessary thing who might just be cute and original decoration your home, and is always ready to accept bouquets of fragrant and colorful flowers into her arms.And since we try to always place flowers in plain sight, the vase must be worthy, so that it fits into the surrounding decor and supports the overall color of the bouquet, because it will largely depend on this appearance in a home environment.
Vases can be very different - from the smallest, which can hold one or just a few flowers, and huge, for example, floor-standing, which can hold more than a dozen roses or any other flower beauties.In order to take on the task of creating a new vase, you will need to decide what size it should be, as well as what manufacturing technique you will choose. Maybe it will be weaving, engraving on a glass surface, decoupage or craquelure, there are many options, we will give examples of just a few of the most interesting ones. Who knows, maybe you will become so passionate about creating and decorating vases that it will develop into your permanent and serious hobby.

Minimalist and stylish
Small vases for one or a pair of flowers
Glass and ballOne of the original and very simple ways- this is a vase for one flower, which consists of an ordinary oblong glass and an inflatable ball. It’s better to choose some kind of ball bright color, for example, red or cherry, cut off the upper part from it, making a cut exactly on the widest part of the ball. 
You can even make a vase out of a lamp
By the way, even the smallest schoolchild can make such a vase, ceremoniously presenting it to his mother on March 8 along with a flower. The ball itself must be pulled on top of the glass, and the “pump” through which the ball is usually inflated must be pushed inside the glass; the flower will now be inserted into it.
By the way, the glass itself can also be decorated somehow, for example, with a beautiful sticker or a pattern painted with acrylic paints.
Bottles and cans
In fact, you can make an interesting vase with your own hands from a variety of elements, for example, from plastic or glass bottles, jars or small boxes.
We bring to your attention an option with plastic bottles. You will need one whole 1.5 liter bottle, preferably transparent, and about five 0.5 liter plastic bottles. You will need to cut off the neck of all small bottles, then make four holes in the large bottle along the inner contour of the neck. 
It is better that these holes are closer to the top, then there will be more space for water. The holes are traced along the contour of the neck of small bottles and then cut out with scissors.
All cut small bottles are inserted with their necks into the hole, creating a unique vase with five necks, each flower has its own hole. Such a vase, for example, can be placed in a country house or in summer house, unusual and very simple!
Of course, you can do it even simpler - cut off the neck of a plastic bottle, and all that remains of it can be decorated with various other techniques.
However, in this case, it is better to use a small glass jar, for example, 1 liter in volume. Glass milk bottles that have an elongated neck are also suitable for these purposes. The easiest way is to cover the outside of the jar with corrugated colored paper. 
Style is in everything
Just cut it into small pieces, choose a wide variety of colors. In order for it to stick well, it is better to use a special glue for decoupage or regular PVA glue, only diluted with water in a 1:1 ratio. After the glue dries, it will become transparent, and for greater effect the vase can be coated with clear varnish.
By the way, instead of corrugated paper, cut pieces of bright glossy magazines can be used; select them in approximately the same color scheme, and glue the jar tightly so that there are no gaps.Returning to corrugated paper - it can, for example, be cut into strips various widths and glue everything to the jar in stripes, it is better that one overlaps the other when gluing. Colored electrical tape may be suitable for the same purposes.
Another interesting way- decorate a glass jar with a knitted or fabric cover. This option, of course, is suitable for those who have experienced knitting and sewing techniques. Such covers can, for example, be changed depending on the time of year or the main color of the bouquet.
Let's do floor vase with your own hands
To do this, you will need a cardboard box, various acrylic paints, acrylic primer, paper, water-based paint, decoupage glue and varnish. Cardboard box should be tall and narrow; gold powder or the same spray paint may also be useful. 
Hand painted is gorgeous
The cardboard box is coated with a primer, which is necessary for good application of the next layers. Then we glue pieces of cut newspaper onto the surface of the box, we get papier-mâché. Now we cover the prepared box with white water-based paint so that the newspapers disappear from view.
After the first layers have dried, we begin to apply the main color, which will be quite visible on the finished product. As a decoration for a vase, you can use decoupage napkins, which are glued to the vase so that various relief protrusions are obtained, all of which is also covered with paint. The reliefs can be coated with golden powder, but so that the main color of the vase is visible.
For additional decoration you can use the most various elements, for example, golden ribbons that can be folded into flowers or bows, or you can simply wrap them around a vase in a casual manner. Beads and iridescent stones are also suitable; you can create a pattern or some kind of design.
Original do-it-yourself vase

You can make cute vases with your own hands. For this you will need beautiful shape bottles and beautiful bright threads. As a result we get:


Another photo tutorial:
Designer vase made from a bottle
How to make a beautiful designer vase in a few minutes using colored rope and twine.To work you will need:
1. Colored rope, twine
2. Glass bottle
3. Scissors
4. Universal glue 


All ends of ropes and twine should be on the same side. 

How to make a beautiful vase from a plastic bottle (video):


Take any transparent container: a glass, bottle or jar - and cover it with multi-colored squares of corrugated paper using PVA glue, stirring it with the same amount of water.
Multi-colored corrugated pieces on glass will look impressive and will greatly refresh a spring bouquet. Just don’t forget to cover the top of the paper with another layer of glue (then it will become transparent), and after drying, with varnish.
Vases covered with strips of corrugated paper of varying thickness also look interesting. If you want to make such a beauty, make sure that the stripes slightly overlap each other. This way the color transitions will be more original.
A vase made by yourself from paper will be a wonderful addition to your interior, and perhaps an unusual gift!
How to make a vase from a jar?
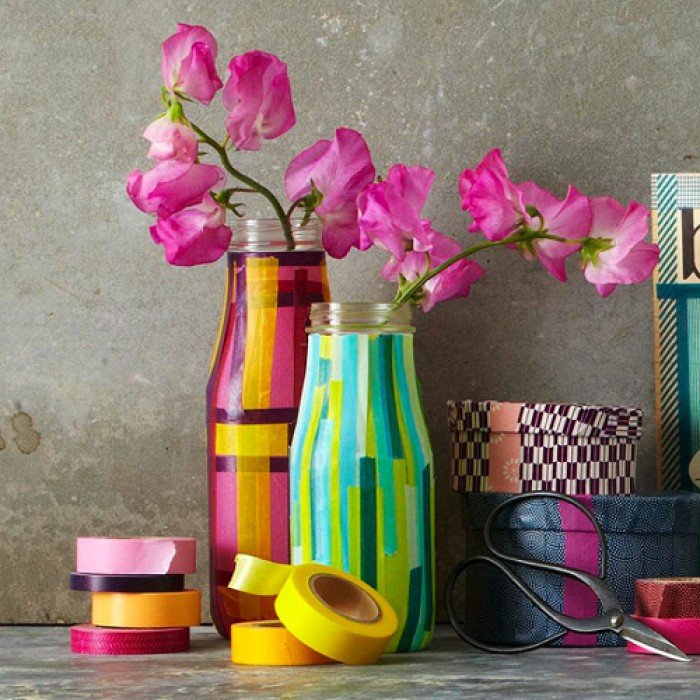
To make this exquisite vase you will need bright multi-colored electrical tape. Cover the jar with strips of electrical tape of different lengths and widths and evaluate how exclusive and original the vase you have turned out to be.
Vase from a bottle
How to make a vase from a bottle? First, find glossy magazine with bright drawings and cut its pages into squares.

Cut out pieces of one color range, for example, turquoise, blue, light blue and violet. To glue them to a glass bottle, use PVA diluted with water 1:1, or decoupage glue. Cover the vase with a layer of varnish.

Use a glue gun to attach the buttons to the vase. The main thing is don’t be afraid to experiment!

You can make a vase from a glass bottle in another way - for example, by simply sticking it on it elements of openwork napkins!

Or maybe turn a bottle into a vase using piece of lace?

Wrapping a glass bottle colored threads or yarn, You will make a wonderful spring vase.

To make the threads stick better to the glass, dip them on one side in decoupage glue or PVA, or spread it on the bottle. But remember that the glue dries quickly, so smear the bottle in parts and pull the thread tightly.


To make the vase bright and original, use threads of different colors.

Decoupage - decorate a vase with your own hands
To beautifully decorate a purchased vase, you just need to cut out some nice picture from a magazine or postcard and stick it on the surface of the vase. However, it’s even better to purchase special napkins for decoupage, primer and varnish: first we apply primer to the surface of the vase, then we glue pieces of the napkin with the desired image, and finally we fix it with varnish! And it turns out to be such a neat vintage beauty.

How to make a vase from a plastic bottle?
To make this vase you will need the help of your dad or mom. Take a one and a half liter plastic bottle and cut several round holes in its upper part to insert the necks of cut half-liter plastic bottles into them and glue them with a special glue for plastic.

Place a flower in each hole of the vase.
This is how fancy and unique a handmade bottle vase can be!
Vase made of glass and balloon
Cut the balloon crosswise at its widest point. Pull the top over the glass and tuck the hole into the glass. Tie the glass with a string and tie a bow. Voila! The vase is ready! You can put a flower in the hole of the ball.

Plasticine vase
Oh, how interesting! Even a child can make this vase. To do this, you just need to cover it with plasticine and decorate it with various seeds, acorn caps or beads. Beauty!

Vase made of clothespins
Take a can of canned food and “garden” it with new wooden clothespins. That's all. The unique vase is ready. Only you probably don’t need to pour water into it. Place a small glass of water inside and flowers in it.
Vases made from natural materials
Cutting off birch bark(better with a cut or fallen one) and wrapping it in an ordinary jar, you will receive an original vase, and at the same time you will take a piece of the spring forest to your room.

Ideal for making vases tree branches, which can be used to cover a jar or flower pot.


How about a vase made of pencils?
There may be a jar or glass inside, and we will decorate it all with lace ribbons and beads.

I hope you liked my ideas, and you will certainly use them to create your own masterpieces. Good luck!
This is why needlewomen are attracted to vases that you can make yourself, a master class from a craftswoman nika-ethnica how to create a vase from a jar with your own hands.
To make such an original vase we will need:
– a glass jar of baby food (such jars can be of various sizes and shapes);
- Double-sided tape;
- scissors;
– paper and pencil;
– a piece of foam rubber;
– gold outline on glass;
– matte and transparent stained glass paint;
– “Iris” threads (preferably melange).
Before starting work, you need to think over the pattern and draw its elements on paper with a pencil. The example uses a variety of leaves, but you can come up with your own version of the design. Butterflies, various flowers or berries will look very beautiful.
We glue the paper decorative elements onto tape and cut them out.

We place the cut out elements on the baby food jar and apply stained glass paint using foam rubber.

Since the paper elements peel off easily, we cover the jar with a continuous layer, not forgetting about its bottom.

When the paint dries, remove the glued elements. As a result, we get a painted jar with transparent curly “windows”.

Now we take the golden outline for the glass and draw a strip along the edge of the transparent “window”. We complete the missing details of the drawing on the painted part.

When the outline is dry, take transparent green stained glass paint and paint the areas that remain transparent. Contrasting bright autumn colors will also look beautiful.

Using a contour, apply leaf veins or other elements (depending on the chosen pattern) onto the dried transparent paint.
All that remains is to decorate the neck of our vase. To do this, you need to wrap a thread around the neck of the bottle in the place where the cap was screwed on. The thread must be laid in dense and even turns.
In the same way, we make a bend at the base of the jar, and continue to wind even turns until we cover the entire part protruding at the base.

A homemade vase from a baby food jar combined with a bouquet of wildflowers looks much more impressive than any ready-made vase. Since children often give their mothers just such simple, but very valuable bouquets, such vases will definitely find use in your home.
The second method is extremely simple and allows you to quickly turn a glass bottle into a spectacular vase:

Minimum costs and maximum effect - in this master class!
Materials and tools for work: empty glass bottle, masking tape, white acrylic paint (in a tube or can), acrylic varnish, brush or kitchen sponge, scissors.
How to make a vase from a glass bottle?
The first and very important step is to wash and degrease the bottle. Otherwise, if fingerprints or dirt remain on it, the paint may lie unevenly or peel off over time.
Cut the masking tape into strips of the desired length and width. For example, the width of the strip will be 2 cm, no more.
Glue the tape in the places where you want to create a pattern. Special attention Pay attention to the neck: right under the ledge you can paste it with a thin strip. Or even seal the neck so that in the end it turns out to be unpainted.
This master class shows geometric patterns on bottles that are suitable for simple interiors and high-tech rooms. However, you can make other designs: for example, cut out hearts or flowers from masking tape and glue them to the bottle.

Cover the bottle acrylic paint. If you have it in a can, then you need to spray the paint, holding the can at a distance of about 50 cm from the bottle. At home, it is better to use paint in a tube: in this case, fewer harmful substances will enter the air.
The paint from the tube can be applied with a kitchen sponge or a regular brush. When painting a bottle, hold it by the neck. Then place the bottle upside down and wait for the paint to dry. After that, place it bottom down and paint the neck.

Thus, you need to apply two or three layers of paint so that there are no gaps.

It turns out that the entire bottle is colored, except for those places that are sealed masking tape. If you are sure that the paint has already dried, you can move on to the next step - removing the masking tape.
After this, you should cover the bottle with acrylic varnish 2-3 times so that the vase acquires a beautiful shine.

The vase is ready! Now you can put a bouquet of fresh flowers or a floral arrangement made from dried natural material in it!
Master class on dot painting of glass using a template Yulia Yu.

How to paint glass using a template.
To make this bottle you will need: the bottle itself, dotted stained glass paints (they are sold in tubes with a pointed spout), checkered paper, scissors, a compass, double-sided tape.

Painting with dots according to a template: job description.
As with any other glass, you must first make sure the surface is clean. Before coating with any paint, the bottle must be degreased and dried. Only after this can you cut out a strip of checkered paper and use double-sided tape to glue it to the bottle. You need to make a wide belt out of paper that will mark the area of decoration.

Now the pasted paper can be used as a template. At the top and bottom of the paper, you should write dots using stained glass paint, making, as it were, rims for a “ruler”. Along with the upper rim, you can immediately draw additional upper dots.

Now you need to measure the circumference of the bottle where the paper strip is located. Next, if the volume is a multiple of five, divide it by five, and if it is four, then divide it by four. This is exactly how many semicircular designs you can fit along the rim of the design. Meanwhile, the first dots applied have dried: peel off the paper and throw it away. Well, using a compass, draw a semicircle on paper, the base of which is equal to the circumference of the bottle divided by a multiple. Let's say the volume of the bottle is 24 cm, then divide this number by 4 and make a semicircle with a base of 6 cm. Cut out this semicircle, glue it to the bottle with tape and circle it with dots.

You can lightly touch up the dots with another coat of paint if it turns out weak.

So, you can paint as many semicircles as will fit on the bottle.

In some places you can make dots in two rows to make it more elegant.


Between small semicircles you can write small dots. In general, this painting is very reminiscent of Indian “temporary tattoos” called mehendi, when graceful lace is depicted with dots on the body.

Fill large semicircles with smaller elements - figure eights, bows or curls. Do not forget to dry the drawing well so that it does not smear.

There are no strict rules in dot painting: you simply draw what is easiest to depict. Elementary details (circle, triangle, curl, zigzag) are welcome here, because you can assemble charming lace from them.

You can also draw quite voluminous flowers.

You can use additional templates if we are talking about shapes that would be difficult to repeat by hand. For example, this is a rhombus and an oval. If you want to draw these details small, cut out small templates from paper and also tape them to the bottle.

Circle these patterns with dots.

It turns out to be a very beautiful part of the painting.

You can first draw a “draft” of dots with large distances, and then trace with larger dots.

The good thing about paint in tubes is that with the help of a spout you can make both barely noticeable dots and bold marks.

Very tiny dots will help you make veins.

This method works great for vases, candlesticks and cups, try it!
Reading time ≈ 11 minutes
Making a vase from scrap materials with your own hands is a great way to pass the time with benefit and pleasure. This way you can give a second life to unnecessary things, get an original thing for your home and transform it. Let's look at several simple master classes on making vases from tin cans, glass bottles and vessels, and other containers available on the farm.
Examples of vases with your own hands.
Decoration materials
In the master classes offered below self-production The vases will use materials that you are likely to find at home, and only a small part of them may have to be purchased. Of course, we are talking about decorating a finished waterproof vessel, since making a vase yourself from scratch will be an impossible task for most.
You may also be interested in:
You can use many materials to decorate a vase:
- textiles of all types, textures, colors, including ribbons, yarn, ropes, burlap;
- buttons, beads, beads, sequins;
- colored (printed) tape;
- enamel painting, glitter;
- coffee beans, cereals, seeds, coarse salt;
- natural plant materials: twigs, chestnuts, acorns, leaves;
- sea shells, natural pebbles;
- kraft paper, cardboard;
- clothespins;
- coins.

Materials for needlework.
For fastening, it is best to use transparent glue, which when dried does not give a tint and does not stain the materials. And as a base, a great variety of containers that do not let water through are suitable:

If you are not going to place fresh cut flowers in a vase in water, then the product can be made of water-permeable material (cardboard base, for example a reel or reel).

Cardboard bobbins.
Vase made from a jar and twigs
To create a vase you will need materials that you can probably find at home:
- glass jar with a volume of 0.5, 1 or 1.5 l;
- twine or thin rope;
- a small piece of burlap;
- chopped twigs of small diameter (about 0.5 cm);
- glue.
Tip: the glass jar can be replaced with any other cylindrical container.

Step-by-step production of a vase from twigs.
Step-by-step production:
- Cut the collected branches with a hacksaw into pieces of equal length. They should be similar to the height of the glass container.
- Using twine, secure the branches at the top and bottom ends, tying the twine into knots. As a result, you should end up with a kind of canvas of twigs.
- A piece of burlap, equal in length to the circumference of the jar, needs to be wound around the vessel, the upper ends wrapped inside the jar and glued. The neat bottom can be left free.
- Next, a web of twigs needs to be wrapped around the container and tied into knots.
Alternatively, you can not use burlap, but plant the branches directly on the jar with glue. Finally, it is advisable to fasten the structure with a rope wrapped around the can in several turns. The product will look just as decorative and aesthetically pleasing as the version with burlap.

Ready product.
If you use thicker pieces rather than thin branches, the vase will turn out to be a rougher design, but no less original:

Another product option.
When using jute
This master class also requires the use of a glass jar or bottle. You will also need:
- glue;
- twine, jute or other beautiful rope, thick rope will also work.

Twine decor.
Manufacturing step by step:

As a result of the work done, you will get such a laconic and effective do-it-yourself vase using improvised materials:

Ready product.
With a fairly impressive size of the vessel, the vase can be used as a floor vase.
Vase made from a painted bottle
This master class is also very simple and will take you no more than half an hour. Necessary materials:
- glass bottle for any liquid ( mineral water, champagne, dairy products);
- universal spray paint in the desired color.

Painted bottles.
Step by step process:
- Wash the bottle inside and out, remove all labels and traces of glue.
- Place the bottle on a metal or wooden rod and turn it over - this will act as a kind of support.
- Now the container can be painted. It is advisable to use paint in a can for an even and uniform layer without smears.
To get a geometric or any other pattern, first cut strips (other shapes) from adhesive tape and stick them on the container before painting.
For a more festive and elegant look, you can use glitter of an adjacent shade. With the help of paints and sparkles you can create very impressive ensembles.

Decor with sparkles.
You can cover not the entire vessel with glitter, but only part of it:

Partial decor.
There is another option for painting the bottle - from the inside. To do this, you can use paint in cans. You will also need a metal baking tray and a mesh. The bottles need to be prepared, then pour a small amount of paint inside and carefully distribute it over all the walls, turning the bottle over. To dry, the vessel must be turned upside down and left for a day.

Painting the inside of bottles.
Vase made of clothespins and tin
The following vase is suitable for a miniature bouquet delicate flowers. To make it you will need a tin can and a set of clothespins.
Tip: to make the vase neat, it is important to use a small jar, the walls of which can be completely hidden under the clothespins.
- Clean the jar of dirt and remove the label.
- Place the clothespins tightly onto the sides of the jar. For reliability, you can use glue. To make a vase, we recommend purchasing a set of plain wooden clothespins – they look as aesthetically pleasing as possible.

Manufacturing process.
The finished vase can be decorated with cutouts or stickers. In fact, it’s not really a vase, but rather a . Inside such a stand you can place a glass glass with a bouquet.

Finished vase.
Vase for artists
You can make the following creative vase in 20 minutes, the main thing is to have all the necessary materials on hand:
- any cylindrical container that does not allow water to pass through;
- strong glue;
- packaging of pencils/markers/brushes.

Decor and pencils.
The photo shows that to make a vase, the container must be carefully and tightly covered with pencils. For beautiful view It is advisable to use a pack of new pencils of the same length. The finished product can be tied with a decorative ribbon.
If you use brushes, the vase will look like this:

Tassel decor.
Using fabric
To create the next vase we will use a simple set of materials and tools:
- glass container (preferably glass, as it looks beautifully from under the areas not covered with fabric);
- a small piece of fabric (you can use several harmoniously combined colors, plain fabrics can be supplemented with printed ones);
- glue;
- scissors;
- for decoration: twine, buttons, beads, ribbons, lace, etc.
Idea: Instead of buying new fabric, it is better to look for unwanted pieces among your needlework materials, and also sort through old, unworn items. They will look the cutest and most tender natural materials: linen, cotton, natural lace.

Necessary materials.
Step-by-step manufacturing process:

The following photo shows another version of this technique:

burlap decor.
Knitted texture
For this next super simple tutorial you will need some scrap knitted items or yarn and knitting needles (if you have knitting skills) and a vessel. The point is to make a kind of cover for the container. To do this, you can cut off a sleeve from an unnecessary knitted item if its diameter matches the vessel. One edge needs to be carefully folded and placed on the container - voila, the decor is ready! If you know how to knit, then an original cover can be made in the evening. To avoid seams, it is better to knit on four needles.

Knitted cover for a vase.
By the way, using the same principle, covers are made for stationery stands, candlesticks, cups and thermoses, and even furniture.

Variations of covers.
Mini vase made from a light bulb
The next vase made from an incandescent light bulb is small in size, so it is suitable for placing a small bouquet or a single color. However, if you put together an ensemble of several “vases”, you will get a very impressive picture.

Vase made from a light bulb.
For manufacturing, prepare the following materials and tools:
- several burnt out or new light bulbs;
- twine or thin braid;
- pliers;
Step-by-step production:
- Use a sharp knife to pry off the soldered part (insulation).
- Next, you need to remove all the “stuffing” from the light bulb: the plug, the electrodes, the thread. It is important not to damage the base.
- Next, you need to wind twine around the base and make a small loop - our vase cannot stand, so it will have to be hung.

Manufacturing process.
The product is ready! All that remains is to manipulate the remaining light bulbs and make a set.

Ready product.
An ensemble located on a tree of branches will look very original:

An ensemble of vases made of light bulbs.
Ensemble
This composition looks very festive, elegant, gentle and at the same time, you will have to spend very little time to create it. The main thing is to choose containers that are identical in size and design. It is not advisable to fasten them with glue - this way, if necessary, you can disassemble the ensemble. A much more practical and elegant option would be a beautiful satin or grosgrain ribbon with several turns, tied in a bow. If the containers have a narrow neck, you can only fit one flower into each.

An ensemble of containers.
Putty decor
Finally, we’ll tell you how to decorate a vessel with putty and paint. If you have some putty left after the renovation, this option is just for you!
What you will need:
- glass vessel of any shape and size;
- putty;
- acrylic paints and varnish (paints should be in contrasting shades);
- floral mesh;
- sponge, fine-grained sandpaper and a small spatula.

Putty decor.
Step-by-step production:
Video: DIY putty vase.