Instructions
It is advisable to use a roller for painting large surfaces. Therefore, it is just suitable for the ceiling. For convenience during the painting process, you can use a special mini roller bath, which is a flat container with two steps and low sides. The paint roller rolls along the first step and leaves excess paint on the second. You can, of course, make a small plastic or tin tray into which the paint from the roller will drip, but you can get by with just one tray.
Good preparation is everything
One of them is this: critical to the quality of the painting! The smaller walls underneath both are in such good condition that you can start painting right away. So this means filling holes and cracks. If you still need holes, leave the dowel and install a screw.
Experience has shown that even with the most careful grouting, a smooth wall is rarely used. Our advice: If everything renovation work The ones shown here are done on a wall, rent a large grinder from a hardware store and grind the wall once. There you will find professional machines that are more suitable than regular random orbital sanders. Although they are useful for removing wallpaper, they can suffer from dust development.
Some people are wondering about the wide roller It is better to paint the ceiling or narrow it, as the pile of a roller should be, and so on. There is no clear answer. In some cases, the choice of roller depends on the material from which the ceiling is made. Some people choose a roller based on personal preference. But one thing is for sure: a wide roller will help you get the job done faster and save paint, and a fine-nap roller will apply paint more evenly than a medium- to long-nap roller.
White walls show every mistake
Obviously, branded products are generally better than no-name products. The latter is due to the lower white pigment content, which is reflected in the lower coating strength. The painting looks easy, but the first time you use the roller, you realize it's not that easy. It's hard to get the hang of it at first and it's often quite common that some areas are lighter than others or roller marks are noticeable. Don't throw in the towel! To get a good end result, you need to practice and know some techniques for drawing with a roller.
It is also worth paying attention to the materials from which the rollers are made. These can be synthetic fibers and pile or natural. But that is another story .
There are rules for painting surfaces using a roller. Recommendations from experts will help you choose the right painting tool and complete the job of painting surfaces with the highest quality possible.
Using a roller requires practice and some techniques. The technique is not needed if the video is of low quality. Usually the economy roller usually doesn't load the paint well, it takes longer to paint and it's easy to get marks at the end. There are wool and polyester blend rollers that usually give good results. If they are conveniently put away after each job, they can stand in ideal conditions a lot of time, so the investment is worth it.
However, cotton rolls have the disadvantage that they release pellios when they are first used. To prevent this from happening, wrap the tape around it, repeating the operation several times until it stops letting hair fall. Alternative option is to use a Teflon-coated roller. This type of coating prevents the fiber strands from caking. It also improves roll loading, reducing painting time.
The roller is a painting tool and is a freely rotating cylinder with a comfortable handle. The roller can be made of metal, plastic, wood, polymers. A foam rubber, wool or fabric coat is put on it, which absorbs the paint and, while the cylinder rotates, distributes it evenly over the surface to be painted.
Also, keep in mind that you will also need a telescoping handle and a bucket with a mesh to complete your painting equipment. To download ink roller, do not immerse it completely in the bucket, but we must follow the following steps. First, you should brush the paint near the ceiling, baseboards, on doors and windows, and in corners. After loading the roller, place it on the bottom corner of the wall, a few centimeters from the base, and apply slight pressure to the ceiling, not in a straight line, but following a slight slope. Follow this pattern from bottom to top until you have enough paint on the roller, but don't wait until you have no paint to reload. You may notice some marks at this stage, but don't worry because they are resolved in the next step. Once the wall is painted and the paint is still fresh, you will have to go through the roller again in the same pattern, but this time without the paint. Remember that you must press lightly on the wall, otherwise you will only be dragging the painting. Finally, smoothes the paint in the area near the ceiling or on the base, above doors and windows, with a discharge roller and after a long stroke in a horizontal direction. Lower the roller to the floor, but this time in a straight line. . When it comes to painting, you have to be quick, because if you overlap strips of wet paint with others that are already dry, there will inevitably be consequences.
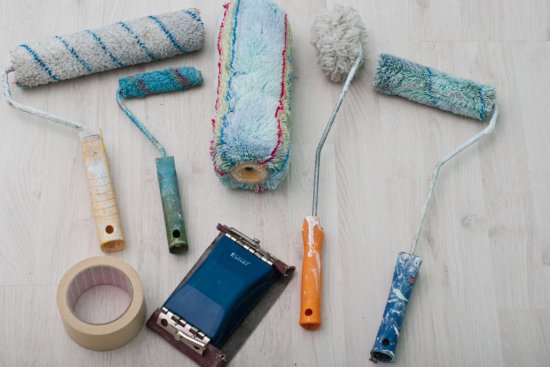
Types of rollers
There are several types of rollers: with fur coats and piles of different lengths, with a foam-coated roller, universal, ceiling-mounted, with a relief surface, and foam rubber. In addition, there are varieties of mini-rollers that are designed for painting hard-to-reach places and gluing wallpaper joints. For high-quality processing surfaces, experts prefer to use rollers with a cylinder diameter of 8 cm. The coat is chosen depending on the type of paint.
Never leave a wall half painted, calculate how long it will take to paint the surface and plan your breaks accordingly. When we are going to paint a room, we already know that the previous step of using a roller is to clean the edges of the ceiling above the base, doors, windows and corners. However, the texture of a brush is different from the texture of a roller, so it is convenient that the horizontal stroke we make with the roller is as close to the ceiling, base or corner as possible so that the brush mark is seen as little as possible.
Rules for painting with a roller
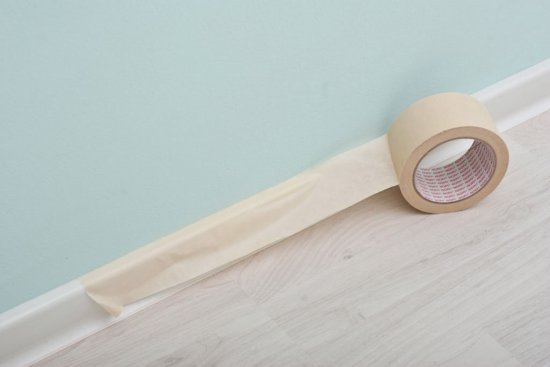
First of all, you need to choose the most suitable type of roller. In addition, you will need to buy masking tape, a narrow brush, and safety glasses (for ceiling work). The preparatory process includes cleaning the surfaces from the old coating, priming, protecting furniture and floors from paint drops. For this purpose, use newsprint or any other paper, polyethylene.
When a paint job takes several hours, it is easy for the paint to form clumps that will travel to the roller and end up on the wall. To avoid this, you can glue it down or also cover the bucket with a damp cloth to delay drying. Also be sure to clean the roller if it becomes lumpy because residue may remain on it.
Roller like golden nozzles
Before storing the roller, we must remove the remaining paint, first remove the excess with blotting paper, and then rinse the roller until the water is completely clear. How to Paint a Ceiling Like a Pro. How to Refresh with the No Residue Brush.
If work will be carried out at height, you should prepare a stable platform, which can be used as scaffolding or durable furniture (table, bedside tables, chests of drawers). The paint is poured into a paint tray or any other suitable container. Professionals recommend starting to paint walls from window or doorways. Joints finishing material additionally painted with a narrow brush.
Whether it's your first time painting a wall or a tenth, these tips and tricks will help you achieve perfection. Take the time to find the right type of paint and your project, in addition to researching brands to find good quality. The quality and type of paint is as important as the color to achieve a good result.
Choose quality brushes and rollers
Are you confused by how many paintings there are? It is important to choose the right one for the surface. If you need new brushes or rollers, choose good quality ones. Ask your paint shop which products are most recommended. Good brushes and rollers will cover the surface better, so you save paint in addition to achieving best result. Although you may spend more, you will have tools that you can use for several years.
Work begins from the top of the wall. The surface to be treated is visually divided into zones 2-3 roller lengths wide and 70-80 cm high. They try to cover this strip in one set of paint. The main rule of high-quality coloring is repeated rolling of the roller. This ensures there are no gaps.
The roller is immersed in a paint tray filled with paint and, to ensure an even distribution of paint, it is rolled 2-3 times over the special surface. The movements of the roller on the wall should be leisurely, directed from top to bottom, in the opposite direction, and the final stroke should be slightly oblique. They do this as long as there is paint in the coat. During work, you need to ensure that the joints of the strips are free of gaps and smudges.
Do not paint on hot or humid days
Of course, if you have no problem waiting days for paint to dry. Remember also to open the windows to not only quickly dry the surface, but also to ventilate strong odors. Good lighting will help you see parts that weren't covered well with paint and other mistakes, plus you can better appreciate the color you've chosen.
Open the windows and apply makeup at a time when there is more light. Use artificial light if necessary. If the walls are clean, the paint will adhere better. Use a mixture warm water and dish soap. Use a sponge to clean all walls from top to bottom. Allow the surface to dry completely before you begin painting.
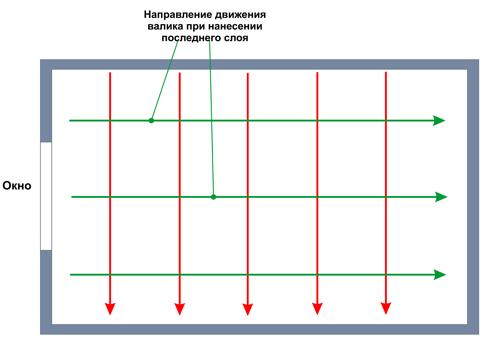
You should not try to paint the corners with a roller: this is done with a brush. You cannot perform the work in several stages, as the color shade of the surfaces being treated may differ. In addition, joints may be visible. Therefore, when starting to paint a wall or ceiling, you need to complete the job in one approach. After the first layer of paint has dried, the finishing coat is applied; the roller movements during this work should be exclusively vertical.
After painting, it is also important to keep the surface clean so that the color lasts longer and is better appreciated. How to clean your walls and keep them in better condition. Do not use more paint only for a quick finish as it will dry slowly and you will end up with a bubbly result.
Use a little paint, let it dry and add more coats if necessary. You won't regret taking your time. If you need to paint more layers or finish the job, you will need to let the paint dry completely. If it doesn't dry long before another coat, the surface won't look good at all when more is added. Allow paint to cure for at least 24 hours before reusing environment when you are finished to avoid marking.
Painting walls is a great way to quickly transform appearance premises. To paint correctly, you need to know the basic requirements for the surface of the walls and the tools used.
Instructions
You can paint both the puttied surface and those pasted with special wallpaper. walls. If you decide to paint during the renovation process, then think about the fact that the putty of the walls before painting must be done perfectly - any flaws will be clearly visible on the painted walls. Wallpaper, on the contrary, will hide the shortcomings made during puttying, and if you do not have enough experience to perform high-quality puttying of walls, it is better
How to paint walls with a roller? Laying out the walls of our home is not an easy task, but it takes some technique and practice to ensure that the surface is well covered and free from roller marks or lighter areas. We teach you some tips and step by step to make the final ending perfect. Choice: It's important to choose good paint and use quality tools appropriate for the type of surface being painted.
Protection: Before you begin and make the cleaning job easier, cover the floor and furniture with paper or plastic. Repair: to ensure good finish, repairs with plaster can damage the wall. Preparation: Just as important as the painting process is good preparation support. It must be clean, dry and properly primed. Paint: Once the surface is prepared, pour the paint into a tray or bucket, mix with a little water and mix well. Start drawing taking into account following tips. Once you have covered the entire area, view the video without loading any more paint, painting and review in strips about one meter wide. It is important to overlap each section slightly to avoid unpainted areas. When the paint is dry, if necessary, and to ensure perfect coverage and uniformity in color, repeat these same tips to get a second coat. Cleaning: Finish the paint job, clean the rollers and brushes with water, rinse them until they are clean. Finishing: Once we're done, remove all protection if possible before the paint is completely dry.
- Protect details you don't want to be drawn on with tape.
- After the surface of the sand has dried and dust has been removed.
- Continue until the entire wall is painted.
It can be argued that the result of the whole process is greatly influenced by the technique of working with the tool and what roller to paint the walls with. If everything is done correctly, the surface will be painted evenly without streaks or other defects. To begin with, the base for painting must be carefully prepared, that is, the walls are cleared of debris, leveled with putty, and primed. It is worth paying attention to the corners - they are always poorly painted, this will require a brush or an angled roller. The upper boundaries are from the ceiling and the lower ones from the floor.
An inexpensive and easy way to get a renovated home is to paint the walls while you do it yourself, since hiring a professional is no longer economical. Luckily, with a little skill and patience, you can get great results. It is also important that you make quality paint and the right tools. Among the most important is the roller, necessary for painting walls, ceilings and other large surfaces.
Learning to use a brush is not difficult. Of course, it must be taken into account that if it is not used correctly, marks may remain on the surface. This is actually quite common. So that you don't have to face this difficult problem to solve, today we are going to give you some tricks to paint with a roller without leaving marks. Do you want to join us?
How to properly paint walls with a roller
It is advisable to carry out all work in the warm season, so that the room can be well ventilated and create a favorable climate. So, we need to prepare the following tools:
Preparation work surface
Here everything works according to the principle: the more expensive, the better. The quality of the putty affects not only the result, but also the ease of use. Elastic, well-stretchy compounds are applied in a thin layer, which reduces material consumption, but a highly absorbent product will have to be applied tightly, and then spend time on sanding.
To mix the solution, before painting the walls with a roller, you need to pour cold water, putty in a small amount and see how much it will be enough to dilute the mixture for its full use until it dries. The dry mixture is scooped up with a medium-sized spatula. It is important to ensure that there are no lumps. To obtain a uniform consistency, the putty is stirred with a mixer. The first layer will be the thickest, the subsequent ones will be thinner. Before filling, the surface of the walls is plastered and primed.
The finishing coat is applied immediately before painting. It is better to sand with sandpaper size 160-180 until a matte base is obtained. Before all work, the floor is covered with polyethylene so as not to spoil the coating. To dilute the paint in a larger quantity than the container provided for it, then take a clean plastic bucket, which must be dry, into which the paint will be drained. This is necessary so that its shade does not differ, since this can happen even if the product is from the same batch.
Which roller is best to paint walls?
For fast processing of large areas, rollers 250 mm wide are required, wooden frames It is better to paint with a narrow tool 30 mm wide. The base of the ink composition determines which roller to use. Foam rubber is used to work with water-dispersed agents, primers and varnishes. Using our advice, you can...
Foam rubber is not suitable for emulsion paints, otherwise bubbles will form on the wall, which do not look at all aesthetically pleasing. Oil paints are applied well with velor rollers. This results in a perfectly smooth surface. The only disadvantage of such a tool is that you often have to dip it in paint.
Rollers made of natural fur or artificial material are expensive, last longer, oil paint apply flawlessly, especially enamels. Another drawback is that the lint from the roller periodically falls out and sticks to the paint. Thread rollers are immediately recognizable; they resemble a terry towel. Their lint does not fall out; in general, such products are easy to clean and can last for quite a long time if handled carefully.
note !
How to apply paint correctly
The mixer is attached to the drill chuck to mix the contents of the bucket. The finished paint is poured into the tray up to the axis of the roller. Rolling it forward/backward, the product is drawn onto the fur coat, then passed along the grooved side of the tray. This is necessary to remove excess paint and distribute it evenly over the entire surface of the instrument.
We took a certain amount of paint onto the roller, now, when applying it to the wall, we need to figure out which area it will be enough for. To do this, you need to select a free area on the working surface and roll out the paint until it dries completely. For uniform and high-quality coloring, you need to divide the square into equal stripes, the same as the width of the sponge. The number of these stripes can be completely different, 4 or 5, let’s say we have 5.
How to paint walls with a roller: application technique
You need to start painting from the top corner, you shouldn’t touch the first stripe, skip it, process the second one, then the third, fifth, then the fourth and the first last. Roller movements are performed from bottom to top. Such manipulations help distribute the paint more evenly on the wall. Starting from the top of the square, horizontally you need to draw stripes sequentially and one under the other. The operations are repeated from the fifth stripe, after two such passes the wall will be painted perfectly evenly.
Work continues according to the same scheme; you need to capture the previous square for the width of one strip. So, row by row, with horizontal shading, the entire wall will be painted. When using two shades, only one color can be obtained interesting effect. The base is applied with a regular roller, and the additional tone is applied with a fabric roller. If painted with bright paint light walls, you will get an original result, where the surface of the instrument is uneven and a light background will show through.