Every year, more and more people decide to connect an electric stove. This is not surprising. Modern technologies, used in their creation, allow you to achieve considerable savings.
Let's imagine that you have already purchased an electric stove and you need to connect it. In this case, you must first carefully read the instructions. This is where the working connection diagram is indicated.
Attention ! Electric stoves consume a large volume electrical energy in comparison with other household appliances, and this must be taken into account when connecting according to the diagram.
Connection algorithm
Before proceeding to directly connecting the electric stove according to the diagram, you need to familiarize yourself with a number of documents:
- PUE 7,
- PTEEP,
- technical certificate.
Only then will you be able to use these instructions correctly. Otherwise, you risk not only losing the warranty on the electric stove, but also putting yourself in danger.
Step 1. Select wires
The power wire according to the diagram must be independent. Simply put, it must be fed directly into the distribution panel. Otherwise, the wiring may simply burn out, thus causing a fire.
If you do not have a dedicated line in your home, then you can use the following types of wires:
- VVG-ng,
- SHVVP.
In turn, in order to connect the electric stove from the outlet according to the diagram, you need to use a PVA type cable. If you can't find it, then KG will do. By the way, the latter has much greater resistance to fractures. During operation, it can bend many times. There will be no harm from this.
When you select the cable cross-section for connecting an electric stove, you need to take into account three main parameters:
- number of phases,
- mains voltage,
- power consumption.
Just look at the table below and select the cable suitable for connecting the electric stove according to the diagram. In this case, it is better to provide a small power reserve, since fluctuations in the network are a common occurrence.

Also, when connecting an electric stove using a do-it-yourself circuit, you need to know about some nuances. Firstly, all operations must be carried out independently of the circuit breaker. Secondly, the current supply rating must be one unit higher than the device consumption.
You can find the technical characteristics of the electric stove in the relevant documentation, which should come with the device in the delivery kit. Also, all parameters are indicated on the case.
Attention ! The circuit breaker must belong to group C.
When connecting an electric stove according to the diagram, you must take care of the presence of an RCD. It will protect you and your family from electric shock during operation of the device.
The RCD must be installed near the circuit breaker. Connecting a residual current device is possible only after installing a circuit breaker. Special attention pay attention to the screw terminals. They must be securely fixed.
Step 2. Making a socket

Ideally, you should already have an outlet in your kitchen through which you can connect the electric stove according to the diagram. But unfortunately, not all apartments are equipped with connectors of the required power, so sometimes you have to take care of this yourself.
Attention ! You need an outlet that can provide power to electrical equipment with a power of over 3 kW.
In most cases, a single-phase socket is installed in the kitchen. It is more than enough to connect the electric stove according to the standard circuit. In this case, the minimum rated current must be no less than 32 A. Ideally you need 40.
The socket that you will use to connect the electric stove according to the diagram must be made with quality materials. Electrical contact must also be ensured.
It is very important that the number of cores is the same as the number of wires. Under no circumstances should wires be connected together to allow connection to a single terminal. This may lead to a fire hazard.
When connecting, only copper wire is allowed. In this case, the cross-section of the wire must correspond to the table values. The outlet itself must be installed on a flat surface. However, there should be no highly flammable materials nearby.
Advice ! When installed on brick wall It is advisable to use a gasket to prevent the base of the socket from cracking.
You cannot install a socket for connecting an electric stove according to the diagram near the washbasin. This does not comply with safety regulations. Splashes can get on the exposed cable and cause a short circuit.
Also, the socket should not be installed too close to iron pipes. The same applies to doors and window openings. From the right choice The installation location depends on the safe operation of the device.
When you finish installing the socket for connecting the electric stove according to the diagram, check the insulation. The cables must not be damaged. Only then turn on the stove.
Attention ! Ideally, the colors of the wires in the plug should match the colors of the cables in the socket.
Pay special attention to the screw terminals, they must be secured properly. Moreover, when installing an outlet, you need every multi-core cable solder additionally. Soldering must be done where they are attached to the contacts.
A multimeter will help you check how correctly you have connected the wires. Once the pre-check is complete, you can enable circuit breaker.
Step 3. Connecting to the stove
To connect the electric stove to the power cable, you will, of course, need a circuit diagram. The exact connection drawing must be in the technical data sheet. Once you find it, you will need to find the small cover on the back panel and unscrew it. Underneath it you will find the wire terminals.
Now you can secure the wires to connect the electric stove according to the diagram. But before that, you need to secure all the cables. Otherwise, with a careless movement you will simply tear them out.
Attention ! There are special clamps for fastening on the body of the electric stove.
The connection of wires depends on the number of phases. For pairing you need to use copper jumpers. They usually come with the terminal block. Make connections according to the diagram you have. After this, tighten the screws.
Usually in the documentation or on the cover itself there is a diagram with which you can connect the stove. Wherein The colors of the connected cables should ideally match each other.
First of all, you need to connect the ground. Usually this wire has light green color(a mixture of yellow and green). After this you can connect the neutral. The blue cable is connected third. Only after this can you move on to the phase wires. The sequence is as follows:
- brown,
- black,
- black.
Extreme caution must be maintained during the connection process, as incorrect contact can lead to failure of the plate or wiring. At the end of the work the lid is closed.
General network connection diagrams

Perhaps this is the most simple circuit connection to single-phase network, in order to connect power you will need:
- Install jumpers on terminals L1 and L2, L2 and L3.
- Connect the brown wire under the phase to L2.
- Install a jumper on N1 and N2.
- Connect neutral to N2.
- The grounding wire is connected to the grounding contact.
However, you must remember that this general scheme. Many diagrams that come with the documentation may have different terminal names.. Moreover, even their number may be different.
If you need to connect the stove to a three-phase network, the diagram will be slightly different. You will have three phases that you simply need to connect to the three terminals L1-L3. In this case, no jumpers are needed during the installation process. N1 and N2 together with PE are connected to the advisory contacts.
With a two-phase network, you will need to install a jumper on L1 and L2. After this, you can connect phase A to them. Accordingly, L3 will output to C. All other wires can be connected in the same way as previous networks.
Results
Connecting an electric stove to the network is not so difficult. Moreover, this is possible in apartments and houses where the design did not provide sockets of this type. But to make this possible, it is necessary to use high-quality components and take into account important nuances like the number of phases in the network.
What prompted such a seemingly simple question? Firstly, any connection of household appliances characterized by increased energy consumption requires the installation of a separate line and the installation of a special socket. The ordinary one, of which there are many throughout the apartment, simply will not withstand it and will melt, as well as the in-house electrical wiring, which is not designed for high current values.
Secondly, when purchasing such equipment, it is necessary to provide for the inclusion of appropriate protective devices in the circuit. Otherwise, “surprises” are likely in the form of periodic switching off of the machine at the input and de-energization of all rooms, incorrect operation (or even failure) of other household electrical appliances. In an apartment, connecting to a single-phase network is not difficult, you just need to know some features and rules. So we'll talk about them.
Violating the connection order is fraught with serious troubles (to put it mildly), including fire or death. Everyone knows about this, but, unfortunately, some points from the manufacturer’s recommendations are neglected. But not many people are aware that failure to comply with them (even for a single item) is the reason for the cancellation of the warranty.
Taking into account the cost of the equipment, for some this argument will seem more weighty. Therefore, the author recommends that even before starting installation, you carefully read two documents - the manufacturer’s instructions and the relevant sections of the PUE (7th edition).

Preparatory activities
What supplies and Supplies, will become clear as the story progresses. Therefore, there is no point in dwelling on such “little things” as screwdrivers, a probe, and the like. Any electrical installation work involves the use of a certain set of household tools.
Inspection of the power shield
First of all, you need to check what maximum current the input circuit breaker is designed for. The value is within 45±5 A - everything is in order; this is usually sufficient. But if it’s less, you’ll have to replace it.
Recommendation: private houses usually have more rooms than apartments. Naturally, if you have money and free space, the cottages are “equipped” household appliances not like them. There are quite a lot of products. It is recommended not to be lazy and calculate the total power consumed by them, and then add an electric stove. Will it hold up? Practice shows that it can be regularly “knocked out”. This mostly applies to purchased houses. It is not a fact that the new owner knows thoroughly what and how the previous owner installed in the panel.

Availability of grounding
This applies to apartment owners, since cottage owners do not face this problem.
Recommendation - it is better not to delve into this issue yourself, but to invite an electrician from the housing department. Why? Only he knows what circuit the house is connected to. If this is a TN-C system, then “surprises” are possible, since operating independently in such an access panel often leads to emergency situations. One of the common ones is the so-called zero burnout. The consequences are easy to predict, including for the wallet of the owner of the electric stove.
Selection and characterization of materials
Cable
The fact that a new thread will have to be pulled is not discussed. This is especially true for houses dating back to Soviet times. At that time there were no traces of electric stoves or other powerful household appliances, so they were not taken into account when calculating indoor wiring.
Core material
Only copper. This is clearly stated, for example, in paragraph 7.1.34 of the PUE. In fairness (and to broaden one’s horizons), it can be noted that the laying of aluminum cables is also permitted, but provided that the cross-section is at least 16 “squares”. It is clear that this is not an option for an apartment.
Number of cores
We are talking about connecting to a single-phase network. Therefore, at least three - phase, zero, ground. Although it is more advisable to purchase a 4-core cable. You never know what will happen, but there should always be a reserve. A little more expensive, but forethought doesn’t hurt, especially considering how troublesome it is to replace the cable in an apartment.
Core cross-section
There are different recommendations, and with an eye on the power of the electric stove - both 4 and 6 cm². But advice from “knowledgeable” people is one thing, and regulatory documentation is another. According to clause 9.2 of SP No. 31 - 110 of 2003, at least 6 “squares”. What should I do? Follow the manufacturer's instructions. It already contains initial data on the cross-section, taking into account the power consumption of a specific electric stove. If it's small, then what's the point of spending money on a more expensive cable?
For those who for some reason do not have a passport for an electric stove, we can recommend using the data from the table.
Cable brand
About which one is best suited for an apartment (laying inside a private house). Therefore, there is no point in repeating.
Other circuit elements
- Circuit breaker (A) – at least 20.
- RCD. This device is mounted in series with the circuit breaker (and after), and its rating is “tied” to the operating current of the machine. The value should be one step higher. That is, if for AB it is 20, then for RCD it is 25. Accordingly, for 32 it is 40.
On a note
The PUE allows not to install an RCD in the power supply circuit of stationary equipment (clause 7.1.79). But it is still recommended to use it in the circuit. If the reader becomes familiar with the purpose and operating principle of such devices, he will understand the usefulness of this note.
The two above protective devices can be replaced with one - a differential circuit breaker. If there is not enough space in the power panel - perfect solution Problems.
Socket, plug

In principle, you don’t have to put a plug on the cable and make a direct connection.

But from the point of view of safety and ease of use, electric stoves are not the best the best option. For example, how can you move it away from the wall while cleaning the room?
All products (plug, socket) must be selected for the design current (indicated in the passport)!
Connection procedure
In principle, the owner can decide for himself how to lay the cable (in a groove on the wall, under a plinth or cladding). From the author’s point of view, it is not worth reminding that you must first unscrew the fasteners on the cover under which the terminal block is located, turn off the voltage in the panel when installing the socket, and the like. But some diagrams will be useful, and there is practically no need for comments on them.

Direct cable connection is indicated both in the documentation and on the contact panel of the electric stove, with explanatory symbols.

What to consider:
- For single-phase connection, terminals 1, 2 and 3 are connected by jumpers. They must be in a bag with accessories (included in delivery). The same applies to the zero terminals (4 and 5). The picture shows everything well.
- If jumpers are missing, they are easy to make. But only from the wire that connects the electric stove to the network! If you take a smaller cross-section, then it is not a fact that they will withstand.

Content:
In apartments and private houses, owners can either choose between a gas and electric stove for their kitchen, or install an electric stove or stove without fail. For example, as is provided for many high-rise buildings, or in the absence gas pipe, or reluctance to connect and use gas cylinders at the dacha or in a private house. It is necessary to correctly connect the stove to the electrical network. This is one of the most powerful 220 volt electrical appliances that operates for a long time. And the consequences of mistakes made when installing electric stoves can cause large losses.
An electric stove that is not connected correctly may cause a fire.
But most householders can connect the stove to the network. You can independently connect an electric stove not only to a single-phase network. Connecting a stove and electric stove to a three-phase electrical network, like a two-phase connection, is also included in the design of these electrical appliances. Next we will talk about this and, after reading the article, it will become clear how to properly connect an electric stove with your own hands. It will also be useful to read the article before connecting the stove or connecting ovens.
Existing solutions
The main feature of electric stoves is their high power by household standards. In some cases, only sauna stoves and some electric heating devices may be more powerful. Current strength of 35–55 amperes is quite common parameters for electric stoves. For this reason, the electrical circuit requires a minimum of connections. Each of them can become, if the contact deteriorates, a source of dangerous heating, which can result in an accident.
Fewer connections - more reliability and durability. Therefore, the most correct connection would be a separate wiring for the electric stove, connecting it and the switch with the RCD functions. But if there is a need to use a detachable connection, an outlet can be installed to connect an electric stove. But it is important that the design of the device contacts matches the current consumption. Since there may be situations in the kitchen that can lead to electric shock, the electric stove must be connected to grounding.

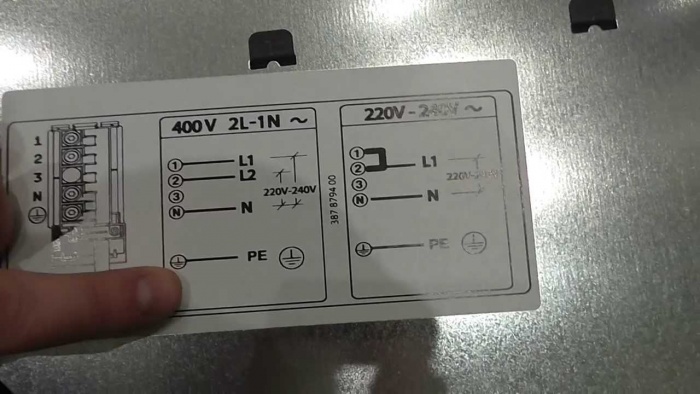
The connection diagram for the electric stove is selected depending on the number of phases that are used. Usually there is a special nameplate on the case, which shows the connection diagram of the electric stove to one phase, two phases and a three-phase network. Or these diagrams are given in the technical data sheet. This data gives you an idea of how to properly connect the electric stove yourself. Below are generalized options for how to connect the device according to the number of phases of the power supply.

About switches
The load capacity of the contacts of a differential circuit breaker or circuit breaker, which must be used together with an RCD, should not be less than the maximum current consumed. Since this parameter for switches is standardized and divided into certain values, and the power of electric stoves is different, most often the desired value is chosen from three ratings - 40, 50 and 63 amperes. The current of the electric stove must be less than the selected switch current.
- But if the homeowner is confident that his electric stove will never operate at full capacity, he can independently determine the current of the switch (circuit breaker or differential circuit breaker).
If a circuit breaker and an RCD are used, the latter in terms of current rating should be the next in increasing order. If the circuit breaker is rated at 40 A, the RCD must be selected at 50 A.
Choosing conductors
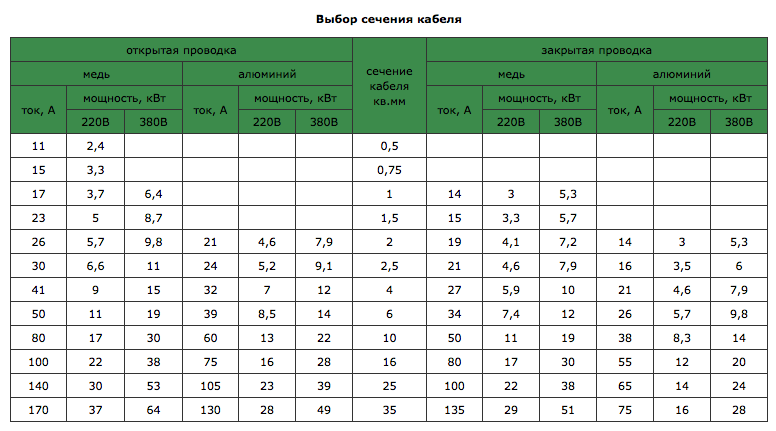
It is better to connect the electric stove to the electrical network using a conductor with copper conductors. A copper cable for a stove will be thinner than an aluminum one. Its connections to the terminals will be more reliable. Regardless of the core material, the wire cross-section, as well as the cable cross-section, is selected according to special tables. Their content is the same, although the data format may differ. One such table is shown below.

If the tile will be connected directly to the switches and will not be rearranged, you can use wires for an electric stove, the cores of which are made of one wire. To connect to the electrical network with a plug connector, it is better to use a cable with stranded conductors between the tile and the plug. The use of such a cable for an electric stove is better because of its flexibility.
Next, as an example, we will consider connecting two models of electric stoves to the electrical network. One will be a combination with two electric and two gas burners and therefore less powerful, and the other will be fully electric - more than twice as powerful as the combination.
Connecting a less powerful electric stove

This model is not supplied with a cable for an electric stove. Therefore, when purchasing, it is recommended to ask the seller a question about the cord if he himself does not comment on this option. If the selected electric stove comes without a cord, it is better to immediately buy a cable to connect the electric stove, based on the data in the table above. We remind you what cable is needed to connect to a 220 V network. It must contain three cores, one of which, yellow-green in color, is intended for grounding.
This model consumes approximately 4 kW of electrical power. The cable for it is shown in the images below.


To keep the cable closer to the wall and out of the way, we recommend using an angled plug.

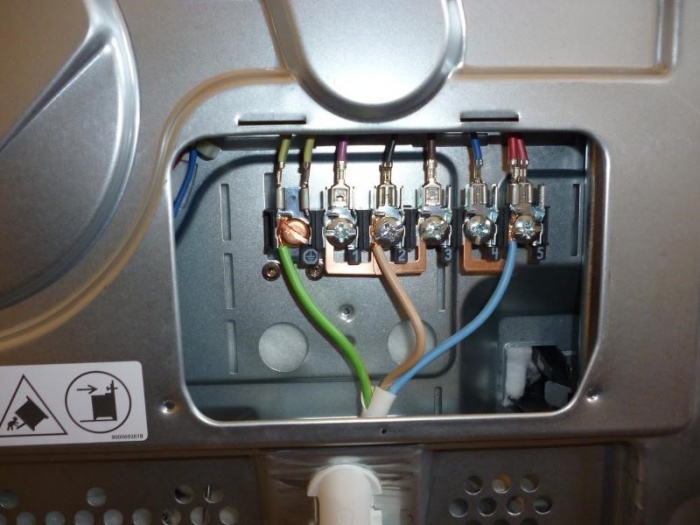
Before connecting the electric stove, the back cover is removed. Under the cover there is a mounting block, which is used in all electric stoves.

The rightmost terminal is for grounding. This can be seen by the color of the insulation of the connected wires. The remaining terminals are numbered so that connections can be made depending on the type of electrical network. To do this, a nameplate with images of connections for each of the networks is glued to the back cover.

The image shows adjacent terminals that are connected to each other. For these connections, jumpers are used, which should be included in the delivery kit. Usually they are all installed together in a terminal block. They must be removed and installed in accordance with the selected connection in relation to the existing electrical network. To install, unscrew the terminal screws slightly so that the jumper fits under the screw head. And after placing the jumper, the screw is tightened until it stops.


The cores of the connecting cord are connected to the terminals of the block in a way that depends on the power of the electrical appliance. IN in this case There are connectors on the block. Their counterparts were purchased and attached to the cord cores. If the power of the electric stove was greater, then a screw clamp would have to be used to connect the cores.

In accordance with the diagram for a single-phase electrical network, we connect the cord connectors to the terminals. We follow the colors in accordance with the wires connected to the terminal block.

Then we clamp the power cord with a block located on the case. The force applied to the cord should not affect the terminals. The block thus protects them.

Then install the back cover on the stove. After this, all that remains is to connect the cord to the electrical plug. The socket was installed before purchasing the electric stove. It is connected to the ground, as well as to the phase and neutral wires. Therefore, after this last operation, the stove can be placed in the prepared place and begin to be used.

When installing the plug, you must first measure the part of the insulation to be removed. The stripped core should cover the screw shaft. It is necessary to obtain the maximum area of contact with each terminal of the plug. The cable must be clamped with a block located inside the plug body.

Connecting a powerful electric stove
The power of an electric stove with an oven and four burners is usually 7 kW or more. For this reason, its connection is somewhat different from the process already discussed for less powerful equipment. Since four-burner electric stoves are generally connected to a single-phase electrical network, many models are equipped with a power cord already connected to the stove. In this embodiment, the task is simplified and comes down to connecting an electrical plug, which has a special design.

It allows the contacts of the plug connector to safely pass the operating currents of this electrical appliance. But if you make mistakes when installing the cable, and as a result the contacts turn out to be unreliable, an accident with insulation melting and even fire cannot be ruled out. If the installation of the socket has not been done before, and the wires for connecting it stick out from the wall, they also need to be installed properly.

To obtain reliable contact at the points of connection with the plug terminals, the stranded cores of the network cable must be tinned. To do this, the veins are prepared by twisting tightly with pliers. This is done in order to fix the wires and the shape of the core. After twisting, it is bent in the form of a loop to obtain a large contact surface.


After trying the loop on the screw with the clamping bracket, it is made flatter by squeezing it with pliers:

Since the hinges will be tinned, they should fit into the bracket screw with clearances that allow for the solder layer.

If you need to mount a socket and connect the wires of a cable laid from the switch to its terminals, you must check how the wires are connected to its terminals. They should not be attached in the same way as the self-tapping screw that imitates the core in the image below. This is the easiest way to connect the core. But due to the small contact surface, high currents will heat up the contact, and an avalanche-like process of increasing contact resistance will begin. As a result, both the wire and the socket will be damaged at best. But a fire may also occur...
An electric stove is an excellent choice for modern kitchen. Given that correct installation and use, the device will serve properly for many years. Of course, you can invite a qualified technician to connect the electric stove, but if you wish, you can do everything on our own and save big!
Familiarize yourself with the basic requirements for connecting modern electric stoves, existing circuits, as well as guides for direct installation of the device and its grounding.


Important! Before you begin any manipulations with wires and electrical appliances, turn off the electricity supply to your house or apartment.
Modern models of electric stoves are usually sold without a cord included. There is a reasonable explanation for this: safety regulations require that such devices be connected using high-quality terminal blocks, i.e. according to the so-called rosette-free method. With this connection option, you can increase the length of the power cord, and instead of a machine for more powerful models, you can install a fuse-link.
To connect, you need to use a cable with a cross-section of 4 mm 2 if its length does not exceed 12 m. If a longer wire is used, the minimum permissible cross-section value increases to 6 mm 2. In this case, it is imperative to install a separate machine specifically for the stove.

Connection via a socket is also acceptable. It is only necessary that the device be designed for a current of 32 A. Electric stoves consume quite a lot of energy, so include them in simple household sockets prohibited.

Thus, the requirements for connecting an electric stove can be combined into a short but very important list, which includes the following provisions:
- to connect the device, a three-core copper cable with a cross-section of 4 mm 2 or 6 mm 2 is used, depending on the length of the cord;
- a separate machine for the stove is installed in the electrical panel;
- installation of a residual current device is in progress;
- The stove is grounded using an accessible method. ABOUT possible options Grounding will be explained at the end of the manual.
Connection diagrams for electric stoves
Before proceeding with the actual installation of the device, study existing schemes connecting the device.
The most common option. Most often found in apartments of multi-storey buildings.
With a single-phase connection, the connection block will look like this (see diagram).

Terminals 1-2-3, as well as 4-5, are connected by copper jumpers with a cross-section of 6 mm 2. If you bought a modern stove, the necessary jumpers will be included in the kit.
The phase conductor (can be gray, brown or black) is connected to terminal number 1, 2 or 3.
Zero core (usually has Blue colour) is connected to the 4th or 5th terminal. The ground wire (yellow-green in the diagram) is connected to the 6th terminal.
The terminal bolts must be tightened until they stop. If the connection is poor, the terminals may burn, resulting in a fire.
In the case of using a socket connection, we feed the phase conductor in the plug and socket to terminal L, the neutral conductor goes to the terminal marked N, and the grounding wire is connected to the corresponding terminal (marked with a grounding pattern, the letters PE, or the word earth).
Two-phase connection

Rarely, but still there is a two-phase connection. For example, phases A and C may be present, but phase B will not be present.
With this connection, terminals 1 and 2 need to be connected with a jumper and phase A must be connected through it. Phase C goes to the 3rd terminal. The further connection procedure remains similar to the previous methods.
Three-phase connection

Owners of private houses most often encounter three-phase power. The supply wire in such a situation will consist of 4 or 5 wires. In this case, the voltage between zero and phases will be 220 V, and between the phases themselves – 380 V.
In such conditions, the electric stove will be connected according to the appropriate circuit. Phases A, B and C will go to the corresponding terminals 1, 2 and 3.
The connection of terminals 4, 5 and 6 is similar to a single-phase connection.

The connection procedure remains the same for networks with any number of phases. There are only a few nuances that you will learn about below. The connection will be made through an outlet.
First step
We choose a place to install the device. The electric stove is classified as a high-power electrical receiver. To ensure its reliable and safe operation, on the wall closest to the stove we install a plug socket with a grounding contact. In this case, the current rating of the socket should be 32-40 A. The socket for a single-phase electrical network will have three contacts, for two- and three-phase networks – five.

Second step
We install a separate circuit breaker in the panel. If the network is two- or three-phase, we install a three-way 16 A switch. In the case of working in a single-phase network, we install a single-way circuit breaker. The switch rating should be 25-32 A.

Third step
We install the wire to connect the electric stove. In two- and three-phase networks we use a 5x2.5 cable of the VVGng brand, for connection in single-phase mode we use a 3x4 cord of the same brand. We pull the wire from the electrical panel to the plug socket of our electric stove.

Fourth step
We connect the wire to the outlet in accordance with one of the diagrams above. Close the socket cover. We work very carefully, observing established standards. If the connection is made using a three-core cable, then the brown wire (it may also have White color) we connect to the phase connector of the installed electrical outlet, connect the blue wire (can be white with a blue stripe) to the “zero” connector, and connect the yellow-green wire to the ground connector. The wires of a five-core cable are most often colored brown, white and red. The order of their connection, as well as the features of marking the socket connectors, were discussed earlier in the description of the circuits.
Fifth step
We connect the plug to the flexible wire of the electric stove. In this case, be sure to pay attention to the marking features of the plug. The element is connected in the same way as an electrical outlet.
Sixth step
We connect the flexible wire to the stove. At this stage, much depends on the model of the device being installed and the number of phases in the home electrical network. In general, manufacturers provide connection diagrams for their stoves in the accompanying instructions or on the back covers of the units. We follow the manufacturer's recommendations.
Seventh step
We separate the power cable of the electric stove in the panel, and then strip the ends of the wires. We connect the phase conductors of the supply cable to the strip terminals of the machine. We connect the “zero” core to a common bus for all zero conductors. Only the yellow-green core remained unconnected. IN modern systems such wires are connected to grounding buses. In older TN-C type networks there are no ground buses. What to do? Read on.

Guide to grounding an electric stove
When working in old-style networks, even qualified specialists often consciously make a grave mistake by grounding various electrical appliances to the working zero buses. Such a connection is fraught with an extremely unfavorable consequence: if the zero wire breaks, the phase will pass through the load directly to the electrical appliance and the user will be shocked.
Electricians often make another serious mistake, confusing the phase and neutral wires. When performing such “grounding”, the result will be similar to the previous case - the owner of the stove can receive an electric shock at any time. But you can’t refuse zeroing either. There are several options to solve the problem. Check out available methods and choose the one that suits your situation.
The first option is to find out whether the apartment’s switchboard is grounded

To do this, we go to the housing office or another service organization. If a company representative says that the shield housing is reliably grounded, all we have to do is connect the yellow-green wire to this housing through a bolt.
If a representative of the service organization gives a negative answer or is confused in his testimony, grounding cannot be performed using the method described above - it will either be ineffective or will lead to an electric shock to the user of the electric stove.
The second option is for residents of apartments on the ground floor and house owners

Owners of such real estate can try to create a separate grounding loop. It is done like this:

Important! Before putting the grounding device into operation, you need to invite a specialist to measure the installation resistance. You can perform such verification yourself only if you have a special device. The resistance value should not be more than 8 ohms.
Table. Smallest sizes grounding conductors and grounding conductors laid in the ground
| Material | Section profile | Diameter, mm | Square cross section, mm | Wall thickness, mm |
|---|---|---|---|---|
| Black steel | 16 | - | - | |
| Black steel | 10 | - | - | |
| Black steel | Rectangular | - | 100 | 4 |
| Black steel | Angular | - | 100 | 4 |
| Black steel | Pipe | 32 | - | 3,5 |
| Galvanized steel | Round for vertical grounding conductors | 12 | - | - |
| Galvanized steel | Round for horizontal grounding conductors | 10 | - | - |
| Galvanized steel | Rectangular | - | 75 | 3 |
| Galvanized steel | Pipe | 25 | - | 2 |
| Copper | Round | 12 | - | - |
| Copper | Rectangular | - | 50 | 2 |
| Copper | Pipe | 20 | - | 2 |
| Copper | Multi-wire rope | 1,8 | 50 | - |
Third option - if grounding fails
The shield is not grounded, but it is not possible to make an individual grounding circuit? Then we simply plug the yellow-green wire and leave it in the shield until better times.
In such a situation, we pay special attention to the stove.
Firstly, we install it so that there is no possibility of simultaneous user contact with the stove and various live elements such as taps, sinks, pipes, etc. metal products.
Secondly, we lay, if not a special dielectric coating, then at least a thick dry mat near the electric stove.
Thirdly, we replace the conventional circuit breaker in the panel with a differential model with a 30 mA response rating.
Fourthly, we exercise special caution and vigilance when operating an ungrounded electric stove.
Important! It is impossible to ground an electric stove to water supply, sewerage and heating pipes. Although the listed elements according to the rules must be reliably grounded, no one usually controls the resistance of such grounding. The result can be a breakdown of the electrical appliance, electric shock to the user and damage to property, not only your own, but also that of your neighbors. It is also forbidden to ground electrical appliances to other utilities such as elevator shafts, ventilation ducts etc.

Happy work!
Video - Connecting an electric stove yourself
Reading time ≈ 3 minutes
When carrying out work on the electrical network, always turn off the power. Typically, the latest modifications of electric stoves are sold without a connecting cord. The electric stove must be connected using high-quality terminals. Moreover, a socketless connection is used. With this connection, it is possible to use longer wires with fuses. True, sometimes you can use an outlet. It is important that the current of such an outlet is at least 32 Amperes.
Connecting an electric stove yourself is also permissible, but you should keep in mind that the diameter of the wires in the cable is at least 4 mm. If the cable length exceeds 12 meters, then the diameter of the copper core must be at least 6 mm. Moreover, the cable must be protected by an independent automatic fuse.
Electric stove connection diagram
The connection diagram for an electric stove of this type is called radial. There is also a ring scheme. With this connection scheme, several sockets can be placed on one cable. It is prohibited to connect multiple electrical appliances through the bug.

To answer the question of how to connect an electric stove with your own hands, you should know how many connection diagrams there are. Moreover, connecting a built-in electric stove is no different from connecting a stand-alone stove. There is a single-phase, two-phase and three-phase electric stove connection system. Since a single-phase system is common in our apartments, the stove should be connected using a single-phase circuit. For this purpose, appropriate jumpers are installed in the terminal block. Then you should connect to the block power cable. The socket must be installed in the location you choose so that the cable length is sufficient.

When connecting an electric stove, special attention should be paid to connecting the burners. The connection diagram for the burners can be found in the passport, which is included when purchasing an electric stove. Typically, a burner includes a steel housing, a terminal block, thermal insulation and flat-type heaters.

The heating element is installed in a cell of the appropriate size. The surface of the burner should be higher than the surface of the stove itself. There are special screws that regulate the horizontal position of the heating elements. The cable cores are connected to the screws and clamped with appropriate nuts. Connecting a burner is a rather labor-intensive and responsible process. When incorrect installation heating elements can damage the stove.

Once you have installed the burners in electric stove You should check whether the connection is made correctly in the electrical panel. Only after this should you connect the stove and check its operation in test mode. Moreover, it is important to check in this mode all the options that are provided in the instructions. Based many years of experience operation of an electric stove, it can be argued that when correct connection The tile will serve reliably and for a long time. If you are not entirely confident in your abilities, then it is better to use the services of specialists.