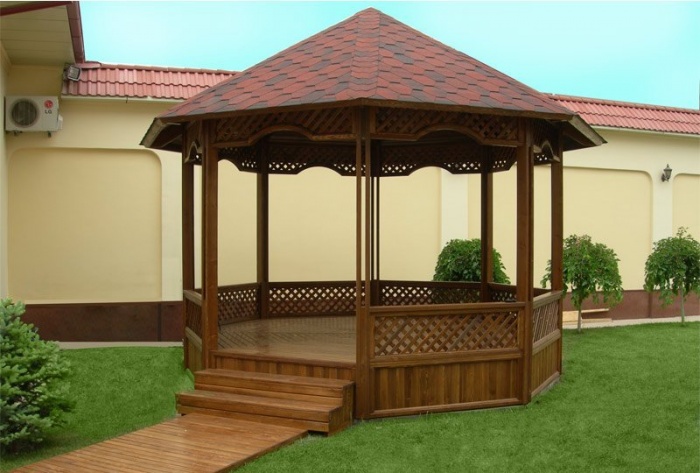
Wooden octagonal gazebos are currently in great demand. Such gazebos have many advantages, one of which is the best streamlining of corners. Thanks to such streamlined corners, there is a lot of space in the gazebo and a company of 15 people can easily fit in it. You can relax in the gazebo at any time of the year. It can be either glazed or open. A half-closed gazebo will protect from the wind. It is very important that the gazebo is made of natural materials. For the gazebo, you can use material such as oak, alder or pine. The gazebo, made from natural materials, exudes a pleasant natural smell, which has a beneficial effect on the nervous system of the vacationer, relaxing him as much as possible. You can also build a gazebo with a barbecue. In bad weather, you can gather in a gazebo with a barbecue with your friends or family and cook a delicious lunch.
The construction of the octagonal gazebo is designed in such a way that its installation does not take much time. You can build such a gazebo yourself with a minimum number of tools. First of all, you need to draw a drawing and choose the place where the gazebo will stand. The drawing will help you build a gazebo without defects and complex modifications. So, a place has been chosen, a drawing has been drawn, and you can begin building the gazebo.
Selecting a location
First, markings are made of the construction plan in the area where the gazebo will be located. In the middle of the area we have chosen, we drive a stake. To this peg we tie a cord or rope with another peg. Using the second stake, we draw a circle, which we divide into 8 equal segments. Moreover, 1 of the segments will coincide with the entrance to the future gazebo. When we combine the ends of the segments, we get a design design. The diameter of the circle will be approximately 3.2 meters.
It is necessary that the center of the site be convex so that water does not get there.
If you decide to build a structure with your own hands, it is recommended to make a columnar foundation. To do this, it is necessary to drill holes at the top and in the center of the octagon, about 70 cm deep and 15 cm in diameter. Pipes are inserted and cemented into these holes. The diameter of the pipe is at least 15 cm. The pipes must be the same size as you plan to make the gazebo.
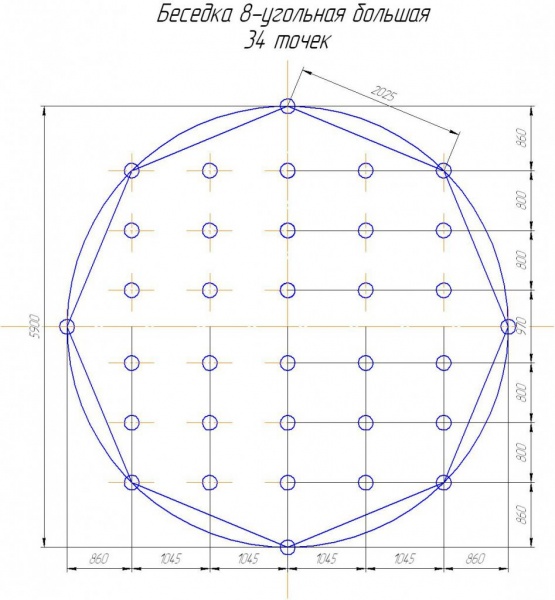
The photo below shows an approximate diagram of marking the territory for an octagonal gazebo.

Design drawing
Level the top of the pipes horizontally using a level. A reinforcement rod is inserted inside each pipe. The diameter of the rod is about 12 mm. It should protrude 15 cm from the pipe. Then the pipes must be filled with concrete. It should freeze. When the concrete hardens, the base of our gazebo is ready.
It is mandatory to use waterproofing on the base. Along the perimeter of the gazebo, logs are laid from beams 50x150 mm. On the sides where the joints are, grooves are made and a hole is drilled through which the logs are placed on the frame.
Then the logs are laid from the middle of the base to the tops of the polygon and secured with nails. In the middle, the logs are also connected to each other. The resulting base of the floor is covered with planks. Sheathing is done either in a circle or from one side to the other. The photo below shows an example of laying the base of a future gazebo.

Installation of the gazebo frame
After the base of our structure is ready, we can begin to mount the frame of our gazebo:
- Place pillars to support the roof. These are beams 100x100 mm. Then select one post and make a hole along the diameter of the frame. Then the pillars must be placed on the frame rods and secured with iron corners. The upper lobes of the pillars are leveled in height and secured with temporary braces.
- Attach a batten in the middle of the lower ends of the logs. Rail - 50x50 mm. Similar slats are attached to the sides of the logs, then railings are attached to them. This gives the structure rigidity.
- Using a board measuring 20x100 mm, punch a line along the top of the logs. The boards are adjusted at the corners of the joints.
- The supports are made from the same boards as the logs, positioned 30 centimeters outside the gazebo. Insets are made in the supports (5 cm). Then you need to strengthen the connection with an iron corner. Where there is a joint, the supports must be sawn vertically and adjusted to each other, then secured with nails and iron corners. The roof must have a sufficient slope, as snow can ruin it in winter.
In the photo below you can see the main parameters of the future gazebo.

Finishing the gazebo
The base of the roof must be covered with boards. Then waterproofing should be done (as in the photo below). After waterproofing, the roof itself is laid. It can be made from tiles, slate or iron. A copper roof looks the most attractive and suits the style better. The inside of the roof can be covered with clapboard. It's also worth thinking about lighting. You can install lanterns in the center of the gazebo or between the pillars. To avoid being disturbed by mosquitoes during summer picnics, you can use mosquito net. Otherwise, it all depends on your taste and purpose of the gazebo. Here you can install a table or barbecue, arrange a flower bed or equip a small greenhouse. All in your hands.
Any site requires a gazebo. It can be very miniature or spacious for a large company. The octagonal gazebo is in great demand now. This gazebo design fits perfectly into any landscape and has a large internal recreation area that can easily accommodate up to 15 people.
Arguments for construction
The octagonal gazebo is so convenient that its design can be called almost the most successful for decoration. By placing benches along the edges of the interior space of the gazebo, and a conveniently shaped table in the middle, it is possible to accommodate a large number of guests. In this case, during a conversation, everyone will see the face of their interlocutor, and no one will disturb each other while eating.
This gazebo is distinguished by its roof structure, which follows the octagonal shape. Thanks to this, the roof of the gazebo has several slopes, and the support points supporting the roof will definitely withstand even the thickest layer of snow cover. Due to the fact that the slopes are at an angle, precipitation will not accumulate on the roof.

Important! If the overhang is of sufficient size, then gusts of wind and slanting rain will not get inside the gazebo.
If on initial stage If you carefully consider the design of such a gazebo, then recreating the structure on the site will not be difficult even without the presence of assistants. And if you also have experience in carpentry, then the whole process will go much faster.

To create a drawing of the gazebo, you will need to accurately provide for all the nuances and enter the dimensions of the future structure into the document. It is best if the images are made in different planes so that all the features of the building can be taken into account.

Self-construction of an octagonal gazebo
Gazebos, as a rule, are installed in the depths of the garden on the site, away from the house, in order to feel unity with nature and enjoy it.
In addition, there are several more criteria that need to be followed when looking for a place to place a gazebo:

Required Tools
To make a high-quality wooden octagonal gazebo on the site you will need the following materials:
- Timber in the quantity required according to the project with a size of 10*10 cm or 15*15 cm.
- Edged board 10*5 cm.
- Board for lathing under the roof. Its type is selected in accordance with the roofing material that is planned to be used.
- Roofing material.
The tools you will need are all those that everyone has on the farm. This:
- Saw, jigsaw
- Square
- Level
- Roulette
- Screwdriver
- Sander
- Fasteners in the form of self-tapping screws and bolts
- Marker for marking
- Rope
- Stakes
You also need to prepare a stepladder so that you can easily work on the site with those elements that cannot be reached from the ground.
Selection and design of the base
Can be used for gazebos Various types bases, their choice depends on the soil that lies on the site and the capabilities of the owner.

For an octagonal gazebo, it is very important that all sides are the same width, and for this you will have to be especially careful about marking the area for the foundation. Necessary actions:
- Mowing the grass on the site.
- Marking in the form of a square with a side that is equal to the length or width of the gazebo.
Important!
- All corners of the square must be at an angle of 90 degrees. To get perfect angles at all corners of the square, you need to drive in pegs and pull the rope diagonally. The resulting diagonals must coincide. If this is not the case, then some of the elements are moved to create correct angles
- . In order to make sure that the square is correct, you need to check all the corners with a construction square.
- Dividing each side of the square into three equal parts and driving pegs into these places.
- Connecting with a rope all the pegs that are in the middle of each side. The result is a beveled square.

With the correct layout, all the resulting sides will be equal, and the pegs from the first square can be removed from the site, since they will no longer be needed.
- An octagonal gazebo can be marked in another way:
- In the selected area, you need to drive a peg in the middle.
Important! It must be secured so that it can be moved in a circle.
- You need to tie a peg to the end of the rope, which is used to draw a circle.
- Draw a diameter through this circle, place another one perpendicular to it and thereby reach 4 lines of diameter.
- Connect all the resulting points on the circle with each other. You should end up with an octagon with equal sides.
In their configuration and design, gazebos can be no less varied than houses. An 8-sided gazebo is structurally considered one of the most complex options, but it makes it possible to accommodate quite a lot of people in a relatively compact building area.
In this article we will tell you what these difficulties are, consider the order of work and possible options design. For those who prefer to do everything themselves, the video in this article will help: “How to build an 8-sided gazebo yourself.”
If we talk about the materials from which an octagonal gazebo can be built with your own hands, then believe me that the number of angles does not play any role here. As in any other case, it can be brick with blocks, wood (see), and profile or forged metal, glazed stained-glass windows made of metal-plastic.
So:
- The degree of capitalization of the building also varies. This may well be a stone structure on strip foundation or, for example, a collapsible version from the manufacturer, installed on a pre-arranged podium.

- In the latter case, installation work is usually carried out by specialists from the company from which the kit was purchased. Well, if you are thinking about how to build an 8-sided gazebo yourself, you will have to delve into all the intricacies of the process.
First, decide on the dimensions of the building, for which you will need a drawing. If you can, make it yourself or download a ready-made version. But when marking, you just need to follow the given dimensions exactly.
Drawing a regular octagon
Drawing a regular octagon is not as easy as it seems at first glance. In order for the geometry of the structure to be correct, you need to make the markings correctly, and for this you will have to remember the geometry. We hope that this instruction will help you cope with the task.
- We think it would be useful to remind you that at the time marking begins, the construction site must be prepared. It is necessary not only to remove vegetation, but also to remove the fertile layer of soil - otherwise it will be inconvenient to carry out marking.
- The drawing that we gave as an example shows the standard dimensions according to which 8-sided gazebos are most often built. You can also take these dimensions as a basis - we will use them in our story. So, let's focus on the drawing.

- The distance between two opposite sides is 4m, and the distance between the corners is 1.65m. As usual, when drawing a polyhedron you cannot do without a circle, but first we will draw a rectangle with the indicated dimensions (4.0 * 1.65 m). This way we will already have the four corners of our octahedron.
- Now you need to determine the center of the rectangle, for which each side of the figure is divided in half by an axis. The center of intersection of the axes will be the center of the circle that we need to draw. The radius of the circle will be equal to the distance from the center to the corner of the rectangle.

- Then it’s simpler: put the distance from the center of the circle to the center of the short side of the rectangle on a perpendicular axis on one side and the other. Draw two lines through these points, parallel to the long side of the first rectangle. In those places where they intersect with the circle, there will be four more corners of the octahedron, and by connecting all the corners, we get the outline of the future building.
A few words about how to draw. You will have to use an improvised compass - you can make it from two stakes and a piece of twine. When the first rectangle has already been drawn and its center has been determined, drive a peg into it.
Tie a cord to it and measure the required length equal to the radius of the circle. You also tie the other end of the rope to a peg and draw with it like a compass rod - that’s the whole secret.
Arrangement of the base
And so, the outline of the future gazebo is drawn, pegs are hammered in the corners, and twine is stretched between them. What are your next steps? Options for the development of events may be different.
First way
You can first build a podium, a terrace - whatever you want to call it, and then install the racks of the building frame on it. In any case, this is exactly how they assemble, as well as glazed octagonal gazebos purchased as a kit from the manufacturer. Using this principle, you can build any gazebo, but a lot depends on the design of the support on which it has to be built.
So:
- If the soil is weak and saturated with water, the building has to be raised higher. In this case, construction is carried out on screw piles. Moreover, they are screwed in not only in the corners and center, but also provide additional support points for the beams of the base of the gazebo floor, as well as for arranging the entrance to it - this is clearly visible in the photo below.

- We will not dwell on the technology of installing a screw foundation now. If this is your case, watch master classes from professionals, take two assistants - and go for it. After the pile field is ready, the foundation is tied. As a rule, it looks like this: if the piles protrude above the ground by more than 60-65 cm, they are tied with a metal corner just below the heads.
- In other cases, it is enough to tie the timber, which serves as the base of the gazebo floor. Opposite corners of the polyhedron are also connected by beams. One of them, the central one, must be solid (diametric), and the rest are attached to it with radii (halves) and secured with spacers or corners. From above, all connections of the strapping beam are rigidly fixed with metal plates.

- The timber for strapping is usually taken with a rectangular cross-section, for example: 100*80 mm. During installation, it is placed on its edge - this way it can withstand higher loads. At the points of its support there must be gaskets in the form of strips of roofing material.
- By the way, greatest strength your gazebo will be provided with laminated veneer lumber rather than planed timber for the construction of load-bearing structures. It is not only more durable, but also has a low coefficient of moisture permeability.
As soon as the arrangement of the base is finished, they immediately install flooring and a gazebo is assembled on the finished podium.
Second way
If the soil is strong and dry, it is enough to place half-buried ones in the corners and in the center as supports under the gazebo. concrete blocks, or it could be pillars made of brick. Simply put, .
- In this situation, the procedure for assembling the gazebo is slightly different: vertical posts are placed parallel to the framing beam, then the upper perimeter is tied, and only then the logs are installed and the floor is sheathed.

- In this case, the size of the timber for the racks can be used the same as for the floor frame, or you can take material with a square cross-section. The top trim, like the roof rafters, can be made with 100*50 mm, or even 100*30 mm timber. In any case, the size of lumber is selected based on the dimensions of the building, and not for reasons of economy. But in general, the more massive the stands, the more harmonious and solid the gazebo looks.
- If you still don’t want to incur extra costs, keep in mind that the more compact and lighter the structure, the more carefully you need to pay attention to the process of fixing load-bearing structures to the foundation. Vertical posts can be mounted on an embedded reinforcing bar or plate for bolting, or they themselves can be embedded in the ground or brickwork.

It all depends on which foundation option is chosen. By the way, it can also be monolithic concrete slab. And if you make the gazebo massive enough so that it doesn’t blow away in the event of a strong wind, then you won’t have to attach it to the base.
Walling
After the frame is installed and tied, it is the turn of the enclosing structures. These include the roof, as well as the filling of the wall spans, which, however, may not exist.
The nuances of assembling the roof frame
There are different technologies for assembling a roof frame, and one of them looks like this. The rafter system of the gazebo, which has the shape of a regular octagon, has several structural elements.
In kits purchased from the manufacturer, these are usually parts in maximum factory readiness: the rafters themselves, rafter extensions, large and small mounting panels, support beams.
- They are assembled strictly according to the manufacturer's instructions, and it looks something like this. A support beam is installed between the mounting panels and secured with 8*80 mm self-tapping screws. On the small board, according to the number of rafters, eight through holes were drilled for an 8*40 mm screw. Steel corners are secured through them using nuts. Next, the rafters will be attached to these corners.

- When cutting and assembling elements yourself rafter system Instead of two mounting panels, one support column is used, which also has eight sides. Attached to the post are the metal mounting elements that you see in the picture above - they serve as supports for the rafters.
- The system can be assembled on the ground, and then using lifting mechanism put the roof in place. If it is not possible to lift the entire structure at once, four rafters are first assembled on the ground (one after another), installed upward, and then the missing elements are delivered. What does it look like in ready-made version, you see in the next photo.

- Depending on the selected roofing material, on the outside of the rafters, lathing is made of lath, or continuous sheathing is made with OSB boards, on top of which tiles are mounted. On the inside, you can, by analogy with the floor, hem it with a board or use a soffit for this purpose.
Soffits are perforated siding panels that are usually used to line the roof overhangs of buildings. The holes in the form factor of the panels prevent condensation from accumulating inside the structure, and this is very important for horizontal surfaces.
Filling the spans between the racks
The gazebo can be completely closed and look like a sort of house with solid walls and glazing, or it can be filled only along the lower perimeter, which plays a decorative role.
So:
- The space between vertical posts gazebos are used to create a beautiful appearance, and seats are usually installed between them from the inside. To fill the walls of a closed version of the gazebo, boards with “block house” sections and imitation timber, as well as siding panels, both long and plinth, are often used.

- Hinged, sliding, or fixed glazed frames, stained-glass windows, double-glazed windows and even blinds can be used as windows. As for semi-closed gazebos, there are the most great opportunities for design - whatever your imagination allows.
- Let's look at one of the simplest ones independent execution options are paneled fencing. They are assembled separately, from 50*100 mm boards, which serve as the lower support and railings, and 10*100 mm, from which vertical decorative elements are made.

- First, the perimeter of the fence is assembled and then filled with panels. The board is cut into blanks in advance, mechanical processing is immediately performed: wood cutting, milling, grinding. Panels can be mounted at a certain distance or closely, with grooves being cut using a cutter.
- They can also alternate with bars: the panel faces outward, and the block faces inward, or vice versa. Railings may also be subject to various options processing or represent not just a handrail, but a narrow frame filled with diagonal padding from slats. The same frames can be used to decorate the upper perimeter of the gazebo. The finished panels are mounted in grooves specially selected in the frame racks.

By the way, using this principle, you can make the entire fence or completely fill the spans of the walls with openwork frames, leaving only the passage free. As you can see, there is a good opportunity to use all your abilities and creative ingenuity.
And also, it will be needed to make comfortable seats inside. It is most logical when in an octagonal gazebo they are located around the perimeter. Their shape, as well as the methods of fastening, can be very different, but this is a topic for a separate article.
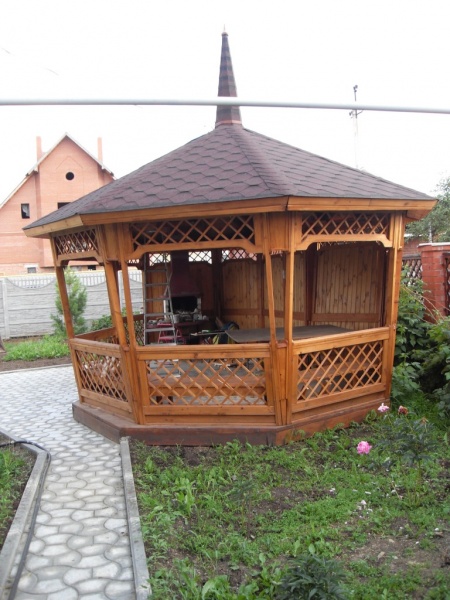
What are the features of building a gazebo with barbecue?
It will help you to get full pleasure from your vacation and prepare your favorite dishes in nature. Octagonal shape, which will be the most suitable for this. An example of such a gazebo can be seen in the photo below.

Almost any materials are used for its construction, but it should be taken into account that this is a permanent structure.
Therefore, the following are usually chosen for the base:
- Stone.
- Metal.
- Brick.
These materials will not catch fire from an accidental spark flying out of the grill, which makes the gazebo safer. You can also use wood, having previously treated it with a fire-retardant compound.
A do-it-yourself octagonal gazebo can be equipped with any type of barbecue.
He can be:
- Stationary. The materials used for its manufacture are:
- metal. These are the most inexpensive, but also short-lived designs;
- cast iron. Such products retain temperature well, improve the taste of cooked food, but are more expensive;
- red brick or stone. Typically, these ovens also have niches for firewood and work surfaces for cutting meat and vegetables are located on them, which makes them more convenient. However, if the owners make a barbecue once a season, then you can get by with an inexpensive metal one.
- Portable. Such barbecues can be placed anywhere, they are quite compact.
After choosing a barbecue, you can begin building the structure. An octagonal gazebo with a barbecue is erected in the same sequence as without it.
But it is necessary to take into account:
- If the owners of the site decide to use a heavy stationary barbecue in the gazebo, then a foundation is needed for it, preferably solid and 20 centimeters larger on all sides than the planned dimensions of the barbecue.
- For such a construction, the presence of a chimney through which hot air circulates, which also makes adjustments to the design of the gazebo. To avoid roof fires, the pipe is insulated with non-flammable mineral wool.
Drawings of the gazebo, as well as its sketches and 3D models must be included in the project without fail. When developing these diagrams, plans and drawings, you need to maintain the proportions of the structural elements, as well as indicate their exact dimensions. In this case, during the construction of the building there will be no problems that could lead to additional time and financial costs.
What are the rules for drawing up drawings and sketches of gazebos, and how should they be drawn? This is what our article is about.
Gazebos with 8 sides


General rules for drawing up drawings
Drawing up drawings of a summerhouse gazebo will allow you to accurately plan the location of various important structural elements - lamps, tables, doors, windows, possibly a barbecue, barbecue or stove. In addition, accurate diagrams and sketches will help determine the amount of building materials needed.

How to make gazebos with your own hands (drawing, photo)
There are rules for drawing up drawings with your own hands that should be followed:
- First of all, you need to measure the space on the site allocated for the construction of the structure. The dimensions of the structure in the drawing should not exceed its area.
- Next, a sketch is drawn.

A sketch of a wooden building or its 3D model clearly shows how it will look in the end
- Then the frontal and profile projections of the building are drawn, indicating the dimensions. For complex structures with barbecues or massive furniture, you will also need to attach a plan (projection from above) to the set of drawings.
- Next, a separate diagram of the foundation is drawn, which can be strip or columnar.

Columnar foundation diagram
- After this, walls and large elements (barbecue, table, etc.) are drawn. At the same stage, the locations of windows and doors should be noted.
- Then, on the finished drawing, mark the dimensions of all frame and cladding elements.

Drawing of the frame of a summer building with the indicated dimensions
- At the next stage, a roof diagram is drawn up with dimensions and angles.
- The locations of the lamps and the electrical wiring diagram are noted.
- If necessary, draw a barbecue with a foundation and a chimney (oven, barbecue).
- Next, you will need to “arrange” the furniture on the plan.

The plan should also include furniture
Important: If it is planned to build a closed structure, it is necessary to indicate the location of all ventilation openings.Examples of drawings with explanations
Wooden structure for rest
Structures on a timber frame are currently the most popular. It is not at all difficult to draw up a drawing of such a design as a rectangular gazebo with a table and benches.

A small garden gazebo on a timber frame, designed for family recreation
First, we draw a drawing of the building in two projections indicating the dimensions.

Simple rectangular summerhouses with your own hands. Frontal and profile drawings
Important: The project must also include small detailed diagrams indicating the methods of fastening and the sizes of elements in the connection nodes.
Diagram of connection points of various structural elements
Next, according to the rules, we draw the foundation. Of course, you first need to decide what it will be like. On weak or unstable soils it is better to build a pile grillage, on soils with good bearing capacity - a strip one.

Detailed drawing of the columnar foundation of the gazebo
Next we move on to the drawing of the walls. The wooden building we are considering is fenced with a low lattice parapet. In the diagram we indicate, among other things, the method of attaching it to the frame of the structure:

Drawings of a garden gazebo, made by yourself. Frame railing diagram
At the next stage, we draw a diagram of the rafter system. You should start with developing a drawing top harness and Mauerlat.

Layout of elements of the upper frame and mauerlats of the building

Drawing of the rafter system gable roof indicating the step width between the rafters and their length
A table of specifications of elements indicating the types must also be attached to the drawings building materials, necessary for the construction of one or another part of the gazebo, their size and quantity.

Table listing design details
After all the drawings are ready, you can go to the building materials store and purchase everything you need.
Advice: Buy materials with at least a small margin. Some elements may be damaged during the construction process. And no one in our country is insured against purchasing defective goods.Log structure with barbecue
In the courtyards of large residential buildings, log summerhouses are often erected. At the same time, barbecues or barbecues are usually installed inside them. Below we present to your attention a project of such a convenient and high-quality structure.

Drawing of a wooden gazebo equipped with a barbecue
Quite enough for someone like this complex design It’s better to make an additional plan.

Scheme of the first crown of the building with a barbecue and its general appearance
Drawings of gazebos with barbecue
A more complex building is a gazebo with barbecue. Such options for yard structures are also quite popular. On the grill you get very tasty kebabs, as its thorough brick walls able to retain heat for a long time. Plan of a gazebo for a summer house with a barbecue:

Plan of a gazebo with barbecue
Important: The set of drawings of the gazebo with barbecue must include a diagram of the foundation of this structure, as well as the chimney.
Foundation diagram of a gazebo with barbecue
In some cases, a barbecue can be installed in the middle of the structure. The grill is a heavy, massive and dimensional structure. That’s why they always place it against a wall or in a corner. Another original design of a gazebo with barbecue:

Sketch of an original building with a barbecue
And the diagrams for it:

Schemes of a gazebo with barbecue
The set of drawings of a structure with a barbecue must include a drawing of the barbecue itself.

Drawing of a barbecue for a gazebo indicating the dimensions of all elements
In addition, an order must be attached to the project. The same goes for gazebos with stoves and fireplaces.

Arrangement of the gazebo barbecue
Gazebo kitchen
Designs that combine a gazebo and a kitchen are considered very convenient. In such a building you can not only spend time pleasantly, enjoying closeness to nature, but also organize lunches and dinners.

Plan of a gazebo for a summer house, equipped with a sink, barbecue, dostarkhan, stove, table and benches
In the video below you can see the original design of the gazebo complex - summer cuisine made of brick and wood.
Metal constructions
Of course, not only wooden gazebos(the drawings of which are presented above), but also structures made of other materials. A very popular option are, for example, structures on a metal frame. Of course, it is also necessary to draw drawings before their construction. Make diagrams of the gazebo from profile pipe as simple as a wooden one. Structurally, they are usually even simpler and it is not necessary to draw complex drawings for them.

What could be a drawing of a metal gazebo? Photo of the simplest design 3x4m with diagrams showing the main dimensions
Very often on summer cottages multifaceted metal gazebos are installed. The design of a 6 coal building is a little more complicated than that of a simple rectangular one. But such structures are also built quite quickly and simply.

How to build hexagonal gazebos with your own hands. The drawings of these structures are quite simple to draw.
A design such as an octagonal gazebo made of metal profiles, wood or polycarbonate is also quite simple to assemble.

Drawing of an 8-sided gazebo indicating the dimensions of the frame and roof
Sketches of a large brick garden gazebo
Gazebos with cathedral stove structures
In closed gazebos, prefabricated structures can be installed, including a barbecue, stove and other similar equipment.

Sketch of a complex for a gazebo, consisting of a Russian stove, barbecue, smokehouse and hob
Advice: If a grill, barbecue or stove is installed in the building, the woodshed should be installed directly under them. This will make using the structures more convenient and save space.As you can see, it is quite simple to draw up projects for structures such as gazebos with your own hands using drawings. If you don’t want to waste time on this procedure, you can order finished drawing in an organization engaged in the design of small architectural forms. However, of course, this will entail additional costs.
Durability, reliability, comfort and functionality - this is the minimum task that gazebos should perform; we have selected photos of the most popular structures for this article. This is an integral part landscape design and a great opportunity to relax in comfort in the fresh air, have a get-together with friends, and, of course, cook something delicious on the grill.
Let's figure out which projects of small architectural forms are the most popular, how to determine the area of construction, what size gazebos are and for what purposes it is better to make them, what are the advantages and disadvantages of structures of different shapes.


General issues
A gazebo is a small architectural form that is important element in design personal plot. They are made of stone, metal, brick, wood, as well as modern materials, for example, from a specialized PVC profile or polycarbonate. But one thing is certain - the building must be in perfect harmony with the design of the site, and delicately fit into the landscape design.

2-storey quadrangular building, below - a covered room for recreation in the cold season, above - open area, which provides an excellent overview of the surrounding area
In addition, modern gazebos are divided into closed garden houses and open buildings, collapsible, portable and stationary, for use all year round, and light summer buildings, attached to the main house and free-standing.

An exclusive project of a small architectural form in the form of a ship

Large gazebo, octagonal structure looks elegant thanks to the light wooden lattice
But the form almost always remains the same. Next, we will look in detail at design features different types gazebos, and find out what the advantages and disadvantages of each form are.

Covered gazebos allow you to relax in comfort not only on a warm day, but also in rainy, windy weather


Basic forms
If we look in detail at typical, and even individual, designs of gazebos, then we can say with confidence that all buildings are based on the basic shape of the structure: rectangular, round, multifaceted - six-, eight- and more angled. And also combined ones, combining spaces with different geometries, for example, a rectangle and a semicircle.

Photo projects of combined type gazebos
The shape of the building is of great importance:
- a correctly selected design will subtly emphasize the beauty garden plot, its individual characteristics;
- with the same dimensions, there are designs that are themselves more spacious;
- some forms allow you to place a gazebo even on a difficult site, without loss of size or functionality;
- with the same internal space area, there are structures that require greater consumption of building materials.

Non-standard modern design for summer holidays
Rectangular designs
Projects rectangular gazebos They are distinguished by the simplicity and functionality of their designs. Today there are many interesting options such buildings:
- collapsible tents on a metal frame with a tent roof and canopy walls;
- traditional open building made of wood under a two- or four-pitched roof;
- rectangular canopy, belvedere type, on metal pillars under a vaulted or pitched roof made of polycarbonate;

A simple project for a quadrangular canopy, the construction of such a structure can be done with your own hands
- closed house - a permanent building, glazed or with bars, most often made of logs, less often - a stone structure, perfect option for outdoor recreation all year round;
- brick or stone structures with barbecue, barbecue or fireplace.

Rectangular gazebos, photo of a closed summer house
It must be said that this can be a mini gazebo 1.5*2 m, 2*2 m, or vice versa, a large building 5*5 m, 6*4 m, 6*6 m, zoned for different needs, with all the amenities. They are usually placed in the depths of the garden, near the fence, in which case the wall adjacent to the fence is made blank.

Original gazebos, a project based on a rectangular building for 6 people
Round gazebo projects
The round gazebo is a classic of small architectural forms; a prominent example is the rotunda: platforms on which pillars are installed in a circle, and they are crowned with a domed roof. Today, in addition to traditional projects, round buildings can be open, most often welded and forged metal structures, and closed, usually made of wood or metal-plastic, glazed. The choice of materials is not accidental, because metal and wood lend themselves well to processing; with certain skills, they can be used to build a curved structure and bring to life any complex project.

An elegant, airy rotunda is a real romantic corner in your garden
Projects for round gazebos can be divided into simple ones - pillars and a roof, and complex, expensive structures, for example, consisting of bent wooden elements, or metal-plastic spheres with panoramic glazing. Sometimes the project may provide for a parapet around the circumference, made of brick or stone, pillars are attached to it, and a canopy is built.
It should be noted that round gazebos can be installed in any part of the site, be it a free area in front of the house, or a tiny spot inside the yard. This shape allows the structure to be placed between large trees or turned to any direction without losing aesthetics and functionality.

Examples of projects of modern round structures
Multifaceted
Projects of multifaceted gazebos are perhaps the most popular among other types. This is due to the fact that they incorporate the lightness, elegance, ergonomics and practicality of round structures, but they are much easier to build.

Polygonal metal gazebo designs are suitable for self-construction
And if a round building, most often, requires the involvement of professionals, then it is quite possible to implement projects of polygonal structures with your own hands.

Octagonal gazebo, the project includes an extension for a barbecue
A hexagonal gazebo is the most popular design for outdoor recreation. Usually it is made of medium size; if you take a standard project, then maximum dimensions along the base - 3*3 m, 4*3 m, 4*4 m. But, despite the modest area, thanks to its convenient shape, the structure is very spacious. Benches are usually located around the perimeter of the building, and a round table is installed in the center.

Closed types of gazebos with your own hands, photo of a wooden glazed building
Polygonal versions of gazebos are most often made of metal, sometimes the sides are sewn up forged grilles or polycarbonate. For more massive buildings, logs or timber are used. But the most popular version of the gazebo is a structure on wooden pillars, with a four- or more pitched roof, covered with an openwork lattice or decorated with carved lace.

Classic gazebos, photo standard projects polygonal designs
Recently, projects of closed gazebos in the Finnish style have become popular: a chopped grill house with a stove, fireplace or barbecue.

A variety of winter houses according to a Scandinavian design
Original projects
Based on the basic forms, many original and very interesting individual gazebo designs have emerged, adapted to the characteristics of the area or way of life.
So, two-story or two-tier buildings look original. The lower floor is an enclosed space, and the upper floor is a viewing platform.

Photo of unusual gazebos, two-tier structure with utility room on the ground floor
I must say that such a solution is very practical, and even small area you can build a spacious gazebo filled with different functionality.

Two-story gazebo, colonial style project
Mini gazebo projects are very relevant; as a rule, these are portable or collapsible structures that can be installed anywhere in a personal plot, and, if necessary, moved.

Mini designs for small summer cottages
Projects of stylized gazebos made from different ethnic materials are also of genuine interest: driftwood, untreated tree trunks, wicker, straw, etc.

Small wicker ergonomic gazebo for four people
As a rule, such projects are built on the basis of traditional forms, but due to the unusual material they acquire color and originality, and become a decoration of the site.

Rustic building - the charm and flavor of a rustic style
Overview of standard sizes
Of course, gazebos are different, from very tiny to grandiose capital buildings, consisting of several spaces united by one concept. This may include a separate area for a barbecue, a small covered space for household needs, and a comfortable recreation area under a canopy.

An open building, the project provides two functional areas: a room with a kitchen and a place to relax
For comfortable accommodation of one person during gatherings and feasts, 2 sq. m. is enough, but for comfortable rest with chairs and sun loungers, 4 sq. m. is already required. Therefore, when choosing a gazebo project, it is very important to determine its functionality, and based on this, choose the right size.

Project of a large closed log gazebo
Good to know: We have already mentioned above that the capacity of the gazebo, of course, depends on its size, but the shape of the building also plays a huge role in this matter. For example, a small rectangular structure 2.35 * 2.70 m will accommodate 4-6 people with relative comfort, and exactly the same 6-, 8 coal gazebo, due to the lack of corners, it can already accommodate 6-8 people.


Let's look at typical sizes as an example. Popular square gazebo 3*3 m. It will fit small fireplace, with dimensions 1200*750 mm, work area-kitchen, dinner table 1200*800 mm, 7 stationary seats - benches and 3-4 side stools.

Scheme of the gazebo with arrangement functional zones
Below in the diagram is the same size, but hexagonal gazebo. In addition to the fireplace and work area, it can accommodate an oval table 1500*1400 mm, 9 stationary seats and 3-4 chairs.

Layout plan for functional areas in a hexagonal building
Now let's look at the 3*4 m design project. in this case you can also make a rectangular and multifaceted gazebo to accommodate a company of 16-20 people, but with some design changes. For example, work area with a fireplace or barbecue it is better to make it in the form of a rectangle 3 * 1.5 m, and the area for gatherings is polygonal. This solution will visually lighten the construction, make it more elegant, neat, but at the same time spacious and ergonomic.

Arrangement diagram for a combined gazebo 3*4 m
Advice: When choosing the design and size of a gazebo for your personal plot, first draw a diagram of the base on a piece of paper. Cut out a scale model of the furnishings from cardboard and try to think through the furnishings yourself. Average sizes: table 1200*800 mm, grill 1000-1200* 750-1000mm, seat width 400-450 mm, standard depth kitchen set 600 mm, but it is better if it is the same depth as the fireplace; it can be made of brick.