Sep 27/12
Cardboard furniture is a choice for those who care about environment
Inexpensive, beautiful and environmentally friendly furniture in your home – is it a dream, a fantasy, or is it really a reality? The answer to your wishes is excellent and original cardboard furniture! You can’t even imagine what a huge amount of different furniture you can make yourself from this material. And you will learn how to turn your dreams into reality from our article.
Today, cardboard furniture is very popular in many countries. Its advantages are quite clear - lightweight, durable, environmentally friendly, inexpensive and, most importantly, it can be easily made with your own hands.
What kind of furniture can be made from cardboard?
Look around you and pay attention to the furniture that surrounds you. What you see: table, chairs, closet, shelves. You can do all this yourself from cardboard. And, believe me, the strength of such furniture will be little inferior to chipboard or wood.
Great amount interesting ideas you can implement just one in the children's room: make a fairytale castle, original children's chairs and even armchairs, interestingly shaped shelves for books or toys, cabinets carved in the shape of various animals.
Without limiting yourself to a children's room, you can design dining area in cardboard style: large table, comfortable chairs.

Even such a conservative room as an office can be supplemented with a variety of elements made of pressed cardboard, for example, an organizer for pens, rulers and other small items, designer stylish shelves, and intricate designs.


If you can’t make some interior items yourself, but you really want to surprise your friends or just add some originality to your home space, order furniture made from pressed cardboard from a manufacturer that works with this material.


Another surprise for many will be the use of cardboard furniture outside the premises - tables in a street cafe. In order to emphasize the peculiarity of such furniture, you don’t even need to paint it.

Having cardboard items in your home or work will show you as an advanced person in the recycling movement. The main goal of this movement is to make interesting and useful items for everyday life from recycled materials and unnecessary items. The entire European part of our continent, as well as the West, is passionately working in this direction.
Even fashion designers at exhibitions present furniture made of pressed cardboard: shelves, chests of drawers, bedroom sets, hallways, bedside tables for a vase or TV, computer tables and much more. Of course, the cost of furniture from a well-known brand will be much higher than your own work, and buying designer furniture made of cardboard may be equivalent to buying ordinary furniture. But why overpay for something you can do yourself!


Designer table made of white cardboard from SmartDeco


DIY cardboard furniture - choosing the right cardboard
Before moving on to the basics of making cardboard furniture, you need to understand what kind of cardboard you need. What gives strength to our future product.
The cardboard we need has a corrugated filling. Usually, Appliances for the home it is packaged in exactly these boxes. This type of cardboard is called laminated cardboard. It can have one layer and be called single-layer, two or three layers, respectively. The more layers, the stronger your structure will be. Therefore, in work it is best to use the last two types: two-layer and three-layer. Also, the strength of cardboard depends on its color: light cardboard is less durable than dark cardboard.
You also need to distinguish between where the front side of the cardboard is and where the back side is. To understand this, just look closely at it and run your hand - the smooth side is the front side, and there may also be various inscriptions on it.
What is needed to make cardboard furniture with your own hands?
In order for the furniture making process to go smoothly and nothing to distract you, first of all you need to prepare properly. All tools should be at hand. If you have small children at home, it will be best if the main work process takes place without their participation. If children have already reached the age of 5 years, then their participation, on the contrary, is very useful, especially if the piece of furniture that you are planning to make is intended for a children's room.
Here is a list of available tools and additional items that you may need to make furniture from cardboard boxes(of course, you will adjust this list depending on what exactly you decide to make):
- metal rulers of different sizes;
- tape measure;
- stationery knife for cutting paper;
- pencil for marking;
- rubber;
- glue gun;
- liquid glue “Moment”;
- fast-acting wood glue;
- universal wallpaper glue;
- glue brushes;
- sandpaper (you will use it to sand the cuts);
- tape: protective and paper for gluing the ribs;
- damp sponge;
- parquet varnish;
- Kraft paper or tracing paper.
Last on the list is kraft paper. It comes in brown and white colors. Its purpose is to make ready-made cardboard furniture smoother, and this paper is also used to cover the edges of the products. First, all edges and seams are processed with brown paper, and then all the furniture is covered with light paper to make it easier to decorate. If you don't have light kraft paper, you can use tracing paper instead. To glue the corners, you can use protective tape; it is glued with a wet sponge. Another way is to use white acrylic paint instead of white craft paper.
The main condition when working with craft paper and tracing paper is not to cut them with a knife or scissors, but to tear them apart with your hands!
We make furniture from cardboard with our own hands
With everything you need at hand, you can get to work. For an inexperienced craftsman, it is not recommended to immediately take on complex pieces of cardboard furniture. Take what is easier. The fact is that, without knowing some of the nuances that will arise in the work, you can cool off from this activity and not only not finish what you started, but also not make other furniture options that could be an impetus in your skill.
To begin with, it is better to download the pattern from the Internet. As a rule, master classes show in a very accessible way how to make furniture from cardboard, so repeating everything until the smallest details, you will be able to get better at it and in the future you will be able to come up with different shapes and options for furniture for your home.
The simplest items that can be made from cardboard are children's or, as well as all kinds of interior items, small boxes for a child's room. By the way, as legs for a table or stools, you can use cardboard tubes on which cling film, foil or baking paper have been wound. But cardboard fabric tubes can be used for the legs of large tables or as the main structure for a multi-level cabinet.


- Furniture with a symmetrical shape will be more stable. You can draw one half of the picture because the second will be identical to the first.
- If you have planned a large protrusion in the designed furniture, you must understand that this may lead to its instability. The way out of this situation is to add support specifically to the protruding surface. It can be made from cardboard tubes.
- As a rule, furniture has at least 3 elements: facade; back wall; one or more internal elements (notches are made on them, into which transverse parts must then be inserted). The number of cross pieces depends on the depth of your furniture and its stability.
- Furniture that will be actively used under a large number of items, such as tables, should be more durable, and those that you do not plan to overload may be lighter.
- When you design future furniture, do not forget that it will take you about 0.6 cm to paste it.
- The most convenient way to cut cardboard is with a jigsaw, but take your time and carefully bring the line to the corner.
- If you cut cardboard with a special paper knife, then a metal ruler will come to your aid.
- When using cardboard furniture with two elements that overlap each other, pay attention to the direction of the waves. So, the first layer: the waves go horizontally, and on the second part the waves should go vertically. This will give greater strength to the structure.
- If your design consists of boxes stacked on top of each other, different sizes, then they can be fastened together with special plastic clips, which are used in cafes on outdoor tables to hold the tablecloth from gusts of wind.
- If you don't know where to get large cardboard tubes, then go to a fabric store, they just throw them away.
You can decorate cardboard furniture with whatever your heart desires:
- fabric - you can easily put it on special pins;
- wallpaper - use the patterns you like or the same ones as on the walls of the room;
- self-adhesive paper with a printed pattern;
- acrylic paints - with their help you can paint furniture in any colors, mix them or create drawings;
- various applications, decoupage.


As you can see, the process of making cardboard furniture with your own hands is very interesting and exciting, and the furniture itself turns out to be truly exclusive. If you have children, then thanks to this method you can not only develop their creativity, but also give them the opportunity to make furniture, houses, garages and much more for their toys. If you just creative person, then surprise your loved ones and friends new furniture Now it won’t be too difficult for you.
You won’t believe it, but furniture made from cardboard is quite strong and durable. See how to make a chest of drawers, shelves, and a table from this material.
It seems that this material is unreliable, but it is not. Using certain technologies, you will make furniture from cardboard that can withstand considerable loads. This one is perfect for a child’s room, it is environmentally friendly and it won’t be a pity if a child scratches or draws on such an inexpensive item.
How to make cardboard shelves?
Before moving on to such global pieces of furniture as a wardrobe, dressing table, chest of drawers, practice on simpler products.

To make such a shelf you will need:
- corrugated cardboard;
- construction knife;
- PVA glue;
- newspaper or other paper;
- universal glue;
- acrylic paint;
- acrylic lacquer.

The dimensions of this shelf are as follows: it is 80 cm high, 77 cm wide, and 20 cm thick.
To make the product strong, take cardboard with two layers of corrugation between the layers.
Cut this material into strips 20 cm wide. For each shelf you will need two identical rectangles. Cut narrow strips from cardboard. Bending them, glue them to the inside of each paired piece.

Glue the blanks together. As you can see, you need to assemble a cardboard shelf in the following way: mark where the following parts will be located on this one at an angle of 90 degrees to this one. On these two blanks you need to make cuts half the width, then put one into the other, thus connecting them.
Now the ends of the shelves and them themselves need to be covered with newspapers or paper. To do this, use PVA glue, slightly diluted with water. Once dry, paint the shelf in one or two coats. When it dries, you need to apply layers of varnish with each layer drying in between. To make cardboard furniture more durable, do not spare it. IN in this case 5 layers of varnish were used.
Such shelves can be hung on the wall using corner brackets. If you have a lot of corrugated cardboard boxes, then connect them with plastic clips or double-sided tape to create a great shelf or rack.

This product can be easily decorated with self-adhesive paper, matching wallpaper or painting.
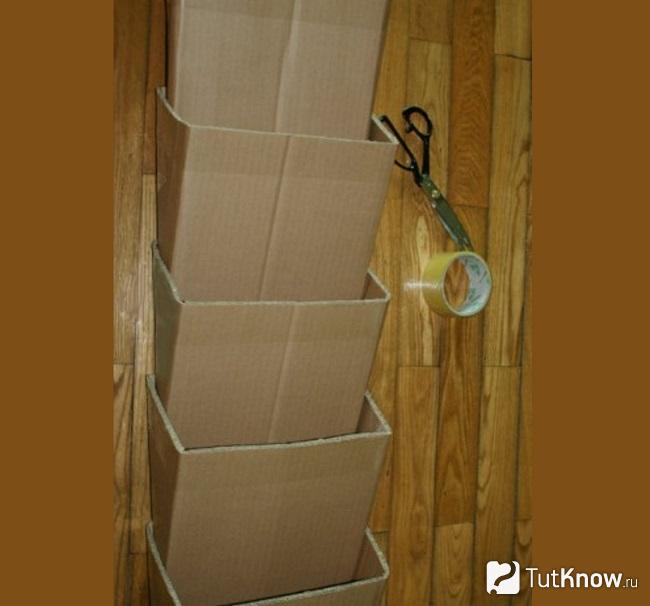
This material makes wonderful shoe racks, and some of them can be hung directly on the wall using double-sided tape.

You can make as many sections as will fit on your wall so that you can easily reach the top pair. See how the section folds.

Each one needs to be secured with tape. Then place the boxes one inside the other and secure them to the sides using a furniture stapler.
Here's another way to make a shelf for shoes or on a wall.

To carry out this work you will need:
- cardboard;
- scissors;
- glue gun;
- newspapers;
- PVC glue;
- acrylic paint;
- acrylic varnish;
- tassels.

Such blanks can be assembled using special plastic fasteners, tape, and cutting each half in thickness, insert into each other.

Using PVA glue, attach newspapers to the ends of the shelves.

All that remains is to decorate the cardboard furniture. It’s nice to paint it with your own hands in the desired color, then varnish it or cover it with self-adhesive wallpaper.

Creative ideas for cardboard furniture
The beauty of this material is that even without any plumbing tools or skills at home, you can create things of an original shape, for example, this shelving unit.

To do this you will need:
- a large box, for example, from a refrigerator;
- glue gun;
- scissors;
- paper;
- PVA glue;
- paint or decorative film.

Using the outlined contours, you need to recreate the middle and front parts of the shelf, attach these parts to the back using cardboard ribs.

Now you should cover the sides and all the shelves with strips of cardboard, and then attach the paper here.

There will be 2 drawers at the bottom; they are cut out according to the shape of these cardboard holes. Then you need to putty your work, when the solution has dried, walk over the surface with fine sandpaper. Now the surface to be treated is ready for decoration. Paint it or paste it over or decoupage the shelf.

Watch another master class. In it, an original shelf in the shape of a snail is created from cardboard. Children will certainly be delighted with such a new piece of furniture; they will put their toys here, but what about the retractable shelf? writing instruments.

Here's what you'll need:
- corrugated cardboard;
- glue gun;
- scotch;
- scissors;
- wire;
- two large beads;
- pencil.

Between these parts there will be another central one, repeating their contours. We strengthen all 3 parts with transverse jumpers using tape and a glue gun.

Cover the ends with strips of cardboard. Determine the size of the future box. Create it from a rectangle of cardboard, gluing it at the corners, attach the front panel.
To give the box more rigidity, you can glue it onto a slightly larger piece of cardboard.

Glue it corner elements, bends with tape. Attach 2 colored wires to the top of the snail, and large beads to their ends. Instead, you can use lacing stops by removing them from an old jacket or purchasing them from a store.

All that remains is to decorate such cardboard furniture in the chosen way.
This unique material can be given other interesting shapes, make a shelf with your own hands in the shape of an octopus or a flower with a box in the center.

First, the back and front walls, as well as the central part, are cut out of corrugated cardboard. They are fastened with transverse strips of the same material.

The ends are covered with pressed paper, the corners and connecting parts are taped. Please note that it must be cut on one side if the surfaces to be glued have curves.

To make the box, cut out a large rectangle and a circle from cardboard. The first part needs to be slightly bent and secured to the second part with tape. The corners of the shelf are reinforced with the same material.

Check out the following creative ideas.

This stand for books or all sorts of things is also made from corrugated cardboard. For the craft you will need:
- corrugated cardboard;
- pencil;
- scissors;
- brush;
- dye.
- body detail;
- two identical blanks for the front and hind legs;
- one central piece;
- four rectangular shelves.

On round blanks you need to draw wavy lines from the edge, then cut along this contour. Using a utility knife, make 2 cross cuts in these circles, with one running vertically through them.
When wet, cardboard becomes deformed, so it is better to paint blanks rather than finished products. They are covered with thick acrylic on both sides. Let it dry a little, put it under a press so that the cardboard does not change shape.
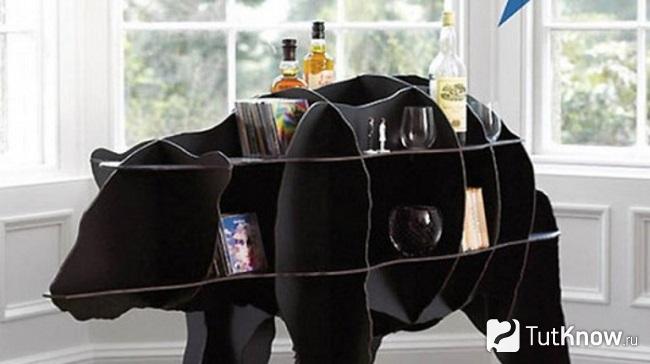
Then you need to start assembling. Place the back, front, and side parts on the lamb's body. Then you need to insert two shelves into the slots on one side and two on the other side. This process is covered in more detail in the video at the end of the article, and the diagrams will help you create such a shelf.

You can put the sheep on an MDF sheet, bend its legs, and glue it to this stand. The original shelf in the shape of a bear is made using the same technique.
If the blanks and this product are painted and covered with several layers of varnish, it will turn out durable. You can put CDs, bottles, books here.
DIY cardboard chest of drawers
Seeing this product for the first time, hardly anyone will guess what material it is made of.

To make such a chest of drawers, take:
- 2 refrigerator boxes;
- stationery knife;
- self-adhesive film - 2 meters;
- non-woven wallpaper - 1 meter;
- acrylic paint;
- furniture handles;
- sandpaper;
- universal glue;
- PVA glue.
First, assemble the product box. To do this, strengthen each part with strips of cardboard bent in a zigzag manner, and a second one of the same type is glued on top of the paired blank. They need to be left under pressure at least overnight so that they dry and do not lose their shape.

For the box you will need two horizontal or vertical parts, connect them into a rectangle, gluing them on the sides. To make the back wall, simply glue a piece of cardboard here.
The chest of drawers will have pull-out drawers. First, attach strips of cardboard 2 cm wide to the sides of this product. Then glue shelves on them, each assembled from two parts.

Create boxes according to the size of the resulting holes. Connect the glued parts, give them time to dry.

Start decorating. Cover the ends of the blanks with wallpaper, then the piece of furniture itself with self-adhesive film.

You will get a wonderful cardboard chest of drawers in which you can store small haberdashery, including threads and yarn.

For these small items for handicrafts, you can make another similar product, but of a smaller size. You will place it on your work table so that threads, knitting needles, and needles are always at hand. The size of this product is 14 by 15 cm.
Take:
- a pack of thick A3 paper;
- self-adhesive film;
- tape;
- glue;
- eyelets;
- finishing elements.

As you can see, from one sheet you will get two boxes. Cut each piece along the red lines on the side, fold the strips as in the following photos.

The cut edges are hidden inside and glued. Thus you need to create 6 shelves. You will need compartments for each, which are created according to the following scheme.

Cut along the red line, bend the leaves, which then need to be glued to the joint.

Now take 4 sheets of thick cardboard measuring 14 by 15 cm. They will serve as dividers for the created shelves. Lay them between the sections of the cardboard chest of drawers, gluing them.

You will need to push the drawers into the gaps and cover the walls with adhesive tape. Once the chest of drawers has a top and a bottom, cut out two rectangles one centimeter larger than the drawers and glue them in place.

These parts must first be decorated with a self-adhesive film; in this case, a wood-like film was used. The boxes themselves are decorated in the same way.
Its side walls are curved in one direction, they are made of a rectangular sheet of cardboard, the back is made in the same way. This chest of drawers has shelves for drawers. They are also made from corrugated cardboard and connected using a glue gun.

For greater strength, the chest of drawers are made of paired parts; they are glued together on all sides with thin cardboard or paper. Then the product is decorated with self-adhesive film.

How to make a cardboard table with your own hands?
As you understand, it is also easy to make from this material.

This could be a table for a child, a coffee table, or a coffee table. To make it, you will need almost all the same materials listed above, these are:
- corrugated cardboard;
- stationery knife;
- acrylic paint;
- acrylic varnish;
- adhesive tape;
- hot gun;
- PVA glue;
- cardboard tubes from rolled material.
For the legs you will need cardboard tubes. You can ask for this one waste material at a hardware store. Oilcloth or film is wrapped around it.
Once you have everything you need at hand, start creating. To make a tabletop, cut out two identical rectangles from cardboard and reinforce them with scraps of the same material. Cardboard strips need to be folded like an accordion and secured with an edge to one of the surfaces. The more of them, the stronger the finished products will be.

Place the second table piece on top and glue it in the same way. Glue strips of cardboard and self-adhesive paper to the sides.

Color the tabletop as you wish. In this case, red and yellow paint was used.

Mark the hole for the legs and cut here with a utility knife. Insert them, secure with a hot gun.

This is how the original table turned out, which, despite the fact that it was made of pressed paper, turned out to be quite durable.
If you also want to make furniture out of cardboard, be sure to try making it. The promised plot will help you with this, because such a shelf is very easy to make, the result is simply wonderful.
If you want to see what other furniture made of cardboard can be, including beds, stools, chairs, then check out the presented photo selection.
Message quote Furniture made from cardboard boxes
Rack - bookshelves made of cardboard boxes
Comfortable, lightweight and easy to make DIY bookshelf from unnecessary cardboard boxes.
As a result of furniture origami, you will get such an original cabinet:
The entire structure consists of individual square blocks, connected like a jigsaw puzzle. The material used is ordinary thick cardboard from boxes.
To create one block bookcase, you need to arm yourself with scissors, a ruler, a pencil and attention, draw out the parts of the size you want on corrugated cardboard and cut out the following parts:
First, it is better to practice on a small piece of cardboard or paper in order to determine the size and assembly method before finishing work. Unfortunately, the original source does not provide the dimensions of each part or schematic drawings, so you will have to experiment with the aspect ratio of the rack yourself.
Just assemble the finished blocks like a construction set, and you have the opportunity to create any shape of bookshelves with your own hands - a pyramid, a ladder, a rectangle, a square. If desired, the rack can be decorated, for example, covered with wallpaper or colored paper, painted or applied with various patterns and designs. Don't limit your imagination!
Cardboard rack for magazines and newspapers
An original creation made from corrugated cardboard was submitted to the CEDIM competition by students from the Mexican University of Design. Folded from cardboard sheets table - stand for newspapers and magazines it looks unusual and, at the same time, elegant. The idea of the table itself is quite simple and feasible. with your own hands.

The design is built on the principle of turning and twisting a stack of sheets; players often like to make similar figures with a deck of cards. A dozen sheets of corrugated cardboard have a rectangular cutout. Stacked together with other solid sheets, they result in shelves for magazines along the entire “leg” of the table - the rack. The main thing when creating such a cardboard miracle with your own hands is to correctly balance the center of gravity so that in the end the asymmetrical table does not fall over.
LeafBed cardboard bed: Spartan furniture
Architectural structures, household items and emergency furniture is back in the spotlight following the earthquake and tsunami in Japan. And many designers in new collections think not only about an interesting concept, aesthetics and appearance, but also consider the model from the point of view of safety, health and benefit requirements.

French designers from NOCC created LeafBed- a patented bed for temporary camps for refugees and victims, made exclusively made of cardboard- material available everywhere in any quantity.

This is a modest sleeping place made from modular cardboard blocks that can be easily assembled with your own hands in the bed at the site of a natural disaster, in a camp, in nature, or immediately after moving to new apartment, while there is no furniture yet. Minimum necessary tools for installation and fastening are included in the kit.

The design of cardboard furniture can be tailored to suit specific needs. So, 4 modules form a bed for adults, 3 modules - a bed for children, 2 modules - for a table, 1 module - for a chair.

The blocks are assembled in such a way that in mode sleeping place the bed bends slightly in the middle rather than at the edges, conforming to the shape of the human body.

In addition, a compartment in each unit allows you to store your belongings.

Wall decor made from cardboard rolls
Cardboard rolls that remain after using paper towels or toilet paper, can be used for original DIY wall decor. From the rolls cut into pieces, you can lay out a floral ornament, a geometric pattern, or even a full-fledged picture on the wall - if only you had enough material, space and imagination!

For such an installation in the form of a flower branch, you will need several rolls of cardboard, scissors, glue, and paints as desired. Lightly press the cardboard roll onto the table with your hands until it takes on an oval shape with pointed tops. Then cut it into equal parts. The greater the width of the parts, the more voluminous the composition will be. You can also experiment with different widths of the pieces, thus giving more volume to certain parts of the installation.

Lay out all the details on the surface and estimate the shape of the future wall decor. Temporarily, it will be convenient to fasten the leaves together with paper clips or clothespins. Having decided on appearance, begin to carefully glue the parts into shapes, and then the shapes into the overall composition. To make the glue adhere better, secure the newly glued surfaces with clothespins.

Oh yes! If you want a colored composition, then you can paint the parts at any stage: either paint the cardboard while still in rolls, or at the cutting stage, or lightly tint the already glued figures.
Search decor ideas in any unnecessary things and trash, because it can turn out to be a very cute composition!

1.
2.
3.
4.
We continue the “Handicraft” section and the “” subsection with the article. Where we will talk a little about cardboard furniture in general and look at examples of its production on video in particular. Following in the footsteps of the article “Handicraft and Reuse” - we reuse cardboard.
Cardboard furniture: patterns and videos - the article is intended to show that there is an alternative modern furniture at inflated prices. Thus, we have previously published articles “Inexpensive do-it-yourself shelf” and “Home design using boxes and drawers,” where we talked about how you can save a lot on shelves. Now it's time for cardboard.
Cardboard (French carton, from Italian cartone, from “ card"paper) is the thickest paper, thicker than sugar and wrapping paper. Cardboard is a material consisting primarily of plant fibers, differing from paper in its greater thickness and weight. square meter. Most experts consider paper with a thickness of more than 0.2 mm or any multi-layer paper to be cardboard.
Well, as we all know, paper is made from cellulose. Consequently, cardboard (as well as furniture made of cardboard) is the same wood. Just less dense.
It is precisely in connection with the density of cardboard that the objection often arises: “Furniture made of cardboard is children's furniture... It is impossible to sit on it... It gets wet...” and so on.
Regarding getting wet, this is not even an objection, it’s just a property of cardboard furniture. Just as a polished cabinet should not be scratched with nails, cardboard furniture should not be wet. So “it gets wet” is just an excuse :) Moreover, if the finished furniture is coated with simple furniture varnish, then no amount of water is scary.
Glued cardboard blanks can be processed no worse than wood or chipboard, so you can create furniture of the most bizarre shapes. And if cardboard furniture is also painted, inlaid with some kind of decor, and covered with acrylic varnish, no one will ever guess what it is made of.

Now about the strength of cardboard furniture. In fact, cardboard furniture is specially designed so that you can sit on it. For this, a very simple principle is used, which has been used in architecture for a long time: a thin and not very strong partition, placed on its edge, is much stronger than if it were placed on its wide side.
You can verify this yourself: take an A4 sheet, fold it like an accordion and bend it in half along the wide part. It is very easy. And then bend it across the short rib. This is several times more difficult than the first option (depending on how tightly you twisted the accordion).
In the manufacture of cardboard furniture, packaging cardboard is used, which can be found in furniture stores, electrical and household appliance stores, and car garages. The thickness of the cardboard, which is measured in layers, plays an important role. The cardboard layer is the little waves that make it up. As a rule, the more such layers, the stronger the cardboard. Depending on the type of furniture and/or part of the model, one-, two- and three-layer cardboard is used in the manufacture of furniture.

By the way, do you know who was the first to think of making furniture out of cardboard? Theater decorators, and after them, toy manufacturers. Then making such furniture became something of a hobby for creative people. And in the 21st century, cardboard furniture is already seriously considered as an alternative to traditional interior items.
Single-layer cardboard is most often used to fill the inner walls of models with rounded, curved shapes; To fill the inner walls of models with straight lines, it is preferable to use two- or three-layer cardboard. Also, darker-colored cardboard is usually more durable than light-colored cardboard. The front side of the cardboard is smoother, on which you can find inscriptions, the back side is less smooth.

The technology for creating furniture from cardboard is very simple.
So, all you need to do is glue sheets of cardboard or blanks cut from it one pattern at a time together until you get a part of the required thickness. Can be used for gluing parts
- PVA construction adhesive,
- wallpaper glue,
- glue "Moment"
- hot glue gun,
- double sided tape
- wood glue,
- glue for Dragon tiles (more information about this glue and gluing features can be found in the article “Ceiling tiles: how to glue optimally?”).
To cut cardboard, instead of a stationery knife, you can use a jigsaw (the simplest model with blades for cutting metal). Its use saves time and results in clearer shapes, since several layers of cardboard can be cut at a time, having previously secured them with paper tape. Using a jigsaw, do not try to cut out the shape in one go, it is better to bring the line to the corner, move the jigsaw and continue cutting, taking it a little further from the corner. Then trim the remaining corners with a cutting knife.

Important nuance: in the event that you need to bend some part without cutting it, IT’S BETTER NOT to bend it just like that, in real life. It will be much more accurate and easier to bend the cardboard if you use a ruler and a knife to make an incision on the side from which the fold will go.
After gluing, it is advisable to keep multi-layer parts under pressure for several hours, or even better, for 24 hours. Then you won’t have to complain about the lack of strength in finished products.

It is very important to take into account the direction of the “waves” of the cardboard; the strength of the furniture depends on this. Usually, when duplicating the walls of a piece of furniture (consists of two identical parts glued together), the first is “cut out” on cardboard, where the layers (waves) are directed vertically, the second, on the contrary, where the layers are horizontal.
The second way to attach parts to each other is using grooves. In this case, you don't even need glue. Needed:
- stationery knife for cutting paper (change blades regularly to ensure clean cutting quality)
- metal ruler 50-100 m cm, where the “zero” line is equal to the beginning of the ruler (if the ruler is wooden, then the stationery knife will cut it and bend it)
- pencil, eraser, brushes (for glue, if he uses)
- sandpaper for sanding cuts
- protective tape, paper for gluing the “ribs” and a damp sponge
- parquet varnish to make furniture waterproof
Well, a proven pattern for future furniture. By the way, if you are planning to make furniture from your own pattern (or are simply planning to make cardboard furniture for the first time), then you can first make a mini-layout to check what will fit together. And then move on to the real size.

The most simple furniture made of cardboard is solid furniture where there are no gaps between sheets of cardboard; the sheets are glued to each other. The procedure for making such “monolithic” furniture is very simple:
- Take a piece of cardboard and draw a template of furniture (such as chairs and footstools). The forms can be absolutely any.
- Cut out the templates using a utility knife. You will need about 50 of these pieces for the chair and a little less for the footrest. The number of parts depends on the width of the chair you want.
- Glue the cut out parts together with PVA glue and assemble into blocks of 5 pieces. When ten blocks are ready, start gluing them together. Do the same with the footrest.
- To improve the adhesion of surfaces, press the entire structure with something heavy and leave to dry for a day.
- Once the glue has dried, drape the chair and stand with fabric and secure the fabric with a furniture stapler or tacks.
The big advantage of solid cardboard furniture is that it can be of absolutely any shape. Paper will endure anything :)
The second option is cardboard furniture, which saves a lot of effort and time (because cutting and gluing 50 pieces of cardboard is not a one-day job). This typesetting way. Due to the nuance here, this method is not so easy to apply. So, in this case it is necessary to have a calculated and tested pattern.
As an example, let’s look at the technology for creating a chair from cardboard using this method. Lesson - on video:
KRXOlnTgbY
As you can see, everything is simple, easy and relatively fast.
In the next video you can clearly see patterns for cardboard furniture:
43Q-IzrjxZc
If you noticed, this video uses very thick cardboard. Which can be a challenge to find. But it’s not a problem to glue such cardboard together - the component parts can be glued together, and no one forbade this :)
Now we offer you a more complex model of cardboard furniture: a video on how to make a small corner table for a TV:
bfcrXLoWiRc
You may have noticed that this table did not remain so rough and cardboard in color. He became beautiful and red :) And this means that the last operation was performed on him, which is preferably carried out with furniture made of cardboard.
So, a little more about what can be done with the surface of finished cardboard furniture. There is a lot that can be done. Almost everything that we came across in the “Handicraft” section can be used to decorate finished cardboard furniture.

So, this is decoupage of furniture, and, and, and - whatever your heart desires. However, it is recommended to take one step first - apply primer to cardboard. That is, paint the finished product with the most ordinary acrylic paint. In this case, the color of the cardboard will not show through the decor layer. So, there are many techniques that allow you to give cardboard furniture the most attractive look.
For example, one more nuance: craftsmen came to the conclusion that before priming the finished product must first be covered with Kraft paper - this is the name of the wrapping material, the raw material for which is long-fiber sulfate cellulose. Kraft paper is traditionally colored light brown, but white is preferred for home furniture. You can use paper tape to secure the paper and trim the edges of the cardboard.

By the way, if you continue to be concerned about the strength of cardboard furniture, you can use the same patterns to make furniture from fiberboard, chipboard, plastic, and basically anything. True, it will be a little more expensive...
As you have seen, furniture made from cardboard is very simple, and there are tons of videos and patterns for making it.

Based on materials from http://www.liveinternet.ru/users/irma2/post159417854/
This article is for those who cannot fight the creative impulses bursting through them. Yes, what kind of furniture is there to order, here are your hands, there are boxes, there are drawers, go ahead! Express yourself!
Cardboard furniture- a new trend in the recycling movement, that is, in turning unnecessary things into necessary ones. Craftsmen from all over the world make full-fledged furniture from ordinary cardboard boxes, and today we will look at which one.
I am sure that the question has repeatedly occurred to you about how you can use cardboard boxes, especially for equipment such as refrigerators and televisions. They are so new, beautiful, durable. It's a shame to throw it away! A little, just a little work - and you will get excellent cardboard furniture.

____________
Furniture made of cardboard looks exactly like ordinary furniture - for example, in the photo on the right you see a rack made of ordinary cardboard boxes, inserted one into the other, pasted at the ends with paper tape and painted with waterproof paint in White color. This rack cost the owners a lot liter jar paints, but it looks very decent. As you can see, if you paint the cardboard well, the furniture becomes completely water-repellent and you can place as many vases with flowers as you like.

Please note in the photo above and the photo on the left that this cardboard furniture is easy to disassemble - the boxes are not glued, but connected with plastic clips, like those used in street cafes, so that the wind does not blow the tablecloths off the tables.
You probably have doubts that cardboard furniture is strong enough. I had them too. But I was convinced that if you take two equipment boxes (one slightly smaller than the other) made of thick corrugated cardboard and insert one box into the other, the resulting “double” box turns out to be a completely rigid structure.

Furniture made of cardboard is not intended for heavy loads, but it is quite possible to put books or accessories into it, as in the photo on the right. As you can see in the photo, cardboard does not bend under the weight of books, and cardboard furniture looks like a full-fledged store-bought shelf.
Of course, you need to make furniture out of cardboard carefully - carefully cut off the “closures” of the boxes, insert one box into another, if necessary, if the smaller box is too small and there is empty space between its walls and the walls of the larger box, fill this space with other sheets of cardboard . Trim the boxes so that their cut (the ends of the “shelves”) is even. Glue this cut with paper tape (you can putty it first so that it has a flat surface). Sand the area where the tape and cardboard meet. And paint it carefully.
However, you don’t have to paint cardboard furniture, but cover it with leftover wallpaper:


Cardboard furniture can be upholstered inside with a beautiful fabric, as in the photo on the left, and then all sorts of accessories can be attached to this fabric with pins - photos, notes, reminders, etc. In the photo on the left, however, it’s not furniture made of cardboard, but furniture made of wine boxes, but the essence is the same.
To upholster cardboard furniture with fabric, use regular pushpins, pressing the fabric well with them.

By collecting many cardboard boxes together and painting them different colors, you will receive excellent furniture for the nursery. Such cardboard furniture can really help you out during the period between moving and final renovation.
Such an improvised rack will include a lot of children's things, and it will cost you about 500 rubles (a can of white paint and several colors).
But it is especially important in cardboard furniture that the baby himself can participate in its production, and this will be very good.

If you are going to make furniture from cardboard not for reasons of economy, but for creative reasons, use different colors, fabrics, wallpaper remnants, pieces of self-adhesive film, etc. A colorful combination can be very beautiful if you choose the colors carefully!
Cardboard furniture, as I mentioned above, - perfect solution for children's. Firstly, it is very cheap, so you can relax about its damage. Secondly, you can make it any way you want, and this stimulates your and your child’s imagination.


It's hard to believe, but the table in the photo on the left is also made of cardboard. Cardboard boxes re-inserted one inside the other. They are glued together and covered with self-adhesive wood-like film. I don’t quite understand what acts as a tabletop - perhaps a chipboard, or maybe also several layers of cardboard.

Cardboard furniture has become so popular in the West that a company has appeared in Australia that produces it on an industrial scale. In the photo on the right is a table made of cardboard, made entirely from recycled materials, that is, cardboard boxes that no one needs. All cardboard furniture is very durable and can be used as regular furniture.
To make it easier to see that the furniture is made of cardboard, the manufacturer does not paint it.


______________________

Well, in order not to get up twice, in this article I’ll tell you more about furniture made from boxes, which are used by retail chains for transporting and storing products.
In the West, everyone is simply crazy about such furniture, and on sites that tell how to make furniture from cardboard or from boxes, they even write: “If you are lucky enough to find boxes of fruit or wine...” Why lucky - because retailers , as a rule, treat their property very carefully and try to squeeze the maximum possible out of the container; boxes are used until they are completely worn out, so finding boxes in good condition is not easy.
But sometimes you can receive them as a gift when purchasing wine in large quantities.
And then the Europeans, who got their hands on creativity, are completely delighted and make either the same racks as the cardboard furniture in the photo above, or other interesting things.


It is considered especially chic not to paint the boxes, but to leave them in their original form - with all the scratches, stamps of the former owner and stains. The boxes are only sanded to avoid splinters, but their appearance remains the same.


It comes to the point that famous designers, creating interiors in an ecological style, make custom-made furniture that imitates furniture from boxes, as in the photo above.

It is very fashionable to screw wheels to the box and get a doll crib, as in the photo on the right, a mobile bedside table or a flower box, as in the photo below.
It is clear that such a box on wheels can have many uses - for example, you can make a serving table this way if you place the boxes on their sides.


Furniture made from boxes can be almost anything - for example, someone made both a coffee table and a shelving unit from identical boxes for their living room, painting them with white paint.
It’s a bit rude for my taste, but it’s obvious that this is exactly the effect the owner was trying to achieve. In general, this is such an uneven, rough coloring or complete absence the one in the photo above is now in great fashion.

It's funny, but you can even make furniture from plastic boxes that are used to transport bottles, as in the photo on the right. Attach legs on the bottom and a pillow on top, and now you have a wonderful funny ottoman. Of course, it will not suit every interior.

You probably noticed in all the photos in this article that furniture made of cardboard and boxes is not universal - it is suitable only for interiors with a high degree of humor, built on the owners’ disregard for everything expensive and glamorous and on their love for everything funny and homemade.
For example, one Spaniard made this bedside table from two plywood boxes, screwing an old shelf onto them on top and painting it himself with acrylic paint. Nothing special, but the manufacturing process itself brings pleasure. Plus, it doesn’t cost anything, but it’s still pleasing to the eye.

Excellent wall shelves can be made from plywood or wooden boxes. It's very simple - cut the box, sand it and cover it with varnish or paint to your liking. Pastoral, sweet, funny.
________________


See what utensil boxes can be made from plywood fruit boxes:

