Every craftsman should know how to bend plywood if he is to sheath curved structures and decorative elements with it. It is necessary to study the basic rules so that the material does not break when bent. The main difficulties lie in the wood structure and individual characteristics of the slab.
More information about the material
Before bending plywood with your own hands, you need to familiarize yourself with such products in more detail. The product is a wood board obtained by gluing fragments of prepared veneer. To improve the strength properties, the fibers are positioned so that they are perpendicular to each other.
As for the number of layers, it may vary. Most often, sheets consist of an odd number of veneer layers. It is easiest to work with thin slabs, but their scope of application is limited to decorative functions. To construct arches or form volumetric structures of a round type, in any case, thick sheets will be required, which are quite problematic to bend.

The process of soaking elements
Craftsmen who are thinking about how to bend plywood at home without unnecessary difficulties can offer this option. It involves holding the sheets over a tank of boiling water or placing them directly into a liquid medium. Soaking time will depend on the type of product as well as its thickness.
The method of keeping slabs in water is more accessible and safe, so it is proposed to consider it in detail. However, when carrying out work, high-quality plywood must be used. Bad sheets can quickly delaminate. Before starting soaking, it is advisable to lower a small piece of material into a container of water. If nothing happened to it, then you can dip whole fragments.
Step by step actions will look like this:
- Blank required sizes placed in water for a certain time. You can understand that the product is ready for further transformations by carrying out regular monitoring. The slab will become pliable.
- Soaking stops when the desired flexibility is achieved. The sheet itself is moved to a convenient place for work.
- The workpiece is bent and fixed with screws in a certain position until it dries completely.

IN living conditions It is recommended to combine humidification with steaming. With this option, only the outer layer is saturated with water. The bend area is treated with steam. It is best to bend the sheets along the wood fibers, then you will be able to achieve the maximum effect.
Making frequent cuts along the bend
If the question is how to bend thick plywood, then in an effective way there will be the creation of numerous recesses in in the right place. To create the cuts you will need a cutter. With its help, special stripes are made in a certain area of the wood board.
When working, do not make deep cuts. They should reach a maximum of half the thickness of the sheet. The veneer layer located on the opposite side must not be damaged. Modern boats are often made from slabs rounded using this technology.
So, how to bend plywood by making cuts in it, step by step:
- Frequent incisions are made in a specific location.
- The workpiece is given the desired shape by fixing it in the required position.
- Thick veneer is glued using PVA or epoxy resin.
- After about 24 hours, the fasteners are removed.

The cuts are best placed on the inside. When gluing veneer over them, voids are formed. If the manufactured structure is used carelessly, cracks may appear.
Method for gluing thin sheets
Before bending a thick sheet of plywood, you should consider using multiple boards. You can glue a number of fragments together, since bending them separately is much easier. However, when using low-quality glue, problems may arise with delamination of the product already at initial stage operation.
First, solid sheets are cut to obtain blanks suitable sizes. All fragments are bent by hand and fixed to each other using epoxy glue. To avoid deformation changes, clamps must be used.
The final part is wiped off from the dried glue. Possible defects are removed from its surface. The last stage is sanding.
Some nuances
The above information makes it clear how to bend plywood in different ways. For achievement best result It is advisable to familiarize yourself with some subtleties:
- When soaking, it is allowed to bend the slabs only in a state elevated temperature, otherwise cracks may appear;
- elements that will be given a curved shape should be stored in rooms with a stable level of humidity;
- If the purchased material is expensive, you can use the services of specialized companies.

Before bending plywood 10 mm or more, you need to decide on the method to be used. The option should be selected depending on the angle of the break. As for products of smaller thickness, they are bent only by soaking with water or steam.
Humidification timing chart
To determine the number of minutes required to soak the material at temperature conditions 95 degrees along the fibers, you can use the data presented.
Number of layers | Thickness in millimeters | Time, min. |
Advantages of using bent plywood
The above methods allow you to give wood boards smoothness of forms. In this case, arches, furniture and other decorative elements are aesthetically attractive and mechanically resistant. Curvilinear surfaces make it possible to:
- keep the number of angles to a minimum, thereby significantly reducing the risk of injury;
- give the interior sophistication, because the eyes are more interested in smooth transitions;
- reduce the number of fasteners.
Plywood sheets are indeed an excellent material for carrying out finishing works and furniture production. The ability to create curves opens up interesting design possibilities. When using bent shapes, stylish products and designs are obtained.
About choosing a method
Knowing how to bend plywood in three main ways, each master must decide on one of them. Each of the options is not universal; it is relevant in a particular situation.
Even the soaking process is not suitable for all cases. It cannot be used to make too strong bends, and it also takes a lot of time, especially if the thickness of the material is quite high.

The method of creating grooves for sheet compliance is not universal. It is not suitable for thin plywood. Typically, a bend is made if the thickness of the slab is at least 2 cm. As for the gluing technology, it can be considered the more universal of all of the above. However, it does not make sense to use it for thin sheets. It’s easier to bend them immediately using the soaking method.
Final part
Some companies manufacture products directly according to customer drawings, so if you wish, you can contact them to avoid unnecessary problems. They produce High Quality with different bending radii.
Bend, Distort and Warp in Photoshop
Sofia Skrylina, teacher of information technology, St. Petersburg
You can deform fragments and objects in Photoshop using both the Edit menu commands and the use of filters. Most of the filters used for deformation are included in the Distortion group, and in addition, three filters - Distortion Correction, Plasticity and Perspective Correction - are located separately. All these tools will be discussed in this article. It should also be noted that Photoshop offers a special tool for warping text, which we will also look at.
Menu commands Editing
If you expand the menu Editing(Edit) and then select the submenu Transformation(Transform), you will see a list of commands that allow you to transform a fragment of an image. Let's list them: Scaling(Scale), Turn(Rotate) Incline(Skew) Distortion(Distort), Perspective(Perspective) and Deformation(Warp). However, access to these commands can be obtained much faster - through the free transformation mode, which is entered by the key combination Ctrl + T (in Mac OS - Command + T), and exited by the Enter key (in Mac OS - Return). To enable a particular command, use the following techniques:
- To scale a fragment, move the mouse pointer over one of the markers of the resulting transformation frame and hold the mouse down with the button pressed. The Shift key allows you to maintain the proportions of the fragment, and Alt scales from the center.
- If you move the mouse pointer to any vertex of the transformation frame, it will take the form of a curved arrow, moving which causes the fragment to rotate. Before rotating a fragment, you can shift the center of rotation - to do this, you need to move the central frame marker to the required place. So, in Fig. 1 rotation is carried out relative to the top left vertex of the transformation frame. The Shift key allows you to rotate by an angle that is a multiple of 15°.
To tilt, you need to move the middle or corner marker of the transformation frame border while holding down two keys - Ctrl and Alt (in Mac OS - Command and Option).


To add a perspective effect in Free Transform mode, drag the top or bottom corner handle by pressing the key combination Shift+Alt+Ctrl (on Mac OS - Shift+Option+Command) - fig. 2.
Activate command Distortion(Distort) from the free transformation mode is enabled by the Ctrl key (in Mac OS - Command) - fig. 3.

Fragment deformation
As a result of choosing a command Editing(Edit) -> Transformation(Transform) -> Deformation(Warp) a mesh is superimposed on the fragment, the editing of which is performed by changing the position of the nodes and the angle of inclination of the guides (Fig. 4).
To apply the changes and exit this command, press Enter (Return on Mac OS).

Content Aware Scale
Content-aware scaling allows you to resize an image or portion of an image without affecting people, buildings, animals, etc. With normal scaling (command Free transformation- Free Transform) all pixels are treated equally, and content-aware scaling mainly affects background and background pixels. Moreover, this scaling allows you to protect the selected area or areas containing colors close to skin tones from transformation. So, in Fig. 5 A the original image of a cow is presented, and in Fig. 5 b— the result of normal scaling. As you can see, the image of the cow has been flattened along with the background - the choice of command was unsuccessful.


Rice. 5. Original photograph of a cow (a); the result of applying the Free Transform command (b); the result of using the Content Aware Scale command without presetting the tool (c); result of using the Content Aware Scale command with selection protection (d)
In Fig. 5 V And G the result of using the command is presented Content Aware Scale(Content-aware scaling). In Fig. 5 V the command was executed without preliminary settings, and in Fig. 5 G The cow image was protected from scaling.
To protect a fragment, you need to create a selection, save it as an alpha channel, and then, before scaling, select the name of the alpha channel from the list in the tool properties panel Protect(Protect) - fig. 6.
To protect against scaling of pixels whose color is close to skin tones, use the button with the image of a person in the properties panel. The result of this button is shown in Fig. 7 b.

Puppet deformation
Puppet warp mode was introduced in Photoshop CS5. This amazing tool allows you to deform certain parts of an image without affecting other parts of it. In puppet deformation mode, a mesh is applied to the object, editing which leads to deformation of the fragment. But, unlike the team Deformation(Warp), puppet warping transforms an object not using mesh nodes and guides, but using pins.
Pins are indicated by bold yellow dots, which can be moved and the grid rotated relative to them. Moreover, the pins perform a dual role: protecting a fragment of the image and, conversely, deforming it. For deformation, active pins are used, which are marked with a black dot in the center, and inactive pins fix part of the image in place.
Let's look at the basic actions with pins:
1. Adding a pin is done by simply clicking the mouse in puppet warp mode.
Note. To enter this mode, run the command Editing -> Puppet Warp to exit the mode - press the Enter key (in Mac OS - Return) or the button on the property bar.
2. Clicking on the created pin selects it, causing a black dot to appear in its center.
Note. To select multiple pins, click on them while holding down the Shift key.
3. To move a pin, you first need to select it and then drag it while holding down the mouse button (Fig. 8).


4. To rotate the mesh around a pin, you must activate the pin, and then do one of the following:
- To rotate manually, you need to move the mouse pointer to the pin while holding down the Alt key (on Mac OS - Option). When a circle with a curved arrow appears, drag the mouse while holding down the button (Fig. 9);
- to rotate the mesh by a given angle, you need to go to the properties panel from the list Turn(Rotate) select item Auto(Auto), and enter the required value in the adjacent field.
5. If part of the grid overlaps, you can change its position - two buttons are used for this Depth(Pin Depth) located on the properties panel.
6. To remove a pin, use any of the following methods:
In addition to working with pins, the properties panel allows you to adjust the elasticity, frequency, and coverage area of the mesh. It is also possible to show it or turn it off:
- parameter Mode(Mode) - determines the elasticity of the mesh. In most cases the value is used Normal(Normal) - fig. 10;
- parameter Frequency(Density) - is responsible for the distance between grid nodes, the value is mainly used Normal(Normal);
- parameter Extension(Expansion) - is responsible for the coverage area of the mesh: the larger this value, the larger the outer edge of the mesh (Fig. 11). The default is 2 pixels;
- checkbox Net(Show Mesh) - displays or removes the mesh.
With puppet deformation, you can easily rotate an arm or leg (Fig. 12 A), bend a straight line into a circle or into some number, for example, eight or nine (Fig. 12 b).
Puppet warping can be applied to layers, vector shapes, text, layer masks, and vector masks. If you need to deform an object, you must first place it on a new layer.


Rice. 12. Examples of using puppet deformation: a — stand on the bridge, b — bend the St. George’s ribbon into a nine
Group filters Distortion
Almost all group filters Distortion(Distort) produce geometric distortions, creating three-dimensional or other shape-changing effects. Let's name some of them:
- Diffuse glow(Diffuse Glow) - adds color to the image with glow and noise;
- Ocean waves(Ocean Ripple) Ripple(Ripple) and Wave(Wave) - used to simulate ripples and waves on water;
- Twisting(Twirl) and Zigzag(Zig Zag) - used to create circles on water or a swirling effect (Fig. 13);
- Bias(Displace) - deforms the image based on the displacement map, which is an alpha channel saved in PSD format;
- Glass(Glass) - creates the impression that there is glass on top of the image, the pattern and structure of which can be adjusted in this filter;
- Curvature(Shear) - allows you to bend the image along the curve that is drawn in the preview area. In some cases, this filter can be replaced with the command Editing(Edit) -> Deformation(Wrap).
Only three filters from this group can be applied using the filter gallery: Diffuse glow(Diffuse Glow) Glass(Glass) and Ocean waves(Ocean Ripple).


Rice. 13. Examples of using the Zigzag filter from the Distortion group: a - for drawing circles on the water, b - for curling the edges of the frame
Distortion correction
Filter Distortion correction(Lens Correction) is designed to correct defects created by the lens when shooting. This can include barrel and pincushion distortion,
Vignetting or chromatic aberration.
Filter(Filter) -> Distortion correction(Lens Correction).
In the preview area, you can overlay a grid on the image by clicking Moving the grid(Move Grid) - it is enabled by default. With its help, correction results can be easily tracked. The filter also has tools Hand(Hand) and Scale(Zoom) to scroll and zoom the image. Correction can be performed with two tools:
Adjustment of chromatic aberration, vignetting and perspective occurs on the tab Custom(Custom) using the appropriate sliders.
In Fig. Figure 14 shows an example of correcting barrel distortion resulting from shooting a book cover at a very close distance.


Rice. 14. Examples of using the Distortion Correction filter to correct barrel distortion: a - original image, b - correction result
Correcting perspective
Filter Correcting perspective Vanishing Point is used to correct perspective planes in an image, such as the side walls of buildings, floors, roofs, or any other rectangular objects. In this filter, you should construct planes that coincide with the image planes, and then start editing them: drawing, cloning, pasting from the texture clipboard, or transforming. All elements added to the image are automatically scaled and transformed in accordance with the constructed perspective planes, so the result of the correction looks very realistic.


Rice. 15. Examples of using the Correct perspective filter to apply a texture and inscription to a box: a - original images of the box and two textures, b - correction result

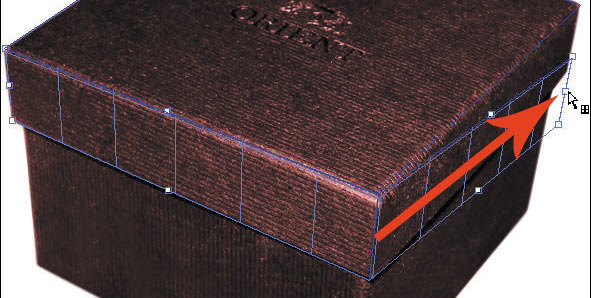

In Fig. Figure 15 shows the original image of the box and the result of applying a texture to all faces of the parallelepiped, resulting in a wrapper effect. As can be seen from the picture, the text of congratulations is also printed on the box and is oriented in accordance with the side edges.
The filter dialog box opens with the command Filter(Filter) -> Correcting perspective(Vanishing Point), on the left side of which the filter tools are located. Let's look at the tools used to create the above effect.
Tool Create plane(Create Plane) creates a plane using four corner nodes. After defining four vertices, the perspective plane becomes active and the bounding box and mesh are displayed, which are usually indicated in blue (Fig. 16 A).
If errors occur when placing corner nodes, the plane becomes invalid and the color of the bounding box and grid lines changes to yellow or red. In this case, the nodes should be moved until the lines turn blue. You can also delete an unsuccessful plane using the Backspace key (in Mac OS - Delete) and create the plane again.
After creating the plane, the tool becomes active Edit plane(Edit Plane), which allows you to edit the position of nodes and the angle of inclination of the plane. The position of the node can be changed by simply dragging the mouse, and a slider can be used to rotate the plane Corner(Angle) in the tool parameters Edit plane(Edit Plane) or the Alt key (on Mac OS - Option). If you hover your mouse over the middle frame edge marker while holding down the Alt key (on Mac OS - Option), the pointer will change to a curved arrow. Moving the mouse will rotate the plane.
If you need to create a new plane, reselect the tool Create plane(Create Plane) and define the four vertices of the future face. To create interconnected planes, after creating the first plane (the mother plane), drag the middle node of the desired frame edge while holding down the Ctrl key (Command on Mac OS). As a result, a child plane will appear (Fig. 16 b). If the plane being created goes to the side and does not coincide with the edge of the image, change the angle of inclination for it.
Note. Editing corner nodes of the mother and child planes is impossible!
Once the perspective planes have been created and their nodes edited, you can begin applying texture. Therefore, you need to exit the filter window for a while, confirming all your changes with the Ok button. In Fig. 16 V five created planes are presented, which will later be used to apply texture.
It is better to place the texture for each face on a separate layer to make it more convenient to edit the result in the future. In our case, we have two pairs of connected planes (the side faces of the lid and the box itself) and one plane located on the top edge of the lid. Therefore we will need three new layers.
You need to copy the texture image to the clipboard, select an empty layer in the palette Layers(Layers) and open the filter dialog Correcting perspective(Vanishing Point), and then select with the tool Region(Marquee) the desired plane and paste a fragment from the clipboard. When you move the mouse pointer, the texture will automatically fit into the plane. After applying the texture to each face, remember to exit the filter dialog box with the changes applied, otherwise all the textures will be located on the same layer. In Fig. 17 shows the result of applying textures to the edges of the box, as well as the palette Layers(Layers).


To place text on the side surface of the box, you need to create a text layer in the current or new document, copy it to the clipboard, and then paste it in the filter window onto a previously selected plane.
Filter Plastic
Filter Plastic(Liquify) allows you to distort individual areas of the image: shift, move, rotate, reflect, bulge and wrinkle pixels. It is used to create caricatures, retouch and correct photographs, and perform artistic effects.
The filter dialog box is called by the command Filter(Filter) -> Plastic(Liquify). All tools are located on the left side of the window, and their settings are made on the right side.
In Fig. 18 shows an example of using a filter Plastic(Liquify) to create a puppet effect.
Eye enlargement performed using an instrument Bloating(Bloat). To treat each eye, you need to use a fairly large brush, the size of which should exceed the size of the eye (Fig. 19).

It is better to set the brush speed quite low - in the example we used a value of 30. You should perform several mouse clicks in different places of the eye, while maintaining its round shape.
Instruments were used to make the mouth smaller Wrinkling(Pucker) and Deformation(Forward). Puckering is applied to the corners of the mouth, with a few clicks made on each of them. To narrow your mouth even further, you need to move the corners of your mouth towards each other with a tool Deformation(Forward) - fig. 20.
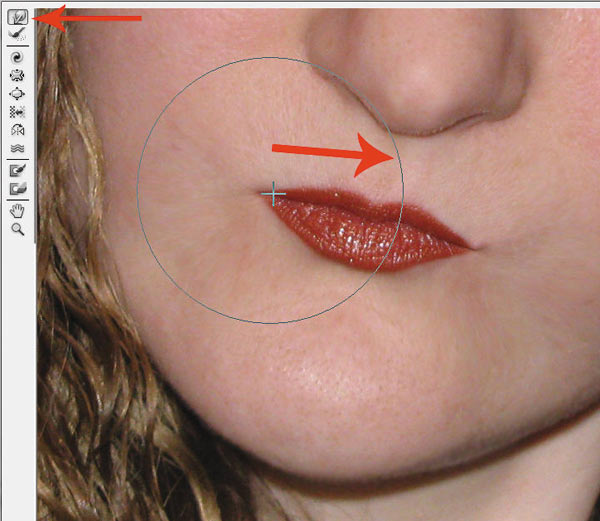
The same tools used to make the mouth smaller are used to narrow the nose. As you work, you may need to reduce the brush size for more detailed processing. A tool was used to sharpen the chin Deformation(Forward).
To complete the effect, the whites, pupil and iris of the eyes were processed with instruments Dimmer(Burn) and Clarifier(Dodge), and also made color correction of the image in the dialog box Hue/Saturation(Hue/Saturation).
In addition to creating caricatures, the listed tools are often used to correct photographs. So, in Fig. Figure 21 shows an example of correcting a portrait of a man.


Rice. 22. The process of portrait correction with the Deformation tool: a — reduction of the earlobe; b - lower lip tightening
Tool Deformation(Forward) the following fragments were processed:
- earlobes - to make them smaller and closer to the head (Fig. 22 A);
- lower lip - to change its shape (Fig. 22 b).
Tool Wrinkling(Pucker) other fragments were processed:
In addition to the correction filter Plastic Can be used to create various artistic effects. In Fig. Figure 24 shows the result of processing lily petals with a tool Twisting(Twirl). By default, rotation is clockwise; to rotate in the opposite direction, you need to hold down the Alt key (in Mac OS - Option). Stamens and pistil are processed with a tool Bloating(Bloat).


Rice. 23. The process of correcting a portrait with the Wrinkling tool: a - reducing a mole; b - reduction of bags under the eyes, the protected area is indicated in red

Warp text
To bend text, a special function is used, which is called by clicking on the button Deformed text(Warp Text), located on the tool's properties panel Horizontal text(Horizontal Type). The convenience of this function is that it does not rasterize the text, allowing you to edit it after deformation. Moreover, all settings are saved and can be changed as many times as you like.
In the tool settings, you can select the distortion style and set the magnitude of the effect vertically and horizontally. So, in Fig. 25 style was used to deform the text Flag(Flag).

We haven't covered everything Photoshop tools to perform various types of deformations. Behind the scenes there are many tools of the 3D group. But the examples given show that the capabilities of Photoshop are indeed very diverse.
If there is a need to create a curved wooden element, then most likely you will encounter a number of difficulties. It may seem easier to cut the required component in a curved form, but in this case the wood fibers will be cut and weaken the strength of the part. In addition, the execution results in a fairly large waste of material.
Stages of performing work on bending boards at home:
| Preparation. Choice suitable variety trees and familiarization with general principles work with him. | |
 |
Wood bending options. Heating in a steam box, chemical impregnation, delamination, cutting. |
Wood is cellulose fibers bound together by lignin. The straight arrangement of the fibers affects the flexibility of the wood material.
Tip: reliable and durable wood material for creating various products This can only happen if the wood is well dried. However, changing the shape of a dry piece of wood is a rather difficult process, since dry wood can easily break.

Having studied the technology of bending wood, including its main physical properties of wood, which allow you to change its shape, it is quite possible to perform bending wooden material at home.
Features of working with wood
Bending of a wooden material is accompanied by its deformation, stretching of the outer layers and compression of the inner ones. It happens that the tensile force leads to rupture of the outer fibers. This can be prevented by pre-hydrothermal treatment.
You can bend blanks of timber made of laminated wood and solid wood. In addition, peeled and sliced veneer is used to give the required shape. The most plastic is hardwood. Which includes beech, birch, hornbeam, ash, maple, oak, linden, poplar and alder. Glued bent blanks are best made from birch veneer. It should be noted that in the total volume of such blanks, about 60% falls on birch veneer.

According to the technology for manufacturing bent wood, when the workpiece is steamed, its ability to compress significantly increases, namely by a third, while the ability to stretch increases by only a few percent. Therefore, you cannot even think about bending wood thicker than 2 cm.
How to bend a board at home: heating in a steam box
First you need to prepare a steam box, which can be done by yourself. Its main task is to hold the tree that needs to be bent. It must have a hole for steam to escape. Otherwise, an explosion may occur under pressure.

This hole should be in the bottom of the box. In addition, the box must have a removable lid through which the bent wood can be removed after it has received the desired shape. In order to hold the bent wood workpiece in the required shape, it is necessary to use special clamps. You can make them yourself from wood or purchase them at a hardware store.
Several round scraps are made from wood. Holes are drilled in them, offset from the center. After that, you should push the bolts through them, and then drill another one through the sides in order to push them in tightly. Such simple crafts can perfectly serve as clamps.

Now you can start steaming the wood. To do this, you need to close the wooden piece in a steam box and take care of the heat source. For every 2.5 cm of product thickness, the time spent on steaming is about an hour. After its expiration, the tree should be removed from the box and given the required shape by bending it. The process should be carried out very quickly, and the bending itself should be gentle and careful.
Tip: due to different degrees of elasticity, some types of wood will bend more easily than others. Different ways require the application of varying amounts of force.
As soon as the desired result is achieved, the bent workpiece must be fixed in this position. Fastening the tree is possible during the process of forming its new shape, due to which it will become much easier to control the process.How to bend a board at home using chemical impregnation
Since lignin is responsible for the durability of wood, its bonds with the fibers must be broken. This can be achieved chemically, and it is quite possible to do this at home. Ammonia is best suited for such purposes. The workpiece is soaked in a 25% aqueous ammonia solution, which significantly increases its elasticity. This will make it possible to bend, twist it, or squeeze out any relief shapes under pressure.

Tip: Please note that ammonia is dangerous! Therefore, when working with it, you must strictly adhere to all safety regulations. Soaking of wood should be carried out in a tightly closed container, which is located in a well-ventilated area.
The longer the wood is soaked in an ammonia solution, the more plastic it will become later. After soaking the workpiece and forming its new shape, you should leave it in a similar curved form. This is necessary not only to fix the shape, but also to evaporate ammonia. However, bent wood should be left in a ventilated area. Interestingly, when the ammonia evaporates, the wood fibers will regain the same strength as before, allowing the workpiece to retain its shape!

How to bend a board at home: layering method
First, it is necessary to harvest wood, which will subsequently be subject to bending. It is extremely important that the boards are slightly longer than the length of the required part. This is explained by the fact that the bending tames the lamellas. Before you start cutting, you will need to draw a diagonal straight line with a pencil. This must be done across the bottom side of the workpiece, which will make it possible to maintain their sequence after moving the lamellas.
The boards need to be cut with a straight-layered edge, and not with the right side. This way they can be put together with the least amount of change. A layer of cork is applied to the mold, which will help avoid any unevenness in the shape of the saw and will make it possible to make a more even bend. In addition, the cork will keep the delamination in shape. After this, glue is applied to the upper side of one of the lamellas with a roller.

It is best to use urea-formaldehyde glue, consisting of two parts. He has high level clutch, but takes a long time to dry.
You can also use epoxy resin, but such a composition will be very expensive, and not everyone can afford it. The standard version of wood glue will not work in this case. Although it dries quickly, it is very soft, which in this case is not welcome.

The bentwood product must be placed into the mold as soon as possible. So, another one is placed on the lamella coated with glue. The process must be repeated until the bent workpiece reaches the desired thickness. The boards are fastened together. After the glue has completely dried, you should shorten it to the required length.
How to bend a board at home: cut
The prepared piece of wood must be sawn through. The cuts are calculated at 2/3 of the thickness of the workpiece. They should be located on the inside of the bend. You need to be extremely careful, as rough cuts can not only deform the tree, but even break it completely.
Tip: The key to success when cutting is to keep the distance between cuts as even as possible. Perfect option 1.25 cm.
The cuts are made across the grain of the wood. Then you need to compress the edges of the workpiece, which will allow you to connect the resulting gaps into one whole. This is the shape it gets bent at the end of the work. After that it is corrected.
In most cases outer side processed with veneer, less often with laminate. This action makes it possible to correct the bend and hide almost any defects made during the manufacturing process. Gaps in bent wood are hidden very simply - for this, sawdust and glue are mixed, after which the gaps are filled with the mixture.
Regardless of the bend option, after the workpiece is removed from the mold, the bend will relax a little. In view of this, it should be made a little larger in order to subsequently compensate for this effect. The sawing method is used when bending metal corner or parts of a box.
So, using these recommendations, you can bend a tree with your own hands without any problems.I would like to make a curved on-screen keyboard for Android. I have looked into on-screen keyboard and other other on-screen keyboards in Google code. Nothing I've found is related to the shape of the keyboard, which is anything other than a rectangle. Ideally, I'd like to create a keyboard that consists of keys distributed across two semi-circles on opposite sides of the screen (i.e. imagine holding the tablet sideways and being able to press the keys with your thumbs).
From the code I've looked at, on-screen keyboards are created as views (usually extending KeyboardView) and appear as a continuous bar at the bottom of the screen. As an approximation to my goal, I tried changing the code I found on google code (dotdash-keyboard-) to only draw its keys in the bottom left corner and leave the bottom right corner transparent. I was able to override onMeasure to affect the view dimensions (see below), but this only seems to change the key positions, not the container positions. In other words, there is a black bar at the bottom of the screen.
//Located within KeyboardView @Override public void onMeasure(int widthMeasureSpec, int heightMeasureSpec)( this.setMeasuredDimension(200, 200); )Is this what I want to do, is it even possible? Is there a better term for this? Are there projects I can use as examples?
I've also tried setting the view dimensions using this.setLayoutParams - but those calls seem to have no effect. I've also tried using this.getParent to access the parent view (if it exists) and resize it, but this approach doesn't work (or, I'm just doing it wrong). Any help is welcome.
UPDATE: 12/21/2012 - I think I need to override the onDraw method of the parent class. Here it looks like the KeyboardView's onDraw method draws to a canvas that is equal to the screen size using the following code:
Final int width = Math.max(1, getWidth()); final int height = Math.max(1, getHeight()); mBuffer = Bitmap.createBitmap(width, height, Bitmap.Config.ARGB_8888); mCanvas = new Canvas(mBuffer);
I think I can override onDraw and draw whatever I want on the canvas.
UPDATE: 12/21/2012 - I overridden onDraw and it is now clear that the View is the dimensions I set for it (200x200). Using the Hierarchyview, I can see that the keyboard layout is inside a frame with the id InputArea. Thus, horizontal stripe, filling the entire width, represents that frame. But I don't create it - where does it come from and how can I resize it?
UPDATE: 12/22/2012 - After more testing, it seems that the behavior (dimensions) of the keyboard layout is partly determined by the action that triggers it. In the browser, I get the behavior I described: the browser window's height shrinks to accommodate a bar at the bottom of the screen that holds the keyboard, even if the keyboard's width is smaller than the width of the screen. In the calendar app, the keyboard size appears because I set it (as a square in the bottom left corner), without the calendar changing underneath it. So it is not possible to achieve my goal in most applications using this approach. An alternative approach could be to have the IME service create a popup window or dialog. One problem is that popups require a parent view or anchor to attach to, and I don't think it's possible to find the topmost view from the IME service. Perhaps I can create a transparent view over the current activity and place a popup on top of that?
UPDATE: 12/23/2012 – Progress. I figured out how to display a popup window from the IME keyboard. The next step is to figure out how to make the popups look a little round/organic. Here's a screenshot of what I did, followed by the source.
Source. The following method belongs to the service IME class and is called by the onMeasure method on the child (service) view so that the popups open at the same time as the keyboard. I set the keyboard dimensions to 1x1 so it wouldn't be visible. The log statements will help me figure out how to position the popups.
Public void initiatePopupWindow() ( try ( WindowManager wm = (WindowManager) this.getSystemService(Context.WINDOW_SERVICE); Display display = wm.getDefaultDisplay(); DisplayMetrics dm = new DisplayMetrics(); display.getMetrics(dm); //display .getSize(p); Log.i("dotdashkeyboard","initiatePopupWindow (from IME service)"); LayoutInflater inflater = (LayoutInflater) this.getBaseContext().getSystemService(Context.LAYOUT_INFLATER_SERVICE); View layoutLeft = inflater.inflate( R.layout.popup_layout_left,null); View layoutRight = inflater.inflate(R.layout.popup_layout_right, null); // create a 300px width and 470px height PopupWindow int popupHeight = 300; int popupWidth = 200; if (popUpLeft == null) popUpLeft = new PopupWindow(layoutLeft, popupWidth, popupHeight, false); if (popUpRight == null) popUpRight = new PopupWindow(layoutRight, popupWidth, popupHeight, false); int ypos = 0; int xposRight = 0; if (display .getRotation() == Surface.ROTATION_0) ( ypos = -(dm.heightPixels / 2 + popupHeight/2); xposRight = (dm.widthPixels - popupWidth); Log.i("dotdashkeyboard","test rotation=normal"); ) else if (display.getRotation() == Surface.ROTATION_90) ( ypos = -(dm.heightPixels / 2 + popupHeight/2)/2; xposRight = (dm.widthPixels - popupWidth)*2-popupWidth; Log.i ("dotdashkeyboard","test rotation=90-degrees"); ) else ( Log.i("dotdashkeyboard","test rotation=unknown=" + display.getRotation()); ) popUpLeft.showAtLocation(inputView, Gravity. NO_GRAVITY, 0, ypos); popUpRight.showAtLocation(inputView, Gravity.NO_GRAVITY, xposRight, ypos); Log.i("dotdashkeyboard","test created popup at ypos="+ypos + " xposRight=" + xposRight); Log.i("dotdashkeyboard","test screenWidth=" + dm.widthPixels + " screenHeight=" + dm.heightPixels); Button cancelButton = (Button) layoutLeft.findViewById(R.id.popup_cancel_button); //cancelButton.setOnClickListener(inputView.cancel_button_click_listener); cancelButton.setOnClickListener(cancel_button_click_listener); ) catch (Exception e) ( e.printStackTrace(); ) )
You seem to be on the right track here. As you noted, most activities will shrink their views to provide space for the keyboard window, so if you want the calling activity to fill the screen, you'll need to use an additional window like PopupWindow. You can set the main window dimensions to 0x0.
In this tutorial you'll learn how to create a realistic page curl. You will need several simple techniques deformation. You can create folded corners for paper pages, choose the angle, fold size, and gradient.
Final image
Start by creating a simple rectangle shape, it can also be a square. It is important that the shape is rasterized. Name this layer 'Page'.

Take Pollygonal Lasso Tool (Straight Lasso) and select the bottom right corner of the page, as shown in the image below.

Press Ctrl+J to create a layer from the selection and name it 'Corner'. To make it easier to see, fill this layer with any color.

Go back to the 'Page' layer and hold down the Ctrl key and click on the layer thumbnail to create a selection.

With the selection still active, go back to the 'Corner' layer. Go to menu Edit> Transform> Warp(Edit>Transform>Warp) and distort the corner to create a page fold effect.

To create a realistic fold, drag control points, lines, or an area within the mesh to change the shape of the bounding box and mesh. To help you with the warping process, Photoshop has added 12 control points around the image. To start deforming, drag the bottom right point in the indicated direction.

Now move the indicated control lines as in the figure below.


The result of the deformation should look like below.

Go to the 'Page' layer and repeat the warp again. Make sure the edges of the two pieces of paper create a realistic fold in the page.

Let's add styles for both layers. Let's start with the 'Angle' layer, add Gradient Overlay(Gradient Overlay) and Drop Shadow(Shadow) to create a 3D effect.


The converted angle should look like this:

Go to the 'Page' layer and add Gradient Overlay(Gradient Overlay) to create light and shadow on a piece of paper.

Using styles ( Gradient Overlay(Gradient Overlay), Drop Shadow(Shadow)) you can change the light and shadow according to your paper color, background color, paper corner curl, etc.; To make them look more real, you can add a soft shadow effect. Copy and merge the two layers. Name the resulting layer “Shadow” and add a layer style Drop Shadow(Shadow). Move this layer back.

Below is the result of a realistic page curl made from scratch in Photoshop.