Updated:
 2016-09-10
Despite the variety of materials, plastering walls for painting remains an incredibly popular solution. This is due to the availability of materials, ease of work, and the ability to do the finishing yourself.
Owners of old apartments and houses may encounter certain problems, since practice shows that the evenness and integrity of the walls leaves much to be desired in such buildings.
Putty for subsequent painting cannot be considered a full-fledged plastering job. She serves as finishing, final leveling of surfaces. Therefore, if the walls have defects, differences and unevenness, you will need plaster first. With its help, rough leveling is performed, and then comes the finishing touch.
Kinds
It should be noted that prices for putties start at 250-300 rubles. The cost of wall putty from specialists starts at approximately the same levels per 1m2. However, there are also very expensive options. Not everyone needs this type of putty. For paintable mixtures, the price depends on the manufacturer and the type of putty they offer to consumers. Therefore, it is worth finding out in advance what types of putty exist, what kind costs and how much you will have to purchase it. Don't forget about the putty tool kit.
Today there are four main types of putties.
- Gypsum cement. Sold as a dry mixture, water is required to prepare the solution. Kneading is carried out strictly in accordance with the manufacturer's instructions. Depending on the marking, gypsum cement putty can be used for residential areas (KR and LR) or wet areas (VH).
- Water-dispersed. The basis for production is cement and gypsum, which are mixed at the production base. Instead of water, it is recommended to dilute with water-polymer emulsions. Sold in buckets in the form of a ready-to-use mixture of thick consistency. This putty is more expensive than gypsum cement, but it is easy to apply, you can rub it in with your own hands without any problems, and it allows you to get a perfectly smooth surface. One of the best options when further painting is planned.
- Acrylic. This type of putty creates perfectly smooth surfaces, but low-quality materials cannot be used for painting; they will not adhere well. The combination of acrylic putty and high-quality paint costs quite a lot, but the price is justified by the quality.
- Oil-glue. Old version putty that has frankly outlived its time. You can only paint oil paint over this finish, since the putty contains drying oil, which easily shows through layers of other types of paint.
 We have figured out the composition of putties, and now let’s talk about the procedure finishing works. This is worth knowing, because when purchasing materials you must understand for what purpose you are purchasing putty.
- Universal. The basis is polymer components; the putty is offered in buckets with a ready-to-use mixture. It requires compliance with storage conditions, and otherwise it becomes unusable. Suitable for starting and finishing finishing, creates ideal high-quality surfaces, even if you work with your own hands.
- Starting. It is also commonly called leveling. Apply up to 15 mm thick. You need to choose this type of putty carefully, since there are different types, suitable for different walls.
- Finish. If painting is planned, without finishing putty you can't get by. Its fine-grain structure provides a thin, smooth layer, excellent for DIY grouting. The material is applied gradually, in minimal layers until the surface is perfect.
It is important to note that the cost of the universal one is higher than the others, but it is completely ready for use immediately after purchase. But what and how much putty you should buy - decide and calculate for yourself. Take the appropriate measurements, this can easily be done with your own hands.
Puttying surfaces
As practice shows, most often people who prefer to carry out repairs with their own hands have to deal with plastered or plasterboard surfaces on which putty is applied.
Therefore, we will consider the main nuances of finishing for painting these particular surfaces.
Plasterboard surfaces
 First of all, prepare the putty. To do this, follow the instructions from the manufacturer and do not deviate from the specified standards. If the requirements are not met, this will negatively affect the quality and properties of the material.
Puttying of plasterboard surfaces and walls is carried out in several stages.
- Seal seams and corners of the room, then apply a layer of primer over the entire surface using a roller. You can putty the walls only after the soil has completely dried, which takes about 6 hours. Be sure to make sure that there are no voids left at the joints by skipping.
- As soon as the joints have dried, you can begin the starting layer of putty. It is applied evenly over the entire surface. When dry, it is carefully leveled and sanded if necessary. After that, another layer of primer.
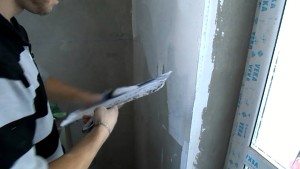
- Once the starter coat is dry, begin the topcoat. Arm yourself with a large spatula and a small one to evenly distribute the material in a thin layer over the wall. Hold the tool at an angle of 25 degrees, press firmly against the surface and distribute the putty. This will allow you to apply a layer of equal thickness over the entire surface. You won’t be able to do everything perfectly with your own hands the first time, but a little practice will allow you to achieve excellent results.
- The last stage is grouting and bringing the surface to perfect condition. Having removed all minor defects, you can begin painting.
Plastered walls
First of all, determine what condition the plaster is in, whether there are serious defects or peeling areas. You need to get rid of all this, seal the cracks, process the recesses. It is not uncommon for plaster to crumble, which leads to the need to completely replace it.
When the plaster on the wall is in good condition, it is treated with antifungal compounds and primed. Then it comes through the putty.
- It is necessary to level the surfaces using starting mixture. This way you will hide all major imperfections, irregularities, and differences. Before painting, the walls must be as smooth as possible, so in some cases you will need to pre-plaster for leveling.
- After waiting for the starting putty to dry completely, proceed to applying the primer.
- It is applied by analogy with work on plasterboard surfaces. Most likely, you will need several layers of finishing composition, each of which must be cleaned and primed.
- At the final stage, the wall is primed for subsequent paint application. Painting plaster walls can be done various compositions. But it is important to choose the appropriate primer that will ensure adhesion between the selected paint and the wall. This way the painted area can retain its attractiveness for a long time. If the paint is acrylic, for example, then the primer should also have an acrylic base.
If you decide to learn how to putty walls for painting with your own hands, video instructions will be very helpful. These are useful lessons from masters demonstrating the intricacies of plastering walls for painting. This way you will be able to understand all the intricacies of how plaster is finished, how to work correctly with concrete surfaces etc. Such skills are never superfluous. This significantly reduces the cost of repairs and saves the family budget.
Despite the diversity finishing materials, painting walls is still relevant. Some are attracted by the simplicity of such finishing, availability of materials and low price, while others are attracted by the opportunity to do everything themselves, without specific construction knowledge. To bring the bases into proper shape, you can use putty on the walls yourself, and this method is suitable for both painting and wallpaper.
When can you get by with putty only?
The question is quite reasonable, especially for owners of old apartments, where the evenness of corners and walls sometimes causes fits of laughter. Putty is relevant in several cases:
- High quality old plaster or minimal voids.
- A slight difference in level.
If both conditions are met, wall putty will bring positive results. If the quality of the old plaster coating is poor (when tapping you find many voids), this option is eliminated. The same applies to large differences in level (over two centimeters).
Puttying the walls for painting is the final stage of leveling the base with your own hands. It cannot perform the functions of full-fledged plaster, since it is intended only for final leveling.
What types of putties are there?

Based on the type of binder, putties can be divided into several groups:
- Gypsum cement.
They are sold in the form of dry mixtures. Dissolve them in water. The kneading technology must be strictly followed. The mixture is poured into water, but not vice versa. They are further divided into three groups, designated by the following markings: KR, LR are used in residential areas, VH in wet areas.
- Water-dispersed.
The base is gypsum and cement, but the mixing is done in a factory. For mixing, not water is used, but a water-polymer emulsion. Sold in buckets and ready to use immediately. They have excellent, uniform viscosity, are easy to rub in with your own hands, are durable, and give a high-quality smooth surface. They are more expensive than dry mixtures. Using these finishing putties on walls will perfectly prepare them for painting.
- Acrylic.
Such putties provide a perfectly smooth surface, but cheap paint does not adhere well to them. For getting good result Buy only high quality products.
- Oil-glue.
An old-fashioned option that is not suitable for modern foundations - brick, concrete, plastered. The drying oil on which it is made is perfectly absorbed, and then easily shows through any paint (the only exception is oil paint), whitewash, and wallpaper.
On a note. You cannot putty concrete walls with this composition if you plan to use them for painting in the future.

Oil-adhesive putty, however, can be successfully used in bathrooms and kitchens, under tiles. It is recommended to treat wooden walls only with this type of putty (wooden shingles); it protects any substrate from rotting and has waterproofing properties.
Types of putties according to the order of work - universal, starting and finishing. And now a little more detail about which ones are needed for what and how to work with them.
- Universal. Produced using polymer binders, sold in buckets (opened and started). But it loses its qualities if stored improperly. It can be used for both starting and finishing puttying. The surface is of very high quality.
- Starting or leveling. It can be applied up to one and a half centimeters thick. You need to select them according to the type of walls. Puttying concrete foundations made with your own hands, for example, with a mixture of Ceresit.
- Finishing putty required if further finishing is thin wallpaper or paint. It has a fine-grained structure and rubs well. Apply in thin layers until the last scratch disappears. If you are planning to decorate a room vinyl wallpaper, panels or tiles, then produce this type no work needed.

To prepare walls for painting, you can use all of the above types of putties. Ready-made universal is more expensive than the other two, but there are no problems with preparation. You just open the bucket, set aside the required amount and go to work. Just don’t forget to close it again, otherwise the composition will begin to dry out and lose its properties.
Manufacturers of putties
The Weber company produces one of the popular putties Betonit. Not the best good option for work, as it adheres weakly to any surface. However, it can be used for painting, but only in dry rooms with stable temperature conditions.
On a note. If you apply a small layer of stronger putty on top of Betonite, you won’t get anything special. In addition, Betonite has poor adhesion to everything except itself. Therefore, it is better to buy another mixture, a little more expensive, but much better at adhering to the walls.
Putties from Knauf are not as economical as Betonit, but they can be used both for painting and for wallpaper. They differ high quality and excellent adhesion. Prominent representatives of the line are Uniflot or Fugagips.
Another manufacturer is Yunis. Its compositions are strikingly white and fit perfectly under painting.
Ceresit produces putties for concrete foundations. This is a German brand, but the products are manufactured in Russia.
Preparing the base
If you decide to do everything yourself, then let's start by preparing the walls. If you plan to hire professionals for putty work, you can also prepare the base yourself. But remember, the price of puttying by professionals is almost equal to plastering work. Therefore, there is a great reason to do everything yourself.

Step 1. Strip off the wallpaper or paint.
Step 2. Tap the old plaster.
Step 3. If there are voids, we knock down the detected areas, clean the walls of dust and prime them. Then you can start working with putty.
Step 4. If there are a lot of voids or the plaster barely holds on, then remove it completely.
Step 5. Clean the walls from dust and dirt, and inspect for oil stains. If you find them, wash them off with solvents.
Step 6. Prime the surface.
On a note. The technology used to putty concrete bases with your own hands includes the mandatory use special primer. It should include quartz sand. After treatment, the concrete becomes rough, which increases adhesion. For smooth concrete walls this best option, allowing the use of putties with a high cement content.
Working with putty
The technology used for final leveling of walls for painting includes two stages - applying a leveling layer (starting putty) and a finishing layer (finishing putty). If you are going to work with a universal composition, then you also work in two stages.
Why will we plaster in two stages just before painting? The answer is simple, this option for decorative wall decoration is the most picky about the quality of the base. If for application decorative plaster, for paneling or tiles If its perfect evenness is not important, this moment is very important for paint. Finishing putty helps make the wall as smooth as an egg.

The technology for leveling walls with putty for painting requires the following simple rules:
- Preparation of starting putty solution.
- Puttying holes, cracks or joints (if we are dealing with drywall).
- Applying a leveling layer.
- 24 hours for the walls to dry.
- Prime and dry again for a few hours.
- Using a carrying lamp, you need to inspect the entire surface of the walls, identify scratches and small holes.
- Preparation of the finishing solution and elimination of remaining defects.
- Smoothing the surface. If no more irregularities are found, then the final layer of finishing putty is applied.
- After it dries, we treat the surface with very fine sandpaper for final sanding.
The technology for making homemade putty is quite simple. Gypsum, chalk and wood glue are combined with your own hands in the following proportions: 1/2/2. First, sift the chalk and plaster, then mix them thoroughly and add them to the container with glue. Mix everything with a construction mixer. But to achieve best result It is better to use either ready-made putty or a dry mixture purchased in a store.
Plastering walls for painting - important stage in repair and construction. It is not needed for laying tiles or decorating panels. But thin wallpaper and paint cannot do without putty work, which will make the walls perfectly smooth, without a single scratch. In the video below you can see how this happens.
One of the simplest and most convenient types of wall decoration is painting. However, this coating only looks good on smooth and even surfaces, so they must be puttied before painting. But how to properly putty walls for painting in order to achieve perfectly level surfaces?
The technology for filling walls for painting differs from finishing surfaces for wallpaper or other types of coatings.
Types of putties
Before starting finishing work, you need to decide what is the best way to putty the walls for painting. To do this, you need to understand what types of this material exist. Conventionally, putties are divided into three types. Starting coarse-grained – designed for the initial leveling of bases with small defects (cracks, depressions, etc.). There is also a finishing fine-grained one and it is used for final leveling and making the surface smooth. You can choose a universal one; it is used for both starting and finishing finishing of bases.

Puttying walls for painting must be done with materials convenient for application, so it is important to choose the right putty composition, which can be:
- oil-adhesive - as a rule, it is made on drying oil, stains from which can appear through the finish. Excellent protection wooden surfaces from rotting, and is also suitable for processing concrete structures in wet utility rooms;
- gypsum cement. It is a dry mixture and therefore requires mixing with water;
- water-dispersed – is a ready-to-use gypsum cement mixture based on a water-polymer solution. It is very easy to apply and sand, suitable for beginners;
- acrylic and polymer - expensive, but very easy to use, perfect for preparing walls for painting, including high-quality painting.
Materials and tools

When thinking about how to properly putty walls for painting, first of all, prepare everything necessary materials and tools for work:
- starting and finishing putty or one universal putty;
- construction mixer for mixing mortar;
- primer;
- roller;
- brush;
- paint tray;
- wide, medium and narrow spatulas;
- mounting knife;
- clean dry rags;
- fine-grained sandpaper;
- abrasive mesh;
- rule;
- big lantern.
Putty stages
The technology for plastering walls for painting begins with preparing the base, and for this you need to perform the following procedure:
- remove old wallpaper or paint;
- tap the plaster on the wall;
- if voids are detected, it is necessary to knock down such detected areas;
- clean the walls from dust;
- prime.
- applying starting putty to level the layer;
- finishing with finishing putty;
- padding.
If you plan to work with a universal composition, then it must also be applied in two stages.
Puttying concrete walls for painting requires the following rules:
- preparing a starting putty solution, if you have chosen dry material;
- filling of holes, small cracks;
- applying a leveling layer;
- 24 hours are given for surfaces to dry;
- priming and drying again for several hours;
- adjusting lighting using a large flashlight or other light source;
- preparing the finishing solution and applying it to eliminate remaining defects;
- after it has dried, it is necessary to treat the surface with fine-grained sandpaper for final sanding;
- cleaning walls from dust formed after sanding;
- applying the final coat of primer.

Painting walls after puttying using this technology will be a pleasure, since your walls will become perfectly smooth, without unevenness or scratches. In addition, by following these rules, you will not have to make repairs in the next ten years, and if you want to refresh the interior, you will only need to paint the walls a different color.
The technology of continuous puttying of walls for high-quality painting is practically no different from preparing surfaces for conventional paint. The difference is that to perform these jobs you need to use polymer materials, characterized by high quality, and after each layer of putty it is necessary to grind.
Puttying drywall
Puttying plasterboard walls for painting is slightly different from finishing concrete and other bases and is performed in the following order:
- applied primer composition, which must be specifically for drywall;
- All joints are covered with reinforcing mesh or fiberglass;
- finishing is done only with finishing putty;
- the surface is rubbed using fine-grained sandpaper;
- dust is removed;
- priming is performed before painting.

Hello dear readers! Preparing walls for painting is a responsible operation, since in this work it is necessary to achieve a perfectly flat surface without the slightest differences or chips. But don’t be alarmed, you can easily do it yourself if you strictly follow the instructions below.
Materials and tools
To work we will need:
- Putty, capacity 25 - 30 l and construction mixer;
- Primer, roller, brush, painting tray;
- spatulas (wide, medium, angled) and mounting knife;
- clean dry rags and fine-grained sandpaper;
- film or paper for covering the floor;
- grater (jointer), abrasive mesh P80-P120, P150;
- usually a flashlight and a finishing plaster trowel with suede (for mirror polishing).

Preparatory stage
At the first stage, it is important to choose a suitable putty. The materials presented in stores differ in ease of application and performance parameters. Let's look at the main types of putty compounds:
1. Oil-glue. Usually made with drying oil, stains from which may appear through the finish. Protects wooden walls from rotting and can protect concrete structures in wet utility rooms. Technical painting of the walls is performed on top.

2. Gypsum cement. Supplied as a dry mixture, mixed with water. The LR and KR markings indicate suitability for general construction work in residential areas; the VH index indicates material for wet areas.

3. Water-dispersed. Ready-to-use gypsum cement mixture based on a water-polymer solution. Easy to apply and sand, suitable for beginners. During work, do not leave the container open for long time– lack of moisture in the applied composition reduces the strength of the putty layer.

4. Acrylic. Easy to use, flexible, well suited for preparing walls for painting, but after preparing the walls acrylic putty, you should not paint the surface with low-quality, cheap paint - it will not adhere well to a smooth surface.

Advice: to buy the right amount of material, calculate the total area of the walls in the room, subtracting the area of the doors and window openings. Average consumption on square meter Manufacturers indicate on the putty packaging. Calculate the required amount and round up with a margin of 1 - 3%.
Preparing walls for putty
old decorative finishing must be carefully removed from the walls. Qualitative plaster layer you can leave it alone (the material does not crumble, does not lag behind the base - booming sounds when carefully tapping the surfaces indicate peeling).

After removing the wallpaper, the walls should be dried. Adhering small scraps of old finishing are completely cleaned off using a mounting knife or a sharp flexible spatula. Protruding irregularities need to be knocked down, deep depressions need to be filled with putty and wait for it to dry. Next, prime the surface of the walls with a compound for deep penetration concrete - to apply the primer, it is convenient to use a paint roller, and treat corners and hard-to-reach places with a brush.

From dry putty mixture The workforce is being prepared. In order for the material to adhere well to the wall and be easily sanded, the mixture should be prepared in strict accordance with the manufacturer’s instructions.

It is important to properly prepare the spatulas for work: use the inner fold of a bent piece of fine-grained sandpaper to remove irregularities and burrs from the working edges of the spatulas, wipe the blades thoroughly with a clean rag - adhered particles will not allow you to level the putty without deep scratches. Also clean the mixer and container well before preparing the working mixture.

Let's start plastering the walls
In the process of leveling the walls, the resulting working composition should in no case be adjusted by adding water or adding dry material. Therefore, it is better if you pour a little more water when mixing - a lack of moisture has a worse effect on the strength of the finished layer. The putty is mixed in small portions, the volume of which depends on the drying speed of the composition (carefully read the instructions on the package).
Step 1: With a medium spatula, putty is applied to the blade of the large one, and a roller is formed along the edge - a “bed”.
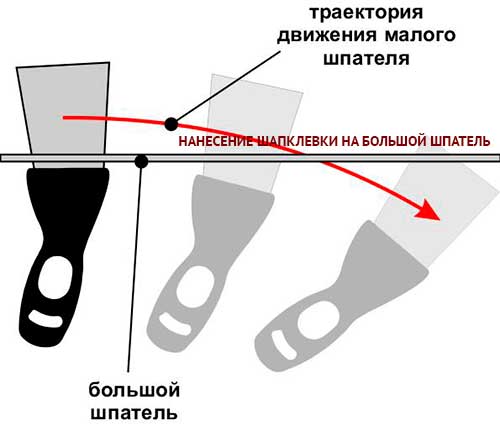
The collected putty must be applied to the wall in one stroke. Then the relief is leveled - it is important to remove the bumps and level out the depressions. This work is carried out with a wide or medium spatula (depending on the size of the depressions) with cross movements. The spatula blade should be held at a comfortable angle to the wall in order to form the putty layer flush with it, without scoring. It is important to work quickly so that the putty spreads properly.

The corners are puttied last: the easiest way to do this work is with special corner spatulas.

Step 2: The next stage is drying. Here, you need to avoid drafts, direct sunlight, warm air currents from heating devices - rapid evaporation of moisture can lead to the formation of cracks and peeling of the putty layer. Only open for ventilation inner door. The drying time of the putty is from 10 to 16 hours, but it is recommended to start sanding after a day.

Step 3: Using a grater with a P80 - P100 mesh, grind the surface of the wall in a circular motion. After sanding, using a rule and a beam of light from a flashlight, check the evenness of the wall - clean off the bulges with a grater, cover the holes with putty. After drying again, check again. Depending on the skills of the master, it takes from 2 to 5 approaches to bring the wall “to zero”.

Step 4: After final drying, a thin layer of special durable finishing plaster is applied to the wall, which is being prepared for painting. Perfect flat wall dry well, then grind with a float with P150 abrasive - in a circular motion and staggered - to remove circular marks. Then the plane is checked again and, if necessary, it is adjusted.
Attention: under glossy enamel, it is recommended to additionally polish the surface with a polishing tool with a suede cover (necessarily new!).
Video on the topic "How to properly putty walls for painting":
The most optimal and in an inexpensive way wall decoration is painting. However, paint must be applied to a prepared surface. And this needs to be done efficiently, since after painting all the flaws and irregularities will be visible. We will try to analyze the question of how to putty walls for painting in this article.
Putty comes in two main types:
- For interior work,
- For external works.
It is unacceptable to use putty for external work inside a building, as it releases toxins that are dangerous to human health. Putty for interior work is also not suitable for exterior work, as it is easily destroyed under the influence of moisture and temperature changes.
The components are divided into:
1. Cement putty - used when puttingtying facades or in rooms with high moisture.
2. Gypsum putty - has a beautiful White color, used as the final stage of wall finishing. Not suitable for rooms with high humidity.
3. Polymer putty, which has subtypes:
- acrylic putty – is versatile. Scope of use: internal, external finishing, as both starting and finishing putty,
- latex putty – used for interior decoration. It is flexible and easy to work with.
According to the stages of work when finishing walls, putty is divided into:
- starting putty, which is used to level out all the unevenness of the walls. Has a rough base due to the sand content,
- finishing putty, which is used at the final stage of finishing. It has a granular structure that provides a perfectly smooth surface,
- universal putty - suitable for both the initial and final stages of work.

Tools for puttying walls for painting:
- spatula 60*80, 20*25,
- nylon mesh, mesh size 0.2 cm,
- sandpaper or sanding block,
- abrasive mesh 60,80, 120,
- bubble level,
- container for diluting putty,
- metal beacons,
- construction mixer,
- roller, brush.
Materials for preparing walls for painting:
- finishing putty,
- starting putty,
- primer,
- water,
- cement mortar.

Work on leveling the walls
The first stage of work is leveling the walls. To do this, we remove everything from the walls existing coatings. Using sandpaper or a sanding block, sand the surface. We check the evenness with a level. The maximum difference should be 0.5 cm. After this, we prime the wall and wait for it to dry completely.
If sanding fails to remove wall unevenness, there are two options:
- finishing walls with plasterboard,
- complete plastering of walls.
If the difference is more than 5 mm, we install beacons and level the wall using isogypsum or cement mortar. To hide gross surface defects, a layer of about 3-5 cm is sometimes applied. Before this, the starting putty is mixed with well-sifted sand. Ratio 1:1.
When the work of leveling the walls is completed, use a roller or brush to apply a layer of primer to the walls. This will help get rid of fungi and microorganisms, and the putty will attach more securely to the wall. Primer drying time is 4-5 hours.

How to prepare the putty mixture:
1. Prepare a bucket of water and putty.
2. Read the instructions; the proportions of water and dry mixture are indicated there.
3. Dilute a small amount of putty mixture, as the putty hardens very quickly and will make it more difficult to work. Optimal time use putty for 30-40 minutes.
4. Be sure to pour the putty into a bucket and then fill it with water.
5. Stir the mixture with a mixer and leave for 5-10 minutes for swelling.
6. Mix again for 3-4 minutes.
7. We do this three or four times.
8. The mass should be free of lumps and have an elastic structure.
Starting putty is always sold dry, but finishing putty does not need to be diluted with water. Since there are many types of long-lasting finishing putty, which are sold ready-made. This putty is more convenient and does not harden during work.
Applying starting putty to the walls
To apply the starting putty we use two spatulas. With the large one we apply the putty on the walls, and with the small one we distribute the putty over the surface of the large spatula. Distribute the putty evenly for easier application.
When applying putty from left to right, the upper part of the spatula is to the right than the lower. Hold the spatula at an angle of 45-6°.
It is better to apply the starting putty in several layers, waiting until the previous layer has completely dried. The optimal layer for applying starting putty is 3-4 mm.
To prevent cracks from appearing in the wall, use a nylon net with a mesh size of 0.2-0.5 cm. Apply a layer of putty to the wall and attach the mesh to it, then apply a second layer to the mesh and spread the putty over the surface. The thickness of the layers is 1-2 mm.
Experienced painters replace the mesh with fiberglass or glass wallpaper, which are sold complete with special glue. After finishing with glass wallpaper, painting is possible, but in this case it will take 2-3 times more paint than after finishing with finishing putty.
Use coarse sandpaper to sand the surface. Fine grains on the surface after applying the starting putty are the norm, because such putty is coarser than the finishing putty.

Finishing putty - application features
The next stage of finishing is applying finishing putty to the walls. The layer of finishing putty is much thinner than the starting putty. Before applying, read the instructions, it should indicate the maximum layer of finishing putty.
The final putty of walls for painting is applied in several stages, and after the surface has completely dried, it is sanded with an abrasive mesh, 60 or 80 grit. When sanding, do not overdo it, so as not to scratch off the entire layer of putty. Use a level to check the evenness of the walls.

How to check walls for unevenness
After completing the putty work, you need to make sure that the walls are completely ready for painting. Since when painting, all small irregularities and roughness will be visible.
Take table lamp or a spotlight, tilt it towards the wall at an oblique angle, but if small defects are visible, you should get rid of them using a grinding machine or a hand block.
Primer is the final stage of preparing walls for painting.
At the end of the putty work, after the last layer of putty has dried, you need to get rid of small particles of putty and dust. To do this, use a dry cloth or vacuum cleaner. Before painting, the walls are treated with a primer.

Technology for preparing plasterboard walls for painting
The process of applying putty to a plasterboard wall is much simpler. To do this you need to perform a number of actions:
1. Apply primer over the entire surface of the plasterboard walls. Under no circumstances should you use alkyd primers, since the drywall is deformed. The thickness of the primer layer is 0.02 mm.
2. Prepare the wall. Inspect the joints of the drywall and how the screws are screwed on.
3. Glue a special fiberglass mesh over the joints plasterboard sheets so that the seam is in the middle of the tape.
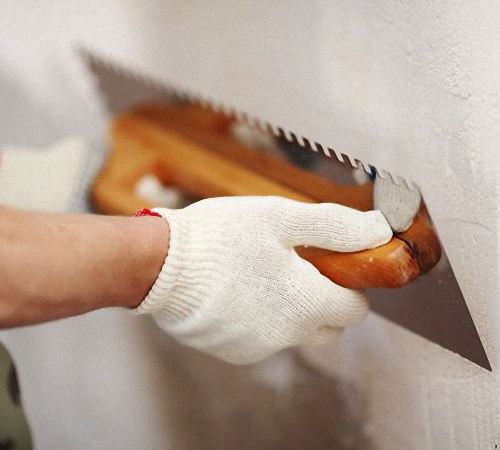
4. We putty the joints. To do this, prepare two spatulas 12-15 and 30-35 cm.
6. Alignment of corners. Putty one side of the corner, and after drying, the other.
7. After all joints and corners have dried, attach metal corners on window or door openings.
8. Putty the entire surface. Using a small putty knife, press the putty into the profile holes. A wide spatula will help level the putty on the surface.
9. To apply putty to the arch, use a special plastic corner. Secure the corner with a stapler.
10. Since this corner is thicker than ordinary aluminum, the putty is applied twice.
11. After drying, sand down any uneven surfaces.
12. The next stage is applying the finishing putty. The putty should be applied in a very thin layer using a wide spatula.
13. After the finishing putty has dried, prime the wall.

Tips for puttingtying walls before painting:
- never apply the finishing layer of putty until the starting layer is completely dry,
- The approximate calculation of putty is as follows: for 1 m² about 1200 g of dry putty,
- when choosing a primer, focus on deeply penetrating types that are resistant to temperature changes,
- primer consumption per 1 m² is about 80-100 g,
- the maximum layer thickness should not exceed 4 mm,
- to apply putty to internal corners, use a rule and a wide spatula,
- the durability and strength of the walls depends on the quality of the putty,
- When preparing the putty mixture, focus on the consistency of thick sour cream. Since a very liquid mixture will slide off the spatula, and a too thick mixture is difficult to work with,
- The putties are of excellent quality: Ceresit, Triora, Polimin, Saten, Knauf,
- when diluting dry putty, use a respirator,
- apply putty in different directions: horizontally, vertically and diagonally,
- Never try to dilute thickened putty with water. Thus, the quality of the putty surface deteriorates,
- for large surfaces use a large spatula, and for corners or hard-to-reach places a smaller spatula is suitable,
- It is best to choose a spatula made of stainless steel,
- It is possible to use an expander gun to apply the putty mixture. In this case, use a rubber spatula to smooth out the putty.
- When finishing work, wash the tool immediately, as it will be difficult to do this later,
- For the first three days after completion of work, protect the room from moisture, hypothermia or too high temperatures.
If the process of applying putty seems very difficult, it is better to trust the professionals. After all, if you do not properly prepare the walls for painting, you will have to redo everything all over again, which means a double waste of materials, money and time. For puttying walls for painting, prices vary, it all depends on the area and quality of the walls. One square meter of putty for painting on concrete wall costs about $8, for plasterboard – $6.