Even garden beds fenced with a border will delight any gardener or summer resident, because in addition to beauty, it is also practical. If the cost of finished materials stops you, then why not make a border for your garden beds yourself?!
Why fence beds - good reasons
Garden beds look much more tidy if they are surrounded by a border. But it is not beauty that motivates gardeners - such beds are also much easier to care for. Firstly, weeds cause less trouble, since the area free from beds, the same paths, can be covered with bark or sawdust mulch. Secondly, with the help of high sides you can increase the thickness of the fertile layer - most often this is the goal that summer residents are guided by when constructing fences. Fertile soil can be selected from plant-free spaces, or increased within borders with organic mulch and compost.
A well-fertilized, fertile layer does not even need to be dug up from year to year., therefore, there is economic sense in the construction of curbs. The sides will make life easier for those who grow plants in greenhouses - it is much more convenient to attach arcs for greenhouses to the hard surface of the fence than to soft ground, and the structure will be much more reliable. Whatever one may say, there are plenty of reasons for such pleasure!
What can you use to make a border for your garden beds? Let’s use your imagination!
The first thing that comes to mind is wood - boards, beams, slats, in a word, everything wooden that can be nailed down and fastened together. In regions where there are no problems with trees, this DIY border for garden beds will be the easiest way out. The solution, of course, is not cheap, but very durable and beautiful. In addition, such structures are installed very quickly, and dismantling them is even faster. And it’s convenient to work with - you can lean on a thick board or beam, or even sit down, put a pot of seedlings or a watering can.
It is not necessary to use it for this new material– on the farm there will probably be a lot of old slats from boxes or other products that have already served their intended purpose.
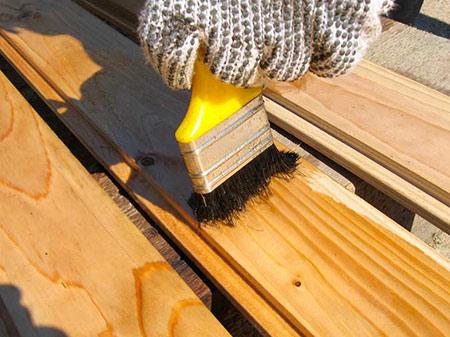
There will be more hassle with them, but the costs will be significantly reduced. Of course, the downside of any wooden element is its weakness to moisture and rot. Although there is a way out here - today there are many impregnations that will protect wood from destruction even in direct contact with the soil.
What can you make a border for garden beds from if you want to solve this problem for a long time, and you are ready to devote not only time, but also money to this issue? In this case the best option you will have metal structures made of galvanized steel - you can either make them yourself or buy them already ready-made options. They will serve for decades and, moreover, are very mobile - rearranging them will not take much time. True, this method also has its drawback - the metal gets very hot under the sun and, in turn, heats the soil.
There are remnants of old slate in almost every household - either the roof was replaced, or they were bought with a reserve many years ago, when it was much cheaper. Of course, there is no point in buying new sheets for such purposes - it would be easier to spend money on wooden beams. By and large, the low cost of this material is its only, but very significant advantage. Disadvantages - fragility and brittleness, and why older material, the more pronounced these shortcomings become.
You can even fence a garden bed with stone and concrete - in such a frame, even carrots will look no worse than an exotic flower. Of course, expensive, but certainly for centuries! A more economical option would be to lay a paved path between the rows - in this case, the path can also serve as a frame. The disadvantage of such fences is their stationary nature. Gardeners love to constantly move their beds, changing their proportions and location from year to year. This option is more suitable for “yard” gardening, when you sometimes want to dig into the ground and eat vegetables from your garden and at the same time spend as little time as possible on such work.
Borders for lawns and flower beds - an economical solution
And flower beds have much greater aesthetic significance than borders for beds, so old slate will not do here. They are not without practical meaning - any fence will protect the soil from erosion and spreading during precipitation and watering. You can decorate a flowerbed with your own hands using old bricks - there has never been a single construction project that would have been completed without its remains. The older the brick, the more interesting it is - the surface slightly corroded over the years, rounded corners...
A fence in which the first two rows will be laid flat, and the third, final row, with an edge, perpendicular to the previous ones, will look very beautiful, which will allow it to hang slightly above the ground. This design in its own way appearance no worse than others expensive options. If there is no time or desire for masonry, the usual arrangement of cobblestones or large pieces of crushed stone can quite adequately decorate and protect your flowerbed. If cobblestone seems too wild an option for you, you can make your own tiles same sizes and molds are much cheaper than buying ready-made ones!
Border tiles - we do it ourselves!
You can give the shape of such a tile using any plastic molds lying around in your kitchen. The main thing is that they are the same! If there are no such molds, look in the store for deep disposable dishes or packaging boxes; it is best to take trapezoidal plates - cement does not stick to their surface, which is very important for obtaining the most aesthetic appearance; they turn out smooth and of a convenient shape.
How to make border tiles with your own hands - step-by-step diagram
Step 1: Prepare the solution
It is best to buy a bag of M500 cement and quarry sand for such tiles. There shouldn't be any debris or lumps in the sand, so it won't hurt to sift it. The ratio for the solution is 1:3. Mix the sand and cement, first without water, until the mass becomes uniform. It is better not to mix the entire solution with water at once; separate a certain amount into a separate container and mix it with water there. We need a liquid solution, like sour cream.
How to make beds from boards at the dacha in order to get not only a well-groomed, neat garden, but also practical benefits? Design garden plantings The easiest way to do it yourself is with wooden borders.
This is what homemade beds from boards look like
Advantages and disadvantages of wooden beds

The disadvantage of wood is rapid deterioration, especially with constant contact with water and soil. However, if you treat the material with protective antiseptics, you can extend its service life by 10 years or more.
What wood to choose for boards
You can use any boards for fencing beds: slab, timber, edged material, clapboard.

Step-by-step instructions for making beds from boards
The choice depends only on how much the buyer is willing to spend on decorating the beds.
- Oak and ash. Highly strong and durable material with excellent rot resistance. However, they are also expensive.
- Larch. An excellent choice - larch has high strength and resistance to humid environments.
- Cedar. Coniferous wood is the most best option for a wooden bed at the dacha. Good balance between affordable cost and high quality.
- Pine. Pine boards are inexpensive, but do not have a long service life.
- Acacia. Sufficiently strong acacia boards can be used for arranging beds.
Wood processing and protection
To extend the life of a wooden bed, you should treat the boards with protective compounds:
Dimensions of board beds
Everyone chooses the shape and size of the beds according to their own taste and the space available in the greenhouse or plot. Eat general recommendations according to the size of the fence, at which garden bed will be most effective:
- width from 90 to 120 cm;
- height from 15 to 50 cm.
The length of the fence can be any, however, if it is long, it is advisable to provide the bed with additional supports. The width of the bed is the most important parameter. It is best to organize the area so that there are no more than two rows of crops in the garden bed. Firstly, with such planting, all seedlings will receive enough sunlight and air. Secondly, a bed that is too wide is difficult to care for and water.
The height of the bed is chosen arbitrarily, as long as caring for it is not difficult.

Scheme with dimensions of beds made of boards
Depending on the type of soil and type of crops given following tips according to the height of the fence for plants:
- If the soil at the dacha is fertile, the bed can be low - 15-20 cm. If the soil is rocky or unsuitable for planting - from 30 cm. Some gardeners make the height of the beds to waist level so as not to bend over when working.
- The height of warm compost beds should be at least 50 cm. High beds with compost will reliably protect plant roots from unexpected frosts in the spring.
- For early ripening crops, radishes, lettuce, and onions, it is better to use beds higher than 20 cm for their rapid ripening.
- If you plan to grow potatoes in the beds, their height should be at least 40 cm.
Installation of a simple box made of boards
The design of the fence for the beds is quite simple and can easily be done with your own hands. To work you will need simple equipment and materials:

Instructions for making a box for a garden bed
- boards – 2 short ones of the same length and width, 2 long ones;
- wooden posts made of timber, pointed on one side - 6 pieces;
- drill and screwdriver;
- wood screws or nails;
- shovel;
- hacksaw;
- hammer;
- roulette and level.
Work order:

A wooden garden bed of simple design is ready. You can fill it with soil and plant fruits and vegetables.
Do-it-yourself raised or raised bed
Raised beds have many advantages over traditional beds:

Raised beds, with all their undeniable advantages, also have disadvantages:
- You will need some basic carpentry skills and knowledge to build a raised bed with your own hands.
- High beds dry out faster than classic ones, so if your dacha has problems with sufficient water for irrigation, such beds can become a problem.
You can do plastic fencing for beds, as well as from iron, bricks, concrete, wicker, slate. Flexible rods make openwork borders.
Plastic fencing for garden beds

You don't have to spend much on these. Currently available for purchase plastic lining in Leroy Merlin size 10x300 cm at a price of 17 rubles. a piece. Use a plastic or aluminum angle bracket to secure these fixtures. But the latter is more expensive.
Here's what you'll need to make your own inexpensive garden bed fencing:
- plastic lining;
- plastic corner;
- liquid nails, transparent glue Titan or Moment;
- hand saw;
- scissors.
You can buy colored plastic lining so that its color harmonizes with small architectural forms and buildings that are located in the country.

Using a saw, cut the clapboard to the length of the beds, as well as the width. Four prepared boards need to be folded into a rectangle and glued at the ends with corners. If you want high beds, then you can install the lining not in one row, but in 2 or even 3. For greater structural reliability, it is better to attach plastic corners not only from the outside, but also from the inside.
Here are the advantages of such DIY fencing:
- efficiency;
- looks beautiful;
- durability, since this material does not rot;
- no need to paint;
- You can make beds of any shape.
If you want fencing for beds and flower beds to not cost a ruble, then use the same material for this, but in the form of bottles. You will need quite a lot of them. Here's what you need for such a border:
- plastic bottles;
- colored tape or rope;
- pegs;
- hatchet

The advantages of such a border are that it:
- free;
- durable;
- easy to install;
- You can make a bed of any shape.
If you have any old vinyl records left over, use them to make borders for flower beds and beds, burying them halfway into the ground.
Even unnecessary car tires will be put to good use. Pre-color them and glue them together.

Do-it-yourself border for beds made of wood
This is also a very accessible and inexpensive material; it is easy to install. Watch the master class, which describes in detail how to make a fence for beds made of wood, and includes step-by-step photographs.
Mow the grass in the selected area. Mark the future bed using pegs and ropes or sand.

To make such borders for garden beds, take:
- wooden blocks;
- boards;
- carton boxes;
- metal mesh with small cells;
- furniture stapler.

These bars have 4 notches. Therefore, it is easy to lengthen or expand the structure, or install additional boards on the side or back.

Similar boxes without a bottom. If rodents may be bothering your crop, place a fine-mesh metal mesh underneath. It is advisable to slightly raise its edges up onto the sides and fix it here.

If you then pour fertile soil into the box-bed and do not want it to mix with what is already there, then lay a dense layer of soil on the bottom. cardboard box in disassembled form. This device will also help protect the plants from weeds, and excess water will flow out through the pores of the paper. To prevent the cardboard bottom from moving, secure it with a stapler.

Pour light soil mixed with compost or humus inside. You can immediately add a little mineral fertilizers. It is necessary to water the soil so that it settles, only then plant greens, carrots or other vegetables.

Take a look at the irrigation systems available for these raised beds. As you can see, you need to attach a hose and watering nozzles along the contour of the curbs, at angles of 180, 90°.

If you plan to plant cucumbers, beans, etc. climbing plants, then you need to install a trellis. Since the soil in such high beds is loose, the space is limited by metal mesh and cardboard, so PVC pipes need to be secured beyond the borders.

For you 3 useful advice about this theme:
- To ensure that the vegetables you grow are environmentally friendly, use deciduous trees rather than coniferous trees. The latter can release resin, which can adversely affect the soil composition.
- Before treating fresh wood with paint or a preservative for such material, make sure that the solution does not contain harmful substances.
- Since the soil here dries out quickly, the density of plantings in such high beds is twice as high as in ordinary ones. This way the plants shade the soil and prevent moisture from evaporating too much. In such close proximity, they fight weeds better, and this only benefits gardeners - the harvest will be 2 times larger.

Learn how different plants like or dislike the proximity of others. In this table green It shows which crops grow well with each other, in red those that are not recommended to be planted next to each other.

You can arrange wooden borders for the garden beds in a ring, and make wide paths inside this structure to make it convenient to walk here and care for the plants. For climbers, supports are also made of wood. If you place the lantern in the center, you will achieve interesting effect Moreover, it will illuminate this part of the dacha in the evenings, and you will be able to pick the vegetables that grow here in the dark.

You can also place rectangular beds in the center, and in the middle you can make one in the shape of a five-pointed star. For each corner you need to saw off two identical boards at an angle and fasten them with self-tapping screws. If this is a high bed, then place two such blanks one on top of the other.

You can also make beds from pallets different shapes. The simplest structure of this type is made by placing such a pallet on a dug-up area and sowing plants between two adjacent boards.

You can cut one pallet in half, making large sides of the box from these parts, and making small ones from the second pallet. You will get such a wonderful garden bed.

If you have several pallets, then you can make a long fence.

Solid beds are constructed from clapboard timber. If you put boards on top, then you can walk here while caring for the plants.

Wicker fences also look great. This environmentally friendly material will not harm plantings.
If you have rounded bars or old shovel cuttings, cut them into pieces of different or equal lengths, sharpen them on one side, sand them, and coat them with an antiseptic. Using a rubber hammer, hammer them into the dug up soil, right along the perimeter of the bed or flower bed.

Do-it-yourself vine fence for a garden bed

To create similar borders, take:
- willow branches;
- round bars;
- axe;
- wire.
You can take not one, but several rods at once.

Make a fence for the beds of the desired configuration. You can give it a round, square or polygonal shape. It will be determined by pegs driven in along a given trajectory.
Make your own flower bed borders to look like baskets. To do this, make a round wicker fence and attach a handle to it on top, also made from wicker.

You can make a two-tier flowerbed by creating a large one from willow branches at the bottom and placing a small one in the center at the top. Plant flowers or greenery here.

Using this material, they make not only fences for flower beds and beds, but also for trees. By trunk circle Drive the pegs shallowly and frame them with prepared willow branches or other flexible material.
If you make two circles at a short distance from each other, then you can pour soil between them, plant flowers here, or put moss, which will regulate the level of humidity around the tree.

If you liked decorating your plot this way, with practice, you will be able to make not only wicker fences for beds and flower beds, but also a real masterpiece on this topic.
Decorate the garden bed with flexible rods and separately weave a lid like this for a magic chest. It is attached to vertical posts, is fixed on the lower basket with door hinges.
If spring and autumn frosts occur, you close the lid of the chest, thereby protecting the plants from the cold.

With the help of flexible rods you can make long beds, make a path from paving stones between them, and your garden will be neat and beautiful.

Fencing for garden beds made of bricks, stone, concrete
A circular high bed is built from brick.

A path is made from the edge to the center so that you can walk along it and cultivate the plantings. Such a beautiful high bed will be created if you take:
- bricks or stones;
- cardboard;
- branches and roots;
- compost;
- metal mesh;
- 3 iron fittings.

On such a high warm bed Pumpkin crops grow especially well. It is best to plant zucchini, cucumbers, melons, watermelons or pumpkins here. But flowers also have plenty of freedom here, as the soil becomes highly fertile and well-moistened.

If you have a garden on a slope, brick beds will help fix this. Place more of this material in the lowlands, less at the top. If the slope is to the south, then leave the beds in the same position, and they will be better warmed by the sun.
A beautiful fence for beds and flower beds will be made from waste material, if you take:
- empty glass bottles;
- cement mortar;
- bricks (can be old).

You can buy monolithic blocks for fences and sidewalks or cast them yourself from concrete using a mold.

If the bricks are placed vertically in a pre-dug recess, then you will get another fence for the beds. To secure them, place a row of bricks immediately horizontally.

Flat stones will also work; just lay them out in a circle near a tree or bed, thus creating a flower garden, arranging them in 2-3 rows.

For the next border you will only need:
- volumetric stones different sizes;
- wooden pegs;
- flexible tape made of fiberboard or hardboard;
- cement;
- water;
- sand.

You can do it differently. Dig a shallow trench of the required width along the perimeter of the flower bed or bed. Just place stones here and your low border is ready.

If you don't have that many stones, then make a low concrete fence. It will turn out so effective.

For such design work you will need:
- rubber hose;
- sand;
- cement;
- water;
- shovel.

Place wooden pegs horizontally between the two types of tapes as spacers, placing them a meter apart. Pour the prepared concrete mortar, level it with a spatula. All that remains is to cover the border with sealant; when it is completely dry, the fencing for flower beds and beds is ready.

You can also make edgings from slate sheets and corrugated sheets.
Such an activity will not seem difficult to you if, after reading the above, you also watch video material on this topic.
What kind of fences there can be for garden beds, their advantages and disadvantages are described in the first story.
You will see how to make fences for garden beds with your own hands from slate sheets in the second mini-film.
And beds with which you can provide an original aesthetic effect. Today there is a wide range of different borders on sale, in addition, you can make them yourself.
Purpose of fences
Garden fences for flower beds and beds have several purposes, and the main thing is to separate the plantings from the general area, which allows you to protect against contamination by earth mounds, as well as visually highlight the beds themselves in the common area. Another purpose of fencing is. They are a peculiar feature that emphasizes the overall composition.
In addition, fencing is used to prevent the flowerbed from growing, which can spoil general form compositions. Specially installed barriers allow you to block the roots of plants, preventing them from spreading beyond a certain area.
Depending on the purpose of use and the functions performed, fences are divided into decorative (up to 7 cm in height) and functional (from 10 cm). The first type is used exclusively to divide the site into certain zones.
Advice! INThe height of the fence depends on its purpose, as well as the type of plants. It should perform its protective functions well and at the same time provide an overview of the fenced off flowers.
Types of garden fencing
Before installing a fence for a flower bed, you need to decide on the purpose of the beds. There may be located vegetable crops, annual or perennial flowers, as well as any bush plantings. It is also worth deciding on the structure of the flower bed. It can be at the same level as the general topography of the site or be slightly elevated. If we are talking about raised beds, then they rise to a considerable height above the ground level of the common area.
Depending on this, the type of fencing is chosen. They may differ in installation method:
- removable - borders should be light, installed only while the flowerbed is in use, and, if necessary, can be used in another place;
- stationary ones are installed in places of long-term use of the flowerbed and are made of durable frost-resistant materials, since they are at the destination not only during the use of the flowerbed, but also in the off-season.
The most common fencing materials for flower beds
If you want to buy garden fencing for flower beds and beds, then you should decide which of those on the market will suit you best. Today, the range of borders for garden beds is quite large, and all of them can be found both in hardware stores and in specialized and online stores. The most common ones on the market are the following:
- plastic fences for flower beds and beds, consisting of sections that are assembled into a single one, have a small height, differ in shape and color, and have special legs for installation on the ground;
- can have different heights, suitable for fencing flower beds and the entire front garden;
- reinforced concrete border is used for fencing stationary flower beds, it is low, and its feature is resistance to temperature changes. Has different shapes;
- You can also buy plastic fencing for flower beds and beds in the form of a tape, which is intended for low plantings. It is buried deep into the ground and allows you to create a barrier for the growth of flowers from the root. The flexible shape allows you to fence flower beds regardless of their shape;
- wooden fences can have attractive appearance and shape, vary in color and height. This is a classic version of fencing.
You can decide for yourself which fences for beds and flower beds to buy, taking into account their features, quality and advantages. If for some reason you are unable to make a purchase, you can make them yourself.
Advice! If the fence should not perform protective functions, but is intended only to delimit the area, then you can use plants for this purpose, creating a small hedge. For this purpose, it is best to choose low-growing annual and perennial plants. bush plants with bright flowers.
Do-it-yourself fencing of flower beds
Do you want your garden arrangements to look unique without spending a lot of money on decorations? Decorate your garden yourself. There are many options and techniques with which you can make fencing for flower beds and beds with your own hands. Let's look at the most common of them.
Just as in the case of purchased borders, you should initially determine the level of the ground in the flowerbed in order to select the height of the fence. Next, we select the material for making the fence. You should choose what is available to you. This could be wood, brick, natural stone or scrap materials.
Wooden fences differ according to the type of original wood:
- planks;
- logs and beams;
- edged board;
- rods.
Advice! DIn order for fences made from the above materials to serve you longer, they must be treated with anti-corrosion agents, which will make the fence more resistant to moisture, temperature changes, and also prevent the premature appearance of fungus.
From the planks you can make a picket fence of the required height. It can have any original shape that can be obtained using, for example, planks of different lengths or different methods of connecting boards. Such a border can be installed on the surface of the ground, made collapsible if necessary and removed in the off-season.
A so-called palisade is created from logs and beams. True, unlike its large-sized counterpart, the tops on logs for small structures are best left blunt. In this case, it is better to sharpen the bottom of the workpiece. This will allow you to easily drive them deep into the ground, creating not only an external fence, which is great for flower beds located above ground level, but also an underground barrier for the root systems of plants.
The edged board is also excellent material for fencing. With its help you can create flower beds of various shapes. Particularly popular today is the creation of pyramidal compositions of three or more tiers. Board structures perfectly hold soil in flower beds, which allows you to create high beds. To build a pyramid, several flower beds of the same shape but different sizes are made and placed one on top of the other so that there is space between them for plants.
The use of rods for fencing was known several centuries ago. Weaving fits perfectly today into landscape design of modern plots. You can create a wicker border for a flower bed yourself. To do this, you will need thin pegs and even branches of a vine or willow. The branches of these plants are quite strong and bend very well, which simplifies the work. To give more flexibility to the branches, they need to be soaked in hot water and work with them before the workpieces dry.
Brick flower beds have different designs, heights and characteristics. To fence the beds, the height of which coincides with the ground level, a small border is erected. In this case, for decorative design one layer of brick is used, which can be installed in any convenient way: vertically, horizontally, and also at an angle, which allows you to create a shaped frame for the flowerbed.
If it is necessary to fence a high flower bed, then the brick is laid in several layers. For raised beds, it is used to form a wall without gaps. When constructing large fences with a height of 30 cm or more, a shallow foundation is poured under the brickwork. This will allow the constructed wall to hold tighter and create an additional barrier for the root system.
You can decorate brick flower beds using various techniques. To do this, it is necessary to prepare the surface by plastering it with cement mortar. Next, you can make patterns using leftover tiles and other materials using mosaic technique. You can also create the effect of natural sea stone. To do this, it is necessary to apply a thick layer of plaster and, until it hardens, make a corresponding relief pattern.
Natural stone looks great in. Therefore, it can also be used to create fences. By using natural stone Various shapes can be created. If it is necessary to lay several layers of material, it is necessary to fasten the elements together with cement mortar or special glue.
If the above materials are not found on the farm, then you can make a fence for flower beds and beds with your own hands from improvised materials.
Fencing for flower beds and beds made of alternative materials
Creating compositions from scrap materials has a lot of positive aspects. First of all, this is, of course, cost savings, because you can create a fence without spending a penny. With the right approach, such structures will look impressive and original. At the same time, you make your special contribution to protecting the environment by not sending used household items to a landfill.