Ecology of life. Estate: You will be surprised by your past doubts - whether to make high beds at the dacha... Your back will thank you - you will simply bend over slightly to care for the bed. Your knees will thank you - you can simply sit on the edge of the bed and tend to your garden.
You will be surprised by your past doubts about whether to make raised beds at your dacha... Your back will thank you - you will simply bend down slightly to care for the bed. Your knees will thank you - you can simply sit on the edge of the bed and tend to your garden.
Your plants will thank you - there is no more competition from weeds or nearby fruit trees. Your land will be grateful to you - you do not trample it and ennoble it with humus. Your garden with raised beds can look beautiful, be comfortable and reward you with a bountiful harvest.
How to make raised beds with your own hands.
1. First we must mark out the space for the beds. The usual width of the bed is 1.2 m, the length can be any. We mark rectangles of the required size on the ground with sand.
2. We assemble high beds. The raised bed has no bottom and consists of posts with grooves on all four sides and boards with corresponding grooves. you can buy ready-made fencing for garden beds or make them yourself. For fencing, it is better to take hardwood, because... Conifers secrete resin, which can have an unnecessary effect on soil composition. We check the horizontal installation of the garden box with a level.
3. Extend the high beds. Because The design of our beds is modular; we can extend our bed on either side with another module.
4. How to protect a high bed from rodents. Even if you haven't encountered it on your own summer cottage with moles and other underground pests of the garden, it is better to provide protection for your garden right now than to unsuccessfully fight these rodents later. Place at the bottom of each box metal mesh so that it extends slightly onto the edges of the fences.
5. How to protect the soil in a high bed from washing out into the main soil. To do this, we use regular packing cardboard in two layers so that it covers the entire bottom of our garden box. If there are not enough solid pieces, we use scraps of cardboard and staple them to the main piece so that the cardboard at the bottom of the box does not move when pouring soil.
6. The soil for high beds should be light, crumbly and “fluffy”. You can easily check its quality by poking your finger into the ground - if it sinks to the third joint, this is normal. To improve the soil composition, you can add peat or compost. We pour the soil into the garden box, check its horizontal level, and water it to compact it a little. During the season we will need to add a little soil.
7. Irrigation system for high beds. It is planned to attach a garden hose with watering nozzles along the contour of the raised beds: we need 90 and 180 degree dividers.
8. Trellis for high beds. Because The soil in the high bed is loose, so it will not be possible to install a trellis in it, so we fix the trellis from PVC pipes into the ground next to the garden box. We stretch nets onto the trellises to climbing plants- cucumbers and beans. For tomatoes we install light supports made of steel rod.
What you need to know when building a raised bed.
1. Try to protect high beds from strong winds and heat by creating partial shade with trellises of flowers or tall shrubs.
2. The long side of the bed should face south - this way the plants will be evenly illuminated, otherwise, more tall plants others will be obscured.
3. The planting density on a high bed is twice as high as on a regular one. This is how plants fight weeds and create a humid microclimate for the foliage.
4. Raised beds with sides will make it possible for older people or people with back problems to take care of their gardens.
5. A high bed is a warm bed. Such a bed warms up faster in the spring and if you make a mini greenhouse based on it, it will surprise you with an early and generous harvest.
6. Divide a long, high bed into square segments with cross braces to reduce soil pressure on the side walls of the bed.
Fences for raised beds.
1. Most often, wooden fences are used for clear beds. There are several points here - do not use used wood, especially sleepers, which may contain harmful chemical substances. Do not treat fresh wood with protection products unless you are sure that they are completely environmentally safe.
2. Wattle fence as a fence for a high bed. For all its environmental friendliness, such a fence has three significant shortcomings- the soil in the bed dries quickly from the wind, proper thermal insulation of the bed is not provided, the soil can spill out through the cracks. Everything can be fixed - use a layer of double cardboard along the inner perimeter of the fence. It is environmentally friendly, the air gap between the sheets serves as thermal insulation, and the soil no longer spills out.
3. As a fence for a high bed, you can use a metal profile, including from old roof or a fence.
5. You can make fences for a high bed with your own hands from brick or concrete. This is a very good option, but you need to take into account that concrete will affect the acidity of the soil in the garden bed for 2-3 years.
6. The best fences for high beds - plastic. They do not release anything of their own into the soil, excellent thermal insulation, long service life and the ability to set any shape of the bed, unlike standard rectangular beds with wooden fences.
7. Fences for high beds made from scrap materials. You can make the sides of the beds from bottles laid like bricks on concrete mortar.
Why are raised beds needed?
High beds allow you to increase the space for a vegetable garden because... awkward slopes or poor or clogged soil can be used. Raised beds provide an eco-friendly way to control weeds and soil erosion.
Such beds warm up faster and produce an earlier harvest. They allow you to more economically use moisture for irrigation.
Various types of raised beds.
In addition to the traditional raised bed with high sides, there are several other types of raised beds.
1. Circular high bed. It consists of a round frame in which there is a path to the center of the bed. This form of high bed is also called a “keyhole”.
Branches, roots, paper, and compost are placed at the bottom of the bed. There is a tunnel in the middle of the bed for fresh organic waste and water.
This bed design provides desired humidity and constant enrichment of the soil.
2. High bed without fences. When constructing such a bed, the first layer of tree trunks (not conifers), branches, roots, and snags are placed in the ground at a shallow depth; the second layer is the removed turf from the place where you are making the bed, laid with grass down; the third layer is 20-30 cm of basic soil mixed with humus.
To irrigate raised raised beds, an irrigation irrigation system is used, when water comes from a ditch between the beds - a good option for vegetable gardens that are flooded in the spring, or you can use drip irrigation, when water enters the garden bed from mini terraces.
The paths between the beds are covered with straw or large sawdust. Never step on the ground in a high bed - this will compact it and make it more difficult for the plants to receive moisture and nutrients.
Raised beds of this type can be used not only for a vegetable garden, but also for growing shrubs and fruit trees if you have problem soil for them in your summer cottage. The service life of such a bed (until the first layer of wood with trunks completely rots) is 20-25 years - this period is enough for any fruit tree.
Do not spare space for paths between high beds - this way you can always go there with a garden wheelbarrow both for harvesting and with a new portion of humus. Spare your back - use a wheelbarrow.
If your raised beds are located next to fruit trees, perhaps before laying out the beds you will need to install a root barrier - dig a trench, cut off the root on the approach to the beds, install a metal sheet into a trench, which will prevent the root from growing in this direction and cover the trench with soil.
Learn more about raised beds through your own experience. This topic contains many interesting finds, experiments and new discoveries for every gardener.
Working in the garden and caring for plants takes a lot of time and effort, and the results are not always equivalent to the labor costs. Raised beds will help increase the yield at your summer cottage and ease physical labor. Grow bountiful harvest, without straining your back, it’s not difficult - raised beds are quite easy to make yourself.
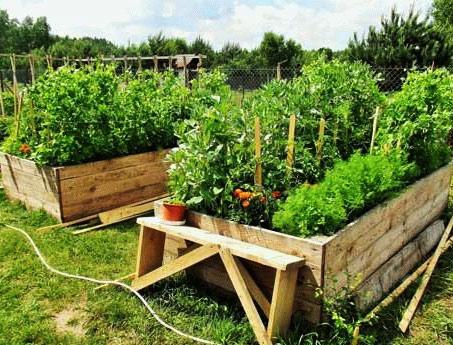
An example of a classic high garden bed
This does not require complex tools or special skills.
Pros of raised beds
Tall or smart beds an almost ideal way for growing any plants: vegetables, berries, fruits, herbs or flowers. Compared to traditional garden beds, high fences have many advantages:
Arrangement of raised beds using unhewn boards

Materials for building smart beds
You can make raised beds with your own hands from various building materials, here are the most popular of them:

Parameters of raised beds
When installing high beds, you should follow some recommendations and take into account the following features.
Optimal height

Length and width of raised beds
The length of the bed is not important; you can make it any length – as much as the site area allows. The only condition is that long beds need to be strengthened with additional jumpers or supporting posts.
You need to pay closer attention to the width of the bed:

Where to install a raised bed
If the nature of the soil is not particularly important for a smart garden bed, then sunlight is important for any crop. For planting, you should choose an area that receives direct sunlight for at least 5 hours.
Before filling the bed, you should do the following:
- A construction mesh is nailed to the bottom of the box - it will protect the plants from rodents and moles;
- Then thick cardboard or geotextile is laid - weeds will not break through such a barrier, and the water will not stagnate.
What to plant
You can plant almost any vegetables, berries, herbs or flowers in high beds. In decorated beds, you can perform crop rotation every year, changing crops in places. Only plants such as sunflower or corn are not very convenient to grow in such boxes due to the tall growing stems.
Do-it-yourself raised beds made from boards
Wooden boards are the simplest and most environmentally friendly safe way make a garden bed. In addition, this material is always available.
However, many gardeners rightly believe that such processing reduces the environmental safety of the material and this affects the quality of the grown fruits and vegetables. The most environmentally friendly way to extend the life of wood is. It is even better to use boards with good resistance to rotting - larch or oak.

Making a high bed from beams
Also, after antiseptic treatment, the inside of the bed can be sheathed with film to limit contact of the soil with chemically treated wood.
Inventory and materials
To assemble a wooden bed you will need the following tools and materials:
- boards 5x20 cm;
- bars 5x5 cm;
- hacksaw;
- wood screws;
- screwdriver or screwdriver;
- shovel;
- building level and tape measure;
- construction mesh.
Installation of a high bed

Filling a raised bed
The bed is ready, now you need to fill it. The effectiveness of smart beds is achieved by filling them correctly layer by layer:
- First, you can lay cardboard to protect the bed from weeds.
- A small layer of sand is poured onto the cardboard.
- The organic layer is long-rotting organic material (branches, bark, coarse thick tops, wood chips).
- Plant residues – plant tops, vegetable and fruit peelings, leaves, non-perennial weeds.
- The bed is spilled with water, or better yet, with infusion of manure, and 15-20 cm of fertile soil is poured.
Raised beds made of slate
Slate - simple and a budget option for the construction of raised beds. And if this roofing material lies like a dead weight after replacing the roof, then this is also a free way to make smart beds on personal plot.
Advantages and disadvantages of slate for making beds
The advantages of construction slate are as follows:
- low cost;
- durability;
- rigidity and strength;
- chemical neutrality;
- neat appearance.
The downside of a slate border is that it gets very hot in hot weather. Plants will need more frequent watering.
Raised beds have some advantages over classic beds. Many people think that making such a bed is a difficult and expensive task, but this does not require special skills or special tools.
DIY raised bed- what to make from, photo and description of the process of assembling the beds, what high beds are intended for, advantages and disadvantages.
Area treatment traditional way requires a lot of effort and time, and the harvest does not always exceed expectations. Therefore, many gardeners set up high beds on their plots, allowing them to receive annual excellent harvest berries and vegetables with proper care.
Raised beds: pros and cons
The main advantages of raised beds over classic ones include the following:
Possibility to set up a vegetable garden in areas not suitable for farming;
- digging and weeding is replaced by light loosening of the soil;
- it is convenient to work with high beds, because they are raised above the ground;
- warming up of high beds occurs faster than ordinary ones;
- it is easier to remove weeds in a limited space;
- by arranging a high bed, good drainage is ensured;
- vegetables and berries ripen faster in high beds, which is important for regions with cold climates;
- the high bed is easy to install and disassemble if necessary;
- beds can be protected in case of frost by covering them with agrofibre or tarpaulin.
Disadvantages of raised beds
A high bed requires frequent watering and increased mineral supplements. A pest like the mole cricket loves to settle in high beds, so you’ll have to keep an eye on it and fight it.
Material for beds - what to make high beds from
High bed is a frame of a certain size. The inside of the frame is filled with compost, soil, and fertilizers. The shape of the frame can be different; the most common is a high rectangular bed.
Material for making beds – boards, slate, plastic, branches and others.

Tree- the most accessible, easy to install and fairly inexpensive material. To assemble a bed you will need timber, boards, or small logs.
The main disadvantage wood is its fragility, which requires additional protective treatment.

Twigs and vines– original, cheap material. The woven walls of high beds look attractive, and the shape of the bed itself can be made to any shape.
Such a frame has a very short service life and you need to know how to weave a vine.


Brick and stone– durable, reliable material for beds. But such beds are difficult to dismantle and construction takes a lot of material and time.

Plastic frame - an alternative to wood. Plastic is easy to install and disassemble, durable and strong.
But some types of plastic contain harmful substances and cannot be used in the garden.

WPC beds- frame for beds made of wood-polymer composite. Beautiful view, durable material, is connected using joining elements. The disadvantage is that the material is very expensive.

Metal– durable, convenient material for creating beds. You can easily change the appearance of the frame by painting it in any color. To assemble such a frame, you need to have the skills of a welder; the material is quite expensive; surface treatment will be required to protect it from corrosion.

Slate- a budget option for designing beds. Installing such a bed is quick, slate is durable, and you can paint the surface any color. The disadvantage is the fragility of the material; caution is required during assembly.

Summer residents use it to build high beds plastic bottles, old plastic boxes.
Video - Raised beds made of slate
Every gardener chooses required sizes and the shape of the raised beds yourself.
There are also optimal sizes, at which the bed will be most effective:
Bed width 90-120 cm;
- the height of the bed from the ground surface is 15-50 cm.

Bed height depends on where the soil will be poured - if directly onto fertile soil, then a height of 15-20 cm is enough, this is enough for good harvest. If the site is not suitable for farming, the bed is raised by 30 cm. Warm beds make it even higher up to 50 cm by adding compost.
Bed width they make it so that 2 rows of plants fit - this will be convenient for processing, the plants will receive enough sun and air.
Raised bed length does not play a role and is limited by the size of the site. Beds with a length of 1.5-3 meters are common.
A convenient row spacing is at least 45-50 cm; do not make a smaller distance, it will be inconvenient to move between the beds and process.
Do-it-yourself raised beds made of boards

Inexpensive and convenient option making a frame for a high bed.
To work you will need:
Roulette
Bayonet shovel
Screwdriver
Hand saw for wood or jigsaw
Building level
Boards size 50x200 mm
Beam 50x50 mm
Self-tapping screws
Construction mesh
Primer

Decide on the dimensions of the frame. Cut the boards to size and cover all sides with antiseptic impregnation (you can use waste oil).
Also cut the timber 50 cm long and treat it with an impregnating agent.
Lay out the boards and timber to dry.
Site preparationChoose a sunny location for the raised bed; it should receive at least 5 hours of light per day.
It is necessary to mark the boundaries of the bed, remove branches, stones, rhizomes perennial plants. Dig up the soil along with the grass; if it is dense, remove the layer of turf around the perimeter to conveniently position the frame.
Assembling the bed frameAfter drying, the boards are knocked down into panels, connecting them together with bars. The height of the shields is the height of the bed. In the center of the long sides of the frame, additionally strengthen it with transverse bars.

Upon completion, you can paint the frame from the outside.
Transfer the finished frame to the installation site. The structure should be as level as possible, the corners should be at the same level.
After installing the frame, add soil around the perimeter of the walls so that there are no gaps left.
Video - Making raised beds
How to fill a raised bed
The bottom of the frame is covered with a construction mesh, nailed to the walls of the frame. The net is needed to protect against moles and mice. Then lay geotextiles that prevent weeds from germinating.
Drainage in the form of bark, small branches, leaves, large shavings;
- a layer of fertilizers: compost or rotted manure, bird droppings;
- grass, fallen leaves, bark, small branches: creating a permeable layer;
- a layer of organic matter that is supplemented mineral fertilizers;
- a fertile layer of soil, the composition of which depends on the type of plants that you plan to grow in the beds. The minimum layer thickness is 10 cm.

When filling, the thickness of each layer is approximately 10 cm; there is no need to mix each other.
When the raised bed is full, it is necessary to pour it well with water and leave it for several days for the layers to shrink.
It is better to cover the bed with black agrofibre or polyethylene at this time to ensure better heating of the bed.
The beds should be made at the end of summer or autumn - this way the layers will rot well before spring and there will be a sufficient amount of nutrients for plants in the soil. Leave this bed covered until spring.
When installing beds in the spring, a month before planting, water the bed several times.

It’s easy to turn high beds into a greenhouse by installing arcs over the frame, which you can fasten to the walls of the frame with self-tapping screws or bolts.
A film or special agrofibre is attached to the arches on top.
Video - DIY raised beds
How to care for raised beds
When the plants sprout in the garden bed, it is good to water them and mulch them. Weeds that break through the mulch layer are immediately removed.

When the entire harvest is harvested, the high bed is loosened and sown with green manure. Replace damaged sections in the garden bed.
The disadvantages of high beds are the labor and financial costs of setting them up, and you may also need to buy nutrient soil. If you use wood or slate for the walls of the beds, the cost of the structure will be very small. But if you want to make brick or concrete frames, then the costs will be much higher. Also the arrangement of paths between the beds. You can simply cover them with fine stones, or you can line them with bricks, stones, or fill them with cement. Complex and expensive options immediately increase the cost of gardening in high beds.
Making raised beds with your own hands
Do-it-yourself production will not only allow you to save significantly compared to options from stores, but also make a bed of the required shape and size. By accurately determining the configuration, you can use the maximum area and use every suitable corner. But we must not forget that most crops require at least 5 hours of intense lighting.

Raised beds are very convenient to process
Materials for creating structures can be:
- Wood.
- Plastic.
- Slate.
- Brick.
- Concrete, etc.
Wood, plastic or slate will not only require less financial investment, but will also make the beds collapsible. It makes sense to install monolithic concrete frames, brick or stone walls only if you are sure that their dismantling will not be required. However, their appearance is so interesting that they can decorate any area on their own. And fruiting or flowering agricultural plants in such beds will add an indescribable charm to the garden.
Advice. There are many types of plastic, some of them are not suitable for use in the garden, because... capable of releasing toxins. You need to try to protect yourself from this, ideal option there would be a certificate from the manufacturer.
Preparing the site for placing raised beds is very simple; you just need to dig up the area, removing perennials, stones, and snags. The process of assembling the frame varies depending on the material. When installing the structure, you need to make sure that all corners are level and the walls are at the same level. It is better to install it in the fall, so that all layers of the soil mixture are well compacted and the natural processes of overheating begin. If you need to install in the spring, you need to do this at least a month before planting the vegetables. All this time, abundant watering is required to compact the layers of the substrate.
The efforts and funds spent on building bulk beds will very quickly pay off. This type of farming allows you to completely eliminate digging and make it easier to care for crops and harvest. And the quantity and quality of the fruits will pleasantly surprise you.
How to make raised beds in the garden: video
Raised beds: photo


Recently, so-called “high beds” have become popular among amateur gardeners, as they are more convenient to work with than regular ones.
Gardeners who have just begun to develop their plots should be interested in the idea of a raised bed. An already landscaped area will not lose from such a bed, and the harvest from such beds will pleasantly surprise you.
How to make warm, high and comfortable beds on the site?
What are “raised beds”?

These are boxes without a bottom, 7-11 m long, 1.3 m wide, 0.7-0.8 m high, and 0.4-0.5 m deep below ground level. This height of the bed (table height) allows the elderly and physically weak people can carry out the work of planting and caring for plants without much effort.
Digging the bed 40-50 cm below ground level is necessary in order to lay down walls through which rats, mice, and moles will not penetrate into the bed.

You can build a garden bed along the wall of the house, but not on the north side; in this case, its width should not exceed 80 cm (the length of an outstretched arm). If the eaves of the roof of the house are holding back rainwater, this garden bed option is no longer available.
Oval and even round beds are possible (Fig. 1,2). They are built from flexible wavy sheets, and are fastened inside with wire.
If possible, choose the direction of the bed from north to south. If the direction of the bed is from east to west, then the plants should be placed so that tall species are located on the north side of the bed vegetable crops, for example peas.
Building material for raised beds

A raised bed is a structure that should last for decades. This must be taken into account when making a construction decision. Essential Elements buildings - walls. What material should they be made of? More important than others are properties such as frost resistance, rot resistance, corrosion resistance and relative strength. Some hobby gardeners solve the problem by buying cheap material on occasion, such as leftovers from a broken down house, most often destined for the landfill.

As they say, “everything on the farm comes in handy.” It can be wood (Photo. 1), hollow blocks, porous or just old brick (Photo. 2). And finally, the most suitable building material is sheets, the use of which for building beds saves working time.

These are, first of all, wavy sheets (Photo. 3) usually measuring 2x1 m, made from the very different materials(for us it could be slate). The advantage of sheets is their stability and strength, provided by “waves” that evenly distribute the external load. Even the thinnest corrugated slabs are suitable for constructing the walls of a high bed.
Laying a high bed

Organic material for filling the beds is prepared in advance, several months before the planned construction. A pile of branches, twigs, and round timber gives the impression of a huge mass, but after chopping and compacting this pile turns into a modest heap. Hence the rule, confirmed by experience: to prepare twice as much material for stuffing as seems sufficient at first glance. And since the need for organic material for raised beds is very large, it is necessary to use waste that can become compost.
From wood material trunks, twigs and branches, waste construction timber, sawdust, and shavings are used to build the garden bed. Pieces of plywood are less suitable, as they contain chemical glue. But if you do use them, then only as a “bulk filling,” and their place is at the very bottom, at the bottom of the pit.
Suitable material - old newspapers. Newsprint, made from wood pulp, decays quickly and is readily eaten by earthworms. The same can be said about cardboard if there is no photo or color printing on it. As a filler, to increase the amount of arable land per 10 meter bed, 2 m 2 of clay or sand is required (Fig. 3).
Construction and filling of high beds

In the future, you can refuse the spirit level. To do this, you need to find two fixed points on the front wall, and hammer in two pegs on the opposite side to which you can attach a cord.
A new stage of work - filling the beds
It should start from the bottom, with the most voluminous material: tree trunks, boards, logs, stumps, piles of newspapers can be placed between them. The larger the material for packing, the deeper it must be laid.
Blocks and stumps, located below everyone else and receiving less air, form a kind of “reserve” for soil microorganisms, thanks to which they remain active even in winter.
The clay filler is mixed with arable soil, and sand is buried in the middle layers of the bed, where it serves as an air-conducting material.
Then come the unchopped branches, which are trampled underfoot. They are covered with arable soil taken from the next section of the bed.

Then again crosswise a layer of branches, this time chopped.
This layer is covered with the remaining subsoil and then in the same order until the end of the bed, until another front wall is installed.
At this stage, it is already possible, without fear of ending up with your feet in the water, to water the loosened arable soil from a hose so that swimming occurs in places. And in the future, the bed will be moistened not only through watering from above, but also due to the capillary rise of moisture from below.
There is no need to worry about compaction of the bed from flooding, which is harmful to plants. This “care” is taken over by brushwood, branches and twigs. Thanks to their cross-shaped position, in an almost meter-thick layer, thousands of small depressions appear - chambers filled with air and so important for the functioning of the bed.
Now you can continue filling the bed: sticks the size of a hammer handle, finely chopped bushes and again a shovel of arable soil from a pile lying to the side, then newspapers, but now not in a whole pile, but unrolled and pre-moistened.

As the volume of filling increases, more and more arable land is required for filling. We are surprised to suddenly discover that our “creation” is even more insatiable than we could have imagined. Instead of soil, if you run out of it, you can pour sand and lay cobblestones.
When the filling level reaches 30 cm, counting from the top, begin stretching. A steel wire is threaded through two holes drilled through the convexities of the sheet on the opposite walls of the bed, both ends are connected and tightened with a screwdriver until (Fig. 4). until the wire loop is stretched, in this case it is necessary to catch in time the moment the tension of the opposite walls stops.
Benefits of a raised bed

Due to the fact that seasonal bacteria create an initial strong heating of the bed above (40°C), and the subsequent temperature is kept constant at (2°C) above the ambient temperature of the earth, vegetables grow faster than at flat bed. Fever This is explained by the fact that the overheating of the organic material of the bed occurs in some places slowly, in others faster, and not immediately, as in conventional plots.
- Blocks, stumps and other coarse material located at the bottom, at the lowest point of the packing, and poorly supplied with air, rot more slowly. And it is here that anaerobic microorganisms behave most actively - a constant source of heat, albeit moderate.
- The second reason for the slightly increased temperature of the bed is the insulating effect of air chambers created during packing.
- And thirdly, the increased temperature of the bed is the result of the dark color of the wavy slabs. Increased ground temperatures accelerate seed germination and vegetable ripening, unless prolonged unfavorable weather (cold, rain) negates these benefits.

A high bed creates optimal conditions for growing spinach, lettuce, green asparagus, strawberries, kohlrabi, Chinese cabbage, celery, tomatoes, leeks, carrots, mushrooms, tuber fennel and other crops (Fig. 6). You can, of course, grow flowers, but not those that are “too lazy” to bloom in the fatty, rich nutrients soil.
If we assume that a high bed is a bed for 10 years, then we can count on a constant increase in the humus layer, savings in fertilizers and an almost complete abandonment of plant protection products.
Great( 3 ) Badly( 0 )