TO category:
Car body repair
Basic methods of body painting
The application of varnishes and paints to the painted surfaces of bodies is carried out mainly in two ways: with a spray gun and brushes. Painting of parts by dipping or pouring is not used in auto repair plants.
Depending on the degree of damage to the painted surface and the type of body repair, body panels and tail surfaces are subject to:
1) touch-up;
2) coloring old paint;
3) full painting with removal of old paint.
To rebuild your house, a good option- paint the walls, giving a new color to the stage of your life. The steps to decorate a room are really simple, just try to take certain precautions and get started. Decorating your home is not an easy task, especially when it comes to walls, if you are looking for room painting techniques, you must consider certain conditions and steps to make the task simple and get excellent results.
As a first step, you must choose a color, so consider the rest of the decoration, from upholstery to furniture, all should be in harmony and respect the same palette. You can also use feng shui techniques to add energy and warmth to your home. remember, that dark colors, such as blues, taupes or very rich reds, compress rooms, while pastel colors and warmth create a feeling of calm and luminosity in your home.
Technological sequence operations when applying paint and varnish coatings boil down to the following:
1) preparing the surface for painting;
2) primer;
3) putty;
4) grinding the putty surface;
5) applying layers of varnish and paint;
6) polishing the painted surface.
1. Preparing the body for painting
When the body is completely painted after removing the old paint and repairing it in the tinsmith department (straightening, welding, filing, filling with solder, etc.), the body, which arrived at the paint shop, is sanded with sandpaper No. 2 soaked in white spirit along the entire outer surfaces and thoroughly wiped with hair brushes or rags soaked in composition No. 1120 until rust deposits are completely removed. Then the body surface is washed with a jet hot water to remove the cleaning compound and blow it with compressed air (especially in corners and other places hard to reach for wiping), after which it is wiped again, first with a rag soaked in neutralizing composition No. 107, and then dry with a rag or towel.
Preparing spaces before painting
Remove all objects, carpets and furniture from the room you are going to paint, those that you cannot move in their dimensions, you must cover them with old sheets or plastic bags to avoid breaking or splashing paint on them, and then remove all electrical attachments, light caps and plugs, etc. Another good measure when drawing is to cut electricity to prevent accidents.
Tricks for drawing easily, quickly and neatly
Covers frames, electrical switches, door frames and windows. Once the walls are completely dry, you can remove them. If the ceiling and walls are in good condition, you will not have problems with the paint itself, however, if the walls are shelled or have multiple layers of paint accumulated, use a steel putty knife to remove any excess paint, then sand down with fine sandpaper. In case of cracks or imperfections, you should fit the wall using plastic wrap to dry very well and sand with very fine sandpaper. Before you begin painting, apply one to three hands of sealer to the surface you are about to paint, allowing time to dry between coats and coats. The better the quality of paint used, the greater its coverage power, it can take one to two hands. Ask a number of hands until the wall is covered with a uniform color, allowing it to dry very well between hand and hand. Remember that when painting it is always painted on a downward path, meaning you should start from the ceiling, avoiding possible drip accidents or unwanted blasting on the side walls. On ceilings, paint is applied with a roller, and corners and areas close to corners are painted with a brush. Apply these areas first and then apply a roller to paint the wider surfaces. Avoid excess paint on the roller. After you finish the ceiling, it's the walls' turn. The procedure for painting each wall is similar to the procedure you did to paint the ceiling, when you apply the roller you should do it in a downward manner, this will give your walls a smooth finish. Finally, it's the line of holes. If the doors or windows are made of wood, you should apply wood sealant before you begin painting. Once the fixative has dried, apply the paint in a decentralized manner using a roller, following the wall painting procedure. In the case of doors, they must be painted on the inside. Ideas for decorating walls with effects and textures.

Rice. 125. Sanding rough film breaks:
1 - metal; 2- old coating; 3 - paint break; 4 - bevel.
When preparing to paint over a painted surface, you must first thoroughly rinse the body and tail with water, remove all fittings and then thoroughly sand the old coating with sandpaper No. 2 soaked in white spirit or turpentine, or with waterproof sandpaper No. 280 with water, being careful. to avoid scratching the paint surface. All sharp breaks in the old paint should be sanded until a smooth transition is formed (bevel, see Fig. 125), after which the surface should be wiped with a rag soaked in white spirit and rust should be removed as indicated above.
Has it ever been that you feel like you're giving new air your home and you don't know how to do it? Would you like to, but don't fall into the same tricks and themes as always? Then don't miss this post with 5 ideas to paint your walls with effects and textures.
#1 Painting walls with a handmade stencil
Imagine that you have one and you want to repair some decoration concrete wall. Look at these simple methods. A stencil is a template with a design or border that can be easily placed on a wall to be painted to precisely define the border or design. You can find them in specialty stores or create them yourself using cardboard or plastic sheets, why not? It's very simple, and unless the wall you want to paint is very big, it will get eaten.
To correct minor damage to the painted surface, the entire surface of the body is washed with water and wiped with suede; then the damaged area is cleaned with sandpaper No. 3 soaked in white spirit, or with waterproof sandpaper No. 220 with water until the rust is completely removed. Sharp breaks in the old paint are sanded until a smooth transition is formed, making sure that no easily peelable paint film remains. You must also be careful not to damage adjacent areas of paint when sanding the damaged area. Then wipe the sanded surface with a rag soaked in white spirit or kerosene, and wipe dry with a rag or towel.
#2 Paint walls with decorative rollers
The only difficulty is to be careful that the splices fit well. There are rubber rollers that come with a predefined pattern or frame. Using them is as easy as traditional rollers and the effect they create is amazing. By combining the background color of the wall with a pattern, you can create authentic wonders. Do you dare to try them?
Another original and DIY idea is the one you see in the image, you can create a rough texture by generously painting the wall and before it dries, run a straw broom, pressing so that it scratches the paint and reveals the color underneath.
2. Primer
When painting car bodies, two types of primer are used: oil and varnish. The main requirements for the primer are: absence of contamination, quick drying, weather resistance, good adhesion to the surface and anti-corrosion.
Glypthal primer is most commonly used as it provides a strong, weather-resistant base for painting and dries quickly.
#4 Painting walls with seals self made. The topic of decorating walls with drawings does not end with stencils and special videos. You can create your own stamps for nothing or less and get a new effect in your home. Look at the image with plain cardboard, with a piece of string, glue and paint, you can create a leaf stamp to mark it on the wall to your liking.
#5 Painting walls with a damp cloth. Just with a piece of cloth or fabric you have at home, soak it up and soak it in the paint, you can paint on the walls, creating a different effect for the ease of smooth painting. The trick is to crumple the fabric and stick these rough edges on the wall. Simple truth?
When painting with oil paints, they also use a primer consisting of iron lead or lead white, diluted with drying oil, and 20-25% turpentine (this composition gives an average semi-matte color).
The primer is applied with a spray or brush (depending on the painting method used) over the entire surface to be painted. When repairing damage, the primer is applied only to areas bare to the metal in a thin, uniform layer.
How do you think? Do you dare to change the wall decoration of your home with any of these simple tricks? The French love to pamper their interiors. And they're doing it even more because we're going through a real estate crisis where prices are high. Result: we do not move, but we change, we transform. One French man of three has carried out work to improve or restore his home over the past three years, National Union of the French Furniture Industry.
People overinvest in interiors during times of crisis. But what exactly are these works? Painting project: renovation of a 25 square meter living room, walls and ceilings. This is the preferred interior French. Ceiling height: 2.5 meters. Wall area - minus the occupied opening area - 40 sq. Partially degraded surfaces are also subject to preparatory work, including plaster passage.
3. Putty
Mechanical preparation of the body for painting involves careful straightening and sealing of dents and other irregularities by soldering (as necessary). However, even after careful straightening, irregularities remain on the metal surface, which are smoothed out with putty.
The putty is prepared on an oil or varnish basis and is sold ready for use. However, when working with oil paints, some paint shops sometimes prepare their own oil putty, which consists of chalk, drying oil and a small percentage of pigment that gives it a certain color.
Parquet project: replacing parquet in a room of 10 square meters. We are changing clothes. Replacing old carpet glued to the ground with mid range laminate flooring. The carpet is torn and the floor is the subject of a patch. The floors are laid to a sound insulation level of 20 dB. Total cost of work: 920 euros, including all expenses.
Purchase of materials and tools
Existing tiles are removed and replaced. Several square meters of pottery on the wall are deposited and replaced throughout the entire surface. The ceiling has also been repaired and repainted. All services include supply and installation for mid-range equipment. Excluding memory block.
The composition of the putty depends on the method of its application (using a spray gun or manually) and the condition of the surface on which it is applied. For deep depressions, the putty should be thicker than for small irregularities.
Putty can be local, when only individual defects are corrected, and continuous, when putty is applied to the entire surface.
Everything you need to know about the cost of painting work per m2
What is the price per m2 of painting? Discover the details of the price per m2 for painting a residential building.
The difference between the price per square meter and the hourly cost of a professional artist
As mentioned in this article, painting companies do not always offer their clients an hourly rate, but generally a price per m² of painting work. This seems more logical because the price of painting varies depending on the surface to be painted and the price of your painter. Thus, the size of your estimate of the craftsman will be significantly more accurate using the surface of the work in question.The lubricating mass is first applied to deep and uneven areas of the body, and then covered with a continuous layer over the entire remaining surface. The number of coating layers depends on the condition of the body surface. Typically, deep places are puttied with one layer, and then the entire surface is covered with two continuous layers. However, in some cases it is necessary to apply three continuous layers of putty; the first and third in the longitudinal direction, and the second in the transverse direction. Do not leave gaps between adjacent strips of putty.
The price of painting work per m2 is to be determined
The hourly price of building painters is an estimate of the duration of work on the surface to be painted. Therefore, calculating the number of painting jobs is more accurate if you directly consider the surface of the work rather than estimating the duration.
It is also easier for a professional artist to "inflate" the estimate of the duration of the work by offering a quote at her hourly rate. By calculating the estimate according to the area to be painted, you greatly limit the risk of having your artist pay too much for your design work.
A continuous layer of putty can also be done with a spray gun, but such putty only covers rough spots and minor scratches.
It is necessary to apply the putty to the surface of the body in an even layer, without leaving any excess lubricant. Poorly executed putty complicates the painting process.
Each layer of putty must dry before applying the next layer.
By assessing the surface that will be painted from your walls, you can easily calculate average cost painting. For example, to calculate the cost of painting the walls and ceiling of a 30 m2 room, you need to paint approximately 85 m2 multiplied by the price per m2 of painting work. This is the total cost of this painting about 32,500 rubles.
Interior Painting Cost Estimates
Of course, you should ask for a price per m2 of painting work from your professional artist before starting work. Also, make sure what is included in this per m2 price and what is not! Examples of prizes for interior paint work include preparing the substrate, applying undercoat and layers of paint depending on the part to be painted and its surface.
To putty corners and other places that are difficult to reach with a normal spatula, use pieces of rubber or pieces of celluloid sheet, which are sharpened with sandpaper.
When repairing damage to paint, putty is applied in small strokes along the length of the damage, partially covering the sanded edge around the damage.
The cost of work is 30 euros on average
It should be noted that the price per m² in painting usually includes
Preparing the walls of your home for painting, installing the trim, 2 coats of paint. More generally, the price of a painting job per m2 includes the supply and installation of materials for repainting the walls or ceiling of a house or apartment. Thus, 1950 rubles m² is average price offered by professional artists.Get a 100% free quote for your paint project
Get a paint estimate quickly to see how much of your project works with your home under construction. Professional artists from your department will send you a comparative estimate. Compare quotes of pictures to the total amount of the site. Make short quotes now.
4. Sanding the putty surface
To final prepare the surface for painting, the putty is sanded.
Each dried layer of putty is sanded in the order in which it was applied using waterproof sandpaper No. 220 and 280 or pumice (natural lumps or artificial in bars). It is most convenient to grind the putty with artificial fine-grained pumice No. 2-3 and 2-4.
Grinding is carried out on a surface moistened with water, using longitudinal movements in the same direction as when applying the putty. Pumice or waterproof sandpaper is also moistened with water. First, the glazing beads, stiffeners, panel corners are sanded, and then the door, side and rear body panels. You must sand carefully so as not to scratch or remove the putty down to the metal.
If after sanding any defects remain on the surface, they are covered with putty, allowed to dry and then sanded with waterproof sandpaper No. 280.
When repairing damaged paint, putty areas are sanded down to the level of the painted surface. In this case, there should be no edges, scratches, or marks on the previously painted surface.
After sanding, the body is thoroughly washed with clean water to remove dust (especially in corners and closed places where it most often collects) and wiped dry with suede or clean rags. It should be remembered that dirt or dampness remaining on the body after sanding can spoil the subsequent painting.
5. Spray painting
The main advantage of the spray painting method over the manual (brush) method is that the time required for painting is significantly reduced.
Since paint dust and solvent vapors from paint sprayed with a spray gun poison the air and make it harmful to health, spray painting is carried out in special chambers, the description of which is given above.
For getting paint coating good quality when spray painting method must be observed following conditions:
1) painting should be done in a room where it is recommended to maintain the temperature at +18-20°C, but not below +12C, and air humidity at about 60%;
2) the temperature of the paint and varnish materials and the body surface to be painted must be the same as in the room where painting is carried out;
3) strictly adhere to the sequence of operations of the technological process and painting modes.
Before starting painting, wipe the surface of the body with gauze soaked in composition No. 401 to remove dust, and adjust the air pressure in the spray gun until a uniform spray of paint is obtained.
The amount of pressure depends on the design of the gun and the quality of the paint material. Too much high pressure accelerates the evaporation of the volatile solvent in nitro varnish, interrupts the flow during painting and produces an overly fine spray. If there is insufficient air pressure, on the contrary, a large spray occurs and smudges form on the surface to be painted (Fig. 126). Normally, the pressure should be 5-5.2 atm. , .
The quality of the spray also depends on the correct dilution of the paint with solvent. Thick paint causes air pressure to increase, and this leads to rapid evaporation of the solvent, and the paint lies on the surface in a somewhat sticky state in spots. In such cases, add more solvent. The amount of solvent required to dilute a given composition also depends on the quality of the solvent.
It is advisable to test the newly formulated paint solution not on the surface to be painted, but on a piece sheet iron or old part and only after receiving good coverage and establishing normal pressure to paint the body.

Rice. 126. Adjusting the spray pressure:
1 - too much pressure; 2 - correct pressure; 3 - low pressure.
If there is no viscometer to determine the required viscosity of the solution, you should record the experimentally obtained percentage (or weight) content of paint and solvent in it, in order to subsequently use this proportion when preparing paint from these materials (the final result of dilution is given as a percentage of the weight ratio of paint and solvent).
The outer edge of the fan, when sprayed with paint, contains less material than the middle. So, if the fan covers an area 150 mm wide, then the outer 50 mm of paint on each side of the fan will be relatively liquid, and the middle 50 mm will be of normal thickness. Therefore, when painting a surface, you must ensure that all stripes of paint lie parallel to each other and that each strip covers the adjacent strip, compensating for weakly painted areas with a secondary coating. When the spray gun approaches the end of the strip, you must release the trigger and stop spraying to avoid drips.
The first coat of paint should be applied in a fine (mist-like) spray to avoid dissolving the oil-based undercoats.
One layer of paint is applied in a horizontal direction, and the other in a vertical direction. The movement of the spray gun should be uniform. Do not draw curves with your hand, pulling it away from the surface to be painted at the end of each strip of paint. This type of work results in an uneven coating. The spray gun should be moved parallel to the radius of the body panel.
In Fig. 127 shows the results of correct and incorrect coloring. When the spray gun moves correctly in relation to the surface, the paint lays down in a continuous and even layer, but when it is incorrect, the painted strip turns out to be rough in segments £ and B and with smudges in segment A. Towards the beginning of each movement, you must gradually press the trigger of the spray gun, releasing it towards the end movements.
Rice. 128. Results of oblique spraying
1 - insufficient staining; 2 - formation of smudges.
The distance of the spray head to the surface to be painted should be no more than 150-200 mm. If you hold the gun further than this distance, the paint will be rough due to excess paint dust; if you hold it closer, you will get smudges due to contact with the surface of too “wet” paint.

Rice. 127. Body spray painting: o - correct; b-wrong 1 - panel; 2-way pistol.
In Fig. 128 shows the results of spraying at an angle.
The diameter of the nozzle hole for primer should be 1.5 mm, for nitro putty - 2.5 mm, for nitro paint - 2.0 mm.
When painting the body in two different colors it is necessary to cover the part of the surface painted with one color (Fig. 129) and then paint with a different color. It is best to cover the painted surface with paper, leaving it on the body until final painting and drying. Newsprint cannot be used, since the solvent in the paint dust dissolves the printing ink and leaves prints on the ink. The paper is fixed to in the right place insulating tape.
To mask windows and body fittings, a special composition is used, which after painting is easily washed off with water. Sometimes the fittings and glass are covered with a thick layer of grease.

Rice. 129. Body camouflage with two-tone paint
Paint consumption when spray painting depends largely on the compressed air pressure, the diameter of the spray nozzle and the distance between the gun and the surface to be painted.
Paint consumption increases with increasing compressed air pressure, nozzle diameter and the distance between the gun and the surface to be painted.
Paint losses increase with increasing air pressure at a distance of the gun from the surface to be painted up to 100 mm and decrease at a distance above 100 mm. Nozzle diameter has little effect on paint loss when the gun is within 100-250mm of the surface.
Weighing of the test plates is carried out with an accuracy of OD g on technical scales. The plates can be wooden or metal.
Calculated consumption rates do not always coincide with the actual ones established in practice. So, for example, according to the calculation table, the consumption of glyphthalic primer No. 138 per 1 m2 of painted area is 60 g; At the Stalin plant, when painting ZIS-110 and ZIS-155 bodies, the consumption rate of this enamel was set at 90 g/m2.
When painting with nitro enamels, after the first coating, all defects remaining on the surface to be painted (irregularities, scratches, etc.) are identified and corrected with nitro grease, followed by drying and grinding the greased areas (the first spray painting is therefore called “detective painting”). Then the sanded areas are washed with water, blown with compressed air to remove moisture, wipe the surface dry and, finally, to remove residual dust, wipe the surface of the body with gauze soaked in composition No. 401.
To provide good quality films, nitro enamel are usually applied with a six-layer coating. After each painting with nitro-enamel, the paintwork is subjected to natural drying within 15 minutes, and after the third and sixth coating - additionally to artificial drying in a drying chamber at a temperature of 55-60°. After artificial drying, the heated surface is cooled in air for 5-10 minutes before proceeding to the next operation.
6. Sanding after painting
After painting, the body surface is treated with waterproof sandpaper No. 400, soaked in soap and water. This processing is carried out in a straight forward and backward motion, and not up and down, diagonally or in a circle (Fig. 130).
During the sanding process, the body is periodically wiped with flannel to check the condition of the surface. Small scratches can be easily removed by applying one coat of solvent. The movement of the sprayed solvent should be perpendicular to the direction of grinding (i.e., from top to bottom), and the spray gun should be held in a slightly inclined position. This allows the solvent-softened paint to fill in scratches.

Rice. 130. Proper sanding of a painted surface.
When sanding a partially painted surface, the adjacent unpainted surface is also sanded.
After sanding and washing, the painted surface is sprayed with a layer of solvent, the purpose of which is to smooth out the strokes and small scratches left after sanding the nitro-varnish film.
7. Polishing
The dried surface of the body is polished with a special paste, the composition of which is given above in this chapter. Polishing is done manually or with a polishing machine. When polishing by hand, the paste is collected onto a swab rolled from clean flannel and applied evenly over the entire painted surface. Polishing is carried out in circular and lobar movements, passing the swab several times over the same area until a shine appears.
A polishing machine with Tsigean skin greatly facilitates and speeds up the polishing process. During operation, it is necessary to move the device along the polished surface, without stopping for a long time in one place. After polishing, wipe the painted surface with a clean flannel to remove any remaining paste.
Below is a detailed technological process for painting the body of a ZIS-110 passenger car with nitro enamel and abbreviated processes for painting the cabin and. platform of the ZIS-150 truck.
The technological process of painting the all-metal cabin of the ZIS-150 comes down to the following operations:
1) prepare the surface for painting, as indicated in technological process higher;
2) primer with ZIS-13 enamel (white spirit solvent) Viscosity 28-30 sec. according to F No. 4 at a temperature of 18-20°;
3) natural drying - 3 minutes at 18-20°;
4) artificial drying - 30 minutes. at 100-110°; !
5) cooling in air - 15 minutes;
6) painting the entire outer and inner surface with nitro enamel No. 507 (solvent No. 646). Viscosity 30-32 sec. three 18-20°;
7) natural drying - 8 minutes at 18-20°;
8) painting the entire outer surface of the cabin with a second layer of nitro enamel No. 507;
9) natural drying - 15 minutes at 18-20°.
The sequence of operations when painting the platform is as follows:
1) cleaning the platform from sawdust and shavings;
2) removal of fatty stains with white spirit;
3) smearing gross defects in wood with putty No. 199;
4) natural drying - 15 minutes at 18-20°;
5) painting the entire surface of the platform with ZIS-Z enamel (white spirit solvent);
6) artificial drying for 30 minutes at 60-70°;
7) painting with nitro enamel No. 578 (solvent No. 646);
8) natural drying - 30 minutes at 18-20°.
8. Infrared drying
In our industry, the process of drying paint and varnish coatings using infrared rays is widely used.
Infrared are invisible rays located outside the visible part of the light spectrum and are transmitters of radiant thermal energy.
The radiant heat drying method involves irradiating the object to be dried with special lamps. Drying coatings in this way is very effective, since the rate of heat transfer from the radiation source to the irradiated surface is very high and energy is not spent on heating the air, since heat rays travel the distance to the heated body with almost no loss.
The main advantages of drying with lamps are the simplicity of the installation design and its maintenance, a significant reduction in the drying time of products, quick heating and fire safety. In addition, drying requires a significantly smaller area compared to steam-heated drying chambers. The cost of equipment for drying car bodies and tails and operating costs for its maintenance are also significantly lower than when using steam-heated chambers.
Source infrared radiation is an incandescent lamp, the light output of which is two and a half to three times less than the light output of conventional lamps. The incandescent temperature of the tungsten filament of drying lamps corresponds to 2100-2500° (instead of 2000-3000° for lighting lamps), due to which their service life increases to 10 thousand hours or more.
The most commonly used mirror lamps produced by our industry are SK-1 and SK-2. A special drying lamp SK-2 with a power of 500 W has a parabolic bulb coated on the inside with silver. It is characterized by high heat transfer and uniform distribution of infrared rays. The SK-1 lamp with a power of 250 W with a normal bulb also ensures uniformity and intensity of heat radiation. Sometimes ordinary lighting lamps with a power of 300 and 500 watts are also used.
To increase the heating efficiency, lamps with a reflective surface on the inner wall of the bulb or reflectors made of polished aluminum, chromed steel and other metals are used.
When choosing a material for a reflector, you should be guided not only by its reflective ability, but also by its durability. The best is a gold-plated surface, which reflects up to 98% of the rays incident on it. However, in practice, electropolished or anodized aluminum, sheet steel or brass are most often used, which are nickel-plated and then chrome-plated. When electropolishing and anodizing, aluminum is processed in special electrolytes under a certain regime. This treatment makes it possible to obtain a shiny and anti-corrosion surface. The surface of electropolished or anodized aluminum reflects 80 to 90% of the rays falling on it and is quite durable.
The diameter of the reflector depends on the power of the lamp used and is usually in the range of 175-300 mm. To obtain a powerful heat flow, the reflector is given a parabolic shape.
The drying and hardening process of the main types of varnishes (oil, cellulose and synthetic) is based on the evaporation of a volatile solvent and the oxidation or polymerization of the binder (in oil paints and synthetic varnishes). As the temperature rises, the drying process is known to accelerate, but with convection drying the temperature increase is limited. This is done for the following reasons
When drying is carried out by flow warm air, the surface layer of paint quickly heats up and the liquid from the painted surface also quickly evaporates due to the simultaneous action of high temperature and air. As a result, a dry crust forms on the outer surface, delaying further evaporation of the solvent from the inner layers of the film, which sharply reduces the drying rate. A significant increase in the drying temperature will cause, in the presence of a sufficiently strong dry crust, the breakthrough of vapors through the outer paint film or the formation of bubbles in it.
When drying with infrared rays, this does not happen, since radiant heat penetrates through the outer film to the metal coated with paint, heats it and is removed outside; only part of the radiant heat is absorbed at the surface of the film
35°). With this heating, the liquid evaporates from the inner layer of the film with maximum speed, since the film dries more intensively from below (near the heated metal) and gradually reaches its upper surface, which hardens last.
There is an opinion that the formation of a surface crust is prevented not by the spread of heat from the metal to the surface of the film, but by moisture that continuously flows from the deep layers of the film to the outer surface due to the intensive drying process under the influence of infrared rays.
An installation for drying with infrared rays is usually carried out in the form of a shield or a tunnel-type chamber (or in the form of a portable single-lamp installation) and consists of a welded frame assembled from angle iron and lamps in sockets attached to it. To ensure uniform heating and simultaneous drying of the entire surface, the frame of the drying unit frame is made according to the shape of the products to be dried.
In Fig. 131 shows a section of a tunnel-type chamber installed at the Moscow Small Car Plant for drying Moskvich car bodies.
The frame of this installation consists of five sections, each containing 132 lamps of the SK-1 type. Each section consumes 33 kW of power and can be turned on independently. Sections consist of two halves - right and left; facing sheets are installed on the end sections on the entry and exit sides of the body.
The power of the entire drying chamber containing 660 lamps is 165 kW. The surface of the body irradiated in the chamber is located at a distance of 100-150 mm from the lamp heads. The chamber is designed for conveyor drying of bodies.
In Fig. 132 shows the process of drying a car body in a tunnel-type reflex chamber.
According to the Kaganovich Carriage Building Plant, the capacity of the factory installation for drying a passenger car with a length of 20.2 m is 96 kW. With such power of the drying unit metal cladding a carriage painted with fiq-solo and covered with varnish putty requires an average of 35 minutes per operation.
At the Gorky Automobile Plant named after Molotov, an experimental tunnel-type drying chamber was made from two arc-shaped iron lattice frames, covering the cab on both sides, for drying truck cabs. 174 lamps, each with a power of 300 W, were installed in the chamber at a distance of 130 mm from the irradiated surface. When all lamps in the drying chamber were turned on, the power consumption was 43 kW.

Rice. 131. Section of a tunnel-type chamber for drying Moskvich cars.
The drying time of glypthal primer M-138 in this chamber did not exceed 10-15 minutes at a temperature of 95-140° instead of 45-50 minutes in a steam drying chamber at a temperature of 115-130°. The drying temperature of glypthal enamel should not exceed 110° to avoid changing the color of the paint.

Rice. 132. Drying the body in a tunnel-type chamber.
By replacing the vehicle headlight reflectors and lamps used in the pilot installation with specially manufactured reflectors and drying lamps, paint drying times were significantly reduced.
When drying car bodies, you should avoid heating the putty layer too intensely; the lamps must be placed at a distance of 450 mm. After drying and cleaning the putty layer and applying the first layer enamel paint To speed up drying, you can move the lamps up to 100 mm from the surface of the bodies.
Drying time depends on the type paint and varnish material, the thickness and thermal conductivity of the coating surface, the distance of the lamps from the irradiated surface and, finally, the power of the emitting installation.
For example, according to available data, the duration of drying with infrared rays of a single-layer coating with gray-green ALG-5 primer at a temperature of 80° is 45 minutes, and with A-138 primer Brown- 30 minutes. Drying the same coating with hot air and at the same temperature takes four times as long, i.e. for ALG-5 soil - 180 minutes, and for A-138 soil - 120 minutes.
Comparative data on the drying time of the metal cladding of a passenger car after each coating are given in Table. thirty.
The painted surface to be dried using lamp installations must have a temperature of at least 15-16°.
After drying and cooling, the irradiated film can be ground with pumice and water and polished. Experiments have shown that the paint film dried by infrared rays is stronger than with other drying methods.
To avoid loss of gloss on the coating surface, drying with infrared rays should be carried out at a temperature of 60-64°.
In automobile industry factories, mobile lamp units (Fig. 133) have become widespread, which are used mainly for drying tinted areas on the body and tail of a car. Such installations are usually mounted on massive stands; The distance of the lamps from the irradiated surface in height is adjusted by moving the frame with lamps along the stand of the stand.

Rice. 133. Mobile installation for drying with infrared radiation.
TO Category: - Car body repair
Nowadays, more and more often, when renovating walls, they do not cover the walls with wallpaper, but paint them. But simply covering the walls with plain paint is boring, but using a variety of techniques to obtain a beautiful and unusual coating is more interesting. Nowadays, stores sell a lot of paints and special tools that allow you to paint walls in an original way. There are also many available tools and methods for obtaining unusual walls. In order to create a beautiful pattern or relief on the wall, anything can be used - from newspaper to soft fabric.
Painting walls using the frottage method
Translated from French, this word means “to stroke.” Many people compare this technique with batik. It can be briefly described as follows: prints are applied to freshly painted walls with a piece of cellophane or newspaper, resulting in stains free form. The resulting effect largely depends on the thickness of the paint. It is important to choose its consistency so that the paint does not flow or spread. Also, if the thickness is chosen correctly, then the paint will be applied better and more evenly. In addition to the interesting effect, this technique has another advantage: if you don’t like the result, then wipe the still damp walls with a brush and apply new prints.
To paint walls in the frottage style you will need: paint (latex or emulsion), old newspapers, wallpaper paste, a paint container, a wide brush. 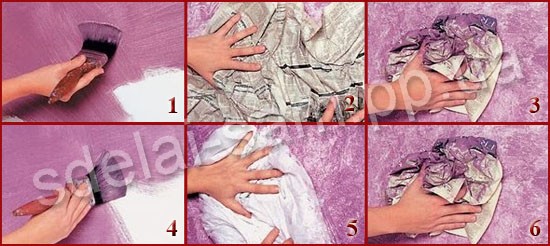
- In a paint container, mix emulsion paint and liquid wallpaper glue in half. Use a wide brush to paint a surface of approximately 3 square meters. meters.
- The old newspaper is crumpled in random order and applied to the old paint. On the wall itself you can still wrinkle it, and then remove it - fingerprints remain on the wall.
- The crumpled newspaper is rolled into a ball and rolled evenly over the walls so that the prints look the same.
- You can also perform frottage using cellophane. Also mixed latex paint With wallpaper glue in equal parts and cover 3 square meters with this composition. meters.
- Take a film measuring 1.5 x 1.5 meters, fold it and apply it to the wall.
- The cellophane on the wall is crumpled until the desired prints are obtained.
It is worth remembering that newspapers absorb more paint than film, so they must be constantly changed. Also, when using cellophane, a different pattern comes out because most of the paint remains on the wall.
Painting walls with a sponge
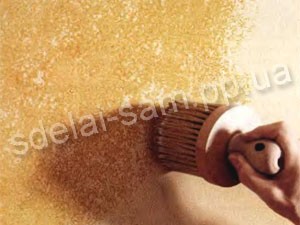 If you are thinking about final finishing there are no walls and no desire to glue wallpaper, great solution Problems will arise when painting walls using the sponging technique. This method involves painting walls with a sponge or brush and allows you to get interesting and, most importantly, varied effects. The big advantage of sponging is that it allows you to hide minor imperfections in the walls - cracks, recesses or hardened mortar. In addition, using this technique you can visually expand the space of the room.
For this type of wall painting they use water-based paint pastel or warm bright colors. The walls must first be leveled, plastered, and, if desired, can be covered with smooth wallpaper for painting. If paint has never been applied to the plaster before, then the walls must be covered with a primer (colorless or light shade).
It is better not to use glossy paints and other compounds when sponging, because after they dry, a shine appears that blurs the color transitions and distracts from the sponging effect. It is better to choose matte paints and emulsions.
The sponging tool can be a natural sea sponge or its synthetic analogue. The sponge should be prepared for work: its edges should be cut and rounded, and cuts and notches should be made on the working surface to imitate the natural structure of the sponge.
The surface of the wall is first covered with the main tone of paint and left to dry. At this time, the paint of a darker shade is diluted in a 1:1 ratio with water until the consistency of liquid cream is obtained. The paint is poured in a thin layer into a flat tray and you can start sponging.
Door casings, baseboards and the ceiling around the perimeter are taped with masking tape to prevent paint from getting in. You can cover these surfaces with thick cardboard.
The sponge is dipped in paint, wrung out and wetted again. Apply paint from top to bottom and slightly to the side.
After the previous layer has dried, you can apply another layer of paint. To do this, use an old, pre-washed sponge or a new washcloth.
For hard-to-reach places and corners use a small sponge.
With this method, it is important to apply the paint evenly. To do this, you can periodically stop working, move away from the wall and evaluate the result from a distance. There is no need to apply the paint too thickly with a sponge; it is better if the lower light tone shows through.
Painting walls with a fabric roller

To obtain an interesting effect when painting walls, it is not necessary to use special means and tools. For example, you can use a fabric roller for these purposes. A soft, lint-free cloth is wound in a random order on a regular paint roller to create a roller for decorative painting.
- The walls are pre-painted more in a light tone, wait for it to dry and pour a dark shade into the paint tray. Then a homemade fabric roller is dipped into the paint, the excess is lightly shaken off and rolled over the walls. In the end it turns out interesting effect marbling.
- Sometimes hard-to-reach places (for example, near the baseboard) cannot be painted right away. In this case, they are painted additionally.
- The most difficult places - in corners, near window sills and radiators - are painted not with a large roller, but with a piece of fabric. It is dipped into paint and strokes are applied to the surface.
You can apply the paint with a fabric roller in one layer or in several. It depends on many factors: paint thickness, roller shape, type of fabric, etc. You can first experiment on a small area of the surface, and then move on to painting the entire room.