Almost all car enthusiasts who make something in their garage every day understand perfectly well that with the tools and components in their hands, you can always create something necessary.
In the same way, you can create an entire compressor for painting a car from an ordinary compressor for a Soviet-style refrigerator.
But how to do this technically, and in what order?
Therefore, due to frequently asked questions from novice self-taught craftsmen, in this article you will learn how to make such a compressor on your own and using hand-made materials.
Which compressor to choose (factory or homemade)
The main criterion that should be followed when choosing a painting station is uniform air distribution, without foreign particles.
If such impurities are found, the coating will have minor defects - graininess, shagreen, cavities. At the same time, these particles can cause drips and stains, so it is best to entrust the painting to a branded air compressor, but there is just one catch - such a device is too expensive, which many car enthusiasts cannot afford.
You can save money and at the same time create a functional model by creating functional equipment, which is described in many videos and articles.
You just have to spend your precious time studying the material, and then creating equipment that should at least be of high quality.
The model presented by the factory or home-made does not matter, because the principle of its operation is the same and it consists in creating excessive pressure. But the method of pumping air is completely different - it can be produced manually or mechanically.
In the second case, this is a significantly higher cost of funds, manual method economical, but labor-intensive, requiring constant monitoring.
Automatic inflation does not consume your energy, but the product requires periodic maintenance, which is only worth the process of changing the oil for the compressor.
This is the only way to achieve uniform air supply and distribution. Having studied the theory, you will realize how easy it is to make a compressor station that will work efficiently, and it will not take much time.
We assemble a compressor unit from improvised means -
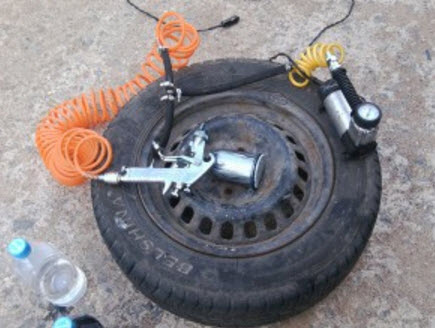
If you decide to create equipment for painting your own car, then you should stock up on certain materials for this:
- The reverse function requires a car camera;
- For the supercharger function you will need a pump with a pressure gauge;
- Chambered nipple;
- Repair kit and awl.
When all the components are prepared, you can begin to create a compressor station. To check how sealed the chamber is, you will need to pump it up.
If the problem still exists, then it can be solved in two ways - by gluing or vulcanization with raw rubber. A hole must be made in the resulting reverse to supply compressed air so that it comes out evenly.
A special nipple is placed in the hole for this purpose. The repair kit will serve for additional fastening of the fitting. To check the uniformity of air supply, simply unscrew the nipple. The original nipple allows you to get rid of excess pressure.
The pressure level is determined during operation, when paint is sprayed. If the enamel is applied evenly to the metal, then the installation is functioning. At the end of the procedure, it is worth determining the pressure indicators; to do this, just spray paint on the body of your car.
If the enamel lays down without tubercles, it means that the device is functioning efficiently. In addition, pressure readings can be monitored using special device- pressure gauge. But, its indicator after pressing the aerator should not be chaotic.

As you can see, you don’t need any special tools or knowledge to create such a compressor. At the same time, repairing and painting a car in this way is more effective than using a spray can.
Remember that neither dust nor water should get into the inner tube. Otherwise, you will have to re-paint the car.
If this installation is used correctly and with the use of all knowledge, then it will last a long time, and if you also automate the air pumping, then the process itself will go quickly.
Alternative to a professional device (refrigerator compressor)
Homemade compressor devices last much longer than the presented time, even in comparison with domestic and foreign-made installations.
This is quite natural, because by creating it with our own hands, we do everything for ourselves. top level. Therefore, people even thought about how to create a compressor from a refrigerator that would be on par with the installations of popular companies.
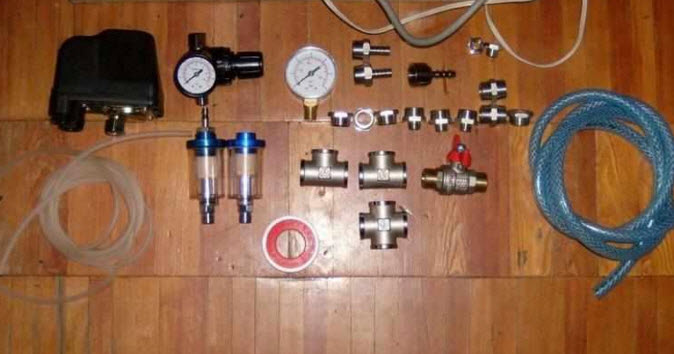
But to create it you should stock up on such components as a pressure gauge, relay, rubber adapters, oil and moisture separator, fuel filters, gearbox, motor, switch, hose, clamps, brass tubes, but also small things - nuts, paint, wheels from furniture.
Creation of the mechanism itself
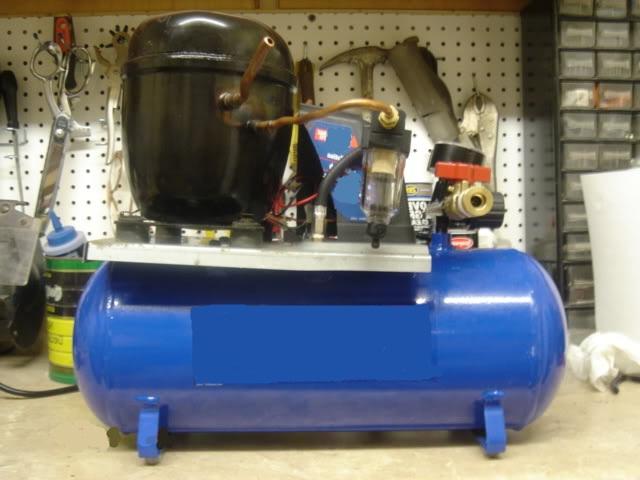
The whole procedure can be simplified by purchasing a compressor from an old Soviet-era refrigerator. This will not cost too much in terms of budget, and there is already a compressor start relay.
Foreign competitors are inferior to this model, because they are not able to develop such high pressure. But the Soviets cope with this task.
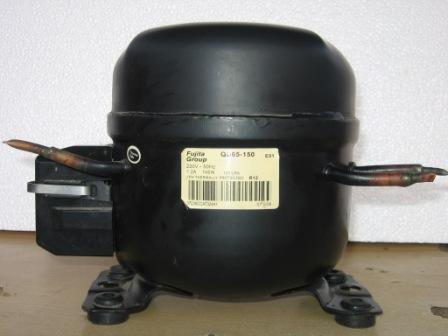
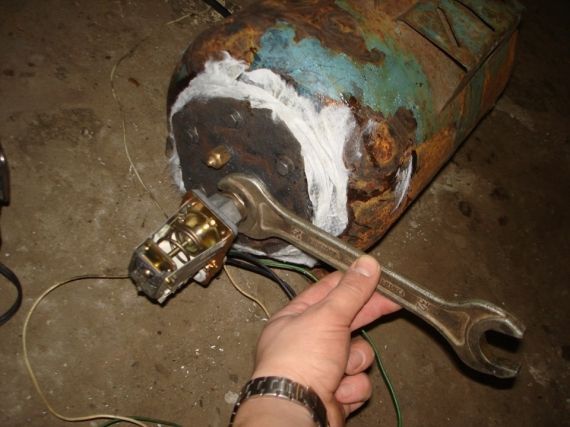
After removing the executive unit, it is advisable to clean the compressor from layers of rust. To avoid the oxidation process in the future, it is worth using a rust converter.
It turns out that the working motor housing is ready for the painting process.
Installation diagram
The preparatory process is complete, now you can change the oil. Since the refrigerator is old and it is unlikely that it has undergone constant maintenance, it is worth updating this point.
Since the system was always far from external influence, then justifiably no maintenance work was carried out there. To carry out this procedure, you do not need expensive oil; semi-synthetic oil is sufficient.
At the same time, it is no worse in terms of the presented characteristics of any compressor oil and has many additives that are used to advantage.
When examining the compressor, you will find 3 tubes, one of them is already sealed, but the rest are free. Open ones are used for air input and output. To understand how the air will circulate, it is worth connecting the power to the compressor.
Make a note of which hole sucks air in and which one lets it out. But the sealed tube needs to be opened, it will serve as a hole for changing the oil.
A needle file is necessary to cut the tube, but be sure to ensure that the chips do not get inside the compressor. To determine how much oil is already there, pour it into a container. With subsequent replacement, you will already know how much it will have to be poured.
Then we take the spitz and fill it with semi-synthetic, but this time expect that the volume should be twice as much as what was already drained. When the container is filled with oil, it is worth turning off the engine lubrication system; for this, a screw is used, which is pre-formed with fum tape and simply placed in the tube.
Do not be alarmed if drops of oil appear periodically from the air outlet tube. This situation is not too difficult to resolve; find an oil/water separator for a DIY installation.
The preliminary work has been completed, only now you can begin the actual assembly of the installation. And they begin with strengthening the engine, it is best to choose a wooden base for this and in such a position that it is on the frame.
It is worth noting that this part is very sensitive to position, so follow the instructions on the top cover where the arrow is drawn. In this matter, accuracy is important, because the correctness of changing modes directly depends on the correct installation.
Where is the compressed air located?
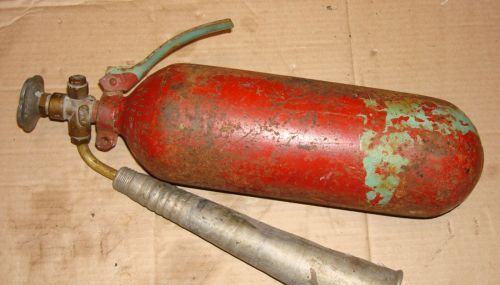
A cylinder capable of withstanding high pressure is a fire extinguisher container. At the same time, they have high strength indicators and can be used as attachments.
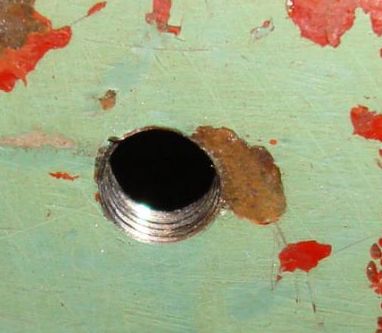
If we take the OU-10 fire extinguisher, which holds 10 liters, as a basis, then we should count on a pressure of 15 MPa. We unscrew the locking and starting device, instead of which we install an adapter. If you find traces of rust, then these places should be treated with a rust converter.
It is not difficult to remove it externally, but cleaning it internally is more difficult. But the easiest way is to pour the converter itself inside the cylinder and shake it thoroughly so that all the walls are saturated with it.
When the cleaning is done, the plumbing cross is screwed in and we can assume that we have already prepared two working parts of the homemade compressor design.
Carrying out installation of parts
It was previously stated that for fixing the engine and the fire extinguisher body, it is suitable wooden plank, it’s also even easier to store working parts.
In terms of mounting the engine, threaded rods and washers will serve, just think about making holes in advance. To fix the receiver vertically you will need plywood.
A recess is made in it for the cylinder, the second and third are fixed to the main board using self-tapping screws and hold the receiver. To give the structure maneuverability, you should screw the wheels from the furniture to the base.
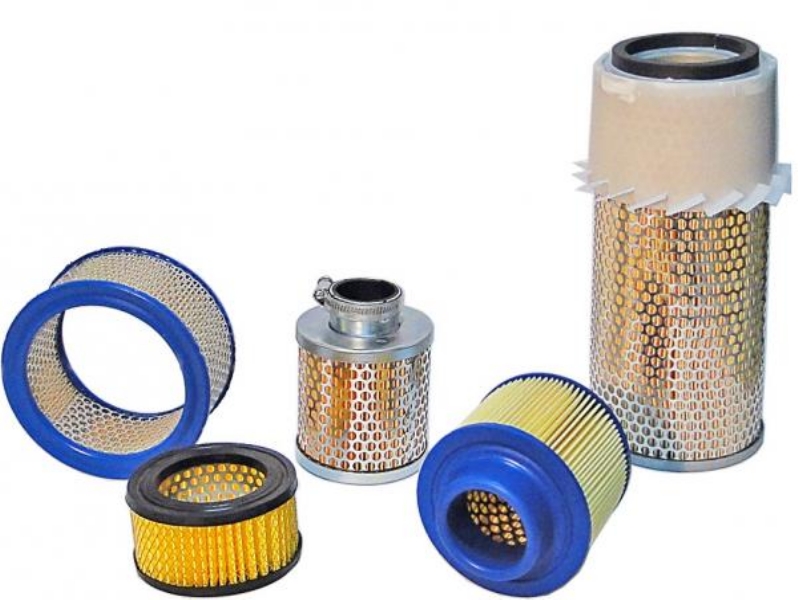
To prevent dust from getting into the system, you should consider protecting it - using a gasoline filter is an excellent option. rough cleaning fuel. With its help, the air intake function will be easily performed.
Since the pressure at the inlet of the compressor equipment is low, there is no need to increase it.
Having created an inlet filter for installation work with the compressor, do not forget to install an oil-water separator at the end to avoid the ingress of water droplets in the future. Since the outlet pressure is high, automotive clamps will be needed.
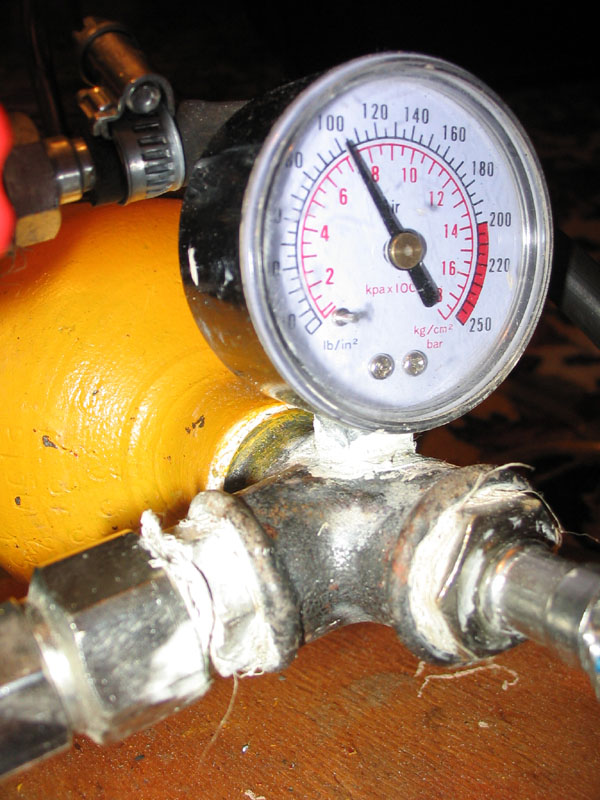
The oil-moisture separating filter is connected to the gearbox inlet and the pressure outlet of the supercharger. To check the balloon pressure, you should screw in the pressure gauge itself on the right side, where the outlet is located on the opposite side.
To control the pressure and 220V power supply, a relay is installed for adjustment. As actuator many masters recommend using PM5 (RDM5).
This device reacts to operation: if the pressure drops, the compressor turns on, but if it rises, the device is completely deflated.
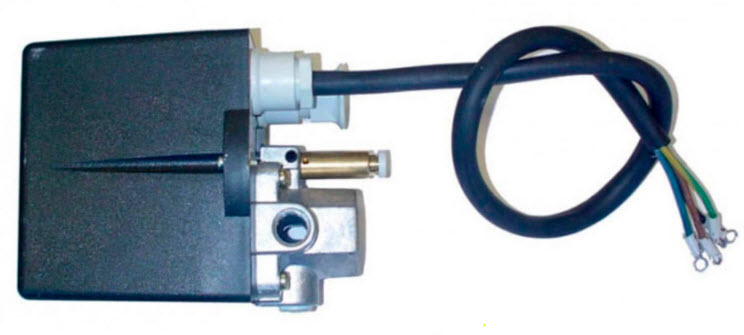
To set the proper pressure, springs are used on the relay. The large spring is responsible for the minimum indicator, but the small one is responsible for the maximum, thereby establishing the framework for the operation and shutdown of the homemade compressor installation.
In fact, PM5 are ordinary two-pin switches. One contact will be needed to connect to the zero of the 220 V network, and the second to connect to the supercharger.
You need a toggle switch to disconnect it from the network and save yourself from constantly running around in the direction of the outlet. All connected wires should be insulated for safety reasons. When this work has been completed, you can paint the installation and check it.
Pressure adjustment
Once the structure is assembled, it is quite natural to check it. We connect the last components - a spray gun or an air gun and connect the installation to the network.
We check the operation of the relay, how well it can cope with turning off the engine, and monitor the pressure using a pressure gauge. If everything works properly, we move on to checking the tightness.
The easiest way to do this is to use a soap solution. When the tightness is checked, bleed the air from the chamber. The compressor starts when the pressure drops below the minimum limit. Only after checking all the systems and bringing them into working condition can you begin the procedure for painting the parts.
To paint, you only need to determine the pressure and do not burden yourself with pre-treatment of the metal. In order to paint with a uniform layer, it is necessary to experiment and determine atmospheric indicators.
It is important to use the supercharger as little as possible. Every car enthusiast will understand the components and begin making a car compressor.
Can choose different variants production, but the use of navigator start-up and automatic pressure control is a more complex design, but its use is a sheer pleasure.
In this case, you will not have to devote time to monitoring the receiver, which will reveal more possibilities, and you can start painting a car, a fence or even a gate.
Routine maintenance is a mandatory procedure in order to prolong the operation of your homemade compressor.
To change the oil - drain or refill it, you can use a regular syringe. Filters are replaced only when necessary, when the rate of filling the tank chamber is reduced.
Compressor connecting components
When it is decided which compressor to choose and reverse, it is worth addressing the issue of combining them. At this point it is worth determining how the air will flow to the airbrush. The unit that is mounted to the receiver is responsible for air distribution.
The main thing is that these components are compatible with each other. The pressure switch is responsible for turning the compressor off and on. Although RDM-5 is used for water supply systems, it is perfect option for our case - for a relay.
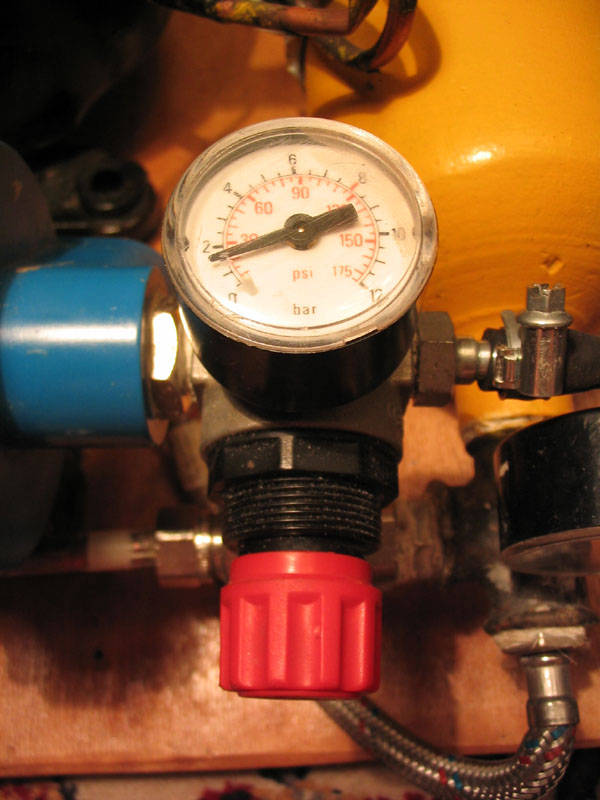
The bottom line is that the connection element fits onto an external inch thread. To find out what pressure is in the receiver, you need to use a pressure gauge and first think about the size that is suitable for the connection. We supply pressure to the air preparation unit and regulate it within 10 atmospheres; at this stage it is necessary to attach the oil separator filter.
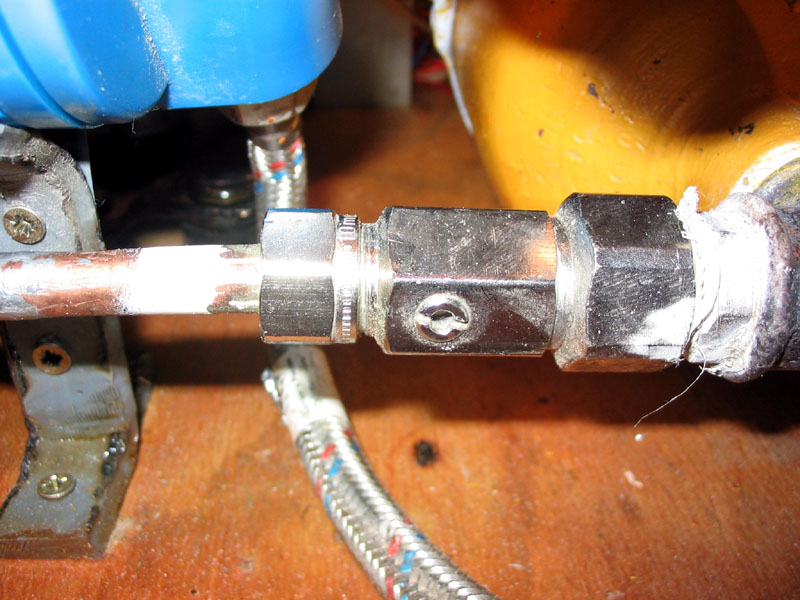
The pressure gauge allows you to check the pressure, and the filter allows you to prevent oil particles from entering the receiver. Turns, tees and even fittings are following components, which will have to be prepared for installation. To understand the exact number, you need to think through the diagram; select an inch as the size.
After solving the issue with adapters, it is important to think about the moment of installation of the structure; most often chipboard slabs are used for this. The design of your station should be maneuverable, because you will have to move it around the workshop. To make your work easier, you should attach roller legs to it.
You won’t have to invent for a long time here, just visit a furniture store, where there are a lot of such furniture wheels. To save space in your workshop, you can build a two-story structure. But here it’s better to stock up on large bolts to secure the structure. To simplify preparation for this stage, make a list of required components.
Assembling a semi-professional air blower
Assembly begins with removing the fire extinguisher screw and installing the adapter device. After removing the fire extinguisher valve, install the adapter there.
Four components are immediately installed on a durable hose - a reducer, a pressure switch and an adapter.
The next step will be to fix the wheels for installation on a sheet of chipboard. Since the structure is planned on two levels, it is necessary to make holes for the studs where the fire extinguisher will be placed.
The hydraulic accumulator is easier to assemble, because there are brackets on both sides. The lower part is fixed to the base, and the upper part is used for installing homemade equipment.
To reduce vibration when installing the compressor, silicone gaskets are used. The hose connects the outlet and inlet of air preparation.
The next stage will be the connection work. Jumper, protective elements - all this needs to be thought through.
The entire connection chain is carried out through the relay and the switch, assuming that the entire connection follows the diagram: the phase wire goes to the switch, the next connection is the relay terminal. To ground the relay, a special wire is connected.

What is better: buy or make a compressor yourself?
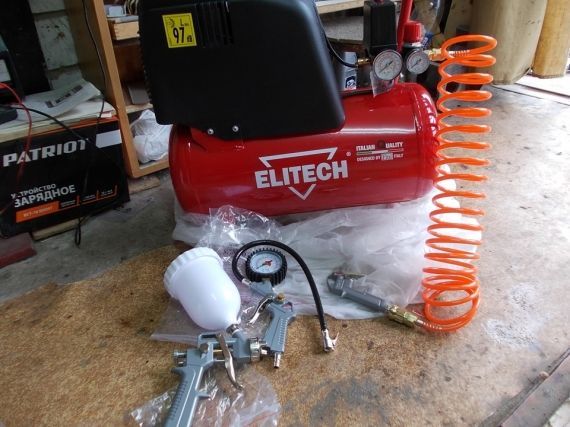
There is a wide range of compressor equipment on the market. Piston components, vibration units, screw stations - all these are components that are used in other areas.
If you wish, you don’t have to waste your time creating the installation; it is presented at any point of sale of auto parts or on specialized websites.
Such a wide range makes choosing the right product much more difficult. But if you decide to purchase a station, in this matter you should be guided by technical indicators, cost and reviews of those who have already assessed it.
If you are chasing warranty periods, then you should pay attention to models of popular brands. Expensive products are worth purchasing if you are engaged in repair work at a professional level.
Products that do not have a name and status can let you down, so it is better to spend money once and not take any more risks in this matter. Many manufacturers budget options save on components.
As a result, you will encounter frequent breakdowns and replacement of parts, while warranty repairs will take a lot of time. Therefore, many car enthusiasts are well aware that a do-it-yourself installation is sometimes more reliable than a factory one.
Such products with technical indicators win. For example, the components homemade device for painting a car it lasts much longer - compressors from refrigerators can last for decades, a fire extinguisher also has a colossal safety margin.
You can always improve the performance of your compressor yourself, everything is in your hands, but you can’t experiment like that with a factory device.
Your garage neighbors will probably get one when they see a well-made and well-thought-out device.
Many car enthusiasts are interested in how to make a homemade compressor for painting a car. After all, buying a ready-made one can cost quite a bit a large sum. Encourages drivers to self-assembly Such a device makes it easy to find the necessary components. Craftsmen often use the most unexpected things to create a compressor. To make such a device you will need a minimum set of tools. Usually, they independently assemble devices that operate on a 220 V network. Therefore, anyone who has a little understanding of electricity can make a compressor.

What does it consist of?
How to make a homemade compressor for painting a car? To answer this question, you need to understand what parts this device consists of:
- Engine (compressor);
- Receiver (reservoir for compressed air);
- Pressure gauge;
- Hoses.
Assembly
You should start with the engine. We remove it from the old refrigerator. Ideally, you need to find an old Soviet unit, but, in extreme cases, a newer one will do. You will see 3 pipes on the engine. 2 open and one closed. Oil circulates in a closed tube. It needs to be drained. To do this, cut the tube and drain all the lubricant. Fresh oil is poured in using a syringe. Don't forget to seal the resulting hole. To do this, you can use a bolt of a suitable cross-section.
It is important to determine which of the air tubes is the outlet. To do this, connect the compressor to power and take a look. Air will be sucked in through one of the tubes and blown out through the other. They should be marked. This will come in handy later. We clean the engine from rust. Then we paint it.
We fix the prepared motor on a thick board. It is important to position the relay correctly. Otherwise, the compressor will not work properly. Usually the location (top-bottom) is indicated on the motors. If yours does not have this, then when removing it, mark the location.
The housing of a ten-liter fire extinguisher is ideal for the receiver. It is quite durable and is guaranteed to withstand high pressure. First we eliminate corrosion. We clean the damaged areas on top. After which we paint the balloon. Just in case, you need to carry out preventive maintenance inside the future receiver. To do this, pour a special liquid inside and shake vigorously several times. This will clean the fire extinguisher from dirt from the inside. We screw in the cross designed for water pipes. This should be done using sealant.
We attach the resulting receiver to the board on which the compressor motor is already attached. It should be installed vertically. To do this, take 3 pieces of durable plywood. We cut a hole in one of them and install a cylinder in it. With the help of the other two, the resulting structure is attached to the base with the engine.
To make it easier to move the compressor, wheels from old furniture are attached to the base.
We are preparing the structure for work. We install a diesel filter on the inlet air pipe. The output tube is connected to the receiver. To do this, use a durable rubber hose. You need to install an air-oil filter in it; it is also taken from a diesel engine. The pressure here is quite high, so it is necessary to use reliable clamps. Must have a screw fastening.
A hose going to the gun is screwed to the receiver. A gearbox with a pressure gauge is embedded into it. This allows you not only to control the pressure, but to regulate it. To make additional settings possible, an additional control relay is often installed on the upper terminal of the cross.
The check proceeds as follows. We pump air into the receiver. We coat all connections with a soapy solution, so we check them for leaks. Next, bleed the air from the receiver. The compressor should react to this and begin pumping in a new batch of air. If everything works as it should, you can try painting something.
Every garage owner dreams of his own source of compressed air - having a compressor in the bins of the garage, you can do a lot of work on repairing your car yourself. But the cost of a new compressor is quite high, and purchasing an old one at your own risk is not a good idea. Although, in rare cases you can stumble upon a very profitable deal. If you still need professional equipment, then you can familiarize yourself with the catalog sold by LLC TD "TechMash".
But in any case, a do-it-yourself high-pressure compressor is great option, requiring minimal expenditure.
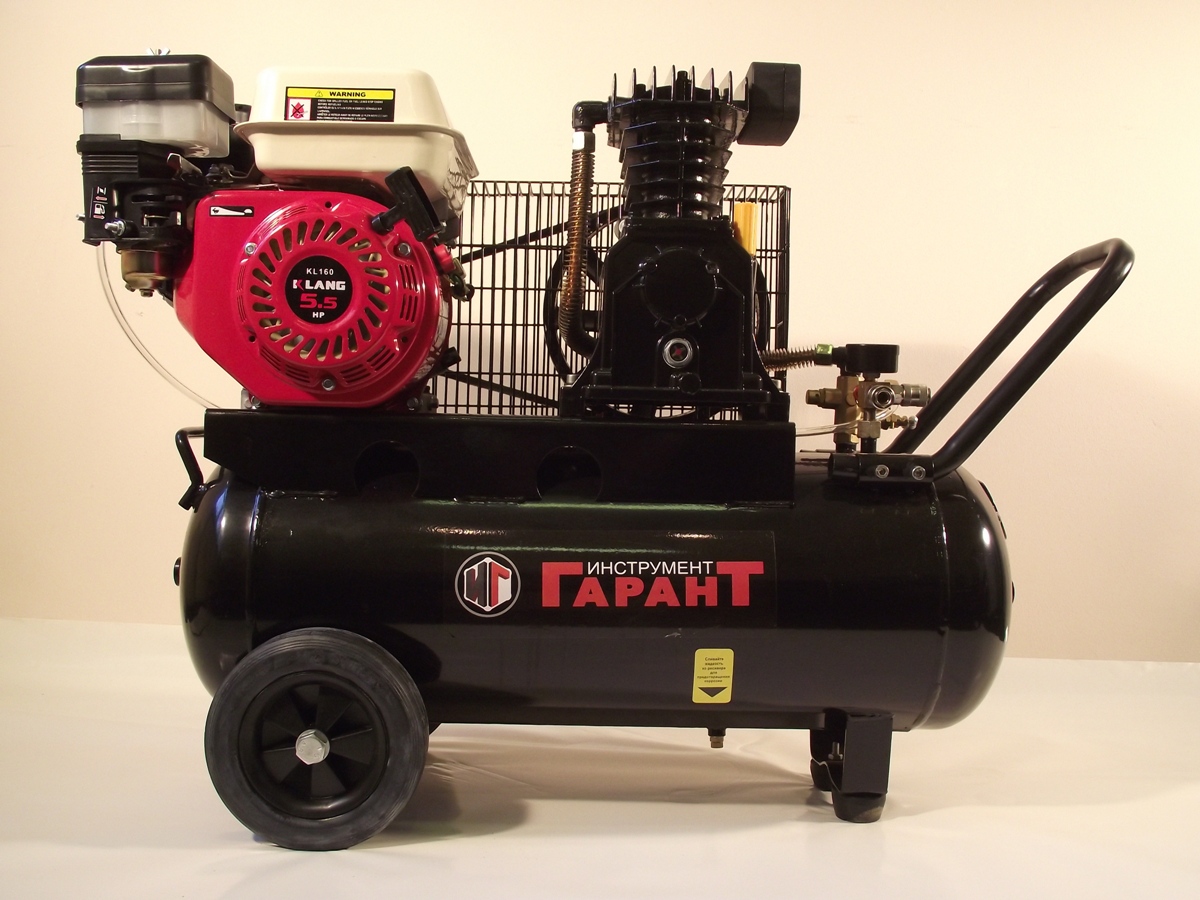
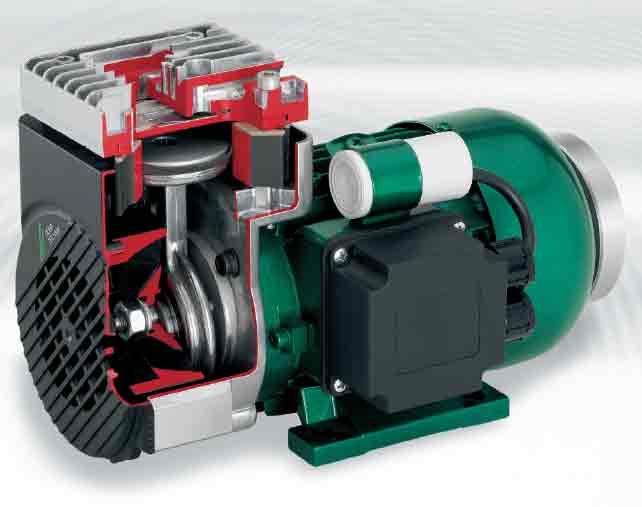
What is needed for this? First, you need to know how the basic compressor unit in the kit functions. And this is the engine, compressor (unit), receiver, connection parts. The engine transmits rotating movements to the compressor pulley via a belt drive. The driven compressor absorbs atmospheric air, which then enters the compression chamber. The movement of the piston reduces the working volume of the cylinder, inevitably compressing the air. The compressed air then enters a container called a receiver, and then through hoses the air activates pneumatics, sprays paint, and supplies energy to various tools. The receiver is necessary to eliminate pulsation caused by uneven compression of air by a piston compressor.
Secondly, when creating a high-pressure compressor with your own hands, you need to decide for what purpose you plan to use the compressor, since this is the determining factor in finding the necessary elements. By choosing a high-pressure unit of 10 atmospheres, you can provide yourself with compressed air for a long time to operate any type of pneumatic tools. For such a machine, a container is needed as a receiver that can withstand such internal pressure. A well-preserved formerly used fire extinguisher, a container from a gas cylinder, or a homemade container made by welding a plugged piece of pipe can serve as a receiver. But at the same time, the quality of the welds and the condition of the metal must withstand internal pressure not lower than one and a half times the operating pressure of the compressor. This will completely ensure the safe use of a homemade receiver.
The inside of the container must be protected from corrosion. There are many special liquids available for sale for such operations. Then you can give the cylinder an aesthetic appearance by painting it. The receiver can be installed horizontally or vertically, depending on its shape and the wishes of the author of the idea. Having decided on the position of the container, you should start drilling holes - in the lower part the hole is necessary for periodically draining the condensate that accumulates at the bottom of the container.
The liquid drain valve must withstand the pressure created by the compressor. To match the diameter and thread pitch of the tap pipe, an internal thread is cut in a newly drilled hole.
Next, the tap is screwed in - for reliability, you can use seals or silicone sealant. Then the same is done in the middle part of the receiver to supply air into it and in the upper part to exit. At the entrance to the tank it is necessary to install check valve so that air does not have the opportunity to escape in the opposite direction towards the compressor.

At the outlet, a through valve of the appropriate pressure and diameter is screwed in. It is best to make the outlet hole at the top of the receiver, since in this case the maximum amount of liquid will remain at the bottom of the cylinder. The pressure gauge can be mounted by making a separate hole for it and cutting a suitable thread in it, or by attaching it to the outlet pipe, up to the tap. Thanks to the pressure gauge, it will be possible to monitor the operation of a homemade high-pressure compressor and, if necessary, subject the installation to more precise adjustments. Another important point is that in order for the compressor to be able to periodically turn off and cool down during this time, you should pay attention to the size of the receiver. You should not make it small - the larger the receiver, the less often you will need to turn on the compressor.
As the main unit, you can use compressors from an old household refrigerator or a serviceable used unit. Car enthusiasts often use a 12-volt compressor to inflate wheels. There are many options. The main thing is to decide for what purpose the compressor is needed and how much air is needed. The advantages of refrigeration motor compressors are that they already have an engine in their design. In addition, they create an extremely low amount of noise. The disadvantages include the fact that when working with air, and not with freon gas, the compressor needs to frequently change the lubricating oil. As for electric pumps for inflating tires, this is also a good choice to create a high-pressure compressor with your own hands. But at the same time you will have to provide it DC 12 volts, that is, an additional power supply is required. And the volume of the receiver must be designed specifically for a specific model, since the periodic operation time of such pumps is limited, and it will have to have time to gain the required pressure in the receiver before it turns off.
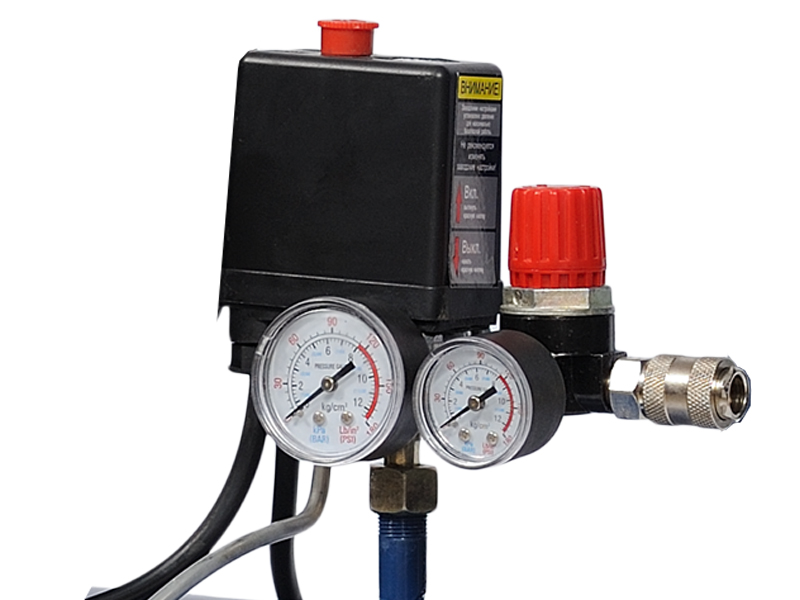
For greater ease of use of the compressor, you can adapt a very useful part - a pressure switch. It is best to install it on the receiver. Thanks to this device, you can correctly adjust the start and shutdown of the unit, which is necessary to control the pressure in the receiver and ensure uniform operation of the compressor and electric motor.
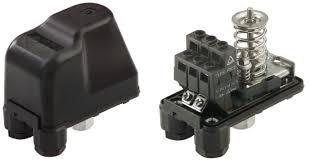
The pressure switch will eliminate the need to manually turn the compressor on and off, which means eliminating the risk of overheating of the electric motor and destruction of elements compressor unit caused by excessive overpressure.
Every owner of a garage or private home has probably had to deal more than once with the need to obtain compressed air to perform any household work or maintain their car. To solve this problem, it is enough to purchase a household compressor for DIY painting, which, in addition to painting, can also be used for other purposes in the household.
Modern models of compressors with required power and have sufficient performance small sizes Due to the compact arrangement of the units, they are therefore well suited for home use.
Criteria for choosing a household compressor
Among other things, the reader will be offered detailed instructions on choosing a household compressor, indicating the main parameters and technical characteristics that you should pay attention to when purchasing such equipment.
Power point
Different types of compressor equipment may differ from each other not only in technical characteristics, but also in their design, principle of operation and type of power plant that powers it.
According to the type of working drive, all machines can be divided into two groups:
- Most often, electric motors are used as a drive machine in household units.. This option is a classic scheme, which differs high reliability, relatively low noise level and relatively low cost, but its operation requires a connection to the electrical network.
- In some cases, a diesel or gasoline engine can be used as an alternative to an electric motor. internal combustion. Such a unit is completely autonomous for its operation, however, it has a significant number of disadvantages: short service life, increased noise levels, significant weight and dimensions, a fairly high price and the need for constant refueling.
Taking into account these factors, devices with gasoline and diesel engines have not become widespread, so units with electric drive are still used more often.
Operating principle
According to their design and the principle of the mechanisms used, the most common small-sized air compressors for household use are divided into two types: screw and piston.
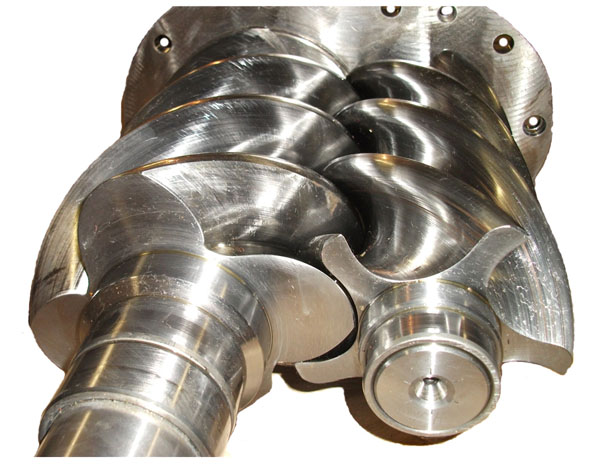
The operation of screw machines is based on two parallel screw shafts with a screw thread of a special profile, which are synchronized with each other using a gear block and rotate in the opposite direction.
Among the positive aspects of such devices are the following qualities:
- Screw units are characterized by high performance, uniform air flow and allow achieving high pressure at the outlet.
- Devices of this type are practically not subject to wear, so they can work long time, without requiring cooling and regular maintenance.
- During operation they generate slight vibration and low level noise.
- Compared to piston-type machines, they are less energy-intensive, which, with the same output power, allows saving up to 30% of electricity.
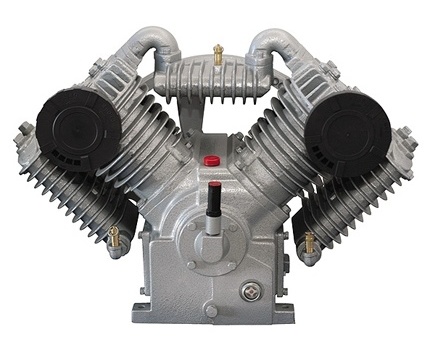
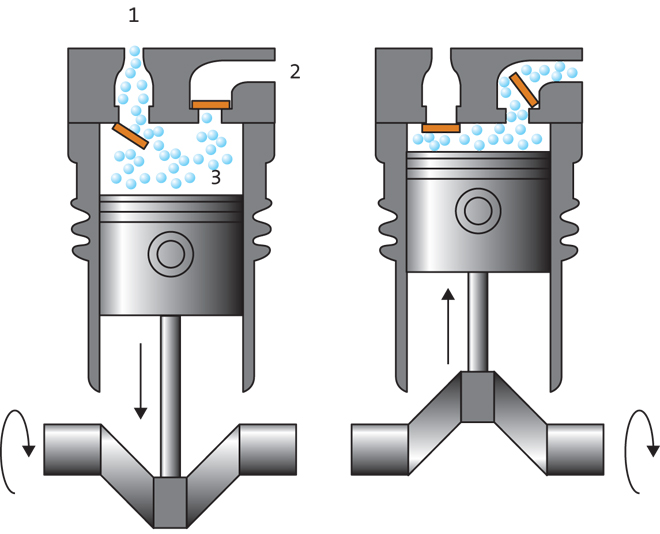
Piston compressors are the most common type of machine for domestic use. The operating principle of such devices is based on the compression of atmospheric air through the operation of a cylinder-piston group. Unlike screw ones, they have more complex design and contain a larger number of moving parts, so they require forced cooling and continuous lubrication.
The advantages of piston units include the following qualities:
- The relatively low cost of a compressor for painting, as well as a large range of models of various sizes, power and performance.
- The simple design and the absence of precision parts make it possible to carry out repairs and planned Maintenance at home without the use of special equipment and tools.
- Unpretentious requirements for air quality and conditions environment allow you to work in dusty, unheated rooms or outdoors.
Despite all the advantages of screw compressors, they are heavy and large in size, require the installation of a powerful electric motor, and in addition, taking into account how much such equipment costs, their use will be more advisable in industrial production or in large workshops. For the same reason, at home it is preferable to use piston-type compressor units.
What to look for when purchasing
Having identified for yourself the required type of power plant, and having decided on the type of air unit used, you should know that various household compressors for painting differ in many other parameters, which can subsequently affect the quality and speed of painting work.
- The electrical part is an electric motor with ballasts equipped with a thermal protection circuit breaker and an electric pressure regulator, which turn off the motor when the maximum permissible pressure in a pneumatic system or when a critical load value is passed. For domestic use, preference should be given to electrical devices that are connected via a single-phase circuit to a network with a voltage of 220 volts. You should also pay attention that the rated power consumption of the motor does not exceed permissible load home electrical network.
- The maximum operating pressure in a pneumatic system for household-grade devices can range from 6 to 12 kg/cm², which is quite enough for most spray guns and other household pneumatic equipment. (See also article.)
- Rated capacity is characterized by the amount of compressed air produced per unit of time and is usually expressed in liters per minute (1 l/min). This is a fairly important indicator, because its value significantly affects the speed of operation and the wear rate of the working unit. For normal operation, performance must be selected taking into account the amount of air flow consumed by the pneumatic equipment used.
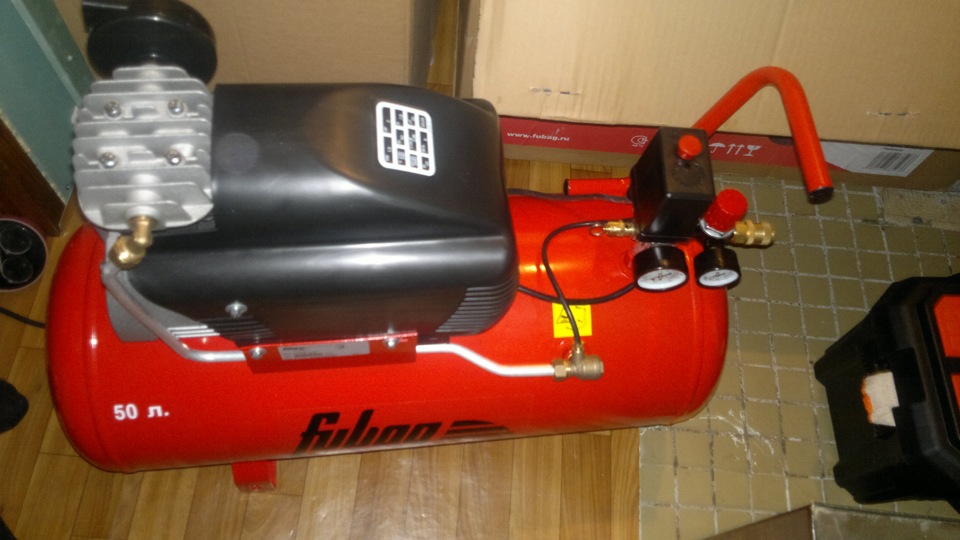
- The volume of the receiver is determined by the amount of air that can fit in storage capacity at atmospheric pressure. The larger this value, the longer it will take for the air to be pumped until it is completely filled, and the less often the compressor will turn on during operation to maintain the required pressure. Most optimal for home use The volume is considered to be 50 - 100 liters.
Advice!
For normal operation with household spray guns, the rated power of the engine must be at least 2 kW, operating pressure at least 8 kg/cm², productivity 220-250 l/min, and receiver volume at least 50 liters.
The quality of operation and durability of the compressor unit largely depend on compliance with operating rules and timely scheduled maintenance.
To ensure trouble-free operation and normal functioning of all parts and assemblies, it is recommended to follow simple rules:
- At negative temperatures the oil in the compressor crankcase can thicken, which increases the load on the engine and negatively affects the operation of all mechanisms, therefore, before starting the unit for the first time, it is recommended to keep it in a warm room or warm it up with construction hair dryer up to a temperature of +5-10° C.
- Condensation constantly accumulates in the receiver, so it must be periodically drained through a special valve at the bottom of the cylinder or settling filter. Be sure to perform this procedure before each painting.
- During intensive use, at least once a month, you need to check and, if necessary, clean the air filter on the inlet pipe, the cooling fins on the cylinder and head, as well as the grille and cooling fan casing.
- Before each start of the engine, check the oil level in the crankcase, and after finishing work, unscrew the output pressure regulator knob to the zero position.
Advice!
To save money family budget it is not necessary to purchase new equipment.
For home use, a used compressor that has been properly looked after and performed routine maintenance will be fine.
Conclusion
From the presented article it becomes clear that in order to do the right thing in the household, you need to take into account the main specifications of this device, as well as take into account air flow rates and operating pressure of consumer equipment.
For more information on this issue, you can watch the video in this article or read other materials on this topic on our website.