The change house is perfect for temporary living during the construction of a full-fledged house. But even after completing the main construction work the change house will not remain out of use. It can be equipped for a budget country house, a place to store various equipment, work clothes, bicycles and other household supplies.
Ready-made cabins are relatively inexpensive. But why spend money if such a structure can be built on our own, having bought only necessary materials and tools? We present to your attention instructions for arranging a cabin made of wood, a finished trailer and a metal profile. Choose the option you like and get to work.


The change house is a secondary utility room, but you should not take the process of its construction and arrangement too lightly.
First, prepare a drawing. You can make it yourself or find it ready-made option in available sources. The drawing will allow you to imagine how the finished building will fit into the surrounding landscape, as well as calculate the required amount of building materials.
Select the dimensions of the structure and its layout at your discretion. Typically, designs industrial production, intended for living, have a length of about 5-6 m, a height of about 2.5 m and a similar width. Otherwise, regarding the dimensions of the house and its layout, be guided by your needs and preferences.
Choosing a place to build a shed

When choosing a place for our house, we take into account a couple important points.
Firstly, we think about whether we will transport the structure somewhere in the future. For example, you are going to build a lightweight house for a couple of seasons, and then remove it to another place. If moving is part of your plans, it is best to place the change house as close as possible to the exit from the site.


Secondly, we decide on the purpose of the room. If the shed will be used only as a shed for storing various tools and other household supplies, it is best to install it approximately in the center of the long side of the main house so that it can be easily reached from any side of the site.

Helpful advice! If you do not rule out that in the future the shed will be converted into a bathhouse, build it in a remote, secluded corner of the site, keeping in mind the fire safety rules.
Making the base
Our foundation will be the same for all three cabins. The only exception would be a ready-made trailer on wheels - there is no need to build a foundation for it.


We make the basis as follows:
- we get rid of the top fertile layer of soil;
- compact the bottom and walls of the resulting pit;
- cover the hole with geotextiles;
- pour a layer of sand over the geotextile and compact it thoroughly;
- We place the cinder blocks symmetrically on the resulting pillow;
- We wrap each support with a layer of roofing material.
Important! If you plan to attach a small porch to the shed, consider installing supports for it at the same stage.
We are building a wooden shed


Let's start building the frame of our cabin. First, we lay a wooden beam around the perimeter of the future structure, as well as in its center to further strengthen the structure.


We connect the opposite sides of the beam. To do this, we fasten the logs to the beam of the lower trim. Any connection can be made in a suitable way. Connections using the tongue-and-groove method, using metal corners and anchors, have proven themselves well. We made preliminary selections to connect the elements and additionally strengthened the fastening points with nails.
We install vertical corner and intermediate posts. We install intermediate supports in meter increments. To do this, we use timber with a cross section of 15x15 mm. Don't forget to leave an opening for the door. To securely connect the frame elements, we use metal corners and self-tapping screws. At the same stage, we install support pillars for the future porch, if its presence is provided for by the design of the cabin.


Important! The height of the vertical supports on the rear and front sides of the cabin should differ by approximately 50 cm. Such a difference will ensure an optimal slope of the roof and precipitation will not linger on it.
We mount the beam of the upper trim. The support posts of our change house have different heights, so we work as follows: first we lay the timber on the tops of the higher supports, then we connect the low posts and install the side crossbars perpendicular to them. We make connections using the already familiar method with samples and nails.


Laying floor beams
As a result, our frame will be divided into a number of rectangular sections. To strengthen the structure, we connect the opposite lower and upper corners of each such section with jibs made of boards.
We attach the rafter beams to the top roof sheathing. We use the boards that are as even as possible to make lathing easier in the future. We install the rafters in increments of about 500-600 mm. We pay Special attention strength of connections on roof beams.


We construct the roof so that it protrudes slightly beyond the boundaries of the frame. This will allow us to arrange a base for drainage on the back side of the cabin, and mount a canopy on the front part.


We choose the material for the finishing roofing at our discretion. For example, ondulin is good. We lay it with an overlap, starting from the bottom of the slope. Before laying ondulin, you should lay out continuous sheathing from boards and attach a waterproofing film over them. Instead of ondulin, you can use slate or other material of your choice.
Change house from a construction trailer


Don’t want to bother with assembling the frame and other related activities? You can buy a ready-made trailer and equip it for a cabin. Such trailers do not even need their own foundation - you just need to carefully level the site and install the container (trailer).
If you equip a used trailer as a cabin, carefully examine its condition. Clean off traces of rust, replace heavily damaged cladding elements with similar ones, weld patches onto the through holes, coat the metal special primer and paint it.
The installed structure must be insulated. The rest of the arrangement is at the discretion of the owner. These points will be discussed separately below.
You can also buy a trailer on wheels. The option is mobile and very easy to use. After all the arrangements for arranging such a trailer have been completed, it is installed on the frame of the trailer.
We build a shed from metal profiles


The construction of a frame made of metal profiles will require more effort compared to the construction of a wooden analogue. But the iron change house will last much longer.
The set of necessary tools includes:
- hammer;
- welding machine;
- drill;
- screwdrivers;
- corner;
- grinder;
- tassels;
- construction stapler;
- roulette;
- hacksaw
We also buy the following materials:
- profiled pipe measuring 2x2 cm, 4x2 cm, 4x4 cm and 4x6 cm;
- mounting rail 2x4 cm;
- galvanized sheet steel;
- corrugated sheeting;
- primer for metal;
- self-tapping screws for fastening corrugated sheets;
- screws for metal;
- staples for a construction stapler;
- rivets;
- OSB boards;
- polyurethane foam.
Making the base
We will assemble the base of the frame from a pipe measuring 4x6 cm. We cut the pipes in accordance with the dimensions of the structure being built.
We weld the pipes according to their external dimensions and get a rectangular edging. In total we need to make 2 identical rectangles. We will make the floor from one, and the upper part of the cabin from the other.
To make the floor reliable, we create a grid inside the rectangle from the same profiled pipes. We are making a change house with a width of 250 cm. With such dimensions, it is enough to weld 2-3 longitudinal pipes along the entire length inside the edging. Cross pipes weld every 50 cm.

Next, we take a galvanized sheet and fix it with self-tapping screws to the base of our change house. We turn the base over and lay it with the galvanized sheet down on cinder block supports or simply a leveled area. The structure does not need to be attached to the cinder block - the cabin will be sufficiently supported by its own weight.
We mount the racks

Installation of racks

Installation of racks


We make vertical supports from a 4x4 cm pipe. We cut it into pieces in accordance with the planned height of the change house. Usually it is 250 cm.
We place the first supports in the corners of the foundation constructed at the previous stage. We check that the angle at the junction of the posts with the base is strictly straight.
We fix the leveled rack by welding. Similarly, we set up the racks in the remaining corners.
Additionally, we will need to install intermediate racks. To do this without disturbing the geometry of the structure, we take the second rectangular pipe base made in the previous step and lay it on top of the corner posts.
We scald the resulting “cube” with intermediate posts and spacers. First, we take pieces of corrugated pipe 4x4 cm along the height of the structure and weld them vertically between the lower and upper bases. The recommended installation step is 100 cm. At the same stage, we provide an opening for the door.
We weld the horizontal cross member around the support structure. The pipe must be welded to vertical posts at a height equal to half the height of the cabin.
We make the spacers from a 2x4 cm profiled pipe. We cut it into 30-centimeter pieces. We cut each edge of the workpiece at a 45-degree angle. We scald all the corners of the structure with the resulting spacers. Additionally, we can scald the floor with them.
We make the roof

We made the bottom part of the frame and the wall. Next we are engaged in the manufacture of the “skeleton” of the roof.
We make trusses in the form of isosceles triangles. We use a 2x4 cm pipe. The recommended installation step for the trusses is 1 m. We weld them along the length of the frame. We cover the roof with corrugated sheets. If you wish, you can use another material of your choice.
All metal elements We cover the frame with a special primer, and after it dries, we apply paint of the desired color.
Arrangement of a change house
We install windows and doors (it is better to purchase them ready-made). It is advisable that the windows have a hinged design and there are at least two of them - you will not have to waste time installing additional ventilation. We are starting to further arrange our cabin.

Making the floor
First, we construct a subfloor from boards treated with an antiseptic. We lay them out as tightly as possible to each other and attach them to the frame with self-tapping screws.


We spread a waterproofing film over the boards. We attach it to the joists using a construction stapler with staples.
We nail additional logs to the base for laying thermal insulation and attaching the second layer of boards. We fasten the logs in increments equal to the width of the selected thermal insulation material. Mineral wool, a relatively inexpensive and time-tested thermal insulation material, is well suited for floor insulation.
We lay insulation in the space between the joists. We fix a layer of vapor barrier material on top. A stapler with staples will help us with this again.
We lay the finished floor boards. We attach them to the joists using self-tapping screws. Finally, we varnish or paint the floor.
We carry out external cladding


The cabin trailer can be left without cladding, but a structure made of wood or metal will require mandatory exterior finishing. We won’t just leave the “bare” frame, will we?
We tighten the frame waterproofing film. Carefully seal the joints of the waterproofing strips with tape. For external cladding Many different materials are suitable for walls:
- wooden boards;
- composite panels;
- siding, etc.
Choose at your own discretion. The cabins covered with a block house also look very nice.


Sheathing a metal shed with corrugated sheets
Important! The area of the frame allocated for the porch is not sheathed.
Interior decoration


We place insulation in the space between the frame posts. We cover it with a layer of vapor barrier material. We attach the vapor barrier to the frame using a suitable method.
We fill transverse slats on top of the frame to secure the insulation. We attach the selected internal lining material to the same slats. Most often for interior decoration clapboard is used. For the rest, focus on your preferences and available budget.
Electricity


We will not install full-fledged wiring into the change house. Such buildings are not permanent and do not require such equipment. But how, in this case, can at least organize lighting and heating? A good extension cord with a cord of suitable length will help us with this. We turn it on to the nearest available source of electricity and pull it into the change house.
In a change house, we can include a tee in such an extension cord for greater convenience and the ability to use several electrical appliances at once.
Lighting
We arrange it at our discretion. In general, a few simple lamps installed in the main functional areas will be enough for a change house.

Water supply
For maximum ease of use of the cabin, we run water into it. We will not build a major expensive water supply system. It is enough to connect a flexible hose to a water supply source, insert it into the household through a pre-prepared hole in the wall and equip it with a tap to shut off the water.
We can install a compact water heater near the hose attachment point. Special bulk models are available on the market. It is enough to remove the top cover from such a tank, fill the container with water from a hose, plug in the heating unit, and after a short time use warm water at your discretion. If desired, a hose with a shower head can be easily connected to such a water heater.
A compact sink wouldn’t be out of place in your household. We attach it to the wall in a convenient place. We connect a corrugated pipe to the sink drain to drain water. We remove the corrugation through a pre-arranged hole in the floor and connect it to the sewer pipe. Water will flow through the sewer pipe into a drainage hole or other designated place.

Heating
The heating is done electrically. A budget option– a pair of fan heaters. More expensive and effective - oil heater or convector. We select the power of the heating unit in accordance with the area of our shed.


At the end, all we have to do is furnish the room. At this point, we focus entirely on our preferences and needs.
| Parameter | Metal shed | |
|---|---|---|
| Price | Cheaper. For additional cost reduction natural wood can be replaced with wood boards. | Expensive. Metal has a higher cost. |
| Durability | Lasts less than metal ones. Wood does not tolerate moisture well. | Lasts for decades. |
| Mobility | It is easier to transport, but there is no guarantee that the wooden structure will withstand transportation normally. | Transporting is more difficult, but safer. |
| Possibility of installing communications and additional elements | Can. More difficult. | Can. Easier. |
| Environmental friendliness | Eco-friendly | Less environmentally friendly when compared with wooden cabins. |
Good luck!
Video – DIY change house
Having acquired a summer cottage, the first thing you should tackle is making your own change house. Why a change house and why your own? Because the complete arrangement of a dacha will take more than one day or even more than one season, and no one can stand spending the night and hiding from the rain in a car for that long. A tent is also not an option: where to wash and cook food in bad weather? And with their own - because the prices for ready-made country cabins are by no means low and their durability often does not exceed 5-6 months. At the same time, in a small room for temporary short-term stay and household needs (which is a change house) there is nothing that a person with absolutely no construction experience could not do on his own. During the construction process, it is acquired, which will be useful during the construction of a house, and other things that are necessary for good rest in the country. AND A properly constructed shed will then serve for a long time, being very useful on the farm.
Change houses are sometimes called temporary buildings, meaning that they are removed when no longer needed. This idea was formed under the influence of people engaged in field work, especially builders. There, indeed, upon completion of the project, all temporary trailers are dismantled or taken away. The same builders were the first to think of building a change house in the country. During the Khrushchev dacha boom, they were also given land, and they quickly began to build something like their own locker rooms, warming rooms, foreman’s rooms, etc. At that time, building materials for ordinary citizens were not widely available, and the construction of a good country house could drag on for years with the full skill and ardent desire of the happy new owner of the site.
Since the change house was supposed to be used for a long time, people soon developed inexpensive designs that required a small amount of materials, but were comfortable and durable. It was a pity to break them later, and in the cabins they initially began to place a utility block in a dacha type 3 in 1: a bedroom-shelter, a storage room/warehouse, a toilet with a shower. In this form, the country house has survived to this day, only externally it has been improved, see Fig: building materials have become more accessible, and demands for aesthetics and quality of life are higher.

The meaning of a change house
The household pioneers of the past often still had to disassemble their creations due to the same shortage of materials, if there were not enough of them for the house. But the modern summer resident immediately builds his change house for a long time. The current country house is designed to perform the following functions:
- Residential, while the site is being developed. In the future, the shelter room will be converted into a bathhouse, a warehouse for finished products, a sparrowhawk rabbitry, a utility room for a greenhouse, etc.
- The utility room is like a shed for household property and gardening equipment.
- Sanitary and hygienic facilities such as a locker room, a bathroom, a storage room for work clothes and shoes, a summer kitchen.
- Aesthetic - with the goal of removing all the unsightly aspects of country life out of sight.

The point of this approach, firstly, is that the very concepts of the purpose of the dacha have changed. The current summer resident definitely wants to have a recreation area with a pergola on the site, decorative pond or, a flower garden, rock garden, barbecue, etc., even if the dacha is commercial and the family lives on the income from it. Therefore, a change house with a utility block and a greenhouse/greenhouse are placed in the backyard, and a recreation area is arranged in front of a beautiful country house, see fig. on right. The robe and shoe covers are left where they worked; to relax or receive guests, they walk along the paved path already clean, without carrying clods of earth from the beds.
Secondly, a country house is essentially a bedroom and a living room. In the heat, you want to be cool in it, but to prevent the air conditioner (which can simply be stolen during the winter) from ruining the budget, an expensive and complex permanent structure with low heat loss and tightly closed windows/doors are required. But who wants to sit locked up in a dacha and make sure that the whole company doesn’t leave the door wide open behind them? What kind of vacation will this be? It’s easier to put blinds on the windows or hang awnings - and let the room be ventilated.
In this case, a kitchen, shower and toilet in the house will not add coziness and comfort. It will also be more pleasant for the housewife to cook in the fresh air, and not in the stuffy air; suddenly there is bad weather, you need to do your cooking under the roof, without bothering anyone and so that you don’t crowd around and make noise. In addition, the installation of a toilet is a very complex problem. The point here is: the sanitation requirements for the distance from water sources and residential buildings also apply to neighbors, plus it is necessary to ensure the possibility of access to a sanitary facility. And if you cooperate with the same neighbors, then the septic tank common to 4 adjacent plots becomes “like a native” at the junction of their borders; pumping is required less often, and may not be needed at all for years. And there is no need to destroy the earth by laying pipes from the house to the septic tank, which is expensive.
Next, you need hot water for the shower and kitchen. Installing a boiler or stove with a water heater in a house is again inconvenient; building a house with a chimney according to the requirements of the fire safety regulations is again difficult and expensive, but a stove fits into a change house much easier, because This premises is not residential. Finally, we live in the 21st century - in the summer, electricity for a refrigerator with an electric stove can be provided by a solar battery, and hot water – a solar panel. Current prices for them are quite affordable, and some designs can be made with your own hands. But they will not add aesthetics to the house, but flat roof they will stand up the cabins “as they were there” and will not be an eyesore to anyone.
In general, everything suggests that You can and should build a summer cottage with your own hands for long-term use, but without the prohibitive costs and without construction experience. Is it possible? Yes, this article is intended to help in such a case.
Build or install?
The first thing that comes to mind is: wouldn’t it be easier to put a storage unit from a shipping container on a simple gravel bed? There seems to be minimal work. No, not the minimum - you’ll be so busy over the openings alone that you could even build a house. Ready-made cabins made from containers of various classes are on sale, see picture, but the prices are very high.

The reason is a lot of unnecessary metal for household use. No one will sell containerized cabins for less than what they cost as scrap metal, and there is a lot of iron in the container. However, we will still remember about metal cabins; in certain circumstances this may turn out to be a good option. But in most cases, especially for beginners, a wooden change house turns out to be simpler and more profitable, so we will mainly deal with them.
What to build?
First, let's decide on the sizes. The smallest shelter cabin, combined with a storage room, has internal dimensions of approximately 2.5 x 3.5 m. A “2 in 1” cabin, with a warehouse separated from the living room by a partition, and a nook for the kitchen, will already be 3x4.5 m; We will talk about this in more detail below.

In both cases, you also need a small bathroom nearby in the yard; one of its long-known designs is shown in Fig. on right. It uses a peat toilet, or powder closet. These days, a dry closet would be more hygienic. From those purchased for the dacha would be better suited a bio-toilet-bucket with replaceable absorbent cartridges, but you can make a bio-toilet yourself, see for example. video below. However, .
Video: dry toilet in a change house
It is possible to put together a “3 in 1” or even a “4 in 1”, including a bathhouse, in a cabin measuring from 3x6 m, and at the same time it can easily be placed on a plot of 6 acres. Problems are caused by the layout, how best to plan a 3x6 m change house, we’ll talk further.
What about the kitchen?

For a weekend summer cottage, there is no particular point in building a shed with a kitchen block: a summer kitchen fits perfectly under a canopy, see fig. on right. If they go to the dacha, or live there, from spring to autumn, then they need a 3-in-1 change house with space for a kitchen and a stove for heating. An alternative is an electrified cabin; then they cook on an electric stove, but at the start of dacha development this is a rare case.
Veranda: immediately or later?
A change house with a veranda at a summer dacha is beneficial in many respects, if only because it can be used to equip a kitchen protected from the wind and/or store household equipment, freeing up living space in the shelter. But a beginner does not need to immediately plan the construction of a cabin with a veranda: it will not be possible to get a sufficiently reliable and durable building without construction experience. It is better for a novice builder to build a simple “box”, and then add a veranda, which has no power connections with the main structure. The problem of connecting the foundations of the cabin and the veranda in this case disappears, because both are columnar, not buried, on a common anti-heave cushion. We’ll talk about what this all means later, but for now, just in case, see Fig. shelter cabin drawing minimum size with an attached veranda. It is built according to frame technology, it’s time to get serious about her and others.

How to build?
Shields
The simplest way to build a cabin is a prefabricated one. The frames of the boards are assembled on the ground, then knocked into a box, on the left in Fig. A simple floor is laid in it, the walls are sheathed with anything: OSB, chipboard, plywood, etc. Then they install doors and windows (on the right in the figure), lay the roof - and you're done! For 1 season or less: a box made of panels is not a frame, there are no separate load-bearing elements in it, and under load the structure warps or even collapses even before the cold weather. A panel change house can only be built as a changing room-shelter and only if it is known for sure that the construction of the house will be completed before the fall.

SIP
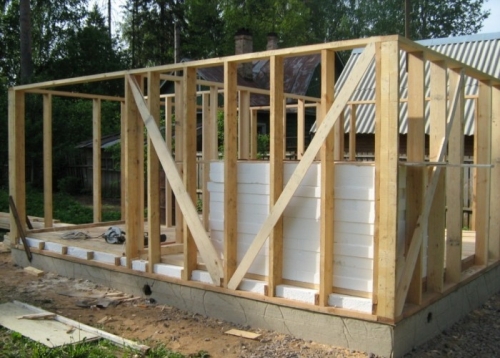
However, the method of panel assembly of prefabricated, fairly reliable and durable buildings, incl. residential buildings available for DIY construction exist. This is an assembly of SIP panels (structural insulated panel, SIP, Structural Insulated Panel). A SIP change house will cost more than the frame one described below, but its construction will give you the experience that may be needed if you decide to build a year-round cottage or Vacation home from SIP, the technology in both cases is the same. Enough has been written about construction from SIPs in RuNet, but for more information about the panels themselves, see the video:
Video: review of SIP panels
Watch out for shields!
Many of the ready-made cabins available for sale are panel houses, with all that it implies. If you decide to purchase a ready-made change house, you can weed out suspicious ones based on the following criteria:
- Good-quality cabins of any design, as a rule, do not have linings on outer skin walls, pos. 1 in Fig. on the right, in contrast to the flimsy panel boards, pos. 2 and 3. These boards are stuffed onto the joints of the boards so that the product can withstand transportation.

- For the same purpose, the corners and openings of shoddy cabins are reinforced with temporary rough overlays, pos. 3. Good quality cabins can withstand transportation without strengthening the corners, and windows with glass are supplied in separate packaging. This trick doesn’t work with hackwork: when transported with empty openings, the booth is already warped so much that the windows won’t fit into place.
Frame as a basis
A strong rigid frame takes on operational loads. For such a simple structure as a change house, it also turns out to be inexpensive and little labor intensive. Frame cabins are built either “from the cage”, on the left in Fig. – the floor is laid in an already assembled frame – or a “cage” of power connections is assembled on a solid foundation, on the right there. The latter requires somewhat more labor and materials, but less skill, so further we will dwell on this method in more detail.

Beam and log
 Log and timber cabins look luxurious, see fig. on the right, but in terms of cost and labor intensity they are not inferior to a larger house, and are built using the same technology. They are rarely built, mainly if in the future it is planned to convert the change house into a bathhouse; frame buildings are not suitable for this. In this case, the change house is immediately built on the site of the bathhouse and equipped with a drain according to all the rules, and the stove, shower, and bathhouse equipment are purchased and installed when the house is ready.
Metal+
If you know how to do plumbing and handle a welding machine, then perhaps it will be easier for you to assemble a change house in a metal frame. In this case, firstly, there is no need for a foundation - the structure will simply stand securely on concrete blocks placed at the corners. Secondly, suddenly the change house is not needed, it can be sold without any problems at a profit.
The basis for a change house in a metal frame is the power circuit of the container, on the left in Fig. below, only for frames and corner posts for the sake of economy, 80x80x(3-4) mm corrugated pipes will be used. The upper and lower battens are made from a paired corner 60x60 mm or a brand of the appropriate size. The floor is laid as described below for a frame cabin, and placed in the walls. wooden frames with openings for windows and doors and, possibly, with insulation, in the center in Fig; For frame designs, also see below. Usually, cabins of this type are sheathed on the outside with corrugated sheets, on the right in the figure, but this design allows you to make any type of cladding, a gable roof and give the building a complete wooden look while maintaining metallic strength.

We are building a frame shed
So, we came to the conclusion that our change house will be wooden frame. Step-by-step instructions for building a 3x4.5 m frame shed have been floating around the RuNet for a long time. Initially, it seems to have been compiled quite sensibly, but with repeated rewriting, errors and arbitrary abbreviations crept into the text. Following such instructions, a novice builder will find himself at a dead end during the work process or, acting according to his own understanding, will end up with a crooked and fragile structure. Unfortunately, the original text seems to be completely lost, so we will have to turn to the available sources, but with explanations and notes.
The first of them: it’s impossible to build a change house “in 2-3 days”. Working from dawn to dusk without smoking breaks and carefully, avoiding mistakes, construction will take half a vacation in a row or 1-1.5 months, if you work on weekends. The last option is preferable, because It’s better to spend your vacation on a house and landscaping. In general, the first dacha summer will be anything but boring.
About impregnation
During the work process, all wooden parts must be impregnated with biocides (antiseptics) and water repellents (water-repellent compounds) before being installed in place. For household use, used motor oil is suitable as both. It is also highly advisable to treat the crown, bottom trim, floor joists and subfloor boards, see below, with bitumen mastic (40% bitumen and 60% white spirit or solvent). They impregnate not blanks, but parts already cut to size, with all the recesses, grooves, etc.
Foundation and base
In fact, any foundation is laid according to the so-called. worn out, but in this case, because the building is small, the work can be simplified if the site for the cabin is not too “humpbacked”. The basis of the change house is built in the sequence according to Fig:

- Lay a columnar, non-buried foundation, pos. 1.
- A common support frame is assembled on it from timber 150x100 mm, the so-called. lower crown or, for a frame structure, just a crown, pos. 2-4.
- The lower supporting frame of the frame, or lower frame, with floor joists, pos. 5.
The choice of foundation type is clear: for such a small and light structure, any other will be unnecessarily complex and expensive. About the design and laying of columnar foundations, here we will dwell on the features specifically for this type of construction, which a beginner needs to know.
The pit for the foundation is dug with a grip (removal) of 0.5 m along the perimeter beyond the contour of the building. Remove humus; if the thickness of the fertile layer exceeds 30 cm, dig with a shovel. Otherwise, pits are dug under the pillars with a bayonet, i.e. up to 30 cm deep. Next, the pit is covered with geotextiles (so that the backfill does not spread) and first a sand cushion of 10 cm is poured, on thick humus, or in the holes under the pillars. Having placed the pillars, the pillow is filled to the ground level; its purpose is, together with anchors (see below), to counteract the forces of frost heaving. The sand bedding is compacted twice, before installing the pillars and after it.
The installation step of the pillars is within 1.2-1.7 m, so that a whole number of spans between them are laid on the sides of the building; for cabins 3x4.5 and 3x6, the step is 1.5 m. When digging holes for pillars, you need to take into account that the contour of the foundation should protrude beyond the contour of the building by 10-20 cm. All operational loads “flow” into the lower corners of the frame; if it lies on the pillars flush with outside, then it will be difficult for them to “spread” in the column, and the structure may move to the side.
Putting brick pillars, as recommended in the sources, should not be done in any case: the best working brick in the ground will begin to crumble in a maximum of 3-5 years, dry-molded facing brick - in the very first winter, and durable high-burnt clinker will cost more than special concrete foundation blocks 200x200x400 mm. There will be 4 blocks per pillar, laid on cement-sand mortar crosswise in pairs; For more details, see about columnar foundations. Thus, the pillar will turn out to be a cube of 400x400x400 mm, of which 200 will be in the ground (30 cm bayonet minus 10 cm cushion), and 10 cm from the outside will be taken out. For a change house 3x4.5 m, the dimensions of the foundation along the contour will thus be 3.2x4.7 m, and the dimensions of the pit in plan will be from 4.2x5.7 m.
Now let's look again at pos. 1. See? The pillars of the middle row are narrow, each made of a couple of blocks. This is actually wrong even for places with mild winters; all pillars should be the same. Foundation blocks are not so expensive that you need to save on them in the most important part of the structure.
The posts are first placed on a dry surface and leveled horizontally using a hose gyro level; adjust the height by adding sand under the low pillars. The rectangle is drawn by measuring the diagonals and sides. You cannot rely only on the equality of the diagonals; instead of a rectangle, you may end up with an isosceles trapezoid! Having aligned the pillars, the upper pairs of blocks are removed and placed back on the mortar.
Next, prepare the base (short) beam of the crown, try it on in place and lay it perpendicular to the long axis of the building, pos. 2. Trying on it, cut the remaining beams 150x100 to size; the crown is assembled flat, i.e. The 150 mm side is oriented horizontally, pos. 3. All connections are half-tree. Don't forget about impregnation! After fitting, the beams are removed, the pillars are covered with 2 layers of roofing material (this is waterproofing against the so-called capillary soaking of wood), the beams are put back and, after checking the crown with diagonals and side measurements, the joints of the beams are sewn together with 80 mm nails, a pair diagonally in each joint, pos. 4. At this stage, the foundation is strengthened with anchors.
Anchors
Foundation anchors are the same “steel bars from 1 m” from the descriptions that seem to need to be walled up in pillars. In fact, it is easier and more reliable to fix a change house, the pressure from which the ground is like pellets to an elephant, with L-shaped crutch anchors driven into the ground, pos. And in Fig. to this paragraph. Crutches are made from corrugated 16-mm reinforcement. Their lower ends are sharpened so that they go into the ground easier and, most importantly, more evenly.

The anchors are hammered in from the inside, a 20x20 mm groove is made in the crown beam under each crutch bar: they are filed along the edges and removed with a chisel. Don’t overdo the cuts; there’s no point in loosening the crown too much! The anchors are driven in according to the diagram, pos. B and C for cabins 3x4.5 and 3x6, respectively, in 2 steps: first they do not finish off 10-15 mm, and then, after measuring again and trimming the crown, if necessary, they finish it tightly according to the same schemes; preferably with 1 hit with a sledgehammer. Additive in Fig. we will need more information about corner nails below.
The next stage is the application of the lower trim to the crown and installation of the floor joists, item 5 in Fig. with a base device. The harness is made in the same way as the crown, but from 100x100 mm timber. Assemble flush with the outer edge of the crown; Thus, a 50 mm step is formed inside, on which the logs will lie. After application, the frame of the harness is fastened along the insets with 80 mm nails, also like a crown, and sewn to the crown with 150 mm nails, as shown in Fig. with anchor location diagrams.
The logs are made from 100x50 timber or 100x40 boards; they are cut into the framing timber by a quarter or a third, i.e. The mustache of the logs will be 25 or 30 mm high. The installation pitch of the logs is 400-700 mm. It is chosen so that the spans between the lags are the same width. If the finished floor is made of a simple edged board, it is better to stick closer to a smaller value, and if it is to be tongue-and-groove, then the lag pitch can be increased. In any case, it is advisable to take it in multiples of 150 mm, this will greatly simplify and save the flooring, see below. Each lag is nailed to the frame with 2 80 mm nails, one nail at a time, and in the center to the crown with a 150 mm nail, for a total of 3 nails per lag.
Underground
At the same stage, it is desirable, and for a change house “from spring to autumn” that is heated at least for a short time, it is necessary to insulate the subfloor, otherwise the floor will become damp. To do this, the openings between the foundation pillars are filled with something (ruble stone, broken bricks, paving slabs), insertion in pos. 5 in Fig. with a base, on a cement-sand mortar, and the subfloor is covered with expanded clay. Careless builders often simply lean scraps of corrugated sheets or broken slate on the outside, pressing them into the sand, and sprinkle the outside with soil. You can also foam it if you don’t mind the foam.
There are some subtleties here. Firstly, the purpose of filling the openings is only to keep the expanded clay from spreading, but you cannot cover them with sheet material from the inside: the subfloor must be ventilated, otherwise it will turn into a condensate collector. Therefore, in each span you need to leave either vents, a pair of about 4x6 cm per span (convenient if filled with rubble or broken bricks), or a gap at the top of 4-6 cm. If the spans foam, you need to insert pipe scraps under the vents in advance.
Secondly, the openings need to be filled from the inside so that the filling does not stick out. Then later, when you get the hang of it and the structure settles, you can make a real beautiful base.
Frame
The first to install the corner posts of the frame are made of 100x100 timber, reinforced with temporary struts (item 1 in the figure), on steel corners and self-tapping screws (5-8) x (60-70) mm, pos. 2. The screws are tightened tightly after the stand is plumb and supported with jibs. The height of the rear pillars is approximately 2.2-2.4 m; can be taken from the mini cabin drawing, see above. The front ones, with a building width of 3 m, are taken 0.5 m longer. If you calculate the dimensions of the racks yourself, keep in mind that the maximum slope of a slate or ondulin roof is 14 degrees, and the optimal one is 7-9 degrees.

Next, the longitudinal upper side beams of the box are applied (talking about a solid top harness in the form of a supporting frame in this case is not necessary), attaching from below with corners, as below, and cutting into half a tree cross beams. The crossbars are fastened with 80 mm nails, a pair diagonally in each insert. After this, install the intermediate posts and the corresponding upper cross members, pos. 3.
At this stage, construction can be somewhat simplified and cheaper. At pos. 3 you can see that the intermediate racks are also made of 100x100 timber, but for a small change house this is unnecessary; 100x50 beams or 100x40 boards, the same as for logs, will be used for the intermediate racks. They are placed across the strapping bars. To ensure that the structure does not lose strength, it is necessary to perform following conditions, see fig. on right:

- The spans adjacent to the corners should all be the same width.
- Corner spans and those adjacent to window/door openings must be reinforced with jibs made from the same board.
- If the corner/adjacent span is 300mm or less, this situation should be avoided by placing doors/windows at a sufficient distance from the corners.
Now you need to replace the temporary jibs with permanent ones, from the same 100x40 board, and install the rafters, pos. 4. There, by the way, it is clear that the builders made a mistake: one of the corner spans is empty, although nothing prevents us from reinforcing it. Strut boards are also placed across the beams; fasten with 80 mm nails, a pair at each end. Next comes the installation of door jambs (you can immediately with the door leaf) and window frames, pos. 5. The installation of the box is completed by fastening the bottom chord to the crown using 150 mm nails with a pitch of 200-250 mm.

Rafters
How the rafters are cut in and installed is shown in Fig. The installation pitch of the rafters is approximately 0.5 m. Additional hangers are made from scraps of boards. In this design they are highly desirable, because It is not possible to firmly attach each rafter to the beams of the upper chord. The overhang of the rafters is approximately 30 cm; The side overhang of the sheathing under the roof will be the same. If the cabin is constantly in the wind (say, in the forest), then you can do without rafter hangers.
Perhaps a dull pitched roof will not suit you. In such a case, in Fig. Below are diagrams of roof trusses suitable for a country house and, of course, a change house. The designs outlined in green are good because they are simple, economical and allow you to reduce the height of the corner posts to 1.9 m while maintaining a sufficient height of the cabin ceiling.

Roof
After assembling the frame, the roof is covered so that rain does not wet the unfinished floor. Its sheathing under a slate roof is assembled at intervals (on the left in the figure), and under an ondulin roof it is continuous, because ondulin is a soft material. Working with it, of course, is easier than carrying heavy, fragile slate sheets, but slate roofing is much cheaper and more reliable.

How slate roofing sheets are laid and secured is clear from Fig. below, but when purchasing it you need to take into account some circumstances. First, most often there are 6, 7 and 8 wave slates on sale. 6-wave sheets are lighter, but the price per square meter of roofing made from them will be significantly higher than from 8-wave sheets. So, if you have little money and are not afraid of work, take the 8-wave.

Secondly, slate sheets are available in different pitches, wave heights and thicknesses. If you take a used one or anything random, it may turn out that the sheets do not fit together. Therefore, when purchasing, you need to pay attention to the markings; there is always a set of 1, 2, 3 and 4-digit numbers, for example. SHEET 40/150 – 1750 – 8 or 6-GOST 40/194/1750. 8 or 6 then will be the number of waves, 40 is the height of the wave, 194 or 150 is its step, and 1750 is the height of the sheet, this is its standard value. If there is a smaller 4-digit number, then this is the width of the sheet.
Floor
The floor of the change house consists of 2 floorings, the lower rough and the upper finishing, with heat, hydro and vapor barriers between them. Nothing can be simplified here, otherwise the room will turn out damp, uncomfortable and will soon rot. In addition, the crown with the strapping and plank flooring form a rigid box, without which the entire base will be fragile. So you need to approach the flooring with the utmost care and attention.

How the subfloor is constructed can be seen from Fig. The skull block is placed along the entire contour of the openings between the lags; “nail” with 70 mm nails in increments of 100-120 mm. It is needed to include the flooring boards in the power circuit. For the subfloor only use a 150x(30-40) mm tongue and groove board! You can still save on finishing flooring by making it from a simple edged board, but the “sub-floor” floor is laid only with tongue and groove! The sequence of flooring operations is as follows:
- Boards are placed along the openings between the joists.
- From the first board, in order of installation, the tongue groove is cut off.
- The next boards, up to and including the penultimate one, are placed by pushing the groove tightly onto the ridge of the previous one.
- The last board is cut to size along the width from the ridge side, i.e. cut off the comb with part of the face.
- They place it obliquely so that the groove fits the ridge of the previous one, and forcefully press it into place; You may have to tap it with a mallet.
- The boards of the finished flooring cell are nailed to the skull beam with 70 mm nails in increments of about 100 mm, and with a pair of nails in the middle of each to the middle beam of the crown. The distance of the nails from the edges of the longitudinal boards is no less than its thickness, i.e. 40 mm. It is also advisable to maintain it for the cranial beam, driving the nails in obliquely.
When the rough flooring is ready, pos. 1 on next Fig., its cells are covered with glassine or its analogues, this is a vapor barrier. You cannot save money by insulating the bottom with polyethylene, because... it allows both vapor and moisture to pass through. Glassine is sewn to the joists with a construction stapler or nailed with small nails, placing pieces of plywood under their heads. In any case, you can’t sew/nail it to the flooring - what kind of insulation will it be, with holes at the bottom?

Now it’s time to insulate the floor. Let us remind you once again that it is necessary in summer cabin so as not to get damp. You won't store it in a heated room in winter, will you? Insulate mineral wool pos. 3, but you need to take mats from long-fiber mats suitable for residential buildings. Short-fiber mineral wool will constantly accumulate dust with microneedles, which are very harmful to health!
Next, the floor is covered with a continuous sheet, or with overlapping sheets of 15 cm, with plastic film, pos. 4. Now the semi-permeability of polyethylene will be just right: the condensate that did get into the floor will evaporate through it, without having time to cause rotting, and the liquid spilled on the floor will also evaporate or drain before seeping into the insulation.
The last “floor” operation is finishing flooring. It is also advisable to make it from tongue and groove, but, as already said, a simple clean-edged board 150x40 mm will also work. “Clean” boards are laid across the joists, i.e. perpendicular to the “black” ones, pos. 5. The finishing flooring is carried out “solidly”, from edge to edge of the frame of the lower trim. Do the so-called. a floating floor, as in a residential building, is not allowed in a change house for reasons of structural strength.
In places where the flooring boards fit on the frame posts, grooves of 50x100 are chosen in the boards, and corners of 100x100 are chosen for the corner posts, so you cannot take a 100-mm board onto a clean floor; the corners of the flooring will come out hanging. “Clean” boards are nailed in the corners with pairs of 70 mm nails diagonally (into the edge of the board and in its corner), and at other intersections with beams and joists - in pairs of the same nails across the board.
Sheathing

The outer sheathing gives the final strength to the structure, so it is also made from boards, and siding, etc., whatever you want later, is sheathed on top of it. They are sheathed either with tongue and groove or a quarter board, so that the water flowing down the walls does not seep inside, i.e. up with the ridge of the tongue or the inner quarter, see fig. on right. If no further external finishing is expected, then it can be sheathed with edged boards in a herringbone pattern. They are sheathed from top to bottom, including the lower belts of the base. Before covering, glassine is stapled to the frame, pos. 1 and 2 in Fig. Now you can install windows; Before installing the trim, the cracks in them and doorways are foamed, pos. 3.

As for the internal cladding, here - as God pleases: plywood 4-8 mm, OSB, chipboard, laminate, etc., with or without insulation, pos. 4 and 5. At the same stage, corrugations are laid in the walls with cables pulled into them, if the change house will be electrified.
Insulation, if necessary, is the same as for the floor. It is advisable to cover the corners with baseboards. In Khrushchev's times, they often did without any interior decoration at all, there simply were no materials. Now it’s easier with them, no matter who is nostalgic for those times.
Partitions
 The frames of the partitions, if any, are assembled according to a pattern similar to the sidewalls of the frame, see Fig. on the right, only from slats 40x40 mm. The jibs are placed only in the outer cells. Internal doors Often it is necessary to place it close to the wall, then an additional rail is placed in the cell with the doorway (shown by the arrow), without it the door in the platband will not fit into place. The frames of the partitions are put in place, nailed with 70 mm nails at intervals of 200-250 mm directly to the walls, and sheathed with the same material as the internal walls. The corners are reinforced with plinths along the entire contour.
For reference
The width of the entrance door leaf is 800-1100 mm, interior door width 750-850 for residential doors and 600-750 mm for utility, utility and bathroom doors. Maximum width single-leaf window sashes – 900 mm; preferably 600-650 mm. A sash width of 400 mm is considered the minimum, but it can be made narrower. Door height – 1900-2100 mm; windows – 600-1300 mm. The height of the window sill above the floor is 750-850 mm.
More angles

Remember how we installed the corner posts of the frame: on steel corners. Perhaps you already noticed that the outer, most loaded corners of the frame from the point of view of construction mechanics are hanging, i.e. weakened. Therefore, it seems that the change house in Fig. is quite ready. in fact, it is not yet ready to take on everything that fate and the weather have in store for it, its outer corners need to be reinforced with overhead boards.

How this is done can be seen in Fig. left: the corners are sheathed in pairs of boards from top to bottom. Scheme for driving nails (150 mm): 1 at a time into the crown and bottom trim, then in a row with a step of 200-300 mm to the racks, then 1 at a time into the upper horizontal beams. First, boards are nailed along the short sides of the building flush with the edge of the corner, and then on the long sides to cover the ends of the adjacent ones.
About shutters
The fact that it is highly desirable to equip the windows of the cabin with shutters is obvious: the winter elements are capable of breaking the glass even without the participation of hooligans. But it is quite difficult to make swing shutters in a change house, and blinds are needed for them, because... In the hot summer, a room without a ventilation system will be stuffy. That's why best option shutter for the change house - folding, see fig. They shade windows like awnings, protect glass from damage better than swing windows, and are easier to make.

Carriages

Construction trailers come in lengths of 6-12 m and a width of 2.4 m. A cabin trailer 6 m long turned out to be very convenient for a dacha: a lot of things can fit in it, and it can be placed without problems even on 6 acres. It was only necessary to increase its width to 3 m, because... The walls of a frame cabin are thicker than in a standard trailer. Change houses of this type, see fig. They are always on sale and sell well.
However, with the development of the needs of summer residents, with often insufficient opportunities to build a comfortable house on the site, problems arose with the layout. Typical construction and traveling change house-vest, pos. 1 in Fig. below, this is only the bedroom and/or dressing room. For kitchens, dining rooms, bathrooms, offices, even bars and billiard rooms, other types of trailers of the same size have been and are being produced, but the summer resident has nowhere and no money to assemble an entire town on the site.
Attempts to use sanitary-ergonomic techniques and standards for residential premises in the layout of cabins lead to the fact that, in addition to the bedroom, there is only room left for a tiny vestibule, in which you cannot turn around in warm clothes, and a warehouse, in which there is nothing but a shovel and a rake. does not fit, or a toilet without a shower, where, while sitting, the door cannot be closed - it rests on your knees, for example, in the center in Fig.

Since the change house is essentially a mobile home, it would be quite justified to apply the techniques and standards of passenger transport to its layout. The only problem will be with the doors, or more precisely, with the direction of their opening, because... They are hinged, not sliding. But doors, in general, are the second biggest headache for planners.
Example rational planning a 6x3 m change house is shown on the right in Fig. higher:
- The bedroom is 1.7 x 2.7 m larger than a railway compartment. It will fit a bunk bed, a small dinner table and a chest of drawers. At night, you can also place a cot on the floor, for which, among other things, there is enough space in the warehouse.
- The bathroom has a corner shower 1.1 x 1.1 m, a bio-toilet and a corner half-tulip washbasin, similar to the ones on the railway. It’s not a luxury, but you can wash yourself and relieve yourself.
- The largest area is allocated for the kitchen block, combined with a vestibule, these are the 2 highlights of this principle. Fits a compact refrigerator, a country stove with hob 3-5 kW of thermal power (enough for heating in the off-season), and there is still room to change clothes; and in the warmth.
- The exit from the bathroom is also into a warm room, which is important after a shower in cold weather.

With smaller cabins the situation is more complicated; here you have to combine a storage shelter with a kitchen. An example of the layout of this kind of “studio cabin” 3x4.5 m is shown in Fig. on right.
And then?
Guess what, the next person at the dacha, as they say, will start screaming: “Build me!” Perhaps when the house is not yet ready, and the bathhouse is only in dreams? That's right, a barn. Either a poultry house or a pigsty, which is almost the same in design.
The situation is peak. How to build it? Where can I get time if I already need more of it than there are hours in the day? And most importantly - from what? There is no extra money and is not expected.
Pallets made from pallets of building materials. There are probably some left over from the construction site, and it’s not expensive to buy used ones: dismantling pallets into irregular lumber with holes from nails is absolutely unprofitable, so used pallets are often sold off cheaply just to get rid of them.
Every owner land plot strives to arrange it in accordance with his preferences. During the construction period, a change house will serve as a comfortable accommodation for a family or a team of workers. A special type of temporary housing can be a mini-house with comfortable conditions. This article will talk about how to make a summer cottage with your own hands.
Purpose of country cabins
A simple-looking structure carries great functionality. Its presence on the site is determined by many factors:
- insulated change house is perfect as the main housing in summer cottage. If it is also equipped with communications, then it is quite possible to live year-round;
Change house, summer cottage vest

- while construction is underway, the change house can be equipped for short-term accommodation;
- it is often used as a utility room, storage of garden tools, mini-warehouse for very “necessary” things;
- the building can be equipped for summer kitchen, a barn for breeding poultry, a workshop or a bathhouse.
Change houses country houses
- There is a huge selection of ready-made cabins on the market. Manufacturers offer to additionally equip them to meet the current and future needs of the client. They can be delivered to the site either assembled or disassembled.
- The standard width of wooden summer cottages is 2.3 m, height - 2.5 m, as for the length, it can be 5, 6, 7 m. The maximum dimensions of a non-permanent structure are 3x12 m.
- Strength metal buildings, as well as the environmental friendliness of wood leaves no doubt, so the choice of material remains only with the consumer. To the advantages of metal should be added the possibility of manufacturing 2- and even 3-story buildings.
- On individual orders, we produce country houses with verandas, equipped with a heating system, air conditioning or other equipment. It is proposed to install related elements: sockets, plumbing fixtures with the ability to connect to various communications. The interior space is planned with partitions, which are located in the standard version or in accordance with the customer’s wishes. You can often find two-story country houses on sale.

Building a shed with your own hands
The construction of non-permanent housing is quite doable on our own. The work can take from a week to a month, this time period depends on the material used, the complexity of the project and, of course, skill.
- If you plan to operate the cabin for a short period of time, then this fact will allow you to significantly save on the interior arrangement of the premises. You can abandon internal partitions, install a minimum of sockets, use cheaper materials for cladding, etc. If the building is planned to be used for a long time, then it is recommended to choose a country house project with a shower and toilet.
Layout of a summer cottage photo

- Before construction, you should think through many important points, even with the condition of temporary residence.
- A foundation is necessary in any case. Typically, a base of pillars is used, which are placed in the corners and long sides of the building. The distance between them should not exceed 2.5 m.
- The gravel bed, arranged before laying the pillars, will serve as an obstacle to emerging trees and plants.
- The site for construction is selected on a hill, which will prevent flooding by melt and rain water. If this condition cannot be met for a number of reasons, then storm drains must be installed.
- Window and door openings are placed on one side or on adjacent walls with access to the south or east.
- If you install a change house near a power line, you can significantly reduce the cost of laying overhead electrical wiring.
Material for making a summer cottage
Materials for a mobile structure are selected depending on the area of application of the structure and financial capabilities.
- Foundation. During construction, preference is given to a columnar or pile foundation. The farther the pillars (piles) are from each other, the more reliable the grillage should be. It makes no sense to carry out labor-intensive and expensive work on arranging a capital foundation.
- Frame. The basis of any structure is a frame made of metal or wood. From channels and metal corners, cabins are produced that are completely ready for use. Wooden frame implies both prefabricated and stationary structures.
- Exterior finishing. Sheathing is done using profile sheets, siding, clapboard, block house, etc.
- Insulation. Special attention is paid to thermal insulation. To insulate a country house, foam plastic and glass wool are used, and the seams are sealed with foam. Floors are also laid with thermal and waterproofing materials.
- Interior decoration. The room is sheathed with hardboard, clapboard, MDF or PVC panels. During temporary use, the walls are covered with edged boards.

- Doors. Iron and plastic are installed on doorways wooden crafts. When arranging openings, special attention is paid to strengthening them. Due to soil movements and the lack of solidity of the mini-house, horizontal and vertical beams may become skewed and make it difficult to open/close the door leaf.
- Window. There are only two materials for making frames - wood and plastic. To protect windows from intruders and vandals, you can install metal shutters. Recently, roller shutters have become popular among developers.
- Roof. Often the roof for a given building has one slope, less often it is equipped gable roof. The slope should not be less than 20°, this will prevent snow and rainwater from accumulating on the surface. A profiled sheet or slate is chosen as a covering.
- Layout. A country house can be two-room or not contain any partitions. Change houses come with attached veranda, shower, toilet, etc. The layout and availability of various amenities depends on the desire and financial capabilities of the developer.
Stages of building a country house with your own hands
Based general information Regarding the choice of material, an approximate cost estimate is drawn up. A more accurate calculation is carried out using a plan-drawing of the future construction.
Frame base
- The area under the foundation is cleared of debris, plant roots, etc. The soil is excavated to a depth of 15-20 cm, slightly larger than the perimeter of the building. Sand is poured into the bottom in a layer of 10 cm, moistened and thoroughly compacted.
- Brick pillars on cement mortar are laid out 20-30 cm high. They are perfect for these purposes. concrete blocks. They are placed in the corners of the cabin; pillars installed in the middle of the long side of the building will help to further strengthen the base.

- The area around the pillars is covered with coarse crushed stone. Adding lime to the gravel will help protect the subfloor space from nesting of rodents or other living creatures.
- If the site on which construction is being carried out has a slope, then the height of the columns must be varied, that is, installed at different heights.
Bottom harness
- The channel acts as a grillage. Its fixation can be done by anchor bolts in advance drilled holes in metal and supports.
- If wooden beams are laid on pillars (piles), the thickness of which should be at least 100x50 mm, then the heads are covered with 2 layers of roofing material or coated with bitumen mastic. The wood is treated with impregnations that protect against rotting and damage by insects.

Frame assembly
- At the corners are placed vertical bars cross section 40x40 mm or 50x50 mm. The beams forming a wall with front door should be 15-20 cm higher than the rear ones, depending on the planned roof slope.
- The top trim is made from above. Fastening of wooden parts is carried out with nails, self-tapping screws or using metal corners.
- The distance between the verticals, as a rule, is 60 cm. The count should be taken from the corner of the building to the windows, from the windows to doorways. Horizontal lintels are immediately installed, which will serve as supports for the double-glazed windows and the door frame.
- Transverse bars, which serve to strengthen the frame, are placed in the middle of the length of the wall. If you plan to install drywall, then the crossbars are installed to match the dimensions of the sheet.
- Along the short wall, logs are placed on the bottom trim; here you can use lumber with a cross-section of 100x50 mm. To do this, grooves are cut in the lower beams along the width of the logs with a depth of 25 mm, and grooves are selected from the ends of the supports in the same way.
- Logs can also be installed in the form of spacers between the beams of the lower frame. In this case, fixation is made metal corners and self-tapping screws. On top of them, edged boards are nailed tightly together, and sheet material can also be laid - chipboard or fiberboard.
- Then logs are installed again, which can be placed both along and across the walls. The step between the floor supports is selected according to the floor covering, but it should not be less than 50 cm. A layer is laid between them waterproofing material and a layer of insulation.
- Next, it is laid flooring. If linoleum is used, then a wooden slab or plasterboard sheets are fixed to the logs.
Roof, ceiling
- A rafter system is installed on the top trim, the pitch of which is 600-800 mm. Cross bars are mounted at a distance of 500 mm. This sheathing design is suitable for coverings made of profiled sheets and slate.

- On the inside, waterproofing and insulation are placed into the resulting cells. The pie is covered with sheets of plywood, fiberboard, chipboard, you can also use drywall.
Walls
- On the outside, the surfaces are sheathed with clapboard, siding, corrugated sheets, and glass-magnesium sheets.
- Sheathing can be done with horizontal boards. Their installation begins from the lowest point, the next row is placed with a slight offset on the previous board. This method will increase the consumption of lumber, but at the same time provide protection from the penetration of wind and raindrops.
- It would be useful to recall that all wooden components of the structure are pre-treated with impregnating agents. The preparations will protect surfaces from exposure to aggressive environments, thereby significantly extending their service life.
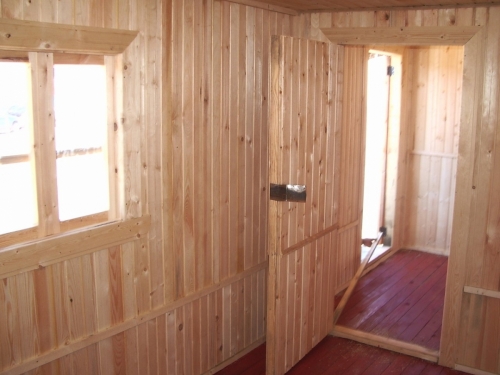
- The inside of the walls can be sheathed with the same materials that were used for exterior work. Between external and internal walls if necessary, insulation boards are laid.
- If the country house is equipped with a toilet or shower, then it is advisable to cover the walls with plastic panels.
- Wiring is carried out in metal or plastic sleeves;
- the location of electrical appliances (lamps, sockets, switches, air conditioning, etc.), as well as showers and other plumbing fixtures, is calculated in advance;
- in places where heavy objects are attached to the wall, it is necessary to install an additional crossbar, on which, in principle, they will be fixed;
- For the arrangement of the bathroom area, only moisture-resistant materials are used. Portable dry toilets are an excellent option;
- You can install a tank on the roof from which water will flow to the shower, taps, etc. To operate the cabin in winter period boiler is installed;
- The following are used as insulation: bulk materials, mineral wool, sheets of expanded polystyrene, glass wool.
- To heat the room, stoves and heaters are used that run on solid and liquid fuels, gas, as well as electrical devices. It should be remembered that heating efficiency is achieved in conjunction with properly and efficiently insulated structural elements (floor, walls, roof).
Country cabins of increased comfort
- Change houses with 2 floors are characterized by increased living comfort. This, of course, is due to the increased area. The space allows you to place a bathroom and shower, a kitchen area, and allocate a place for relaxation.
- The ascent to the 2nd floor is carried out by means of an extension ladder; due to the mobility of the structure, the arrangement of a staircase inside the change house is not provided.
- When choosing such a structure, a stronger foundation is selected. Here a strip type of foundation is formed; a pile-rammed foundation is also perfect.
In any case, do you want to buy a ready-made country house or build one? with my own hands The main thing is to choose the right material and make a layout depending on its purpose.
Most construction trailers for temporary residence offered on the market please the buyer's eye with an affordable price. But here’s the problem: they are made from cheap, low-quality building materials, poorly insulated and limited in width in order to save on transportation (2.5 m is the standard size of a truck). If you need a more cozy and comfortable home, you will have to make it yourself. The cost of a cabin built with your own hands will be no less, but you will get a reliable and high-quality structure of the desired size. And the construction technology is described in our article.
Trailer design and drawings
To purchase the required materials, the first thing you need to do is decide on the size of the dacha cabin, develop a layout and draw up an estimate based on the drawings. At the same time, think about how to use this building later, when a full-fledged residential building appears on the site. As a rule, the owners turn a temporary trailer into a bathhouse, shed or guest house.
Advice. It is advisable to provide the dimensions of the structure in multiples of 1.5, for example, 3 x 6, 4.5 x 6 or 4.5 x 9 m. This will save materials, most of which are produced according to building standards.

Layout options
Draw a plan and side view of the future building, taking into account the following recommendations:
- Use the principle of minimalism. The home should be comfortable and at the same time compact, so take the most “running” size as a basis - 3 x 6 m. If desired, it can be expanded to 4.5 m by adding a terrace.
- Try not to make walk-through rooms. If 2 living spaces are needed, place the entrance with a vestibule in the middle, as shown in the drawing below.
- For a one-room house, provide a vestibule and porch on the side or at the end.
- Doors from the bathroom or separate shower and toilet should open into the hallway, not into the bedroom.
- Plan the roof to be pitched with a slope of at least 10° and overhangs for effective water drainage.
- Small windows are needed in living rooms and in the kitchen; for a bathroom it is enough to make a ventilation opening.

When the layout is ready, you can move on to selecting building materials, calculating their quantity and drawing up an estimate. You need to understand that all cabins are built using frame technology in the following ways:
- from wooden beams the frame is mounted and sheathed on both sides with clapboard (or other cladding), insulation is laid inside;
- the same, only the frame is welded from metal;
- construction from steel profiles finished with insulated sandwich panels.

Note. Construction shed with sandwich lining, shown in the photo, is very attractive to its appearance. Until you find out how much such panels and shaped accessories for them cost.

A wooden trailer is easier to build, it is lighter and cheaper than a metal one, although it is not as durable. If you are not a welder, but know how to work with wood and have limited funds, then a house made of timber is a suitable option. Some tips on how to choose wood and other materials for it:
- The main structural elements - racks and strapping beams - will use 10 x 5 cm timber. If you need to make the house warmer and put 100 mm thick insulation in the walls (instead of 50 mm), then the section of the racks needs to be increased to 15 cm.
- Make floor joists and rafters from edged boards 50 x 100 mm. For jibs and jumpers, take a 50 x 50 mm beam.
- Boards 25 x 100 mm are suitable for roofing sheathing.
- As insulation, use mineral wool protected on the outside by a diffusion membrane (wind barrier);
- For external cladding, use clapboard, block house or corrugated sheeting. It is better to line the inside of the room with plastic panels, and how to do this correctly is described here.
- Budget options roofing covering there are several: the same profiled sheet, slate and ondulin.

Construction from SIP panels
Advice. If instead of mineral wool you want to use cheaper insulation - polystyrene foam, then provide wall cladding from OSB boards by example Canadian SIP panels. The fact is that wood does not like to come into contact with moisture-impervious polymers and begins to rot.
If you need to mount a reliable steel change house, then prepare for the frame and roof truss profile pipes with a cross-section of at least 60 x 60 mm, and for lathing - 40 x 40 and 40 x 60 mm. The construction technology is similar to the manufacture of a wooden trailer, the difference lies in the welding fasteners.
How to build a house - guide
The construction of a carriage - a cabin with your own hands is divided into several stages:
- Preparing the base.
- Assembling the frame, laying the floors.
- Installation of roofing structures and coverings.
- Installation of external and internal cladding with insulation.
- Installation of engineering communications.

Since a wooden trailer is a fairly light structure, there is no need to prepare a capital foundation for it. It is quite enough to place concrete blocks on a leveled plot of land so that their upper sides are in the same plane. Observe the installation step of 1.5 m, which means that with a cabin width of 3 m, the blocks must be placed in 3 rows - two outer and one in the middle.
Note. For more massive metal houses, shallow foundations are built in the form of columns of several blocks resting on a sand cushion. The process of marking and installing a columnar base is shown in the video:
The simplest foundations made of solid blocks will allow your structure to stand for 2 to 5 years, then distortions will appear due to subsidence. If you are counting on a longer period in order to later convert the change house into a bathhouse, then you need to lay down a capital columnar foundation made of brick with waterproofing according to the diagram:

Frame installation
At this stage of construction, you need to make the bottom frame from timber and mount the walls. Step by step it looks like this:
- Treat the wood thoroughly with an antiseptic. Cover the upper planes of the posts with roofing felt, folded in half for good waterproofing.
- Make notches at the ends of the strapping bars to connect half a tree, as shown in the diagram. Place these beams on the foundations and fasten them together, maintaining an angle of 90° (checked by measuring the diagonals).
- Cut 2 grooves in the middle of the short beams and install the middle beam. The binding is ready.

Note. There is an easier way - to use 150 x 50 mm boards installed on edge as beams. But it won’t be cheaper, because the boards will have to be installed more often, and the design will not be as reliable. The simplified technology is described in the video:
The next step is the installation of floor joists from boards installed on edge in increments of 50 or 60 cm (depending on the width of the insulation boards). Skull blocks are nailed to their sides, onto which subfloor boards and heat-insulating material with a water barrier are laid.

After installing the thermal insulation layer, the logs are covered with a vapor barrier film in accordance with the diagram, and then finished floors are laid from boards.

Floor insulation scheme
The walls of the frame cabin are assembled in a horizontal position, directly on the floor. Put together a shield of the first longitudinal wall with jumpers (belts) and racks for windows and doors, be sure to install the jibs, as shown in the photo. On top of the first partition, immediately assemble the second, and then the side walls.

Lift all the frames one by one, place them in the design position and fasten them together. If everything is done correctly, then one longitudinal wall should be 0.5-0.6 m higher than the other to ensure the slope of the pitched roof.

Reference. The metal frame is welded from profile pipes or corners in place, in a vertical position. It is important to maintain a 90° angle between the posts and beams and to weld the oblique stiffeners in time so that the structure does not move.
Roofing device
To cover a summer cottage, you need to install and secure rafters made of 150 x 50 mm boards turned on edge. The beams are mounted directly above the posts and with the same spacing; galvanized corners can be used for fastening so as not to cut out grooves. Sheathing boards are placed on top along the rafters and nailed to them. There is another option: the rafters are immediately covered with sheets of OSB plywood, as shown in the picture.

Note. The rafters must protrude beyond the dimensions of the trailer by at least 150 mm and form roof overhangs. Subsequently, their ends are sewn up in front with boards.

Ondulin is most often used as a roofing covering, laid on a wind barrier (super-diffusion membrane). The film sheets are laid out from bottom to top with an overlap of 100 mm and fixed with a stapler, after which ondulin or corrugated sheeting is mounted. You can see how the frame-panel assembly of the trailer takes place in the video:
Wall cladding and insulation
Unlike ready-made cabins, we are building comfortable temporary housing, so the external walls must be sheathed using construction technology frame houses. The “pie” for insulating the external fences of a home is shown in the diagram:

Finishing work is carried out in the following order:
- Pull and secure on the outside of the fabric windproof membrane. Next, cover the facades with OSB boards, and then decorate them with clapboard or corrugated sheets.
- Place slabs of basalt wool (recommended) or other heat-insulating material between the posts. From the inside, cover the insulation with a vapor barrier film and nail it to the studs with strips.
- The last step is the interior lining. Usually the vapor barrier is sewn up with the same OSB plywood, to which the internal finishing material – plastic panels, block house, wallpaper and so on.

Installation of wind protection film
Note. Thermal insulation and finishing of ceilings is carried out according to the same scheme. But here it is advisable to use thicker insulation, as on the floors.
Upon completion of finishing, install windows and doors, mount ebb and flow systems. At external corners, under roof overhangs and in the lower part of the structure, place shaped elements that cover the joints of finishing materials.

Home interior design
Normal living conditions imply the presence of minimal amenities - heating, running water with sewerage and electricity. It is assumed that these communications are already available at the dacha; all that remains is to connect them to the change house. In this regard, we give the following recommendations:
- Heating can be arranged in two types - electric or wood. In the first case, you need to install convectors or other heaters in the rooms, in the second - install a chimney pipe and a stove. It is important to protect wooden structures from fire - cover the walls near the stove with sheets of iron, and insulate the chimney with fireproof basalt fiber.
- Water supply and sewage pipe it is started through the floors of the trailer, going there along pre-dug trenches. How this is implemented, see the diagram below.
- An electrical cable (recommended brand SIP) is attached to a bracket mounted on the wall, and then enters the room through a hole. A protective device (RCD) must be installed at the input, and behind it there is a control panel with automatic switches on lines of sockets and lighting.
![]()
Advice. It is better to do internal electrical wiring in plastic cable channels; they look neat and nice. Lead the power line to the heaters with a wire of a larger cross-section (refer to the dimensions of the connecting factory cables with plugs). All passages through wooden walls do it in metal cases, in other words, in pipes.
Conclusion
A change house is a temporary structure. But, as usual, there is nothing more permanent than temporary buildings. Hence the conclusion: approach construction thoroughly, as if you were building garden house or a bathhouse. Of course, it will take much more time, and you won’t be able to save money, but after ten years you will probably have the opportunity to appreciate your own work. Over such a period, a purchased construction trailer will turn into a ruin.
Sometimes there is a need for cheap temporary housing. Change houses are inexpensive compared to a permanent structure, so their use has become widespread both on the construction site and on a personal plot, and the rational distribution of space inside a mobile home has made temporary shelters convenient and comfortable housing.
What attracts us to cabins?
Cabin trailers are made of wood (cheaper) and metal (more expensive), but each type of structure can be made independently, although to produce a container you will need special knowledge and tools, and a prepared room. The welded frame of the metal cabin allows it to withstand the load of the second floor of the mobile building. If you need a high-quality trailer for a construction site, then you should purchase a reliable design.
The benefits of change houses are not fully realized until temporary housing is purchased. But if you already have a change house, then your workers will be grateful to you for comfortable conditions residence.
Advantages of cabins:
- A quick process of manufacturing in production or installation on site, which cannot be approached by a handling crane.
- The construction of a permanent foundation is not necessary. It is enough to level the site for the structure and lay the foundation blocks.
- Change houses will cost you little, since their cost starts from 25 thousand rubles. Modern materials make it possible to build cheap but warm cabins. Once there is no need for use, more expensive structures are rented out or sold. But, most likely, you will need the change house more than once.
- The mobility of a temporary shelter is the main advantage of a cabin, because a mobile home can be transported from site to site, no transportation permits are needed. And if there is a chassis with wheels at the bottom of the cabin, this will greatly facilitate unloading or loading the structure. A trailer trailer is a more convenient option for a cabin.
- Ready for use immediately after unloading.
- Re-equipment of a change house is an easy task, due to which the intended purpose of the product changes.
- When purchasing prefabricated cabins, you save storage space.
The area of use of temporary housing does not end at a construction site or a summer cottage, because a change house is useful in conditions of remote work in the field, as a warehouse, security post, mobile office or as another housing near your home, the so-called. guest house.

Sometimes temporary shelters are needed only for the construction season, and in this case it is worth buying wooden cabins inexpensively. A clapboard façade does not require special insulation if the structure is needed for the summer. But, more often, it is better to sheathe the change house with mineral wool, which will not only make the room warm, but also protect wood cladding from rotting.

How to make a wooden change house on your own?
If you do not want to overpay for the production services of assembling a change house or simply need to be confident in the high-quality installation of a temporary shed, then you should do it yourself. The manufacturing process takes 10 hours, subject to operation electric tools together with a partner. In addition to the materials presented in the table, you will also need self-tapping screws, staples with a stapler, and fiberboard panels for the interior cladding.

| Material | Characteristic | Quantity |
| 10*10cm length 6m | 10 units | |
| Board | 5*10 cm | 12 units |
| Board | 2.5*15 cm | 1.5 m3 |
| Polyester | Thickness 150 micron | 6*8 m |
| Polyester | Thickness 100 micron | 3*10 m |
| Vapor barrier | In rolls | 2 units |
| Mineral wool | Thickness from 50 to 100 mm | 8 m3 |
IN end result the result should be a wooden shed on a timber frame of coniferous wood, covered with lumber natural humidity. Lining is also used for interior decoration, but when installing a change house inexpensively, opt for hardboard or fiberboard. Wood moisture content should not exceed 12%, which minimizes the risk of cracks due to shrinkage of the structure.

The dimensions of a standard cabin are no more than 2.5 * 6 m and a height of 2.5 m. Standard dimensions facilitate quick transportation of the structure on the back of a truck. The wood should be treated in advance with an antiseptic compound, and the floor, walls and even the roof should be insulated with mineral wool, which is attached to the frame along the edges with staples.

Windows and doors are made of wood, but for greater thermal insulation they are made of metal-plastic. If you want to make a roof from ondulin or metal tiles, this will increase the cost of the change house by 8 thousand rubles, installation of electrical wiring - plus another 7-8 thousand rubles, sheathing the facade with siding, imitation timber or block house - plus 10 to 15 thousand rubles to the project.
Arrangement of a foundation for a change house is desirable, since if it is present, the change house will not be destroyed from the bottom. You can choose either a pile or block foundation installation option, which depends on the service life of the temporary building.