Specialization: Capital construction works(laying a foundation, erecting walls, constructing a roof, etc.). Internal construction work (laying internal communications, rough and fine finishing). Hobbies: mobile communications, high tech, computer technology, programming.
Recently I had to take up insulation of slopes plastic windows with your own hands. The fact is that one grandmother I know, at one of the feasts in the village, complained to me that modern technologies I work in construction worse than the already proven old-fashioned methods.
It turned out that she had recently replaced the window frames with plastic ones, after which her house became not warmer, but, on the contrary, colder. I immediately understood why in the house It became colder, but he didn’t try to prove anything to her. I just decided to help the old man, especially since there were only two windows, and the technology itself is as simple as possible for me.
But then it turned out that the slopes had to be insulated not only from the inside, but also outside. But the result turned out to be so good that several more grannies decided to take advantage of my kindness. Naturally, I was not able to help everyone, so I compiled detailed plan work on which it was necessary to act.
This instructions, as I later found out, she helped their sons and sons-in-law do everything with your own hands. I think that this information will help you to insulate the slopes like plastic windows, and wooden window blocks.
Background
Since this whole story began with a dispute about how effective modern construction technologies, I cannot help but raise the question of how windows were insulated earlier, during my childhood.

Not so long ago, in order to get rid of the piercing draft blowing through the cracks near the window opening (after all, window units were far from ideal, believe me) only improvised means were used. From childhood I remember the following types of “insulation”:
- old unnecessary rags of different sizes;
- special paper, which was sold in rolls in hardware stores;
- medical cotton wool;
- foam;
- sticky tape and so on.
This insulation of slopes was produced independently, and this did not require any special knowledge or special tools. However, the effectiveness of the measures taken left much to be desired. Not to mention how beautiful it all looked.

Often, after dismantling such insulation, entire layers of paint fell off the window frames, after which it was necessary to sand, putty and paint the damaged surfaces again.
In general, I think there is no need to prove the effectiveness of old methods to anyone except a grandmother in the village. Therefore, it’s better to tell you about what thermal insulation materials are used insulation of slopes from the inside and outside now.
Material selection
On the market building materials There are a huge number of different insulation materials that are suitable for insulating window slopes. I will highlight only the most popular of them. To make it easier for you to choose, I have compiled a table, which I present to your attention.

| Material | Peculiarities |
| Styrofoam | One of the most popular solutions, in my opinion, due to its maximum cheapness. In principle, working with this material is also not difficult, but you need to take into account some features. For example, the ability to greatly change its size when heated and cooled. In this regard, I personally recommend using a minimum of adhesive so that it does not crack during use. |
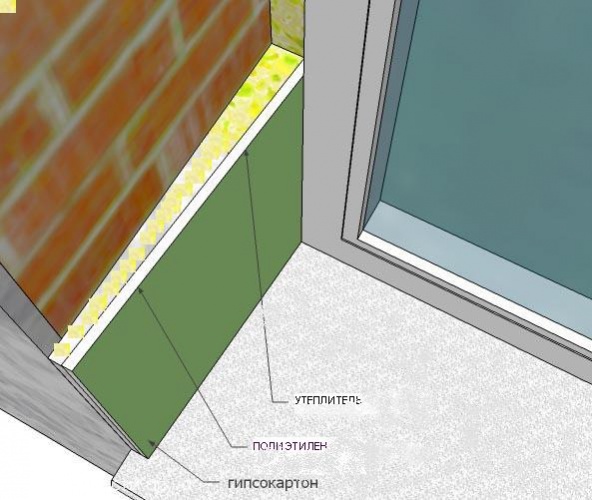
| Foamed polyethylene | In addition to a low thermal conductivity coefficient, it boasts excellent hydrophobic properties. Often in my work I used polyethylene with an additional foil layer, which plays the role of a heat-reflecting screen, retaining heat inside living spaces. When working with this material, I recommend that you spend increased attention sealing and sealing joints in slopes. |
| Basalt wool | The optimal choice for insulation window openings from point of view technical characteristics and cost. In addition to protecting against cold and preserving thermal energy, cotton wool acts as an excellent sound insulator. For grandmothers, this may be a disadvantage, since from her window she will not hear what is happening in the neighbors’ yard. Among other things, basalt wool has water-repellent properties and does not lose its characteristics when wet. |
| Multilayer panels | Practical and affordable independent implementation way. We are talking about ready-made plastic panels, which are supplemented on the bottom with a layer of insulating material. They absorb noise well and are quickly installed. |

If the builders who installed the windows had crooked hands and left a large number of cracks, you can combine the materials listed above, achieving maximum protection against heat loss.
Methods for insulating plastic windows
After thinking about everyone possible ways insulation and assessing the scale of the work, I decided to insulate my grandmother’s windows with sheets of foam plastic. It will turn out cheap, and quickly, and of sufficient quality. Moreover, after the last repair I still had a supply of this material, so I didn’t have to spend much.
Method 1 – Internal thermal insulation
Now I'll tell you how I spent insulation of window slopes from the inside. The scheme of work is quite simple and consists of several simple steps:
- I cut off all the protrusions and rags of polyurethane foam. By the way, I would like to immediately say to all novice masters. Finishing of slopes must be carried out as soon as possible, otherwise the foam, exposed to the sun and wind, will quickly crumble. You will have to seal the cracks again.

- Primed the slopes special primer. I always buy a composition that not only removes dust from surfaces and improves their adhesive properties, but also contains antiseptics that prevent the formation of mold and mildew on slopes.

- Mixed up plaster mortar(I bought one for this purpose plaster mixture in dry powder). For mixing I used a special mixer, which is inserted into a drill, and a plastic bucket. I can’t tell you exactly the proportions of water and powder (you will have a mixture from another manufacturer), but the information of interest can always be found on the packaging.

- Plastered the slope. Here it is not necessary to carefully observe the level. The main thing is to level the surfaces of the window opening so that foam sheets can be easily glued to it.

Special attention it is necessary to pay attention to sealing the cracks into which construction foam was blown. They need to be plastered as thoroughly as possible to avoid destruction of the sealant during operation.
- After that, I let the plaster dry completely. Then, in order to reduce glue consumption and improve the degree of its adhesion to the surface, I primed the slopes again. Like last time, I used a composition with special antiseptic additives.
- Cleaned the foam. The point is that this warm insulating material has a smooth surface, so that it sticks better in window opening, it needs to be lightly scratched with sandpaper.
This needs to be done on both sides. There will be glue on one, and I will also plaster the other (more on this in the following paragraphs of the instructions). - Cut the foam into necessary details on previously removed surfaces. I advise you to leave small allowances. Subsequently, they can be easily trimmed with a blade or hacksaw. And if you miss by a smaller amount, you will have to throw out the entire part.

- I glued the parts to the plastered and primed surfaces. To do this, I smear glue on each part and press it tightly to to the right place. After the glue has completely dried, you can finally trim the pieces of foam so that they perfectly match the size of the slope.

- Then I attached special corners to the corners of the foam plastic, thanks to which, after finishing the work, the corners of the slopes will look perfect without additional effort in leveling. Such corners are sold in hardware stores and are inexpensive. Therefore, I see no reason to refuse to use them.

- After that, I plastered and puttied the slopes on the inside of the window opening.
- Then I primed the surfaces and painted them with paint. Selected White color, which is ideal for decorating window openings and matches the colors of plastic frames.
- I decorated those parts of the slopes that face the main wall with wide plastic corners. But it’s better to finish them with the same material that was used to decorate them. It’s just that my grandmother had them covered with old wallpaper, and I considered this option to be optimal.

By the way, there are many options for decorative finishing of slopes insulated with foam plastic. You can not plaster them, but cover them with sheets of plasterboard, and then putty them.
Can be finished decorative plaster. Can be decorated plastic panels. It all depends only on your imagination.
There is another finishing option if you decide to use drywall. In this case, you need to immediately cut out the parts from plasterboard and foam plastic, then glue them together, thereby obtaining decorative insulating panels, and then fix this whole “pie” on the wall.
But in any case, the drywall will also have to be puttied, primed and painted.
Method 2 – External thermal insulation
You already know that I am used to doing my job well, therefore, having taken on the insulation of window slopes in an old woman’s house in the village, I decided not to limit myself to working inside the house and to insulate the window opening from the outside.

Moreover, the villager’s house is not a high-rise building in the city, so I didn’t need to fence off scaffolding or call a lift. And as a result, I think the elderly woman will remember me more than once with a kind word when she finds out how much less coal she will need in the future to heat her home.
I’ll tell you what I did for external window insulation:
- I cut off the remaining construction foam. By the way, it has already begun to partially crumble, since none of the installers installing the windows explained to the village resident that the seal needs to be protected from exposure to sunlight, wind, water and other destructive factors.

- Then I treated the surfaces with an antibacterial primer to avoid the appearance of mold and other unpleasant microorganisms.
- From the outside, the surfaces of the grandmother's window opening were smooth (it is clear that the grandfather, who built the house, approached this matter with all possible responsibility). Therefore, there was no need to plaster anything.
If your surfaces around the window have large unevenness and defects, plaster them using the technology that I have already described.

For external insulation I use extruded polystyrene foam. This is a thermal insulation material that differs from polystyrene foam in its greater mechanical strength. In addition, it is not destroyed by intense exposure to atmospheric moisture.
- As with internal insulation, I cut out sheets of polystyrene foam, fitting them to the slopes of the window opening. Then I spread it with glue and applied it to the desired surfaces.
To make the insulation hold more firmly, I additionally secured the material with dowels with wide plastic caps. Expanded polystyrene, unlike polystyrene foam, does not crumble during finishing, so the described process will not cause much difficulty even for an untrained home craftsman.

- I attached a specially purchased corner to the corners. It simplifies further decorative work and preserves the integrity of the decorative edging of the window opening.
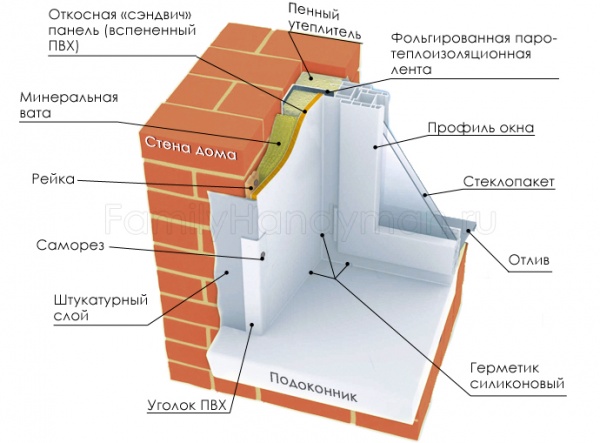
- Then I coated the installed heat insulator with special adhesive composition, after which he laid the reinforcing fiberglass mesh. It will provide the required strength. Without it, the plaster mortar will quickly crack and fall off, since it will be constantly exposed to snow, wind, sun, and so on.

- Plastered the outer slopes of the window. To do this, I used construction powder from which I made the solution. There is no need for special wisdom here; everything is done according to the standard procedure.

- I puttyed the surfaces, making them smooth, and then painted them with white water-based emulsion.
In the end, everyone was happy, and I spent my country holiday With maximum benefit for society.

By the way, sometimes a situation arises when, despite insulation, condensation forms on the glass. In this case, I recommend installing a ventilation hole in the window block or under the window opening. It will help regulate the humidity level in the room.
Conclusion
So now you understand how to do it right insulated window slope helps keep the house warm and improve relationships with grandmothers in the village. If you are interested in additional information on the issue raised, you can read video in this article.
I will also be glad to hear from you stories about how you insulate windows and what material you use for this. Perhaps the technology you describe will help someone do insulation of slopes faster, cheaper and more efficient.
August 28, 2016If you want to express gratitude, add a clarification or objection, or ask the author something - add a comment or say thank you!
Content:
After installing plastic windows, owners expect to receive excellent protection from cold, moisture and other manifestations environment. However, expectations are not always comparable to reality. Many people complain about drafts coming from the cracks of plastic windows, and mold forms around them, because high humidity- an ideal place for fungus to develop. It is very difficult to live comfortably in such conditions, but insulating the slopes will help solve the problem.
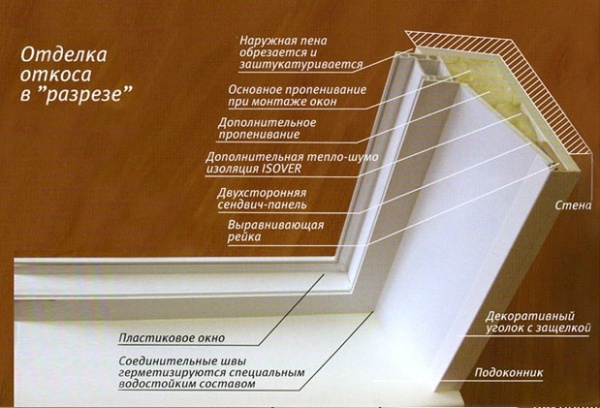
Theoretical information
The slope is the surface of the wall, it is located near the window and partially contacts it. Slopes are divided into internal and external depending on their location. For effective insulation, you should pay attention to the internal ones. The slope covers the visible part of the polyurethane foam, but its main purpose is not aesthetics, but practicality, because it protects the room from wind, noise, dust, etc. If this element is designed correctly, this guarantees high-quality thermal insulation of the room, as well as the prevention of mold, rot, and condensation on windows and walls.
Typically, slopes are insulated for the cold season. There are many companies that offer thermal insulation services for plastic windows. However, the disadvantage of such services is the high cost. You can carry out this procedure yourself, and the quality will be absolutely no worse than that of specialists. The main thing is to follow all the rules and know what materials to use. Another advantage of insulation is an increase in the service life of slopes.
The effectiveness of insulation can be increased if you place the insulating material not in individual areas, but along the entire perimeter of the window, not forgetting about the boards located under the window frame.
Materials for slope insulation
Due to poor-quality installation of plastic windows, cold air can enter through the cracks and moisture can penetrate. The procedure for insulating window slopes is designed to eliminate this negative phenomenon. It is very important to choose the right material and auxiliary tools. So, the following materials are suitable for thermal insulation:
- polyethylene foam;
- fiberglass;
- Styrofoam;
- sandwich panels;
- extruded polystyrene foam.
The choice of a specific material directly depends on the size of the gap. If the width of the installation gap is more than 40 mm, you can use polystyrene foam, fiberglass or polystyrene foam with a thickness of about 20-30 mm. If the gap dimensions are not so large, then mineral wool or regular wool will do. polyurethane foam.
Styrofoam
Foam insulation is one of the most economical methods. In addition, it is easy to cut and install. It is not at all necessary to have blanks of the exact shape; you can also use leftovers. The effectiveness of such isolation is quite high. To secure the foam you will need glue.

Some experts do not recommend using foam plastic for external insulation of slopes due to its porous structure, which accumulates moisture. But if you follow all the rules and recommendations, you can create a warm, durable and moisture-resistant coating.
The disadvantage of this material is the change in volume during changes temperature regime, for example, when heated even from sunlight, the foam expands, which can damage the slope.
Polyethylene foam
This insulation works best in combination with foil. It allows you to increase the efficiency of polyethylene foam by 20-30%. The advantage is to provide not only reliable protection from heat loss, but also excellent hydro- and vapor barrier. Disadvantage: high cost and relative complexity of installation.
Mineral wool
Many people consider this material the best insulation due to its excellent insulating properties. Mineral wool has low heat transfer and the ability to absorb sound waves. The downside is poor resistance to moisture.

Sandwich panels
The advantage of this insulation is durability, moisture resistance, and thermal insulation. Panels are made in the form of a plate using hot or cold pressing. Installation is carried out using special glue. The panels perfectly absorb external sounds. The disadvantage is the high cost.
Fiberglass
Excellent material for window insulation. The cost of fiberglass is quite affordable, and you can buy it at almost any hardware store. It does not allow moisture, cold air and electricity to pass through. Although installation on plastic windows requires certain skills.
For complete insulation window frame sometimes foam plastic is used, but to install it you will have to dismantle the window sill, this will allow you to properly seal all the cracks and voids.

For high-quality insulation of plastic windows, the window sill should also be insulated. The most in a simple way is the use of polyurethane foam.
The process of internal insulation of slopes with foam plastic
Thermal insulation of slopes - simple, but sufficient painstaking process. You can do the work yourself if you have at least minimal skills and knowledge in the field of construction. The main thing is to follow all the recommendations and advice from experts. If the walls in the room consist of several thick layers and are equipped with high-quality insulation that reaches right up to the window frame, then insulation of the slopes is not at all necessary. However, for single-layer walls you cannot do without thermal insulation. Installation of polystyrene foam immediately after installation of a plastic window is carried out according to the following algorithm:
- Cut off any protruding pieces of foam.
- We prime the slope with a special antibacterial substance.

- Next comes the plastering process.

- We clean the plastered surface, then repeat the process with antibacterial primer and you can start working with the foam.
- To increase the adhesiveness of the insulation surface, it must be treated with sandpaper, apply special glue and press firmly against the wall.

The foam should be cut out a little more than necessary. If necessary, you can adjust the size when the panel is mounted on the wall.
- After drying, you can mount the plastic corner; it should be puttied.
- If you use polystyrene foam for thermal insulation, then you can use various substances to apply the finishing coating: plaster, paint, moisture-resistant plasterboard sheets. It all depends on your preferences. The drywall is secured with dowels, the caps are then puttied and cleaned.
If condensation forms on the window during the cold season, it must be insulated not only inside, but also outside. The outer layer of foam will prevent the cold from entering the room. But you definitely need to think about ventilation, otherwise the formation of condensation will not stop.
The process of external insulation of slopes
It is necessary to carry out external insulation of slopes even before installing a double-glazed window; ordinary polyurethane foam is suitable for this. Polyurethane foam is an excellent heat insulator that does not allow cold air to pass through, does not deteriorate over time and withstands close contact with moisture. If you perform insulation with plastic windows already installed, then some of the seams will be inaccessible for processing, which will reduce the efficiency significantly . External gaps between the frame and the window sill must be sealed with silicone sealant. We seal all installation seams in the same way. External slopes primed and painted with thixotropic enamel.

There are other methods of insulation, for example, using plaster. However, it does not perform very well when sub-zero temperatures. Therefore it is better to use plastic materials in the form of sheets. The insulation process ends with the removal of debris and dust.
Insulation of slopes is an important process designed to create convenience and a cozy atmosphere in the house. Thanks to thermal insulation, you can get rid of condensation, mold, cold air and dust entering the room.
In order for thermal insulation to be maximum and heat to be reliably retained inside the house, all parts of the building where there is a high probability of cold bridges are insulated.
These include slopes. Moreover, it doesn’t matter whether a new or old window is installed, the slopes still need to be insulated. Of course, you shouldn't skip doorways either.
Even after wooden frame will be replaced by plastic double glazed window or old doors to new ones, the ideal result is not always achieved. Since during the installation process there may be voids that are not visible to the eye, through which warm air will constantly escape out.
Warm flows are not dangerous for the environment, but heating costs will constantly increase. At the same time, frost and cold wind will penetrate into the room, which is fraught with the following consequences:
- Freezing of the slope is the appearance of frost in the window opening inside the house.
- The appearance of condensation on the glass.
- Accumulation of moisture on the windowsill. Since water condenses on the glass, it has to drain.
- The formation of fungal plaque on double-glazed windows, as well as slopes.
- If there are voids that are open to the outside, then with strong gusts of wind a howling can be heard.

To prevent such problems from affecting the residents of a house or apartment, it is better to immediately perform insulation after installing new windows and doors. It will be difficult to cope with such a task correctly on your own, so they turn to specialists.
In addition to the fact that the slopes need to be insulated, they are also decorated. Any heat-insulating material under the influence of sunlight, as well as atmospheric moisture, is destroyed and loses its properties. Decorative coating will create a barrier that will extend the service life of both the heat insulator and the new frame.

What materials are suitable for thermal insulation?
In order for all the activities carried out to have a positive result, it is necessary to select the right materials. The following is used as a heat insulator for slopes:
- Mineral wool (basalt, slag or glass wool).
- Styrofoam.
- Extruded polystyrene foam.
- Polyurethane foam.
- Sandwich panels.
- Fiberglass, one side of which is covered with a layer of foil.

During the selection process required material take into account the size of the window opening and the places where the insulation will be installed. Mineral wool, for example, performs its functions with a thickness of at least 10 cm, which is not always convenient for insulating a window from the outside.
In addition, cotton insulation requires the use of a water barrier on both sides. This is due to the fact that after getting wet the material loses its insulating properties.
An affordable and popular option is to use polystyrene foam and extruded polystyrene foam (penoplex). Moreover, the latter material is preferable because it has a higher density with a smaller thickness. It is important to protect the polymer insulation from the sun in a timely manner. When exposed to ultraviolet radiation, foam becomes brittle.

If polyurethane foam was used during the installation process, then there is no hope for complete thermal insulation. Of course, if the voids are densely filled, some of the heat will still be retained in the room, but if the house is located in a region with low winter temperatures, then you will have to take care of additional insulation.
A good option that solves two problems at once would be sandwich panels. The top layer is decorative material, bottom – insulation. At the same time, it is possible to choose an option for your home if the facade is already lined, but the slopes had to be insulated later. In addition, some creators of such panels offer options with different insulation materials.

A new option for insulating slopes is fiberglass with a foil base. It is difficult to install such material with your own hands, so you need to take the help of professionals. But you will be 100% sure of the result. The insulator perfectly protects against moisture and penetration of cold air currents.
Sequence of work on internal thermal insulation
Those who want to get a positive result from insulating slopes need to be prepared for the fact that the process is carried out both outside and inside. Both options for carrying out work have features and a certain sequence of execution. Therefore, we will consider each of them separately.

The internal slope is insulated according to the following plan:
- Leave the new window for several days so that it is well fixed in one place.
- Inspect the foamed space. If there are gaps, add foam and leave until completely hardened.
- Trim off excess areas.
- Treat the surface of the slope with an antibacterial primer composition. The solution will help resist the growth of mold and mildew, and will also increase adhesion for subsequent stages.
- Level the slope using plaster. A flat surface will make a good base for tightly fixing the insulation.
- The plastered and dried base is again covered with antibacterial primer, for the same reasons.
- Glue the insulation. To do this, use liquid nails or glue suitable for the selected material.
- The corner is covered with plastic or metal corner and plastered together with the total area of the slope, be sure to use a reinforcing mesh. Fiberglass will make the plaster layer strong and reliable.
After this, they begin decorating. Painting, tiling, or another option chosen by the home owner will do.
Sequence of work on external thermal insulation
The outer slope also needs to be insulated, and this process should be taken seriously. Material that is laid outdoors is constantly exposed to destructive factors such as:
- Atmospheric moisture.
- Negative air temperature.
- Ultraviolet radiation.
- Exposure to wind.
- Insects, rodents and birds love to make their nests out of insulation materials.

Therefore, unprotected material quickly becomes unusable. Insulation of external slopes is carried out according to the following points:
- Remove excess polyurethane foam.
- Cover the slope with soil with an antibacterial composition.
- If there are large differences, the surface is plastered. Select plaster for external use.
- Once again they resort to priming. The composition will protect against fungus and mold, and will also increase adhesion with the following materials. Don't skip this step.
- Start with insulation. For external treatment of slopes, a denser material is chosen, for example, penoplex. It is glued to an exterior adhesive suitable for polymer materials.
- For greater reliability, the heat insulator is fixed to the slope with dowels with a wide head. It is not necessary to do this indoors, since there is no exposure to gusts of wind.
- Slope corners are closed corner elements. They will make the edging more neat and attractive. In addition, making a beautiful corner will be much easier.
- The insulation is covered with plaster with mandatory reinforcement. If you do not use a mesh, during the first year of operation the layer may crack and crumble.
After the layer has dried, perform decorative finishing. Sheathing materials are used only those that can withstand external load.
Thermal insulation of slopes on doors
Area around entrance doors it also allows heat to escape to the street, and if you do not create a barrier, then cold air will penetrate into the house without restrictions. The process of insulating door slopes is not at all different from the same work around the window. Therefore, everything is done according to the same plan:
- Cleaning the surface of excess polyurethane foam or old decorative coating.
- Application of deep penetration primer.
- Plastering if necessary.
- Primer treatment.
- Installation of insulation - fixation with an adhesive solution and several dowels with a wide head.
- Application of primer to improve adhesion.
- Installation of corner elements.
- Fastening the reinforcing mesh with the same glue.
- Plastering insulation.
- Rubbing the dried layer.
- Decorative facing of the slope.

Please note that door slopes bear the same load as window slopes. The insulation selected is hard, but it should not be too thick so as not to take up free space.
If the owner of the house knows at least something about construction, then he can make a thermal insulation layer on all slopes with his own hands. Of course, before starting work, you should familiarize yourself with several sources in order to study all the intricacies.
But a beginner in this field does not need to do everything on his own. There are professionals who will be happy to help in this matter.
In practice, plastic windows are not as perfect as the advertisement describes. They perfectly transmit not only sound, but also cold. So what's the deal? After all, the characteristics of window profiles are superior to wooden ones in all respects? The answer is simple to the point of banality - having adopted European manufacturing technologies, domestic manufacturers still cannot insulate them efficiently.
It is not surprising that 90% of Russians before winter wonder how to insulate plastic windows? After all, our cold weather is no joke. Simple construction foam is not enough for thermal insulation.
Before insulating plastic windows with your own hands, you need to evaluate the scope of work. Firstly, thermal insulation will have to be done both inside and outside. Secondly, the window sill will also have to be addressed.
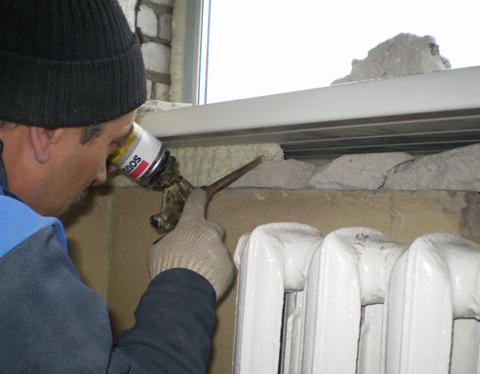
The thing is that the installation of plastic windows is often accompanied by significant damage. As a result, the holes between the window sill and the wall are more than impressive.
Due to inept installation of the wall, entire bricks are missing. And builders, in order not to add to their work, most often decide to insulate such holes with garbage and cement. This result cannot be called satisfactory. So that builders use mounting foam.
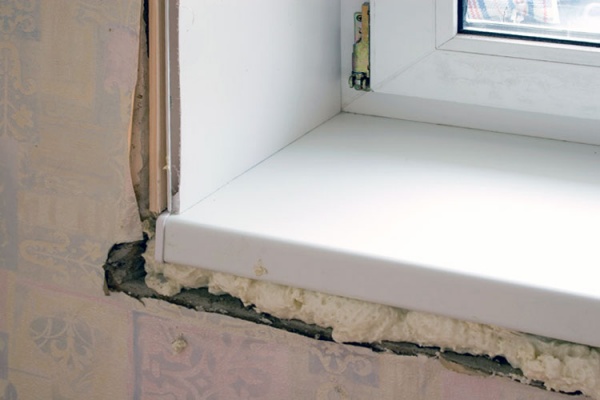
It is not surprising that insulating the window sill of plastic windows is a mandatory part of preparing for winter.
Important! To insulate plastic windows, you need to wait for warm and windless weather - this is the key to safety and quality.
Other reasons that require immediate insulation of plastic windows for the winter include:
- Seating the walls.
- Worn out insulation.
- Loss of tightness due to incorrectly installed slopes.
In the first case, it is enough to simply adjust the fittings and everything will be in order. The insulation can be easily replaced with a new one if necessary. But you will have to tinker with the depressurized areas.
Determining critical places
It is very important to find out exactly how cold air gets inside the room. To do this, you need to take a lighter and run it around the entire perimeter of the plastic window. Pay special attention to the places where the frame meets the wall. The window sill and slopes are also worth checking. If you don't have a lighter, use an open palm.
Important! Pay special attention to the fittings. Very often, domestic companies use low-quality components to save money.
Setting the clamping mechanism
Over time, under the influence of mechanical and climatic factors The sealing gum may lose volume. Because of this, air begins to penetrate into the room. Fortunately, to insulate plastic windows, it is not necessary to change the gasket. It is enough to adjust the clamping mechanism.
Important! If the gasket has completely deteriorated, it will have to be replaced.

To insulate plastic windows by adjusting the mechanism, you need to find protruding cylinders in the slots of the metal plugs. These are called trunnions and fit into hooks on the frame.
To insulate the frame, move the hooks to the desired position. Or adjust the trunnions. To change the position of the hook, you need to loosen the bolts. Moving towards the street increases the pressure, and towards the room decreases it. Here is a detailed video on how to insulate a plastic window yourself by adjusting the clamping mechanism:
Heat-saving film
Film for insulating plastic windows can significantly reduce heat loss in the house. However, in order for its application to have the desired effect, it is necessary to properly prepare the surface. In this case, you will need the following tools:
- stationery knife;
- scissors;
- scotch.
First, the surface must be cleaned of dust and dirt. Wipe the glass thoroughly (a layer of dirt and dust makes it difficult for sunlight to penetrate inside). To check the quality of cleaning, take the paper and press it across the glass; you should hear a distinct squeak.
The perimeter of the box is covered with double-sided tape. The edges of the film are separated with a stationery knife. Cut it with scissors to the size of the window and stick it on the previously attached tape. Take a hairdryer and spray the film warm air. Burst the resulting swellings with the tip of a knife. This is the simplest and inexpensive way insulate platinum windows.
Insulation of slopes of plastic windows
Material
To insulate the slopes of plastic windows with your own hands, you need to stock up on the following materials:
- extruded polystyrene foam;
- Styrofoam;
- sandwich panels;
- isover (fiberglass);
- mineral wool.
The materials are used for insulation of internal and external slopes. Their correct application will provide an additional layer of protection and good thermal insulation.
Advice! If the gap is more than 40 mm, insulate the plastic windows using polystyrene foam or isover. The thickness of the material is 2-3 cm. Construction foam is ideal for small gaps.
How to insulate the slopes of plastic windows from the street
Safety is important first. If you are above the second floor, it is better to call industrial climbers for this work. Without any problems, you can insulate a plastic window with your own hands inside the loggia. The operating algorithm is as follows:
- Trim away any remaining construction foam.
- Treat the slopes with a primer with antibacterial additives.
- If necessary, plaster.
- Cut tiles from polystyrene foam to the size of the slopes. Spread assembly glue on them and press them to the surface. For greater reliability, use dowels.
- Install the corner.
- Apply adhesive to the tiles and place fiberglass mesh on top. Wait until it dries and apply glue using a spatula.
At the end of insulating the slopes of plastic windows, paint the surface with water-based paint.
Attention! Below is an educational video “How to insulate the slopes of plastic windows?”
Important! Painting work can only be carried out after the mounting adhesive has dried.
Insulating plastic windows from the outside avoids the formation of condensation. In addition, the room becomes much warmer.
How and with what to insulate the slopes of plastic windows inside
Sometimes after ripping out old windows, the internal slope looks like a battlefield. It is not surprising that constant drafts near the window blow out all the heat. In addition, shreds of polyurethane foam have an extremely unaesthetic appearance. The insulation process includes the following stages:
- Trim off unnecessary polyurethane foam.
- Apply a primer to the slope, preferably with an antibacterial effect, to prevent mold from appearing.
- Mix the solution and make plaster.
- Clean the surface and reapply primer.
- Cut foam boards to suit your size.
- Scratch the surface of the foam, apply glue and attach to the surface.
- Wait until it dries, install the corner and putty.
- Secure the casing.
The finishing coating can be varied. The most commonly used materials are plaster and painting. Drywall is also trending now. Here is a good video on how to insulate the slopes of plastic windows from the inside:
How to insulate the window sill of a plastic window
Over time, under the influence of mechanical loads and thermal factors, the foam becomes unusable. Cracks appear, and this sealant tends to dry out.
To insulate the window sill of a plastic window, you will have to buy a can of foam. Its average price is 200-300 rubles, depending on volume and quality. It is best to give preference to European brands.
Remove the old foam and run the dispenser along the entire length of the base of the frame. This insulation does not cope very well with small cracks. It is best to insulate them with silicone sealant.
Thanks to the advent of modern building materials, which are distinguished by their positive characteristics, it has become fashionable among owners of apartments with old windows to replace them with more advanced ones - plastic ones. But installing a new window is only the beginning of a process that should end with finishing the slopes.
But it may also happen that after replacing the window, the apartment becomes cold and damp. This may be due to gaps around the window frame. In this case, only insulation of the slopes will help. Of course, if it allows you family budget, you can invite experienced specialists who know how to properly insulate the slopes of plastic windows. But, in order to save money, we will tell you how to insulate window slopes with your own hands.
Why worry about insulating the slopes of plastic windows?
I would like to immediately emphasize that thermal insulation is an integral component of a well-installed window profile. The main reasons that require insulating the slope:
- The window has a frame that does not fit tightly enough to the slope, resulting in a seam. Polyurethane foam is used to fill it. Yes, this material retains heat well in the house, but it is afraid of moisture and sudden temperature changes, which destroy it. That is why you need to hide it under finishing materials.
- Since the window profile is not sufficiently protected from external influence, without insulation, water (precipitation, condensation) can penetrate into the joints. In winter, at low temperatures, the fastening elements will begin to deteriorate, causing the window to sag.
- As a result of shrinkage of the window profile, voids may appear, through which not only moisture, but also cold air will penetrate into the house.
- If a PVC window is not insulated, condensation may accumulate on the inside, causing fungus and mold to appear. If the slopes are insulated, the likelihood of this can be minimized.
In addition to the fact that it is necessary to insulate slopes for their proper functionality, it is also necessary to complete their appearance.
Which material should you prefer?
To ensure that the installation of a plastic window does not disturb the microclimate of the apartment, you need to pay special attention not only to the insulation of the slopes, but also to choose the right material for this. Today the construction market is very big choice insulation materials, here are the most popular of them:
- Styrofoam. This is the cheapest insulation that does not cause any particular difficulties during operation. But, due to temperature changes, it is susceptible to destruction and changes in characteristics.

- Mineral wool. This insulation material can be used both inside and outside. Distinctive feature – low level flammability.
- Penoplex (extruded polystyrene foam). The material has the most suitable characteristics, but is not as affordable as foam sheets.
In addition to these options, you can use various materials(see table). But all the materials we talked about need further finishing. The only exception is the sandwich panel, which not only has exceptional performance, but also has excellent thermal insulation properties and provides durable protection. The table below shows a more detailed list of available insulation materials and their features.
| Name of material: | Peculiarities: |
|---|---|
| Foamed polyethylene: | A material that has excellent hydrophobic properties. Very often used with a layer of foil, which reflects heat, keeping the maximum amount of heat in the apartment. It is very important to carefully handle joints and gaps. |
| Basalt wool: | An excellent solution if you compare price-quality-technical characteristics. In addition to the fact that the material perfectly protects the room from the cold, it is also an excellent sound insulator; noise from the street will not reach the apartment through such slopes. It is also worth noting that cotton wool is not afraid of moisture. |
| Multilayer panel | Wonderful material, especially for DIY work. Such panels are plastic profile, which is complemented by insulation tape. |
As you can see, there are a lot of options for insulating the slopes of plastic windows outside and inside. The most suitable material can be easily selected for any budget.
Insulating a slope with foam plastic (video)
Features of internal insulation
After you choose insulation for the slopes of plastic windows, you can get to work. And so, before you insulate the window slope yourself, familiarize yourself with the sequence of work (you can watch the video above):
- Remove any protruding foam.
- Apply an antibacterial primer to the surface to prevent mold from forming.
- Plaster the perimeter of the window so that the evenness of the surface allows you to easily fix the foam sheet on it.
- Clean the surface and prime it.

After preparing the surface, insulation can be laid. Please note that if your choice fell on foam plastic, then before fixing it to the wall, scratch the sheets with sandpaper to deprive them of their smoothness. When the foam slopes are ready, the only thing left to do is finishing.
To do this, you can choose any option proposed by the designer or finisher (the most popular solutions can be viewed in photos in catalogs or on the Internet), or create your own unique finish.

The following solutions are in great demand:
- imitation stone or brickwork, for which you can choose a flat tile or decorative relief stone;
- sheathing with plastic that imitates wooden beams;
- classic finishing with white plastic or plasterboard;
- plastering imitating different surfaces;
- coloring;
- modeling or its imitation, for which you can use a self-adhesive baguette.
This is not the entire list of possible window designs. But, before making your final decision, consider whether such a window will fit into the interior of your home.
How to insulate slopes from the outside

For owners of apartments in high-rise buildings, the task of how to insulate the slopes of plastic windows from the street raises many questions. But, if you are not an expert in this matter, it is better not to risk your life and entrust the work to experienced specialists, especially since today there are enough private companies to choose the appropriate option. So, outdoor version finishing of the slope is carried out in the following sequence:
- Remove the foam and treat the surface with an antifungal solution.
- If there are uneven surfaces, level the surface with plaster.
- Lay the selected insulation and secure it carefully.
- Install the corner.
- Cover the insulated slopes with glue, cover them with fiberglass mesh, and make the surface even. Wait until the glue dries a little and repeat the glue treatment again.
- When the surface is thoroughly dry, the slope can be painted with water-based paint.
That's all, now your home will be warm and cozy even in severe frosts.
Photo gallery of finished works
