What could be better than relaxing outdoors with your family and friends? Cooking fish or meat allows you to have a pleasant time and have a delicious dinner. It is for such purposes that people buy collapsible barbecues or grills.
But relatively recently, some owners of private houses or cottages began to build brick or stone barbecues around which the whole family can gather. Also, thanks to materials such as natural stone or brick, the heat will be retained for a long time and the structure can even be used as a fireplace.
This article will tell you how to make a barbecue with your own hands, and we will also look at drawings, photos and even videos. In addition, for people who do not have the opportunity to make a stone or brick oven, a barbecue made from scrap materials would be an excellent option. But first, let's look at how to do it brick barbecue.
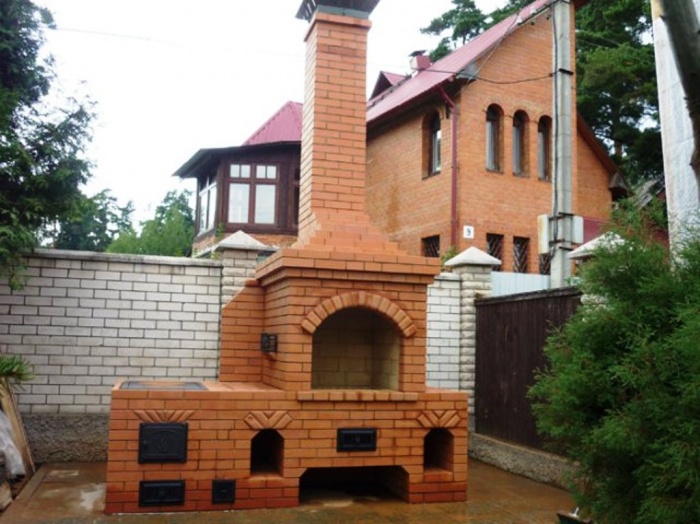
Brick BBQ
In order to build a brick barbecue you need to purchase some materials. To build a furnace you need to purchase fireproof and facing brick. Fireclay is ideal as a refractory brick. Due to the fact that this material contains a lot of clay, it can easily withstand high temperatures. It is also very important that the brick is not too fragile and does not crumble. In addition to bricks, you need to buy clay from which the mortar will be made.
In order to prepare the solution, you need to purchase cement, red or refractory clay and sand. Cement and sand will be used to line the barbecue oven, and clay will be used to lay fire bricks.
Preparation of the solution
To build a barbecue, you definitely need a high-quality solution. It is impossible to prepare ordinary cement mortar, since high temperatures will cause the oven to crack and it will be impossible to use it. Therefore, it is necessary to prepare a clay mixture.

Clay mortar is divided into two types - skinny and fatty. A thin solution will not work, as after firing it will crack or, even worse, spill out of the seams. But the fatty mixture has plasticity, thanks to which the solution will be evenly distributed over the entire plane of the brick.
The process of preparing a clay solution for a barbecue oven is as follows:
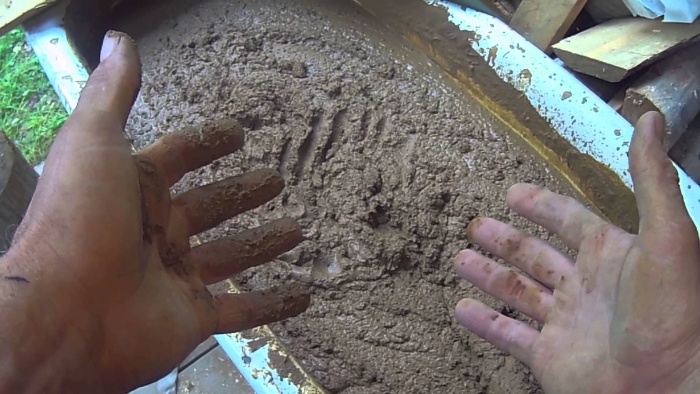
In order to understand whether the solution is of high quality or not, you need to scoop up a little of the mixture with a trowel or shovel. The solution should not stick to the shovel or leave behind too wet marks. A properly prepared solution should slowly slide off the shovel and not spread.
For a high-quality solution, you need to clean the sand from gravel or other debris. This work can be done using a sieve.
In order to give the solution greater strength, you need to add to the composition table salt. About 200 grams of salt are needed per bucket of solution.
Foundation for brick barbecue
The first thing you need to do to build a barbecue is to choose right place. Special attention fire safety should be taken into account. Trees or bushes should not grow near the stove.

Also, it is not recommended that the barbecue be located too close to the main buildings, bathhouse or utility block. Experts advise taking into account the direction of the wind so that it does not blow towards the main buildings. Also, during construction, it is necessary to think through everything in such a way that sparks are not carried by the wind to the neighbors. You can see the barbecue project in the video below.
Today it is difficult to imagine outdoor recreation without organizing a picnic. And a barbecue became a mandatory attribute of such a holiday. From our article you will learn how to make a stove, barbecue and barbecue out of brick at the dacha with your own hands. With their help, you can not only prepare an excellent meal for guests, but also successfully decorate your area.
At the dacha, in the process of preparation
U personal stoves and barbecues made of brick - photo, p advantages and disadvantages
Before you begin the construction process on your personal plot of this structure, we will consider the advantages and disadvantages of a brick oven-barbecue.
Among the main advantages that a brick grill in a country house undeniably has are the following:
- versatility. The barbecue oven is ideal for preparing not only meat kebabs, but also allows you to skillfully cook fish, vegetables, and poultry;
- big sizes. One of the undeniable advantages is the large frying area. Its rear wall allows the heat to be distributed evenly over the entire area, which promotes uniform cooking;
- the ability to vary the cooking mode. IN in this case The products used are not threaded onto skewers, but can be evenly distributed on the grill. Moreover, depending on what is being cooked in the oven, you can vary its height in search of the best cooking option;
- possibility of use various types fuel. In this brick grill stove, both wood and coal can be used;
- the design of the barbecue provides an exhaust hood;
- in more advanced models, a temperature level indicator can be installed, which allows for more convenience when preparing dishes;
- When using a barbecue oven, preliminary marinating of meat is not required.
 Outdoor ovens and barbecues made of brick - photo on the site
 Despite a number of advantages, one significant drawback can be noted:
- construction is quite an expensive undertaking.
How to make a stove, barbecue and barbecue out of brick at your dacha with your own hands
Next, we will tell you in detail how to make an oven, barbecue and in the country. When choosing a material for building brick, you can be sure that no additional special skills will be required, such as when using metal. Another important advantage is the significant cost savings, because you do everything yourself, without involving outside specialists.

In this article, we have prepared step-by-step instructions for you that will help you build a brick oven-barbecue in your garden. In this case, the following main stages can be distinguished:
- carrying out preparatory work;
- construction of a barbecue;
- decoration.
Preparatory work
We will decide at the first stage how to build a brick oven-barbecue at your dacha with your own hands and what you will need for this.

Preparatory work should include the following steps:
- choosing a place where the grill will be installed;
- production of the project;
- selection of tools and materials.
We determine the location for installation on the site
Initially, you need to determine the location for installing your future outdoor stove and brick grill, photo below.
It is imperative to remember that in the place where the brick barbecue is installed there should be no tall plantings nearby, the proximity of which could lead to a fire. Also, the place should not be exposed to strong winds.

When choosing a location, you should consider a number of requirements:
- at the design stage, it should be taken into account that smoke from the barbecue does not reach the main buildings;
- consider protection from wind and weather;
- to protect the lawn, it is best to lay out the place where the barbecue is installed with brick or stone;
- provide for the possibility of installing lighting in this location.
By the way, the ideas are all described in a special separate article on our website.
Project, drawing and diagram on paper

In order to correctly determine how to make a brick oven-grill in the country, you will need a project or diagram on paper. At this stage, you will be able to sketch a sketch of the structure itself, which will mark all the key elements. After this, you can begin making drawings, where the structure itself will take on more realistic shapes and dimensions. With its help, we can calculate the required consumption of materials.
Tools and materials
Now you need to decide what tools and materials you will need to build a barbecue stove. Materials you will find useful:
Finishing tiles
Plaster
Heat resistant paint
Tile adhesive
The amount of materials you spend directly depends on your project.

Putty knife
Concrete mixer

Extension


Gloves
Ordering a brick grill oven
The order is a diagram that, step by step, marks the sequence of actions when laying a stove, the sequence of masonry with a description of the required materials. Steps to help answer the question How to make a stove, barbecue and barbecue out of brick at your dacha with your own hands:
- foundation production;
- preparing mortar for masonry;
- plinth masonry;
- installation of a brazier;
- masonry of walls and smoke collector;
- decorative finishing.
Order is required and to an experienced master. Knowing the exact number of bricks, the sequence of their laying, as well as the sequence of work, greatly simplifies the process of constructing a barbecue stove.
Foundation for a brick grill with a stove
To build a foundation for a brick barbecue stove, you will need to dig a hole about 30 cm deep, which is quite sufficient for the weight of the barbecue.
It must be remembered that the depth of excavation depends primarily on the weight of the structure itself.
The dimensions of the foundation being laid must be larger than the dimensions of the barbecue itself.
The foundation should be 10 cm larger than the building itself, which will make it possible to make a concrete area around the barbecue in order to increase fire safety.
Use a cutting board to secure the formwork. We fill the resulting pit with a mixture of gravel and sand and compact it thoroughly, periodically adding water to the solution.

Masonry mortar
To prepare it we will need::
- cement;
- sand;
- clay.
For masonry you will need to prepare two types of mortar.
First of all, you will need to make a solution for those areas that will not be in direct contact with the fire. The quality of the mixture directly depends on the brand of cement. It is best to use cement grades M25, M50 and M75. To prepare the solution you will also need sand. The following proportions will be optimal:
- sand to cement grade M25 - 5:1;
- sand to cement grade M50 - 4:1;
- sand to cement grade M75 - 3:1.
To make the firebox itself, it is best to use fireclay clay. It has the best fire resistance properties, which are suitable for high temperatures. In stores it is also called “kaolin”.
The next step in building a brick barbecue with a stove in the country is laying the base.
To do this, the prepared formwork is filled with a solution, the preparation of which will require two bags of cement. After which two days are given for the cement to harden. Next, waterproofing is installed.
Roofing felt is best suited as an insulation material for a barbecue stove.

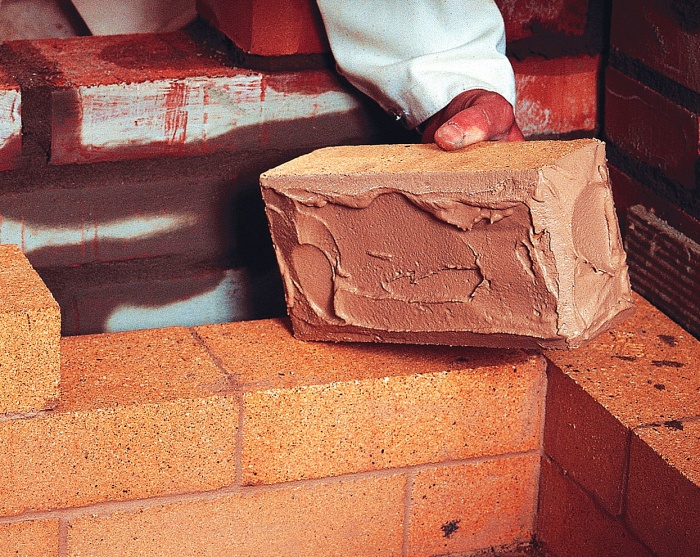
Before you start building walls, in accordance with the project, it is necessary to calculate the number of solid bricks required, as well as their pieces. If you use previously used material during construction, you must first clean it of accumulated dirt and mortar residues.
The first two rows are laid out in the form of a solid rectangle. This will prevent overheating of the roofing material at the base. The corners of the grill are leveled using a building level. During the laying process, excess mortar is carefully removed. Only when laying the third row of bricks does the volume and shape of the stove itself begin to form.


During the construction of a combined barbecue and brick stove, it is imperative to provide an ash pit for your barbecue stove. To do this, it is best to use materials that can withstand high temperatures.

It is necessary to leave a gap between the brickwork and the door, since metal tends to expand when heated.
The height of the cooking surface will also depend on the size of the door: its optimal value will be 84 cm.
For unhindered penetration of heat into the fryer, it is necessary to provide a gap in the structure, the size of which will be two bricks. Its presence will help you in the future to easily remove coals after cooking.
If you do the masonry correctly, you can be sure that the door is securely fixed. To organize the woodshed, a separate wall is usually formed. To give the structure an aesthetic appearance, it is best to use ¼ bricks. To secure the door more securely, wire is used, which is additionally secured with bricks.
At the next stage, the woodshed arch and roof are formed. It is best to build an additional wall inside as a support point.

In the central part we leave space for laying the grate.

All seams are secured using cement mortar. After this, you can build the walls of the brazier. At the final stage, all seams are rubbed down.

The firewood can be covered with a galvanized sheet.

Half the job is done, now it’s time to think about the walls and smoke collector. After forming the brazier and woodshed, we continue to lay out the back wall with bricks. At the same time, several rows are laid out to form a firewood arch - this will give the barbecue a finished look.

The next step is to make six moves that will help remove smoke from the fryer.

We erect firebox ceilings using flooring.

A layer of insulation and a cooking surface are laid on top of the firebox.

Finally, a chimney is formed using bricks.

Decorative finishing
The final step is to give your brick oven-barbecue decorative look so that it blends harmoniously with the rest of the buildings on the site. For this you can use decorative stones, ceramic brick and other materials to choose from. Consider the option of finishing using decorative stone.
For finishing you will need:
- trowel;
- Master OK;
- bucket;
- building level;
- grinder with a disc for cutting concrete.
Before laying the stone, it is necessary to carefully level the surface by plastering it. Next, use a special stone solution to install it.
In this case, it is better not to use silicone, since the final quality of work is inferior to that using a solution
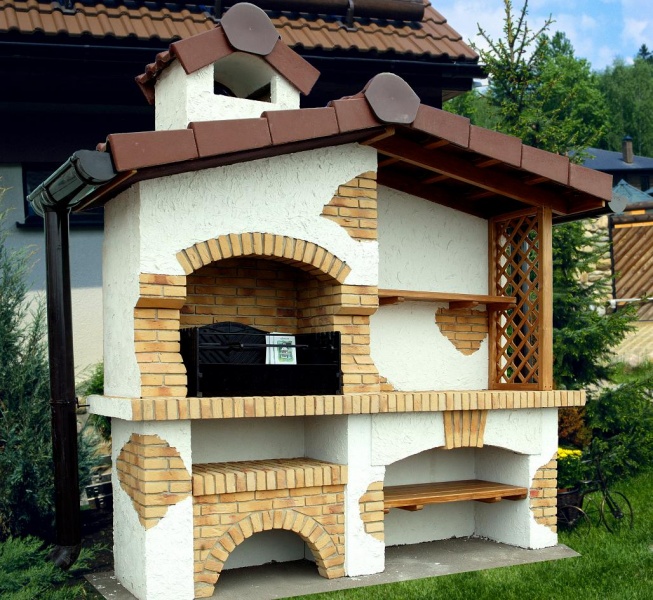
 Do-it-yourself brick grill cauldron (drawings and photos)
 Brick brazier is a special brazier for preparing shish kebab, built of brick. A solid brick grill is often more functional and is used as a grill and barbecue; often other dishes are cooked on it, even just to heat up food. This is also an interesting art object on suburban area. It’s nice to gather around such a structure with a large group.
How to choose a place?
- Don't forget that this building- an object of increased fire hazard. It should not be located near the house, wooden or other flammable outbuildings.
- The building should not be too far from the resting place. Perfect option- near the gazebo or not far from summer kitchen. You can put up a wide canopy that will not only protect the brick grill from precipitation, but also cover a couple of benches and a table.
- Be sure to arrange the site. There should be no flower beds or beds nearby, as the grass will simply wither due to high temperatures. You should consider a convenient approach, or better yet several. There should be no toilet or trash containers nearby.
- If the wind constantly blows in one direction, make sure that smoke does not enter the windows of residential buildings.

What is needed for construction?
The best material for construction is fireclay brick (kiln). It can withstand large temperature changes and does not collapse. Use clay and sand as a mortar for masonry. But it requires pre-soaking.
For an outdoor brick grill you will need a good foundation, which means you will need construction material for the foundation (cement, sand, rubble stone, plywood or formwork boards, reinforcement, stones and crushed stone).
You will also need metal corners, gratings, valves, sheet iron. If you plan to make niches and a work area, you will need a tabletop made of stone; the doors can be made of wood or metal.
Tools needed:
- shovel;
- Master OK;
- level;
- buckets for solutions;
- concrete mixer or trough;
- Circular Saw.
A project must be developed or a ready-made one taken. It is not only convenient to carry out work, but also to calculate the required amount of materials. A small supply never hurts, but there is no need to have large surpluses.

Pouring the foundation
A stationary brick grill requires a foundation:
- It is necessary to dig a hole according to the size of the project.
- Line the bottom of the pit with rubble stone and crushed stone, and install the formwork (it is better to moisten it).
- Next the hole is filled concrete mixture made of cement and sand in a ratio of 1:3, but in layers and laying reinforcing mesh. Under no circumstances should the reinforcement lie at the bottom of the pit. If the pit is small and the walls are smooth, then formwork is not needed.
- The foundation is covered from above with roofing felt or ordinary film.
- When the weather is hot, it is recommended to occasionally spray the base with water to ensure uniform drying. It will take 1-2 weeks for the concrete to set and dry. Brick laying is carried out only after the foundation has completely hardened.
- During this time, you can prepare a clay solution. It is necessary to soak the clay in the tub for a week, stirring occasionally and adding water if necessary. Then add sand. A good solution has a consistency similar to thick sour cream; it should be easy to handle and not spread.
- It is easy to check the quality of the solution. To do this, mix a small amount of clay with dry sand. Roll it into a rope with a diameter of 1 cm. It should not lose its shape, crack or spread.
 The foundation for the barbecue is required, this is an important part of the work
Bricklaying
Order brick barbecue shown in the following figure. If you want to draw the order yourself, then it is most convenient to do this on a piece of paper in a cage.
 This is what the barbecue arrangement looks like
The easiest way to lay a brick barbecue is to move each row by half a brick in one direction or the other. Laying the plinth should begin from the corners towards the center along pre-marked lines. Every 3 rows, check the level and plumb line, and also lay down the reinforcing mesh.
The first row of masonry, like the second, is made continuous. The base may have different heights, depending on the project, and several compartments in which it is convenient to store firewood, charcoal, some utensils, etc.
For the brazier, you can use a pre-cast concrete base with reinforcement or lay it out of brick.

If the firebox is planned to be arched, then a circle is used. A gap of 1 cm is left between the bricks. It is best to use wood chips for this. This way you can distribute the bricks evenly. Only after this the space is sprayed with water and filled with solution. The circle is left for 1-2 days.

The firebox is covered on top reinforced concrete beam or an iron corner. Another row of bricks is laid on top of the lintel.
If you plan to use a brick grill as a barbecue, then you need to think in advance about where to install the grate. For this purpose small protrusions are made. The grill itself is placed on reinforcement bars embedded in the walls of the building. You can make several projections to be able to place the grill at different levels.
Next, wind walls are laid and a smoke collector is made. The pipe is attached to supporting columns and gradually narrows. This is the simplest design. And to protect it from precipitation, a metal canopy is installed above it.
IN simple circuits For barbecues made of brick, the pipe may be completely absent, as well as wind walls.

Finishing and canopy
In order for the building to last as long as possible, it is necessary to build a canopy.
He can be:
- general and cover the entire recreation area;
- be located directly above the grill.
For this purpose, under the pillars of the canopy are made concrete bases or attached to the base. The supports can be metal or wood. In the latter case, according to fire safety rules, they are required to be at least 16 cm away from the structure and treated with special antiseptics.

The roof for the canopy is made from absolutely any material. But if it is combined with the roof of the house and other outbuildings, then the brick grill will harmoniously fit into the overall landscape.
The structure can be left as is with just a little sanding. Can be coated with special paints for brick kilns. The decoration made of decorative stone looks interesting. You can also use special plaster.
More use various elements decor not only on the grill itself, but also on the doors of built-in cabinets, shelves, etc.
Watch the following video, which clearly shows the process of building a brick grill.
Projects, diagrams and drawings
There are many finished projects barbecues made of bricks, varying in level of complexity of execution, costs and decorative options. You can develop your own drawing based on existing diagrams.
We present a barbecue diagram, according to which it is easy to build a barbecue out of brick with your own hands.

Typically, the height from the ground to the roasting pan is defined as the distance from the level of the hand to the floor. If the owner is tall, then the firebox will be located quite high. The width of the frying pan does not exceed 30 cm, otherwise a standard skewer will simply fall into it. Most often it does not exceed 1 m in length, based on 10 skewers.
You can build a brick grill with your own hands according to the following drawing.
 Perhaps this drawing will suit you better?
Another drawing and real photo to him, step-by-step instruction for the construction of a brick barbecue.

A barbecue is one of the mandatory attributes of a summer holiday. If space and budget allow, it is quite possible to arrange it in your own summer cottage. These days there are many detailed instructions, which describes step by step how to make a brick grill yourself.
Yes, you can just buy a ready-made barbecue for your dacha, but there is something attractive in plans to build such a barbecue out of brick with your own hands. A country barbecue is not only a gathering place for the whole family and an interesting element of country design.
Advantages of a brick grill (barbecue)
- It is possible to cook not only meat, but also other products. For example, fish, various seafood, vegetables, poultry, even sweets.
- Larger dimensions and a round (usually) shape of the roaster + back wall contribute to a more uniform distribution of heat over the entire area.
- Products are not strung on skewers, but placed on a grid, and you can change its position in height, thereby choosing the optimal mode.
- Heat can be obtained not only from burning wood or coal, but also from other heat sources.
- Existence of a hood.
- In some cases, a temperature indicator is installed, which provides additional convenience in cooking.
- It is not necessary to marinate the meat before cooking.
Choosing a place to install the barbecue and its dimensions
This is where you need to start. On several hundred square meters, when literally every inch of land is accessible, making a choice is not so easy. But the drawing of the barbecue is drawn up based on the size of the segment on which the stove will be built.

What is taken into account:
- The barbecue should not become a hindrance to the daily work process at the dacha.
- It is advisable to place the stove so that the prevailing wind blows the smoke away from the house.
- There should be a main pipe near this place.
- It is hardly advisable to bring a full-fledged water supply line to the object, and even pull it through the site.
- To prevent the vagaries of the weather from becoming an obstacle when preparing barbecue, it is advisable to erect at least a light canopy over the barbecue.
- Therefore, there should be no tall bushes or fruit trees nearby.
- And if we take into account that the heat from the stove will not have the best effect on them, then the need for some distance from the vegetation becomes even more obvious.
- In addition to the barbecue itself, it is advisable to equip this area with a storage area for firewood, as well as place a small table and at least a couple of benches (as an option).
It will be equally important to consider the following:
- The ground surface must be flat;
- It is advisable to place a barbecue area near the kitchen. This will make it easier, if necessary, to equip the cooking area with light or water.
When building a barbecue, it is better to decide in advance where you will cook the meat, serve it and wash the dishes.
The grill is a source of open fire. Its location should be at a sufficient distance from buildings, especially flammable ones, as well as from trees and bushes.
 Tools
Tools
List of tools needed to build a brick barbecue:
- measuring tape,
- as a rule,
- wheelbarrow,
- chalk,
- bayonet,
- sledgehammer,
- pitchfork,
- shovel,
- bucket,
- trowel for laying mortar and jointing,
- jigsaw,
- pick,
- chisel,
- rubber and carpenter's hammers,
- level,
- saw.
Selection of bricks for the barbecue
The operation of a brick barbecue is very different from the use of other buildings. Therefore, when selecting bricks, it is necessary to take into account the following conditions:
- High temperatures. When burning some types of wood, the temperature can reach 1000 °C or higher.
- Sudden temperature changes. In a short time, the brick heats up to high temperatures and then cools down very quickly.
Attention ! For regular red or sand-lime brick It is simply impossible to maintain such a regime. The result will be rapid destruction, manifested in the appearance of cracks.
Some types of refractory bricks are designed to withstand prolonged exposure to high temperatures, for example, in industrial furnaces, but are not able to withstand sudden heating and cooling. The consequence of its use will also be rapid destruction.
Therefore it is better to use red kiln brick. It is calculated specifically for significant changes thermal regime, and can last a long time without destruction.
Preparatory work
Foundation for a brick barbecue
For a barbecue in the country, given that it is made of brick, the most rational decision There will be a slab base. Firstly, strength and stability of the structure are ensured. Secondly, you won’t have to carry out extensive excavation work, which for a habitable summer cottage highly undesirable.
To begin, mark out the area prepared for the foundation. To do this, you can use twine and pegs (its size should correspond to the area of the barbecue in the drawing).
Then you need to dig a hole in the designated place (a depth of 30 cm will be sufficient). In the resulting pit you need to install formwork. The bonding solution will be placed in it. This mixture is prepared from sand and cement in a ratio of 3 to 1.
 The base of a brick barbecue must be reinforced. For such purposes, both reinforcing bars and reinforcing mesh are used. The rods must be placed in the base after filling half of the prepared volume of the foundation.
In the case of a mesh, it will have to be laid twice. The lower part of the foundation needs to be filled with approximately one third of the solution, lay a mesh on top of it, fill another third and lay the next reinforcing layer. Then simply fill the foundation to the required height. 

Laying a brick grill
To brick walls looked neat and even, it is recommended to first lay the first row of material without mortar. On the foundation, you can mark guidelines for the location of all subsequent rows in the masonry.

The brick grill should be laid out in a checkerboard pattern, i.e. the next row will always be shifted by half a brick block in relation to the previous one.
Before laying bricks, you must ensure that the foundation is sufficiently hardened. To be sure, it is better to wait a few days before starting work.
Masonry mortar
For laying the barbecue, two types of mortar are used:
Standard building mixture for places not in direct contact with fire. Depending on the brand of cement, the amount of sand is calculated:
- for M25, a proportion of 5 parts sand to 1 part cement is used;
- for M50 – 4 to 1;
- for M75 – 3 to 1.
Fireclay clay is used for laying the firebox itself. This fireproof material can withstand high temperatures. In building materials stores it can be found under the name “kaolin”.
Laying process
The procedure for laying bricks directly depends on the order of your chosen design/drawing of the barbecue, which must be strictly adhered to, so below we will only indicate general rules and tips:
- Carefully lay the bricks of the initial row.
- You need to start laying out the row from the corner, and only then fill the side walls.
- The width of the spaces between the bricks is 1 cm.
- Maintain the correct angles and level of masonry.
- The solution for the first row should be thick.
- The bricks of the next row necessarily overlap the seams of the previous row.
- When laying out subsequent rows, do not forget to check the corners of the masonry for verticality.
- Every third seam must be reinforced with mesh or steel rods.
Roasting rack
For the base under the roasting pan, it is necessary to place metal corners or reinforcing bars between the opposite walls. The base of the firebox made of bricks is laid out on them. For us, this role is played by a metal pallet. The main condition is that the firebox is easily cleaned of ash.
In the area of the firebox, it is necessary to leave side gaps in the brickwork unfilled with mortar. This will ensure air enters the chamber. After all, without an influx of oxygen, the combustion process of fuel is impossible.

The base for the brazier is placed in the space between the walls of the structure. To do this, metal rods or corners can be placed between them, on which the brick base will be laid. As an alternative, you can use a tray made of thick metal sheet.
Chimney for barbecue
The simplest option is to install a metal box shaped like a cone, tapering upward.

It is more difficult to make a brick chimney; practical experience is needed here. It is enough just to note that it is necessary to correctly calculate its height.
For the construction of the firebox and chimney, only refractory bricks are used.

Working surface
For greater ease of use of a brick grill, build a special one directly next to it. work area. The tabletop should be in harmony with general view the resulting stove and be convenient to use. You can take durable floor or paving tiles.

It is important for the work surface that it is durable and easy to clean.
+Bonuses
Calculation of materials for building a barbecue made of bricks (for example)
The grill, built according to the proposed drawing, is used for preparing dishes of any cuisine: Russian, European, oriental. You can cook in it - smoke, fry, bake, boil - for large quantity eaters.
Materials:
- Brick - 1850 pcs. (without pipe)
- Clay - 1 m³ sand - 2 m³
- Rod ∅ 14 mm - 2.2 m
- Strip steel 50x5 - 1.2 m
- Sheet steel S=5 mm - 1.5 m²
- Water and gas pipe 1/2″ - 0.4 m
- Steel corner 100x100 - 2.9 m
Furnace appliances:
- Grate 415x260 - 7 pcs.
- Ash pan door 270x130 - 3 pcs.

You shouldn’t start cooking kebabs right away. . A newly built barbecue, as well as any other oven, must be preheated. This means that for at least a couple of days it is heated idle, that is, in a gentle mode, with a small addition of firewood. And only after such a kind of “break-in” can the structure be used for its intended purpose, that is, to cook kebabs.
Drawings of brick barbecues with order


When preparing the article, materials from the sites were used:
my-fasenda.ru
centrog.ru
banivl.ru
bouw.ru
diz-cafe.com
strmnt.com
101dizain.ru
idealsad.com
better-house.ru
mukhin.ru
heat.guru
Are you ready to build a brick grill?
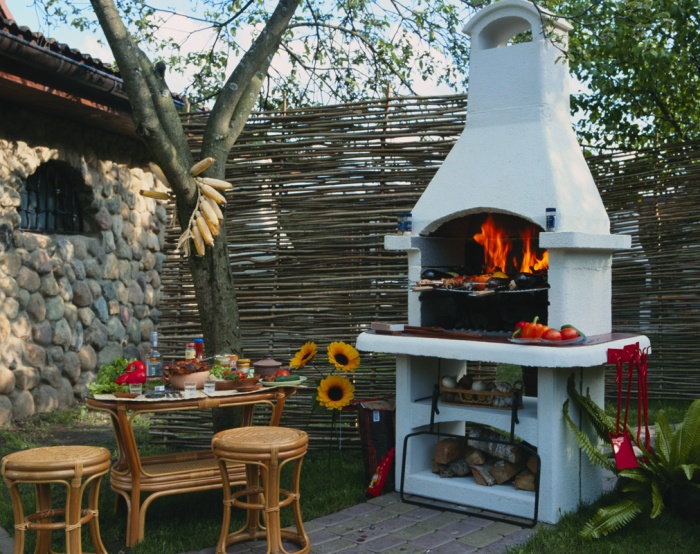
Today you can make a brick barbecue oven with your own hands or have it made by professionals. Every hospitable host simply must have such a design. The benefits of such a structure can hardly be overestimated. Most often, brick models are installed. They have the following advantages:
- solid appearance;
- effectively complement the exterior;
- durable and reliable;
- high-quality material has excellent fire-resistant properties;
- does not require specific care;
- food cooked on a barbecue has a special taste and aroma;
- the heat is distributed evenly throughout the fryer;
- unlimited design possibilities.
The peculiarity of this type of building for outdoor cooking is that, due to its design, it is possible to achieve uniform cooking of food. In addition, the products are saturated with the smell of natural smoke, which gives them a special piquancy. At the same time, the brazier is protected from rain, so bad weather will not ruin your barbecue outing.
Please note: in a barbecue you can not only fry meat and vegetables, but also bake, boil and stew dishes.

Many people are intimidated by the dimensions of the barbecue, but it is worth considering that you can adapt the design to your needs by removing or adding side working surfaces, etc. In addition, the stove is located outside, so problems associated with a lack of space rarely arise.
Design
Making a barbecue with your own hands will take a lot of time, since the arrangement process includes many stages. One of the most responsible is the design stage. Here you need to decide on the exact location of the building, find out all the necessary parameters and, based on this data, develop a detailed project.
Selecting a location
Making a brick barbecue oven with your own hands begins with selecting suitable place for its location. There are no strict requirements in this regard, but some recommendations should still be taken into account:
- Pay attention to fire safety precautions. You should not build a barbecue near flammable objects. There should be no dry plants, wooden outbuildings, gas cylinders and other dangerous items.
- It is best to allocate a separate area for this purpose, at some distance from the house. Set up a recreation area with a concrete platform, a canopy or a spacious gazebo.
- You should not set up a grill area in an area with drafts, as sparks can be blown over a long distance, including to neighbors.
- Smoke should not go towards the house and smoke neighboring areas.

The ideal option is to arrange a separate recreation area with a gazebo or canopy
Advice: the best option is the location of the barbecue in the backyard on the leeward side, a short distance from the main buildings. At the same time, the design should not violate the overall composition of the landscape.
Sizing
A more difficult stage is determining the overall dimensions of the product and the sizes of its individual elements. First you need to think about overall design and draw the barbecue with your own hands. This will make your future work easier, because you will already have a rough idea of the design.
Since building a brick barbecue oven with your own hands requires individual approach, we can only name approximate parameters for the design:
- The width of the stove is often taken within the range of 60-80 cm, without taking into account additional working surfaces.
- The grill level is 65-75 cm, selected individually according to the user’s height.
- The oven is located 10 cm below the grill.
- The width and depth of the brazier are calculated by the dimensions of the brick. Typically, values are taken in the range of 60-90 cm and 40-70 cm, respectively.
- The total height of the structure exceeds 2 m, and if you take into account the chimney - 2.5 m.

The exact dimensions must be determined independently when the materials are selected and other nuances are taken into account.
Drafting
In order for further work to be carried out without hitches and errors, it is also necessary to think through each step more carefully. installation work and create an exact barbecue project with your own hands. This stage involves transferring calculated data to drawings and developing a so-called order for brickwork.
Important: you need to draw the layout of the material in accordance with the scale in order to see the exact location of each element.

For clarity, the drawings include a front and side image of the stove, as well as a detailed drawing of each individual row. On average, a barbecue grill consists of 30-35 rows.

We previously wrote about and advised you to bookmark the article.
Selection of materials
The durability of the structure largely depends on the quality of the material. It makes no sense to build a brick barbecue oven with your own hands using cheap raw materials, since it will not be able to fully perform its functions.
To build a durable and at the same time beautiful structure, you will need the following materials:
- refractory brick, preferably fireclay;
- red fire clay;
- cement grades 200 and 300;
- crushed stone;
- river sand;
- pure water;
- fittings;
- decorative finishing (clinker, porcelain tiles, stone, etc.);
- metal parts for arranging a grill, shutter, etc.

Construction of the furnace
Before using prepared materials, they must be properly prepared. The sand must be sifted to prevent debris and shells from getting into the solution. The clay needs to be soaked in water for about 5-6 days. Bricks should also be wetted shortly before use so that they do not draw moisture from the mortar and bond better with it.
Foundation
It begins with preparing the site and laying out the foundation. It is made from grade 300 cement, sand and crushed stone. You can add a plasticizer in the form of slaked lime. To follow the contours when equipping a protruding pedestal, wooden formwork is used.
Please note: if the stove is built on open ground, you need to deepen the foundation into the ground, and if it is on a pre-concrete site, you need to additionally strengthen the foundation with metal piles.
You can completely limit yourself strip foundation or fill a solid area. To begin with, a layer of soil of approximately 30-40 cm is removed. Then crushed stone with a layer thickness of approximately 7 cm is laid on the bottom. A reinforcing mesh is mounted on top and only after that concrete is poured.

The basis of the foundation - liquid concrete and reinforcing mesh. The first row of bricks also serves as a support
The surface of the foundation is leveled and covered with film. You can continue work only after the base has completely dried, which can take from several days to two weeks.
Brickwork
For the construction of durable brickwork that can withstand high temperature and a significant load, it is necessary to use a special solution. It consists of materials such as red clay, sand and cement grade 200. Moreover, the mass should be plastic and not too liquid.
The first structural element is the pedestal. This is the base of a brick barbecue oven. It’s quite easy to do it yourself if you follow a pre-designed layout scheme. It also contains a recess for storing firewood - a woodpile. On the sides you can build work surface, arrange storage shelves, etc. Additionally, consider the placement of reinforcing bars to strengthen the structure.

After the pedestal, a stove and chimney are built. These elements are somewhat more difficult to make, especially for a beginner, so you need to consider the work in more detail.
Fryer device
The barbecue roaster can have different sizes, but it is important to coordinate them with standard indicators so that the stove fulfills its direct function. The most convenient option is 6 bricks long and 3 bricks wide. For small structures, a 3x2.5-element roaster will be sufficient.
Please note: it is better to lay the walls of the oven with a double row of bricks so that the structure retains the heat and is durable.
When making your own barbecue grill, you can use any design. Installation of a rectangular window is simpler, but in aesthetic terms the arched vault wins.

To set up a brick barbecue oven with your own hands, you also need to think about smoke removal. The pipe should extend strictly vertically, connecting to the smoothly tapering roof of the brazier. Typically its height is at least 50 cm. To ensure traction important element is a chimney tooth and a metal damper installed inside the pipe.
Decoration
In order for the barbecue to look aesthetically pleasing and fit into the exterior of the yard, you need to take care of its decoration. For this purpose, use any materials that can withstand high temperatures. It is imperative to make sure that they are safe and free of harmful impurities. A solution of cement and sand is used to line the stove.

After the masonry has dried and finished, the first testing of the new structure can be carried out. Typically, 1 month is allowed for drying.
If everything is done correctly, the heat will be good and even, and the smoke will flow into the chimney, so your time near the barbecue will be comfortable and enjoyable.