Masters and in general creative people find inspiration in any subject. It doesn’t even go unnoticed by them. After all, by cutting logs you can make wonderful designer items that will serve as interior details and simply decorate your home or country cottage area.
Let's look at some interesting ideas for using wood cuts. You don’t have to remove the bark from the trunk, so the work will turn out even more natural and creative.
Chair for the garden
You can use a chainsaw to cut such a comfortable chair from a large log for your summer cottage. To make it stable, you must first cut the base evenly and install it in its location. Next, start processing the seat. Here you need to act carefully so as not to make it too thin, otherwise, when the body rests on it, the thin layer may break off and cause trouble for the sitting person.
The seat is cut straight. The bark on the front of the chair is cut off so as not to scratch the legs or tear the clothes of the person sitting on it. You can cut out the unnecessary part of the log from the back side. Then the chair will be much lighter, and it can be moved from one place in the yard to another. To make crafts made from wood cuts with your own hands look beautiful, they need to be sanded so that the surface is smooth. To make the wood shine and look brighter, you can rub it vegetable oil. Impregnated wood will not deteriorate longer. After several impregnations, the chair must be washed and dried. That's it, the piece of furniture is ready! You can sit down.
Original table
To make crafts from wood cuts with your own hands, you can use not only a whole log, but also individual sawn circles. To make such a table, you need to take two large cut circles and several small ones of the same thickness. The base is made slightly smaller than the tabletop. “Pancakes” made of wood need to be thoroughly sanded several times. First, a large one (100) is taken, then it is cleaned with a smaller one (80). The same preliminary work is carried out with all the details of the future legs of the coffee table.

An important point when making such crafts from wood cuts with your own hands will be clear, even planes of the circles. If the angle shifts, the table will come out crooked, and no one wants that. It is also necessary to follow safety rules when working with sharp tools and small parts.
When everything is ready, you can start assembling all the elements. The base is placed down, and a slightly smaller “pancake” is attached to it to weigh down the leg so that the table does not tip over. Next comes the most difficult part of the assembly process. “Pancakes” are installed with a one-third shift, first in one direction, then from the middle up the elements are shifted in the other direction. They should come together from above under the countertop.
One wide circle is also installed under the table cover so that there is a solid base and objects from the table do not fall onto the floor. Next, to make crafts made from wooden cuts look colorful, the tabletop can be varnished. The entire structure of the tree will appear, and the table will look bright and festive.
Flower stand
We offer another idea for crafts made of wood for a summer cottage. This is a beautiful stand flower pots. This stand can be used for other things as well. For example, place soap, a glass of toothbrushes, and dishes for washing on the shelves next to the sink. You can also put dishes with fruit on the shelves so that children, walking in the yard, can refresh themselves without running to the kitchen.

To make such a craft from wood cuts with your own hands, you need to select a large circle for the base. Then the entire structure will be strong and the stand will not tilt to the side. Next you need to cut out an area from the tree with branches diverging in different directions. Then the shelves will not overlap one another. In the largest circle, a hole is drilled in the middle according to the diameter of the branch, and it is inserted tightly into it. You can attach the base with glue or drill a couple of screws into the side from below.
Horizontal cuts are made on the branches different heights, and they are glued onto them or the shelves are clogged. They can have both same size, and different. At the end, the tree cut at the DIY garden craft needs to be processed. If such a stand will be placed outside, it is better to wipe it with vegetable oil several times after sanding it. If the stand will be in the house, you can cover the surface with acrylic varnish.
Mirror decoration
Small circles cut from wood can be used to beautifully decorate a frame for a mirror or picture. You need to cut a lot of parts of the same thickness. To fill the space between large elements, small circles from branches are also prepared. The work is small and meticulous, because every detail needs to be processed. First, the bark is cut off, then each element is sanded several times. Next you will need to coat it with varnish. When all the elements are ready, a strong base is taken that will hold its shape well. It's better to take a sheet of plywood.

Place a mirror in the center and draw a template. Then the central part is put aside and they begin to design the frame. Work begins from the drawn circle. First, large elements are laid out, then the voids are filled. When everything is glued, time is given for complete drying. At the end, you can lift the work and make sure that nothing falls. Next, the mirror itself is glued onto liquid nails. Such a beautiful piece of furniture will decorate not only the cottage, but will also look good in a city apartment.
Decor element
Now it is fashionable to hang on front door decorative elements. It is quite easy to make such a heart from wood cuts. Even a novice master can do this job. Saw cuts will do different sizes, the main thing is that the thickness is the same. Then all the elements are glued together to form the design desired by the author. It could be a heart, like in the photo below, or a butterfly or dragonfly. You can make your favorite cartoon character if there are children living in the house.

A screw is screwed into the middle and a rope is tied to it, with which the picture will be hung on the wall or door. You can close the fastening with a bow or a flower made from ribbons.
Hidden drawer
Do-it-yourself country crafts made from logs can be very functional. For example, a great way to hide something from unwanted guests, who, unfortunately, sometimes visit other people's houses, is to make such a hidden box in a log. The photograph shows a unique piece beautifully crafted by a professional carpenter. But a safe hidden in a piece of wood can be made much simpler. The main thing is that this is a wonderful place where none of the uninvited guests would think to look.

A piece of log lies in a corner near the stove. Not even the most experienced thief will guess that something valuable is hidden there. So this is great advice. And every craftsman can cut a piece from a log. Then you need to close the box tightly so that the joints are not visible. You can also turn a round log the other way.
Conclusion
As you can see, you can make many useful and necessary things from logs using the sawing method, both for a summer house and for a city apartment, the main thing is to have the desire and time to make things. And we gave you ideas. Good luck!
All photos from the article
In this article we will talk about how wooden cuts are used for decoration and why choosing such a material is good. In addition, we will look at popular examples self-made crafts from this category of lumber. It should be noted that there are many such examples, and you will certainly be able to choose something to decorate your home or summer cottage.
Despite the fact that the use of saw cuts as decorative elements has recently been presented as exclusive, this category of lumber has been used for its intended purpose before.

For example, back in the Middle Ages and in later eras, a tree trunk cut into round logs was widely used for paving roads. True, the choice of saw cuts as an alternative to paving stones was explained not by aesthetic properties, but by the ease of mechanical processing.

In the photo there is a wall decorated with wood slices
So, let's look at what can be made from a tree trunk cut into circles. But, before listing the various crafts, let’s decide how to make wood cuts for the interior.
Features of making saw cuts

It is not difficult to make wooden cuts in the required quantity with your own hands. To do this we need a tree trunk and a tool for cutting wood.
The tool you can use is an electric circular saw or a regular hand saw.
The production of the lumber we need by hand is carried out as follows. Wood is placed in pre-installed sawhorses, on which we mark the risks along which we will cut. Then, using a one-handed or two-handed saw, cut the required number of round logs.
Note!
Cutting instructions using circular saws are no more difficult to use hand hacksaw, but depends on the device modification of the equipment used.
An important point is the selection of wood species. For example, a path made from softwood cuts will not last long and will probably rot within a few years. At the same time, the use of round timber for these purposes, made of hard rock with a high degree of density and low porosity, guarantees long-term operation of the path.
The density of wood according to the species is given in the following table.
Based on the information given in the table, we can draw a conclusion about what materials are suitable for arranging personal plot and dachas, and which ones not. However, lumber, regardless of strength indicators, can be made more durable.
For these purposes, special deep penetration impregnations are used, which are applied to the surface of the wood. Impregnations penetrate into the porous structure, fill it and thus increase the density of lumber, at the same time making them resistant to rotting.
So, we have decided on the characteristics of wood, now let’s look at the instructions for making certain crafts.
Path at the dacha

The question of how to make a path from wood cuts arises before the owner country house when the price becomes known paving slabs. Wood is an inexpensive material, especially if you have previously cleared the garden of dried out trees and don’t know where to put a couple of trunks.
The instructions for making the path are as follows:
- We place the trunk in the sawhorses.
- We use a hacksaw to make markings in increments of 35 cm.
- We saw the trunk according to the markings, trying to keep the cut line perpendicular to the trunk.
- On the site, we mark the direction of the path in such a way that there are enough stumps prepared in advance.
- In the marked area, holes 30 cm deep are made with a hand drill.
- We place stumps in the holes and apply several blows with a sledgehammer on top.
Tip: In order not to damage the stump, we hit not the cut surface, but the board laid on top.
- Sprinkle the gaps around the perimeter of the stumps with sand.
Making the floor

After we have decided on the features of making the path, we will try to build a floor from wood cuts in the house.
The instructions for making such a coating are as follows:
- We prepare the end cuts of the log. The size of the cut depends on how much you plan to raise the floor level above the level of the rough foundation.
- We level the rough base and lay hemp on it. To prevent the stumps from moving from side to side, they can be laid on a base covered with bitumen mastic. In this case, the wood will stick to the base and will not have direct contact with the concrete.
- At the next stage, we prepare a filler that can be poured into the spaces between the stumps.
We prepare the filler as follows: thoroughly mix 2 kg of soaked clay with 1 kg of slaked lime, add 4 kg of fine sawdust and 1 kg of technical fat to this mixture. Mix all the ingredients again until a homogeneous consistency is obtained with a uniform shade throughout the composition.
We insert the resulting filler into the gaps between the stumps. Level the surface of the resulting base with a rubber spatula.
After the filler has dried and the surface has hardened, we pass over it with a sanding machine in order to level the floor surface.
We remove all dirt and dust from the surface, and then apply wax or special parquet polishes. - The floor made in this way not only looks great, but also has enviable durability.

So, we have looked at two ways to use wood slices; let’s look briefly at how else these lumber can be used.
Using tree trunk cuts when arranging a country house and surrounding area

If desired, wooden cuts can be used in the interior as follows:
- for bar counter or kitchen.

In the photo you can see a stool that is made of a metal frame on which a section of a wooden post is attached.
If desired, the thickness of the round timber can be made smaller or larger. The cut surface can be left in its original form, or it can be sanded and varnished.
If there is no metal base from old stools, a chair or bench made from sawn wood can be assembled from scratch, using it as a .
- Decorating a hanger in the hallway. Many people have boring wall hangers in their hallways that can be transformed using tree trunk cuts. For these purposes, we prepare the required number of round timber.

The thickness of the workpieces should be minimal, which can be achieved using a circular saw.
We glue the blanks to the surface of the hanger with “liquid nails”. If the thickness of the sections is no greater than what is shown in the photograph, the product will last for many years and nothing will come off.
For aesthetics, the finished product can be coated with stain and a layer of varnish.
- Fireplace surround. Agree that a woodpile and a fireplace are a great combination. So why not decorate the wall with tree trunks around the fireplace, even if it is gas or electric.

As in the case of decorating a hanger, narrow circles are cut and glued to the wall with “liquid nails.”
To ensure an optimal aesthetic effect, when making circles, it is advisable to use trunks of different thicknesses. In this case, the woodpile will look more natural.
- Manufacturing wall clock .

A round or oval cut from the barrel can be used to make a wall clock dial. Any electronic alarm clock, the price of which is low, can serve as a donor for making a watch.
A hole is drilled in the middle of the cut, a spindle is inserted into it, onto which the hands can be attached. All that remains is to mark the numbers on the surface of the dial and the watch will be ready for use.
Conclusion
So, we learned how to put waste lumber to good use. Now you can make a floor from wood cuts with your own hands or decorate the interior of a country house with minimal spending.
Are there any questions that require clarification? More useful information can be found by watching the video in this article.
Dacha is the most appropriate place for experiments. Here you can place traditional and creative wood crafts. It doesn't matter whether they are successful or not.
Any item made with my own hands, will give the site color and originality. Below are photos of wood made by yourself. They can be copied or used for inspiration when creating your own products.
Varieties of wood crafts
Wood is an excellent material for making various crafts. It is cheap and easy to process. To make things from wood, it is enough to have the simplest tool. The material can be fastened in any way you like: gluing, driving in nails, screwing in screws, tying parts together with cords.
Wood is the most accessible material in the country. Being in nature, it can be found everywhere. There is no need to specifically go to the store and buy something. Good raw materials for creative crafts for the dacha can be found literally under your feet or, armed with a saw, you can get them in own garden with your own hands - logs, birch and fruit logs, branches, saw cuts, bark will do.
You can use any wood in your work:
- logs;
- hemp;
- roots and driftwood;
- branches;
- boards;
- plywood.
The following types of wood crafts are most often found in summer cottages:
- frame for ;
- hollowed out logs and stumps used as plant containers;
- garden figurines in the form of animals, fairy-tale characters, huts, mills;
- small architecture structures - decorative bridges paved with boards or sawn logs.
When working with wood, it is not necessary to concentrate only on the land plot. Interior garden house You can also decorate with great things that will look beautiful, be useful in the household and fit into life outdoors.
Wood can be used to make kitchen utensils:
- bread bins;
- rolling pins for dough and pestles for chopping vegetables into puree;
- dishes;
- spoons and spatulas for turning food in a frying pan.
Even an inexperienced craftsman can put together a stool or chair for a summer house. Boards and plywood can be used. But to make one for your dacha out of wood vines with your own hands, you will need good literature or watching video classes.
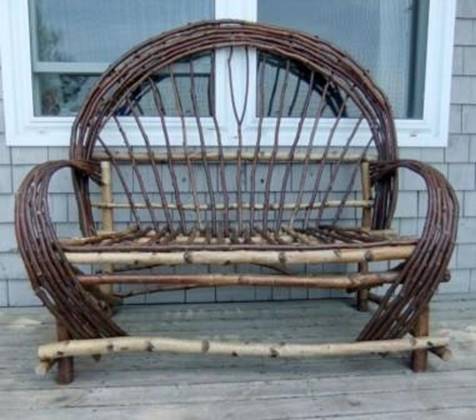
Weaving furniture, video tutorial:
Wood is indispensable when decorating. All types are built from it. All parts need to be well sanded and painted so that the children’s hands do not become covered with splinters.

What can be made from plywood?
Crafts for the dacha made of wood in the form of animal figures, made with your own hands, unusually decorate the site. They can vary in complexity of production. Some are available for beginners. For others, you will need a special tool: cutters, and sometimes a carpentry machine.
Plywood is the easiest to work with. This material can be easily sawed with a regular jigsaw. The work is greatly simplified if you have an electric jigsaw on your household. Plywood can be glued and joined with metal fasteners. It is very easy to make garden figurines from it - to do this you just need to cut out the parts and then connect them in a certain order.
Making a chair from plywood in the photo:
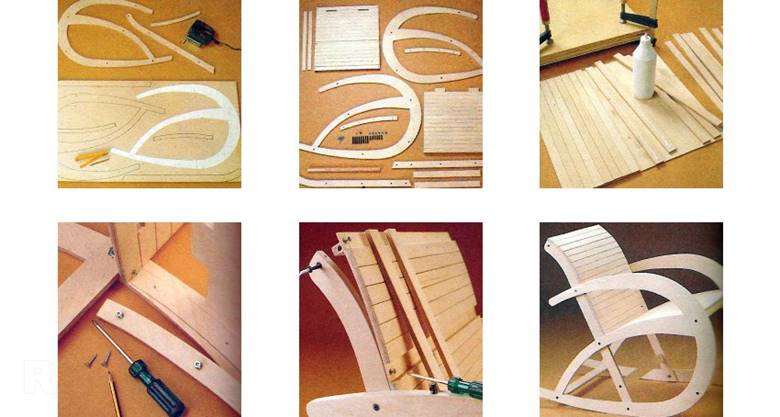
Transformable plywood chair, video:
Crafts for the dacha made of plywood and wood can be painted or burned into the desired pattern using electrical appliance. Making a figurine from plywood takes only a few hours.
Plywood consists of veneer sheets glued together. The material is afraid of moisture, so the finished product must be immediately varnished or painted with moisture-resistant paint.
If the product consists of small parts, you need to choose the highest quality grades of plywood. They are especially durable and will not crack under the influence of a jigsaw.
You cannot cut wet plywood. The tool will break. Those who plan to immediately start making crafts need to purchase a dried sheet. Wet will have to be kept in the sun for two to three weeks.
Tools for work:
- jigsaw with a set of files;
- drill;
- awl;
- ruler;
- burner;
- Grinder.
The last two devices may not be required.
The most budget-friendly ones are made from plywood garden figures. They are placed at key points on the site to add emphasis.
Despite their simplicity and flat configuration, plywood figures fit very harmoniously into the landscape design. They are installed leaning on any support. If there is no support, a peg is provided at the base of the product, which can be stuck into the ground. It must go into the ground at least 50 cm. This will allow the figure to withstand the pressure of the wind without falling under its gusts.
Photos of plywood figures that you can make with your own hands:
You can get a stencil from gardening magazines or make it yourself. First, all the details are cut out of paper, and then the patterns are placed on plywood, traced with a pencil and cut out.
Sawing out of plywood with a jigsaw, video tutorial:
Stumps and logs
If you passed in the garden spring-cleaning, the gardener may have a stump or a whole log at his disposal. They can be used for firewood, but it is better to create a beautiful and unique thing. Stumps and logs are suitable for making garden furniture or crafts.
Only dry wood is suitable for work. She should stay in the sun for at least 1-2 months. Otherwise, the finished craft may crack, which will overshadow the joy of creativity.
It is better to throw away rotten material immediately. If the rot is only on the outside, the stump can be cleaned with a grinder and then used for work.
It is better to remove the bark. To do this you will need a chisel and a hammer. If the craft is supposed to be made with bark, it must be immediately treated well with iron sulfate and varnish to protect it from rotting.
Any stump can be used: wide and narrow, high and low. It doesn’t even have to be uprooted from the ground. But the dug up stump can be used in more different ways.

To process stumps and logs you need:
- Grinding machine with brushes and discs.
- Sandpaper.
- Burner for a beautiful, aged appearance. The burned surface is cleaned with sandpaper or a grinding disc.
- Chainsaw. It can simply be used to split a log into pieces, but in the hands of a virtuoso it turns into a sculptor’s tool. Shaped cutting with a chainsaw requires skill and compliance with safety precautions. Before starting work, it is better to outline the contours of the future product with a pencil, and then all that remains is to remove all that is unnecessary.
- Brushes, varnishes, paint, wax. They protect against rotting, give beautiful view. The varnish is applied in at least two layers, the second only after the previous one has dried.
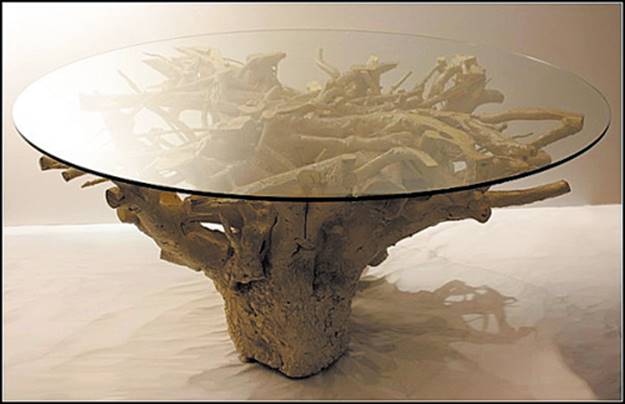
Using a stump or log as a basis, you can create complex designs. The parts are attached to the base with glue, self-tapping screws and metal ties. Wood can be combined with metal or you can make a beautiful table with a glass top mounted on a stump instead of a leg, as in the photo.

One stump will make a simple coffee table or stool, and several will make a wide dining table if you use them as legs.
Photos of tables and chairs made of wood that you can make with your own hands:
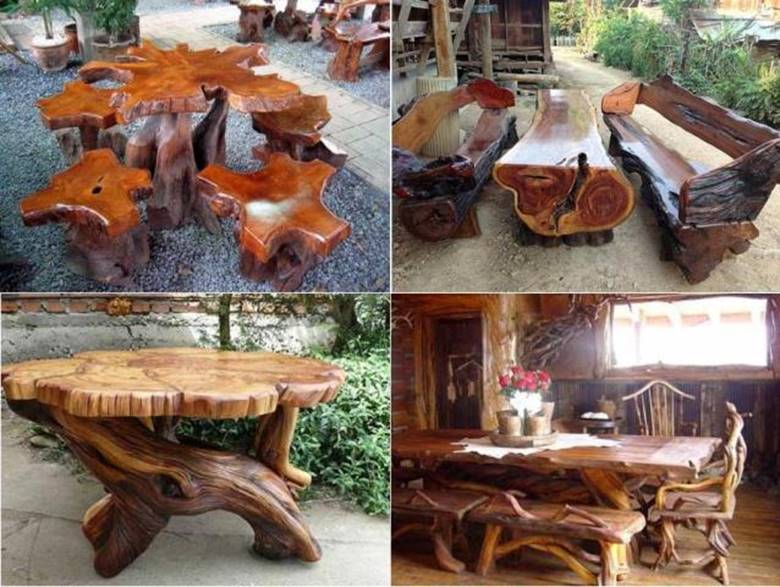
Especially large tree stumps can be turned into unique throne-like chairs if desired. To do this you need to work well with a chainsaw.

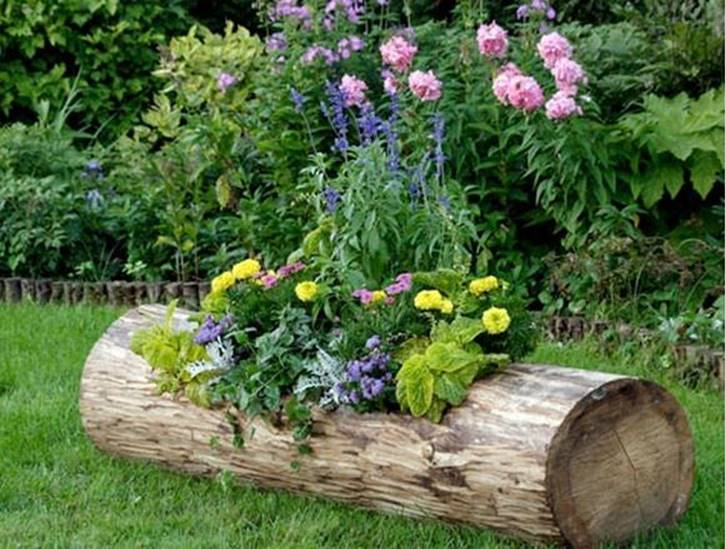
It's very easy to transform a tree stump into a unique flowerbed. To do this, you need to hollow out the core and fill it with earth. To make this pot last longer, the inside is lined with polyethylene.

Traditionally, logs are made from logs. This could be the frame of a well or an interesting flower bed. The log house is installed on sand-cement mortar or stones. To preserve the natural style, it is better to caulk the cracks with moss. It is not forbidden to paint the logs themselves with varnish or paint.
A small log can become a flower pot. Using an ax or hammer and chisel, the core is removed and plants are planted in the resulting niche.

If you cut a log into logs, you will get blanks for a variety of garden figurines. They are mainly used to make animals and people, trains, cars and other mechanisms.
Blocks of wood can be used on the sides of flower beds or sandboxes, bridges and even a completely original chaise lounge.
Crafts for a summer cottage made from logs that you can make with your own hands, photo:
Bark and branches
Not every summer resident has logs on hand. But bark and branches are truly publicly available material, which is abundantly available in the nearest forest belt. The only limitation is that you should not take openly rotten wood for work.
To make interesting crafts for your dacha with your own hands, you need to be able to discern the potential in driftwood. What was once a semi-finished product can turn into original decor in the now fashionable eco-style, which, moreover, will not cost its owner anything.
From branches you can make:
- furniture;
- flower vases;
- table setting items;
- landscape figures.
All objects made from branches will have the most bizarre shapes. They are truly unique and creative. Crafts from branches and bark are an excellent hobby that help emphasize the individuality of the site and the interior of the garden house.
Before work, branches and bark need to be prepared:
- inspect for cracks;
- clean from dust, dirt, debris;
- sand the crumbling areas.
The easiest way to use small branches is to make a vase for the garden in which you can put a bouquet. To do this, take any moisture-proof container (glass or plastic) and cover its walls on the outside with vertically arranged pieces of branches. For decoration, the vessel is tied with braid, ribbon or twine. The same method can be used to decorate ceramic flower pots. Such simple crafts are quite in the spirit of country life.


To make a more sophisticated vase, you will need a glue gun and wire cutters. As a base, you can take any container, for example, a glass jar that is unsuitable for preservation due to its non-standard neck.
Manufacturing:
- The branches are cleared of bark. It is better to do this while they are still raw, as the shells are harder to remove from dry ones.
- Using pliers, cut the branches into short sticks.
- Allow the material to dry.
- Using a glue gun, glue each piece to the base, creating a cross-shaped lathing.
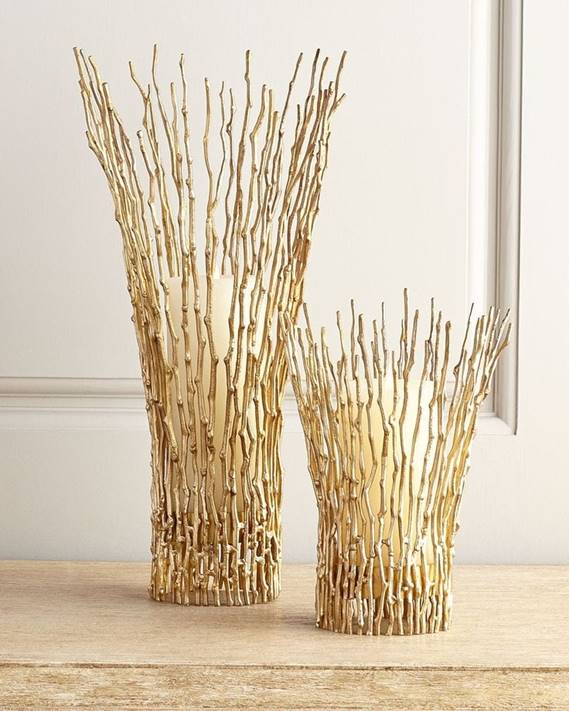
Branches for crafts do not have to be strong and massive. The most beautiful wooden crafts for the dacha are made from fragile twigs. Even thin shoots of willow will do. Painted in gold, they create an elegant frame for candles. To prevent a fire, the branches must be treated after painting. fire-resistant composition. It can be purchased at a hardware store.
If you glue the cuttings of branches into a massive cube, you will get an ottoman or a coffee table. It can be installed directly on the street.

This hanging garden light took just half an hour to create. The branches are fastened together using a glue gun.
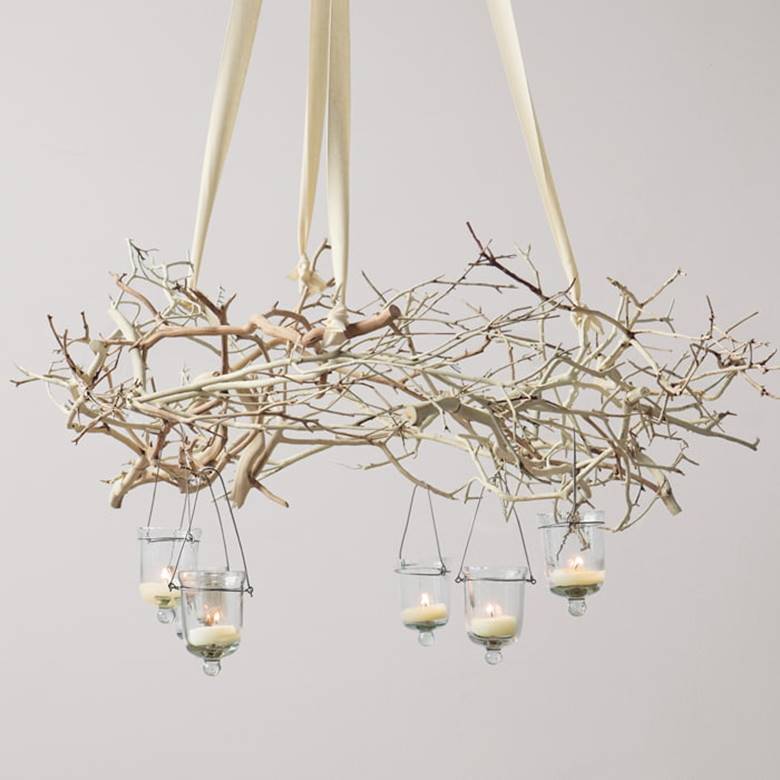
Glass candlesticks were purchased at a nearby interior design store. The fastenings are made of cotton utility tape. The chandelier can be hung anywhere on the site - where the owners usually spend evenings in the fresh air.
Crafts from saw cuts
The most popular use of saw cuts in the garden is paving paths. The path made of round stones looks beautiful and is easy to use. Unfortunately, its service life is only 3-5 years. Rotten pieces of wood must be constantly replaced with new ones.

It is better to use saw cuts for making furniture and interior crafts. It can be varnished and the piece of furniture will last for decades. If you need to connect the sections at the end ends, they are placed on glue.
Photos of crafts from saw cuts:
To make a lot of rounds you will need a chainsaw. An ordinary hacksaw will not work, as it takes a long time to work with it and the products will turn out uneven. The log is placed on trestles, clamped and pieces of the required thickness are cut off. Then the workpiece needs to be dried. This will take a couple of months. The wood is turned regularly so that it dries evenly.
The round wheels are polished with a grinder. It is important that the bark does not fall off. Without it, the saw cut does not look as beautiful as the natural one. For impregnation, you can take linseed oil. If you cover the bark with clear acrylic varnish, it will not crumble.
Wooden furniture for the garden
You can make exclusive furniture from free building materials found in every garden. Snags, stumps and logs can be used. Wood needs to be cleared of bark - harmful insects usually hide behind it. Then everything is carefully treated with stain and antiseptics.
Wooden furniture for a summer house in the photo:
A selection of ideas to create wooden furniture to the dacha, video:
Good afternoon friends!
A new long-awaited one is already beginning summer season. For some it’s working in the garden beds and being proud of the harvest, and for others it’s relaxing and barbecuing in the fresh air. And in order for a summer cottage to be pleasing to the eye, it is necessary to decorate it beautifully. Today I propose interesting ideas made from wood cuts with your own hands: these include paths and all kinds of crafts.
What can be made from wood cuts
IN in capable hands Even an ordinary log contains a lot of possibilities. We already have some good ones. But you can use it not only in the country, but also make decor from wood cuts in the interior of a city apartment. Moreover, now the eco style and the use of natural materials are very popular.
Just don’t go overboard here, if it’s a wall, then it’s enough to decorate one wall in the room or make a panel, and in addition decorate a couple more objects with saw cuts.
What to make from wood cuts with your own hands for the garden and home:
- garden paths
- fence
- walls
- street benches
- furniture: tables, chairs, countertops, cabinet decor
- clothes hangers
- housekeepers
- panel
- paintings
- shelves
- coasters
- vases for fruits and flowers
- candlesticks
- lampshade for kitchen
- decor of mirrors and picture frames
- flower pot decor
- wreaths
- owls, snowmen, souvenirs and many other crafts.


I've included most of the photos in the video at the end of this post.
Garden paths made from wood cuts
One of, perhaps, the most popular options for designing paths in the garden is a path made from wood cuts. It is quite possible to lay out such a “mosaic” with your own hands, although this is a labor-intensive task and requires men’s hands.

Let's do it step by step.
- We mark a path where we will walk using pegs. You can string a rope between them.
- Then you need to dig a trench with a flat bottom along the planned route. Its depth should be 10 cm greater than the thickness of the cut.
- The most important thing in paths of this configuration is a “cushion” of sand, which must be filled halfway into the trench and compacted well.
- To protect the wood from moisture, it is necessary that the saw cuts do not come into contact with the ground, so we cover the sand cushion with polyethylene on top.
- And now the most important and difficult thing is to prepare the material for the track itself. The logs must be cut into circles at least 10 cm thick. But this size will also depend on the diameter of the tree; the larger it is, the thicker the cut should be (up to 20 cm), otherwise large thin circles will simply jump out of the path when walking along it. All blanks, of course, must be the same size.
- To protect the wood from rotting, we treat the saw cuts on all sides with hot drying oil in two layers. Apply the second layer after the first has dried.
- If you wish, you can install a border made of logs.
- We lay the prepared cuts on the path as our imagination dictates.
- We fill the voids tightly with gravel and sand and flaunt along the path made from saw cuts, made with our own hands!
DIY crafts from wood cuts for the interior
On a cut of wood you can see unique drawings of annual circles - real natural works of art that can be used to create original furniture, crafts, wall and floor decor.
While preparing this material, I came across questions that people often ask: “How to dry and how to process cut wood,” since over time the wood dries out and cracks form on it.
Firstly, you should not use freshly cut logs for crafts. You must first cut firewood at least a meter in size, clear the bark, and paint the ends oil paint and let them dry in places where there is no direct sunlight or drafts for at least 2 months, or even a year.
Secondly, you can keep the saw cuts, even fresh ones, in a saline solution (5 liters of water - half a pack of salt), or even better, if possible, cook them in this solution for an hour. And then dry it, turning it over every day.
To dry faster, you can wrap the saw cuts in newspapers, changing them as they get wet.
But experts say that even a log that has been dried for a year will still give cracks later and advise sawing it along the intended cracks or the center. But, as I understand, in this case, round cuts will not be obtained. Or maybe ignore the cracks? With them, crafts will look more natural.
But you need to process the cuts before use:
- It is advisable to remove the bark to avoid the appearance of bark beetles and various bugs
- Process the cuts with a grinding wheel; in extreme cases, sandpaper will do
- cover with stain or varnish.
I’ll tell you about some of my favorite ideas for crafts made from wood cuts with my own hands.
Designer fruit dish

As a base, we will need a concave metal dish - a bowl.
We lay out the cuts on an inverted dish, fastening them together at the points of contact with a stapler.
Then we turn the dish over and fasten the cuts from the inside.
Placemats for plates and mugs
If you lay out the saw cuts in one plane and fasten them with a stapler, you can get spectacular backings for plates and mugs.
You can also decorate wooden circles with painting using decoupage technique.
Decor of shelves, mirrors, picture frames

Decorate the side of an old, boring shelf with wooden cuts, placing them on glue.
Before starting work, you need to measure the width of the shelf and select the appropriate number of cuts.
In the same way, you can decorate a mirror and frames for paintings and photographs.

Decorative panel

As an option to create decorative panel from saw cuts - on an MDF board.
A shield of the desired size is cut out of a piece of MDF and coated with white acrylic enamel.
When the paint has dried, you can lay out the saw cuts on the board for trying on. At the same time, the cuts on top and on the sides should protrude beyond the edges of the shield. Thus, the shield will be camouflaged, and the panel will resemble a decorative woodpile.
Now we glue the cuts one at a time: lift them, thickly lubricate them with glue and press them to the base.

Using the same technique, you can make an entire wall from saw cuts and lay out the floor. Just keep in mind that glue is not suitable for attaching saw cuts to the floor. When walking, such a coating will not withstand and the floor will become loose. The floor cuts will need to be placed on a cement mortar, and their surface carefully leveled by grinding to the same level.
Sundial
You can also make an original watch from saw cuts by drawing or scratching numbers on a treated wooden circle and attaching a dial.
To create them, you don’t need complex mathematical formulas and tables, just free time and a sunny day.

You will need:
- tree segment, approximately 50 cm in diameter. It should be cut straight at the bottom and at a slight angle at the top.
- drill and bit
- sandpaper
- bamboo stick 40 cm long
- waterproof glue
- ruler, pencil, felt-tip pen
- clock for checking time.
The wood segment must be thoroughly polished using sandpaper and immediately installed in permanent place in the country, which will always be under the sun.
After caring for the garden, a summer resident, as a rule, is left with a lot of waste: from thin twigs to massive logs. They can be used for firewood, but it is much better to make them garden crafts made of wood with your own hands, which will decorate your site and attract everyone's attention.
Landscape design elements
Garden buildings
Wood can serve as a material for the construction and decoration of various structures: barn, well, gazebo, kebab house and so on. Such DIY wooden garden crafts look especially attractive against the background country house from logs or planed timber, forming a unified style of landscape design of the site.
It should be remembered here that the construction of even a very small structure will require a fairly large amount of wood. Therefore, you need to be prepared for the fact that the missing amount of lumber will have to be purchased. However, the result is worth it.

By organically combining rounded logs and branches obtained after pruning trees in the garden, you can create unique and inimitable exteriors.
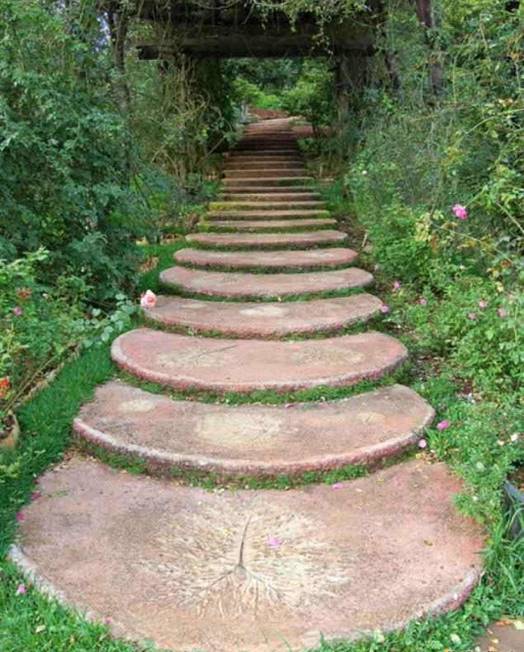
garden path
Paths paved with tree cuts will help make your summer cottage beautiful and unusual. Cuttings of thick branches and sawn tree trunks that remain after cleaning the garden are perfect for this. You just need to make sure that they are not damaged by pests, as this affects the strength and durability of the coating.
The work is done like this:
- the tree must be cut into pieces of equal length (diameter does not matter here);
- treat the workpieces with a special compound that protects them from rotting;
- According to pre-made markings, dig a trench, the depth of which is equal to the length of the prepared cylinders plus 15-20 cm;
- pour a sand cushion at the bottom of the recess, which is then thoroughly compacted;
- Only after this can the saw cuts be installed.

The gaps between large elements can be filled with thin blanks that you sawed from tree branches.
After finishing the work, the remaining gaps are filled with sand or earth. The latter can be mixed with seeds, after germination of which the path will become even more attractive appearance.
Fences and supporting walls
Wood is also perfect for constructing various fences. In addition to the main purpose - zoning a site or restricting access to people and animals - a wooden picket fence or fence also performs a decorative function, complementing or emphasizing various design solutions V landscape design. Such a fence can be easily made from scrap materials without spending money on their purchase.

Zoning of the site can also be done using supporting walls made from dry tree branches or logs of suitable thickness. This solution will be effectively combined with a house made of timber, paths made from sawn logs, wooden garden furniture and so on. It is only important not to overdo it and maintain a sense of proportion.
Decorative bridges
The ensemble of wood crafts can be completed by bridges made of logs and branches, thrown over streams or artificial reservoirs. They look very colorful and are often used by designers to decorate landscapes of summer cottages.
They have one drawback - the need to use large quantity material. It is unlikely that you will have a sufficient number of logs and thick branches at your dacha. However, in this case, the nearest forest can help out. Surely there will be a sufficient amount of dead wood there that can be put to good use.

Note!
Before cutting down trees in the forest, you must make sure that by these actions you do not violate the existing regulations relating to the use of natural resources.
Decor elements
Flower bed
After cutting down an old or dried tree, you are left with a massive trunk, which is most often sawn into firewood and burned in a fireplace or sauna. However, with a little imagination, you can turn it into a unique and attractive clubhouse that will decorate your yard, barbecue area or outdoor summer kitchen.

To make it you will need:
- old tree trunk;
- chisel and hammer;
- chainsaw;
- plane or sander.
You are unlikely to need manufacturing instructions. You just need to arm yourself with patience and imagination, and then give the unsightly piece of wood any desired shape. Also, do not forget about the depression, which must subsequently be filled with soil and flowers planted there.
Advice!
When choosing plants, make sure that they match each other in shape, color and flowering time.
This way you will achieve the best effect and get rid of dead wood in the flowerbed.
garden furniture
Do-it-yourself garden crafts made of wood, which serve as furniture, have recently become widespread. The price of such products made by professional craftsmen is quite high, but you can make a simple chair, table or armchair yourself.
You just need to take into account the following nuances:
- To make furniture, it is necessary to use wood with a thick cross-section, which is difficult to find in a summer cottage.
- During the manufacturing process we use professional tools and equipment. If you don't have them, the right power tool can be rented at the nearest construction supermarket.

Wood processing and furniture manufacturing are carried out in the following sequence:
- a log or branches of suitable thickness and length are processed with an ax to remove remaining bark and knots;
- using a chainsaw, objects are given their final shape and size;
- after fastening the parts to each other, they are finalized with a hammer and chisel;
- at the very end, all surfaces should be cleaned with sandpaper, achieving perfect smoothness.
Advice!
So that the resulting garden furniture served for a long time, it must be treated with an antiseptic, getting rid of pests inside the wood, and coated with varnish that protects the product from the effects of negative external factors(sun, water and so on).
Decoration of the playground
Wood can be used to make various figures that decorate playgrounds. They will serve not only as a design element, but also as a game item. For example, a wooden horse. Making it will not require much effort from you.
The work is carried out in the following sequence:
- First, the torso is constructed. To do this, you need to take two cuts of a large diameter log and connect them using small planks. The thickness of the cut should be about 3-4 centimeters, and the diameter should be at least 25 centimeters. In this way, a box is formed, which, if desired, can later be filled with soil in which to plant flowers.

- The next step will be making the legs. To prevent the horse from falling during games, they must be durable and hold the body steady. Will do wooden beam with a cross section of at least 5-6 cm or tree branches of a similar diameter. It is advisable to select the length based on the height of the children.
Remember that the legs must be firmly attached to the body and set in the ground. Can be used metal corners for rigidity, and bury the lower ends of the beams in the ground. - The final stage is decorative details. This includes the head, mane and tail. The last one is the easiest to do. You just need to secure a few pieces of rope. The head is made of plywood, which is given the desired shape using a jigsaw. You can attach the head to the body using a wooden block 30-40 cm long.
- Don't forget about painting the figure. This will not only give it an attractive appearance, but also protect the wood from negative impact sun, rain and snow. Remember that you must use wood varnish or paint that is safe for children and does not emit harmful substances into the atmosphere.
Another way to make a horse out of wood is to use scraps of branches and logs left over from clearing the garden. But in this case, it is necessary to show remarkable imagination, constructing some kind of sculpture from them.

You can also make a children's swing and sandbox from wood. With a little imagination, you can design climbing ladders, labyrinths and many other objects that the younger generation loves so much.
Note!
All items installed on the playground must be safe.
Make sure that the base of the swings and stairs is carefully concreted, that all parts are securely connected to each other, and that the surface of the wood is free of nails, splinters, knots and various defects that could injure the baby.
By the way, the old logs at your disposal can be successfully used to make cars, trains, and so on. All you need is a chainsaw and some paint. And the delight that will be reflected on the faces of your offspring will serve as your best reward.
Conclusion

It is hardly possible to give an exhaustive list of garden crafts that can be made from wood. By showing your imagination, you can come up with many more ideas, each of which is worthy of implementation. After watching the video in this article, you will learn a lot more interesting things.
