Plywood is a universal building material. It can be used not only as a structural material for rough finishing, but also for the facial decoration of walls and floors. A finished floor made of plywood is a finishing coating that is in no way inferior in its attractiveness to the laminate that is so popular today, but its cost is lower, and its strength and resistance to various unfavorable conditions higher.
Plywood can be used as a finishing floor covering. To add beauty, it is varnished, painted, etc.
The installation of such a finished floor can be carried out using various methods. The sheets are laid directly on concrete base floor or on specially prepared logs. You can immediately create an unusual surface in the form of imitation parquet with traditional surface varnishing or by painting plywood in unusual bright colors, which will be ideal for any modern interior.
Features of plywood

Plywood for flooring is not only an excellent and attractive covering, but also warm, which significantly distinguishes it from tile floors or other finishing materials. Among the advantages of a plywood finished floor, it should be noted:
Simple installation that does not require experience or complex preparation. During the work, wet construction processes and cement-based solutions are not used. This makes leveling faster and cheaper.
- Plywood can be laid on any base, including screed, wooden floors and joists.
- The surface is warm; in most cases, additional insulation is not required.
- The coating is durable and resistant to stress.
- Using plywood it is possible to create Beautiful design flooring, including imitation of natural parquet.
Return to contents
Installation on joists
Plywood can be mounted not only on concrete screeds, but also on joists. This option is convenient, since the floor can also be leveled, plus additional insulation. If necessary, utility lines are laid under the surface of the cladding.
The installation process is as follows:

- First, the floor surface must be marked. The level of the future floor and the position for laying the joists are indicated. The step between them should be about 30-60 cm, but the height depends on the need for alignment.
- The logs are attached to the surface; special adjusting anchors can be used. Before the beams are laid on the base, they should be treated with an antiseptic. During work, the position of the logs is strictly observed; for leveling, you need to use a building level.
- When the logs are in place, it is necessary to adjust their position and trim off the excess adjusting screws.
- The cavities between the joists are filled with insulation; it is best to use special bulk substances. Expanded clay, which has a low cost, has proven itself to be excellent; ecowool can also be used. In the latter option, the price is even lower, and installation is extremely simple. This material is not subject to rotting, has best characteristics on thermal insulation.
- The plywood is laid after cutting; temperature gaps must be maintained between the boards. Fastening is carried out with self-tapping screws, all joints must be on joists. The installation itself is done in a checkerboard pattern.
- Finishing Finishing work can be carried out using several methods. Plywood can be attached to a concrete screed or wooden floor.
Return to contents
The most common plywood can be used to not only level the floor and make it smooth, but also to create an unusually beautiful parquet flooring. Such a fine finish will seriously compete with even such a popular laminate.
The work will be done as follows:

You can use plywood to create a parquet flooring.
- It is necessary to draw up a sketch, it will clearly show what appearance will receive a finishing coating after installation. There are many options to choose from, but the most common are square or rectangular elements. You can post them in different ways, including checkerboard and classic herringbone. After installation, the surface can be painted, stained and varnished.
- Work is planned to level the floor. You can make the cladding directly on the concrete base or on the joists.
- Insulation is selected if necessary. In city apartments, insulation is done quite often.
- The finishing material is selected. For the leveling first layer, it is better to use ordinary birch plywood; its surface may not even be sanded. For the final face layer, you can take plywood with a regular surface High Quality or a special decorative one, the finishing of which is much simplified.
The work itself on laying the final layer of plywood includes several stages:
- cleaning the base;
- primer;
- cutting sheets;
- installation of plywood covering;
- Finishing work.
Return to contents
Substrate stripping and priming

It is better to apply the primer to a concrete base using a roller.
Typically, plywood is laid on a finished screed. To begin work, the base must be cleared of dust and debris. If there are cracks, they must be carefully masked. It is best to use an industrial vacuum cleaner for such work, which not only removes all dust, but also rinses the surface. Under no circumstances should you use a regular broom, as it will not be possible to moisten it, and cleaning with a dry broom will not give any special results. It is impossible to over-moisten the screed, as it will take a long time to dry, and it is prohibited to start laying the plywood covering on wet concrete.
After the base is cleaned, you need to start priming. Special compounds are used for the work. You can also make the primer yourself. It is enough to purchase a primer in the form of glue or mastic, then dilute it with plain water or gasoline. Apply primer to the surface with a paint roller. The finished primer can be applied in any other convenient way. Experts advise using factory-made compounds. Their difference is as follows:
- The primer removes dust from the surface of the screed. This is an important condition for any finishing coating.
- The deep penetration primer provides adhesion for the adhesive. This is especially important if the plywood will be glued down rather than mounted onto joists with adjustable anchors.
- The ready-made primer penetrates well into the surface of the screed, making it stronger and more durable.
- The adhesion rate increases significantly.
Cheap flooring for most consumers associated with the use of wooden products. Pine materials are inexpensive. The most expensive of them are solid wood and parquet. In their production, natural wood of especially valuable plant species is used.
When installing a wooden floor in a house or apartment, you can get by with more affordable and cheap materials: pine, parquet or laminated board. In addition, original technologies for finishing wooden floors have now been invented.
Materials for cheap wood flooring
When the phrase “cheap” is uttered, associations arise with low-quality, substandard, second-rate material. However, among the products made from natural wood, there are decent budget items with high performance in terms of quality and consumer capabilities.
In most cases, the installation of cheap flooring involves the use of wood. The base and topcoat are made from it. In private houses, this structure consists entirely of wooden parts: joists, rough flooring. In high-rise apartments, boards are thrown over concrete floor, creating a smooth canvas that is used as an independent covering or as a base for linoleum, laminate, carpet, and tile.
If you plan to cover the boards with another material, there is no need to buy expensive products. Those that have minor flaws are suitable: blue, knotty. These defects will be hidden by the finished floor fabric.
Rough covering of a wooden floor in a private house and apartment
Pine boards are suitable for rough cheap flooring. These are the cheapest wooden crafts. They are made from natural wood, which is harvested throughout our country. IN different regions pine has its own structure and density. The most valuable specimens grow in the North and Siberia. They make excellent building material.
With natural pine boards at the base, the cheap one will last a long time and will maintain warmth and comfort for the inhabitants of the apartment all this time. It is best to place parquet or laminated products made from components close to natural on them.
As a base for the finishing coating, you can purchase cheap products that have undergone partial processing. They must be absolutely dry without obvious defects (curvature, insect damage, large holes from knots) with smooth edges, but not planed. This preparation of boards for use makes the floor much cheaper without affecting the main quality characteristics.
Rough cheap floor in a private house they are mounted on logs made of timber. In apartments, thick boards are laid on concrete in increments of 30-40 cm. These products can also be made from pine. Before use, they are treated with an antiseptic to prevent mold, mildew or insects.
Finishing cheap flooring
Pine boards can be used as floorboards to finish a cheap wood floor. In this case, you will need smooth and even specimens that have gone through the entire woodworking cycle. They must have absolutely smooth edges so that wide gaps do not form at the joints. Manufacturers are now supplying solid boards"locks". This allows them to be laid as tightly as possible and prevents them from diverging.
To install a wooden floor, you need the appropriate tool.
In addition to the relatively cheap cost, pine boards have many other advantages:
- beautiful design and clearly defined relief;
- light shade;
- Possibility of use in any interior style;
- ability to hold paintwork, maintain natural lines and color under transparent compounds;
- warmth and pleasant sensations during tactile interaction
- the actual cost of the product.
Covered with varnish or transparent oil, the cheap one looks impressive in the interior village house and a city apartment.
Cheap pine boards can be used for carpeting and other flooring products. It retains strength and reliability for a long time.
The cheapest floor, video
Cheap plank floor with original finish
If you don’t have enough money to purchase and use solid boards and expensive modern products, you can use interesting finishing technologies and build a cheap floor with your own hands. For example, bulk decorative coating from paper.
For a cheap floor you will need
- thick packaging paper (old bags);
- PVA construction adhesive;
- wood stain;
- parquet varnish.
The process of preparing and finishing a cheap floor
- First, the floorboards are treated. They are cleaned, leveled and smoothed. The gaps between the floorboards are sealed or covered with special putty. The wooden canvas must be perfect. To make it this way, plywood is often used. Its sheets are additionally coated with a primer.
- The paper is torn or cut into small pieces. This way you can create the effect of a stone coating. If you want to make “skin,” the paper is crumpled and placed under a press for 12 hours. The trimmings will straighten out, but the characteristic lines will remain.
- Glue and water are diluted one to one in a bucket.
- Each piece of paper is straightened and dipped into the liquid mixture, removing excess glue by hand.
- Either side is placed on the wooden surface of the floor and straightened. The next piece is placed slightly by 0.5 mm, overlapping the previous one. Roll everything with a roller to remove excess air.
- The floor covering is left for 2-3 days until completely dry.
- After this time, the floor is smeared with the same adhesive mixture: water and PVA - 1:1 and left to dry.
- To even out the color of paper, which can have different shades from different sides, a stain of a certain color is used. It will give the coating a woody shade of light or dark tone. In order not to miss the color, first carry out the experiment with a small amount of paper soaked in glue. When the desired result is achieved, stain is used for the entire floor in the room.
- 3-4 days after applying the stain, the floor will dry and it can be covered with parquet or other varnish intended for finishing wooden surfaces. Varnishing should be done 2-3 times so that the glued paper adheres well to the boards.
Despite the fact that the process of creating this decorative cheap floor covering takes a lot of time and requires effort and patience, it looks impressive, resembles natural expensive wood, leather or stone chips, and costs a penny. It's warm and cozy on such a cheap floor. When creating it, practically no harmful chemical components are used, so it is environmentally friendly and odorless. It is easy to care for. It is not afraid of moisture and temperature changes. In principle, such a wooden floor is not much different from modern laminate. It is only assembled by hand, and the panels are made into compact products.
Cheap floor– does not mean unpresentable, low-quality, second-rate. Any, even substandard, wood waste can be turned into spectacular original canvases. Designers suggest using improvised means and waste materials: sawdust, shavings, paper and create unusual coatings from them. Of course, they will not last as long as factory products, and they cannot be used in every room. However, anyone who wants to make a cheap wooden covering with their own hands can be sure of its exclusivity.
Views: 15,385
The best floor in wooden house from similar material. The tree is environmentally friendly, has beautiful view and at correct installation The coating will last quite a long time. Such floors always remain warm, give the interior comfort, coziness and fit perfectly with any design. Market building materials offers a lot of possibilities for designing flooring in the house and in the attic. But today there are two priority ways to build a floor in a wooden house: on the ground and with the help of logs, which are often installed on stilts.
Thus, the options for arranging floors come down to two:
- Concrete;
- Wooden.
The most common floors are made of wood, but we will look at all types of subfloors.
Concrete floor

Pouring a concrete floor does not require the services of professionals. It is enough to have a special level to level the horizontal surface. Subsequently, any floor covering is laid on the concrete. After watching the video and photos in this material, you can begin work, saving not only on calling a specialist, but also on installation costs. A concrete floor is much more economical than a wooden or stilt floor. In addition, all concreting processes take less time than laying and arranging a wooden floor. Concrete floors are practically not used for the attic, as they increase the weight of the building.
To prevent concrete cracking, it is necessary to add a special plating agent to the solution. chemical composition. This will allow the concrete substance to retain its plasticity and compact it.
Important! The heavy weight of the concrete floor increases the load on the foundation. Therefore, when calculating options at the design stage, it is necessary to clearly determine what floors will be in your new home.
Pouring concrete screed has several options:
- Ground. The method requires determining the floor level by tying a cord to pegs. Afterwards the gravel layer is backfilled, then sand and thoroughly compacted. The pegs are removed, a layer is laid waterproofing material
- Concrete. Arrangement of concrete floor on logs. The process requires more time and effort. To begin with, the place where the floor is to be arranged needs to be deepened to half a meter, a layer of crushed stone and sand must be filled in and compacted with a stream of water. Moreover, the bulk layer must be at least 30 cm. Piles (support columns) can be made of brick, wood or concrete (the most reliable). First, piles are installed along the entire perimeter of the floor, and then inside the building. The distance between the columns is set to 0.7-1 m. Afterwards, a waterproofing layer of roofing material is laid on the piles, then beams are attached on top and only then logs.
Important! The joists must be made of very high-quality wood, otherwise the heavy weight of the floor will crush the entire structure. To set the concrete, it is necessary to cover the floors with film and leave for about 7 days, after which the film is removed and the concrete is allowed to “ripen” for 21 days.
How to make concrete floors is clear. But if your home is supposed to have not one, but two or three levels, concrete floors between floors may become impractical precisely because of their weight.
Wooden floors

When choosing a wooden floor (quality), buyers give preference to a material that has the highest standards and characteristics:
- strength;
- practicality;
- environmental friendliness;
- beauty;
- natural warmth;
- hygroscopicity;
- wide range of uses.
The tree is perfect for the attic and will fit comfortably between floors. You can cover any small piece of flooring with dies and, in general, solve any design issues. But you should understand that the complexity of installation affects the price indicator - the cost of wooden floors is much higher than concrete. The wood is treated to give it durability and strength. various compositions, protecting against rotting, damage by bark beetles, and also impart fireproof properties. This is especially true for the external attic.
Important! High level humidity in the room is a direct threat to wood, the floors will swell. Therefore, the moisture content of the material should be no more than 15-18%.
Arranging a wooden floor structure

Floors of this type also consist of several layers:
- draft;
- hydro-, heat-, sound-insulating materials;
- finishing floor;
- coating.
A heated floor system often used in homes is installed between the subfloor and the finished floor. Moreover, the main types of structures are equipped with logs. Advantages:
- different types of foundations: concrete or soil;
- the ability to remove all communications into the space under the floor;
- floor leveling speed.
Remember that such a design is completely inappropriate in rooms with low ceilings. Due to the arrangement of logs, the floors rise by 15-18 cm, forming a distance between the ground and the flooring. The lags are installed parallel to the window opening, and the fasteners depend on the base. The logs are attached to the concrete floor using glue and dowels, and self-tapping screws are used for wooden bases. It is not recommended to hammer in joists with nails: rust will lift and deform the caps. And here are a few more rules:
- Between the joists you need to fill the space with insulation and vapor barrier materials;
- The boards are laid perpendicular to the joists;
- If the length of the board is not enough, the joints are made on the block;
- It is mandatory to attach each board to the joists;
- Laying the first row of boards should be done with a deviation from the wall of 13-15 mm, in attic rooms 20 cm;
- The slot joints between walls and boards are decorated with plinths;
- Decorating an attic with wood has the same rules as arranging the floor in the house itself.
Types of wood floors

Depending on the selected raw materials, there are several types of flooring that are suitable for main rooms, installation between floors and in attics:
- array;
- laminated wood;
- parquet;
- laminate floors.
Each material has its own advantages and disadvantages. In particular, double or triple the weight of an array, compared to a laminate, is contraindicated for buildings with a fragile foundation, and a fragile laminate will deteriorate in rooms with high humidity.
But how and what is the best way to cover the floors, how exactly to make the floor in a wooden house is up to you to decide. After looking at the photos and videos, you can choose the material for the main rooms and attic. And for this it is important to understand the main characteristics of each selected flooring.
Board and laminated wood
The floorboard is made from solid wood. Dimensions 0.9-6 m long by 1.8-6 cm thick. One side of the element is equipped with a groove, and the other with a ridge. Installation is carried out using a hammer. For the material used the best varieties hardwood: pecan, oak, larch. You should not buy coniferous species due to their rapid wear.
Low thermal conductivity and high strength qualities have determined the popularity of this material, but the price of the floors is quite high. It should be remembered that outer side The boards are necessarily varnished to extend their service life, and the array is often impregnated with oil, which protects the floors from rot and fungi.
Glued laminated wood is a double layer of dies glued flat. Coniferous wood is used. Main qualities: strength, low thermal conductivity, resistance to deformation and aesthetics. The price category is high, even compared to the array. But floors covered with laminated wood can withstand large temperature fluctuations, which is why they are recommended for flooring in attics.
Parquet, laminate

After looking at the photo, owners often give preference to parquet as the most convenient product in terms of price/quality ratio. Made from natural wood, parquet fits perfectly between floors, fits into any room, and can also be of different color shades. There are different types of parquet, piece, artistic, modular and parquet board. View the material in the photos offered by manufacturers, you can choose the type and price. Moreover, the cost of parquet directly depends on the complexity of the pattern, the thickness of the block and the type of wood.
Laminate is an imitation of wood flooring. In many ways, laminate is one of the most popular products for floor covering. Thanks to the variety of varieties, laminate can be selected to suit any decor; its low weight allows you to lay floors between floors, in attics, or to cover a bathroom or veranda. When choosing a laminate, you need to remember the class assigned to the product: indicator of small, medium, heavy loads.
For a variety of reasons wooden houses and concrete slabs with cement-sand screeds don't fit well. In the vast majority of cases, floors in buildings built of wood are made using wooden beams. Accordingly, the floors here are special. We'll talk further about how they work, what options exist, and which floor design will be most effective.
Principles for the implementation of floors in wood construction technologies
Note that beam floors are typical not only for a frame, log or timber house, but similarly create a very large percentage of private cottages built from brick, various blocks, or cast from concrete in one way or another. That is, almost everything stated below will be relevant for private construction in general.
Modern requirements for comfort, energy efficiency and durability of residential buildings are growing every year. In order for the house to serve as long and trouble-free as possible, you need to pay due attention to all its elements, without exception. It may seem that the floor is some kind of secondary structure, but this is far from the case. Wooden floors must be considered in conjunction with the floors, because they, in fact, function as a single whole.
When considering the design of wooden floors in a cottage, two types of systems should be distinguished:
- 1st floor floors,
- floor on interfloor ceilings (one and a half, second, third level...).
They will work differently, and the requirements for them will be different. In the first case, we have an enclosing external structure, regardless of what is underneath - ground preparation with an air cushion or a basement/cellar. Here it is necessary to protect the interior space from cold, as well as from moisture that tends to penetrate into the room from below.
The floors of the second or third floor do not need insulation and waterproofing (with the exception of those located above bathrooms, swimming pools, steam rooms...), but it is extremely important to create a system that will prevent the spread of impact, airborne and structural noise.

In both cases, the task is to obtain the construction:
- its performance characteristics comply with all current building codes;
- capable of living no less than the entire house;
- as light, simple and inexpensive as possible;
- technologically advanced in terms of installation and maintenance;
- environmentally friendly;
- ensuring the correct functioning and aesthetics of the final floor covering.
Along joists or beams
Obviously, it is quicker and cheaper for the homeowner to lay the deck directly over the floor joists and then apply the topcoat. But the problem is that the beams, as a rule, are tightly tied with load-bearing walls. Because of this, any impact noise: walking, moving heavy objects, the operation of engineering equipment and household appliances - all this is immediately “emitted” to adjacent structures and disperses throughout the house. That is, there is a huge risk of generating structural noise.
In addition, some movements are possible in a wooden house (even if we do not take into account the shrinkage of the “log houses”), they can affect the quality of fit of the flooring elements and cause the appearance of gaps, creaks, and deformation of planes.
In some cases (especially in basement floors), the step between the beams is too large to allow sewing directly to them without using a board with an excessively large cross-section and mass. Very often, the upper edges of the beams lie relative to each other with a fairly large horizontal difference, which greatly complicates or makes it impossible to create an even flooring along them.
The use of joists located perpendicular to the floor elements helps to avoid such problems, since they do not need to be rigidly attached to the beams; moreover, it is recommended to install them through elastic damper pads without the use of any fixing brackets or through metal fasteners. The logs are not tied to load-bearing walls and other stationary structures, such as flights of stairs, columns, etc. They are not even brought close, leaving a technological gap of 10-15 mm between the ends of the beams and the walls, and the outermost logs in the room are placed at a distance from the walls (up to 10 centimeters).
Essentially, this creates a “floating” flooring base that is valued for its soundproofing capabilities and stability.


Important! Some craftsmen offer customers to make floors in which “joists” run along the floor beams (sewn to their sides). Thus, they get the opportunity to level the rough plane, but even with the use of vibration-damping pads, the noise of such floors is too high. The secondary role of installing logs in this way is to create a ventilation gap (in our diagram above, this is already provided for).
The optimal spacing of the logs, as well as the appropriate cross-section of lumber for their creation, depends on many variables (material and thickness of the flooring, distance between the support points - beams, design loads...) and is determined in each specific case separately.
If we talk about the type and quality of lumber used, they are usually produced from a bar or board of the 1st grade in such a length that they are enough from wall to wall without joints. Mostly products are used natural humidity or “dried”, you can find out how to dry lumber in the article Atmospheric drying, ideally planed. Pine or spruce as raw materials for logs have proven themselves to be excellent, primarily due to the good ratio of cost, moisture resistance and strength characteristics. An integral rule when working with lumber is antiseptic treatment of all wooden elements. We recommend using OZONE-007. You can also use aspen boards, which are usually easy to buy.
Why and how to make a subfloor
When talking about a subfloor, we can talk about two things. Either about flooring on top of beams or joists, which carries one or two more layers (depending on the option you choose - finishing flooring and finishing coat); or about filing from the bottom of the floor beams.
We'll look at the first version of the subfloor below, and we'll talk about the filing here. Hemming beams performs several functions:
- Is a supporting base for insulating materials, because in most cases they are located just between the beams. Not only the insulation rests on the lining, but also sound insulation, films and membranes - the whole technological pie.
- It can simultaneously serve as the finishing cladding of the ceiling, both with continuous cladding, when the ceiling is hidden, and in interiors where the beams remain visible on the lower floor (a rather fashionable solution in the “country” style these days). In both cases, the lining material hides the “contents” of the ceiling - frame elements, hidden communications, insulating layers.
- Due to the high coefficient of heat transfer resistance of wood, the lining works as an element that reduces the amount of heat loss. As part of a complex multi-layer structure, it helps stop the flow of airborne noise between floors.
Technically, hemming can be made from any materials designed to create planes. But when implementing a load-bearing base, it is most profitable to use grade 2 edged boards, with a thickness of 20-25 mm and a face width of 100 to 200 mm. If it will play the role of a ceiling, then it makes sense to use lining with a “classic”, “softline” or “calm” profile, the front side of which will be facing down.
Installation of rough filing or “facing” is sometimes done using cranial bars, which are secured between the beams. This option is quite complicated, since the master has to fasten a lot, measure and cut very accurately a large number of boards of short length so that they fit as tightly as possible between the load-bearing elements of the floor. It is more convenient and faster to hem the beams along the lower edge with long lumber, obtaining a continuous plane. But, it should be noted that sometimes it makes sense to use boards 3 meters long, which will be easy to place under the beams (especially important when filing basement floor, where there is quite a bit of space), but at the same time it will be possible to fix the part on several beams at once.


Types of flooring, what to make of
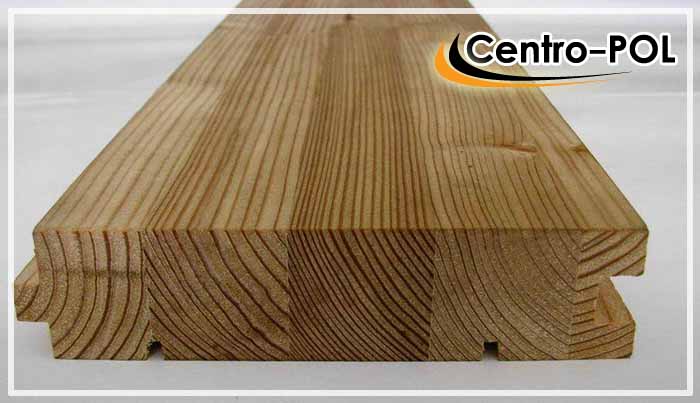
Finish coating. A classic of the genre can be considered a solid tongue-and-groove board with a thickness of 28 to 45 mm and a width of 110 to 140 mm. This type of lumber is specially designed for creating a wooden floor; it is made from pine needles dried to 12-15 percent moisture content, and usually has a well-planed front surface. This material is made from high-grade raw materials (products belong to category “A”), environmentally friendly without any compromises.
But the main advantage of such products is the presence of a groove and a tongue. Firstly, we get a flooring that does not have through gaps along the plane, unlike technologies using edged boards. The lock prevents blowing, sound and cold. Secondly, the tongue-and-groove elements make it possible to attach the finished floorboard to the joists hidden, when a nail or screw is installed at an angle through a groove or ridge, the so-called “parquet” method. Thirdly, most models of floor tongues are equipped with a groove on the back side, which in any design ensures ventilation of the flooring.

Rough flooring (floor). To create a base for laying finishing floor coverings, it is not necessary to use a tongue-and-groove planed board, although it, of course, is also great. IN in this case Edged boards of the first and even second grade will perform normally.
Important! The rough flooring (floor) from edged boards is made even before creating wooden floors from tongue-and-groove solid wood. By installing a floor tongue across a solid subfloor, it is possible to obtain a structure that is very resistant to bending loads and completely eliminate the occurrence of squeaking in the future. After all, its cause is usually the friction of adjacent lamellas against each other when the fixation is weakened and the boards sag when walking.
Also, when choosing components for assembling a finished flooring, you should pay attention to sheet materials, which make it possible to make the floor quickly and with a minimum of joints. These include:
Do wooden floors need insulation?
Unfortunately, a wood floor can only be considered “warm” figuratively. If it is operated on the ground floor, then insulation is indispensable. Whatever modern insulator is used, with indicators of 0.3-0.44 W/(m*S), its thickness should be from 100 mm. Polystyrene foam, cotton wool or EPS are available in this thickness, but it is better to use 2-3 or even 4 layers of 50 mm each to arrange the plates in a “checkerboard pattern” and cover all the gaps.
If we consider the performance properties and practicality different types insulation, then the clear leader (many experts believe that for a wooden floor in a wooden house is the only option) will be mineral wool. It is distinguished by elasticity and some compressibility, so it can easily be adjusted to any pitch of beams where it becomes awkward without obvious gaps. It is vapor permeable, therefore it is able to remove excess moisture from the room without causing condensation inside the structures. It does not burn, therefore it significantly increases the fire resistance of wooden floors, becoming a fire barrier. Mineral wool slabs are absolutely safe for humans and can be used in residential premises without any problems.
Due to its fibrous structure, cotton wool absorbs sound air waves and impact noise in the best way. Therefore, it is this material that is laid in the ceilings of the upper levels to ensure proper sound insulation. These can be both universal models and products specifically designed to combat noise.

It is allowed to use both fiberglass-based wool and those made from basalt rocks (stone wool) inside the structure of a frame wooden floor. Considering that there is no pressure on the insulation, products of relatively low density (from 23 kg/m3) are suitable for installation in such systems. And since the orientation of the thermal insulation is purely horizontal, and no slipping is expected, there are no contraindications to the use of cotton wool mats supplied in rolls.
It should be said that for normal operation mineral wool, it must be supplemented with construction films. In the floor of the first floor and in the floors above wet rooms, before laying the insulation, a waterproofing sheet is first placed on the rough subfloor. As a rule, this is reinforced polyethylene, which differs from ordinary ones in increased strength and durability.
Important! No matter how perfect the waterproofing and vapor barrier measures may be, all elements wooden floor and wooden floors must be treated with impregnating compounds with an antiseptic effect, which in the event of an “accident” will help avoid the spread of rot or fungus, for example, OZONE 007.

On top of the cotton wool, to prevent the emission of fibers into the room and to protect the insulator from external moisture from the room, the insulating layer is covered with special membranes, including superdiffusion membranes, which allow the wool to always remain dry. There is one very important point: the finished flooring of a wooden floor should not touch the insulation or any of the films with its back side, otherwise there will be problems with the ventilation of the subfloor and a possible decrease in the durability and efficiency of the structure. Therefore, additional spacer elements create a ventilation gap. This can be a rough flooring (floor) under a tongue-and-groove floor board, joists, or a counter-batten up to 40 mm thick if the floors are laid directly on the floor beams.
When it comes to a wooden house, associations of special warmth and comfort immediately arise. Such houses always have a special microclimate.
However, a house made of natural wood requires special attention and care. The main requirement for the floor is its ideal evenness. The material from which the floor is made - cement, stone, concrete - does not matter; it must meet certain requirements. If the gender does not match at least one of them, this may subsequently negatively affect quality characteristics the entire structure.
Requirements for the floor of a wooden house:
- sanitary and hygienic;
- operational;
- constructive;
- decorative.
All coatings are divided into:
- heated floor (used for residential premises);
- medium (tiles, linoleum - for the bathroom and kitchen);
- cold (concrete, stone - utility rooms).
What materials can the floor be made from?
- board (larch, pine, cedar);
- ceramics (mainly used for sanitary zones);
- parquet;
- laminate;
- linoleum.
 Laying floors in a wooden house is First stage interior decoration. Begins immediately after completion of construction work. Floor insulation is prerequisite. Very important right choice thermal insulation method. At this stage, it is necessary to take into account the design of the subfloor in the house: multilayer (boards, concrete, tiles and joists), concrete screed or wooden floor on joists. Also taken into account presence of a basement or basement room.
If basement room is absent, then the arrangement of a multilayer structure is implied:
- A waterproofing layer (roofing felt) is laid on a concrete screed or on the ground.
- Wooden logs are placed on top.
- Insulation is laid between the joists and covered with a vapor barrier film. To improve the characteristics, the film is laid with an overlap of 0.10 -0.15 m. The edges are not cut off, but are placed on the walls along the entire perimeter, to a height of 10 cm, and nailed down with a plinth.
It has proven itself well as insulation - penoplex, which can be laid without vapor barrier film. This is foamed polystyrene. In fact, it is a good modern replacement for foam. It has low thermal conductivity and good sound insulation and moisture resistance. Penoplex can be insulated any part premises.
If there is a basement, the floor requires insulation from below. Foam insulation is usually used, eliminating any appearance of cracks.
For maximum effect, the floor is made double:
- Subfloor - as a rule, made from untreated boards (25−60 mm). It allows you to preserve the finished floor in case of slight displacement of the structure. Placed on floors - wooden beams. It is not nailed, but placed into grooves in the beams. The wood used is predominantly coniferous.
- Finish floor - waterproof plywood or chipboard, fiberboard is used. Thickness from 28 to 44 mm, width from 98 to 145 mm.
Both floorings are mounted at a distance from each other.
Floor insulation on joists. Between the lags it is laid out waterproofing film. The insulation is laid out in a checkerboard pattern. The seams are blown out polyurethane foam. On top of the insulation nail the covering.
Such a floor practically does not allow heat to pass through, but for better energy efficiency penofol is used. For the manufacture of this material, foamed polyethylene and aluminum foil are used.
If you combine penoplex and penofol, you can achieve 100% energy saving.
Floor installation in a wooden house can be divided into 3 stages:
- First, the quality of the sex pie is carefully studied.
- It is necessary to familiarize yourself with different installation technologies.
- Decide on the most suitable flooring option.
Types of flooring in a wooden house
 In a wooden house, only 2 flooring options are possible: wood or concrete.
It is very rare that a concrete floor is installed in a wooden house; it not the best option for a wooden structure.
Thanks to modern technologies, regardless of the type of floor, you can install a “warm floor” system.
Concrete floor
Advantages:
- efficiency;
- speed of installation;
- the ability to carry out all the work yourself.
Flaws:
- possibility of cracking concrete surface and heat loss;
Wooden floor
Advantages:
- environmental friendliness;
- possibility of using any design solutions;
- If necessary, repairs are carried out using available tools and materials.
Flaws:
- labor intensity installation work;
- It's hard to get a perfectly flat surface.
Laying the floor in a wooden house directly depends from technical features. Typically, multilayer structures resembling a pie are installed. Consists of the following elements:
- rough floor;
- hydro- and thermal insulation;
- finishing floor;
- flooring.
Space between rough and finishing layers perfect fit for installation of a "warm floor" system.
 Wooden flooring is divided into single and double layer. For a single floor, installation is carried out without using lag. High-quality installation, in this case, depends on the thickness of the board and the distance between the beams.
Multilayer flooring provides immobility and strength top floor covering in case of slight displacement of the wooden structure.
Lags are necessary in several cases. Firstly, if the walls of the house beams start(log size should be 5x5 cm or 6x6 cm). Secondly, logs must be used when used for flooring support pillars. The distance between the logs and beams is 1 m. The distance between the beams is directly affected by the thickness of the boards.
The floor pie in a wooden house consists of:
- fastening the subfloor (OSB board);
- waterproofing layer;
- thermal insulation layer;
- vapor barrier film;
- finishing floor
Between the thermal insulation layer and the finished floor remains air bag 1.5 - 2 cm thick. It is necessary to ensure natural circulation air.
Also for good air circulation and ventilation of the underground, holes with a diameter of 4-5 cm are made in the baseboards or in the corners of the room.
Finished floor boards
For the finished floor, milled boards with a tongue-and-groove connection are used. The back side of the board has longitudinal recesses- “vents” 0.2 cm high. Boards with trapezoidal, straight or segmented tenons are also used.
Due to the fact that the back side of the board is untreated, this is significant complicates the process flooring Unevenness may occur. If you do not fix it in time, the boards will subsequently sag.
The installation of support pillars is First step laying the floor in a wooden house. For getting good result, the following steps must be followed:
- The soil is excavated to a depth of 50 cm.
- The resulting space is filled with a layer of building materials. Crushed stone, sand, and gravel are used.
- Compaction of the layer is required. To do this, you need to thoroughly spill the layer with water. The height of the top line should be 20 cm higher than the main soil.
- Support pillars are installed. The material used is brick or concrete. Dimensions of concrete supports - height up to 250 mm: 400×400, 450×450, 500×500. Size brick supports- “one and a half bricks”, “two bricks”.
- The supports are mounted inside the house. The step (distance) between them is 70−100 cm.
- A layer of waterproofing material is laid. 3 layers of roofing material are used.
- Beams are laid on top of the insulation. Materials and equipment necessary for work: wedges, gaskets, nails, level.
Cold floor without basement
Conditions for installing such a floor:
- low groundwater level;
- high base;
- dry base soil.
- The length of the nails should be 2.5 times the thickness of the board.
- The fastener is driven into the bottom of the groove at an angle of 45 degrees.
- The gap between the boards should not exceed 1 mm.
- It is recommended to nail 4-5 boards to the joists at once.
Warm floor with cold basement
- high groundwater level;
- dry base soil.

For finishing floors in a wooden house can be used any material. But experts recommend 4 types that are most suitable for a wooden house:
- solid board or parquet;
- cork covering;
- laminate.
All these coatings are natural material and have excellent characteristics. They differ only in cost and design.
Depending on where the floor is installed, it should be smooth shock-resistant, have hydro- and noise-insulating properties.
How to make a floor in a wooden house? There is no definite answer and cannot be. How many people - so many opinions, there is always a choice remains with the buyer.