Reading time ≈ 4 minutes
The hip (hipped) roof gives the house a sophisticated look. The special design of the roof makes it possible to additionally protect the structure itself and its walls from moisture. Therefore, building a roof with four slopes is optimal for regions with high rainfall and strong winds.
Stages of building a hipped roof
The first stage of building a roof is determining the purpose of the roof (covers the attic floor, attic, etc.), choosing the roofing material (depending on this, the list of materials for construction will be determined), taking into account the atmospheric conditions of the place where the roof will be used (wind, rain , snow).

Choosing a hip roof will give the building greater resistance to rain and make it more durable (the rafter system is more reliable). The main difference between this type of roof and a gable roof is that instead of side gables, it has two triangular roof slopes.

When choosing the angle of inclination of the slopes, you should take into account the level of precipitation and wind characteristics of the area. For low and medium annual precipitation, it is recommended to choose an angle within 4-40 degrees. In case of heavy snowfalls and prolonged rains, the recommended optimal angle The slope of the slopes is within 40-60 degrees.

The roofing material can be: rolled roofing, tiles or metal tiles.

Depending on all the above nuances, the thickness and other parameters of the wooden component of the hipped roof will be selected.

The end result of the first stage is the creation of a diagram of the future roof, on the basis of which construction will be carried out.

We will describe further technology on how to make a hipped roof with your own hands.
The second stage is to build the base for the roof. The base is used to evenly distribute the load from the roof to load-bearing walls. The construction of a hipped roof requires a base that can be built on your own - a wooden mauerlat and beds. Waterproofing is required under the base to extend the service life of the roof. A mauerlat is placed on the hydraulic barrier along the outer contour of the building (the size of this beam varies, either 100x150 mm, or 50x150 mm).

Lezhni - a beam located in the plane of the base rafter system at the same distance from the two side mauerlats. It serves as a supporting element for struts and racks, so it is laid on load-bearing partitions (see drawings of a hipped roof). Large roof structures may include several roof decks.

The third stage involves the direct installation of the roof frame (base, rafters, sheathing).

Structurally, the construction of a roof in a house with or without existing floors differs (in in this case there is no need to lay floor beams on which the supports will be installed).

The installation of racks (vertical supports of the roof frame) should be approached with particular care. It is necessary to accurately maintain the installation angle (90 degrees). At the slightest deviation, further deformation of the roof is possible. The installation pitch of the racks is up to two meters.

The structure of a hipped roof of a house consists of four planes (slopes). Two trapezoidal and two triangular. Trapezoidal slopes will be formed by side rafters, hip (triangular) slopes - by slanted (diagonal) rafters.

The rafters at the top of the frame are supported in the ridge beam (purlin). This beam goes on top of the vertical posts (possibly a groove connection with the posts). The distance between the rafters is from 50 to 150 cm (according to the roof plan). The recommended width of the rafter board is 150 mm.

The frame is fastened using corners and steel plates with self-tapping screws (nails). To strengthen the resulting structure, diagonal supports, struts, and wind beams are used. They allow you to increase permissible load systems.

Waterproofing is laid on top of the rafters. Then a counter-lattice is made (bars that are attached to the rafters on top of the waterproofing). It is needed to create ventilation duct between roofing material, sheathing and waterproofing. This will allow moisture to be removed quickly and effectively. Next, the sheathing is performed - horizontal boards are attached from the bottom to the very top to the counter-lattice (see diagram of the hipped roof structure).


The last step is the installation of roofing material. Installation is carried out depending on the parameters of the material. Example.
The architectural appearance of a building is largely determined by the type and shape of the roof. But, paying attention to the aesthetic component, we must not forget about the requirements for the functionality of the roof.


Varieties of hipped structures
The solutions presented on our website include buildings with a laconic functional roof, as well as buildings with roofs of complex shapes, the design of which includes the installation of dormer and dormer windows, a combination of roofs at different levels, etc. We offer two main types of hipped structures.
Tent. The upper ends of the corner rafters converge at one point, forming a ridge unit. All slopes are identical isosceles triangles.
Hip. The corner rafters are attached with their upper ends in pairs to the ridge, the length of which is less than the length of the slope, due to which two triangular and two trapezoidal slopes are formed.
Advantages of 4-pitch roofs
Reliability. The configuration and angle of inclination of the hipped roof planes allow it to withstand high snow loads, as well as withstand strong gusts of wind due to its low windage.
Possibility of creating an attic. Hip structures They are perfect for organizing this room, allowing you to significantly increase the usable area of the house. On our website you will find projects of cottages with a 4-pitched roof, which include an attic.
Wide selection of roofing coverings. For a hipped roof, any sheet or piece material, including composite and soft tiles.
House projects with hipped roof, price and photo of a house project with a 4-pitched roof
Projects of houses with a hipped roof. Large range of house designs. Finalization of plans for the customer.
Projects of one-story and two-story houses with a hipped roof

It is impossible to start building any house without a well-designed project. It is in it that all data regarding the size, location of rooms and materials used will be displayed. Today, the option of a house with four remains very common. pitched roof. This is due to the fact that such buildings are quite spacious, have attractive appearance and can act as a year-round home.
One-story projects
One-story structures with a hipped roof are perfect solution for a summer house or a private home in which you can live comfortably throughout the year.
Project No1
This design has a total area of 139 m2, but the dimensions are 11x15 cm. In total, there are 4 rooms, including 3 bedrooms. The project does not include a basement, garage or attic. The decoration is made of wild stone.

One-story house with a hipped roof 139 m2
Foam block or aerated concrete was used in the construction of the walls. According to the project, the house has: a room for receiving guests, a kitchen, a hall, a pantry, an entrance hall, a boiler room, 3 bedrooms, 2 bathrooms, winter Garden. And here's what they look like frame houses V Scandinavian style, can be seen in the photo in this article.
Project No2
The total area of the building is 58 m2, but the living area is 32 m2. The dimensions of the building are 10x8 m. The attic, basement and garage are not included in the project. Plaster was used as cladding.

When constructing the walls, foam blocks or cellular concrete were used. The base is pile-grillage type. The house has: a vestibule, a boiler room, a steam room, a bathroom, a hall, a guest room, a storage room and a bedroom. It will also be interesting to see what an American-style house looks like.
Project No3
This house has a total area of 65 m2 and a living area of 44 m2. Its dimensions are 9x9 m. There is no attic, basement or garage. Plaster is used to finish the facade. The house has an entrance hall, boiler room, hall, bathroom, 2 bedrooms, bathroom, living room and kitchen.

Project No 4
This project involves a house with a total area of 61 m2 and a living area of 35 m2. The dimensions of the building are 8x10 m. There is no basement, garage or attic. As exterior finishing plaster is used. The walls were erected from cellular concrete or foam blocks. But what projects exist beautiful houses V classic style, and what they look like. This article will help you understand.

The base is presented in the form of a monolithic strip reinforced concrete slab. The house contains such rooms as a vestibule, boiler room, steam room, bathroom, bedroom, hall, wardrobe, living room.
Project No5
The total area of the one-story house is 132 m2, and the living area is 68 m2. There is no basement, garage or attic. As exterior finishing used facing brick. Walls are erected from cellular concrete or foam blocks.

According to the project, the house contains the following rooms: entrance hall, hall, living room, 3 bedrooms, 2 bathrooms, dining room, kitchen, pantry. Here's what small projects look like two-story houses made of brick, and how their construction occurs is described in great detail in this video.
Two-story projects
Choose two-storey house with a hipped roof stands big family, since such structures are quite spacious.
Project No1
This is a two-story house with full second floor, made in traditional style. According to the project, the house has a spacious Utility room, which can be equipped for storing tools. The daytime part of the house is divided into a living room, dining room and kitchen. There is a small storage room under the flight of stairs.

The spacious room on the 1st floor may contain an office, which, if necessary, can be converted into a living room. On the second floor there are 3 spacious bedrooms and 2 bathrooms.
Size 225 m2
The total area of the house is 225 m2, and the living area is 172 m2. The roof is slanted at 30 degrees. Its area is 255 m2. The walls are erected from ceramic blocks or cellular concrete. Solid type ceiling. Ceramic tiles and metal tiles are used to cover the roof. And this is what modular ones look like country houses
, and how such a house is built, this article will help you understand. What does a one-story frame-panel country house look like? cottage
4x6, can be seen in this article: http://2gazon.ru/postroiki/zhilye/karkasno-shhitovye-dachnye-doma.html You might also be interested in learning about what kind of house to build for permanent residence
Project No2
, and by what parameters it should be chosen. This two-story home features a side-mounted garage and an office on the ground floor. The house is made in a classic form, which looks advantageous with the coloristic design of the exterior. The discreet design puts the focus on panoramic glazing
second floor.

Even when planning the internal area, harmony was maintained. On the ground floor there is a day area. This is a guest room and a kitchen. There is access to the house from the garage through a separate dressing room. On the ground floor there is a bathroom and an additional room.
size 162 m2 On the second floor there are 4 bedrooms, which form the night area. The most spacious room has access to a balcony. It will be possible there in summer warm evenings
sit with a cup of tea and just relax. Each bedroom is equipped with a built-in wardrobe. But the bathroom is shared. The total building area is 162 m2, and the living area is 137 m2. The roof is slanted at 25 degrees and its area will be 191 m2. When constructing walls, cellular concrete or ceramic blocks. Solid type ceiling.
Project No3
Ceramic tiles, metal tiles or cement-sand tiles can be used for roofing. But this article will help you understand what the plan of an 8x8 house with a brick attic will look like, and how good this house project looks. This project involves the construction of a compact, made in a simple style. The laconic shape is distinguished by the hipped roof and the calibrated façade cladding. 4 people can live in such a house comfortably.
There is also a spacious bathroom on the ground floor. There are 3 bedrooms on the second floor. One of them contains a dressing room. There is also a shared bathroom on the second floor.

Size 114 m2
The living area of the house will be 114 m2. The roof is sloped at 22 degrees and its area is 114 m2. For the construction of walls, cellular concrete or ceramic blocks are used. Solid type ceiling. The roofing can be done using ceramic tiles, metal tiles and cement-sand tiles.
Types of hipped roofs
The hipped roof structure can be made in several options, including:
- Classic. It has straight rafters without fractures, corner ribs originating from the ridge. All overhangs are concentrated on one level.
- Tent. This option involves bringing all the edges together at one central point.
- Danish hip. In its upper part there are short gable slopes. It will be possible to provide full vertical windows in the Danish roof.
- Broken or attic hip. This design is difficult to manufacture, but with its help you can allocate a large area for living rooms.
Houses with a hipped roof remain one of the most popular today. This popularity is due to the fact that it is possible to equip an additional room. To install such a roof, metal or ceramic tiles are often used. The above projects can be used to build a cozy and complete home for year-round living for the whole family with comfortable conditions.
Projects of houses with a hipped roof, how to make them
Projects of houses with a hipped roof. One-story and two-story houses with a hipped roof. Types of hipped roofs for houses.
Projects of houses with a hipped roof

One of important stages When building a house is the creation of a roof. From her the right choice and construction depends not only appearance home, but also internal comfort. For country houses, as a rule, they choose a hipped roof, which has many advantages over other types of covering, but its construction also requires knowledge of many nuances.
Project of a cottage with a hipped roof
In addition, this type of roof has several varieties with their own characteristics.
Advantages of a hipped roof
First of all, the hipped roof ensures uniform heating of the room from all sides. In addition, the space under the roof forms a warm and large attic; as a result, when building a one-story house, you essentially get two floors, and you can build an attic in the attic space.
It’s probably not even worth saying that such a roof provides excellent protection from bad weather, but few people know that this type of covering is more resistant to wind. Such a roof allows you to cover a structure of almost any complexity, unlike gable roof, which is intended mainly for standard buildings.
 Example of a hipped roof in original project residential building
The design of a hipped roof allows you to include additional elements in its design that serve not only decorative element, but also carry a functional load. These could be attics and dormer windows, which will enliven the appearance of the house, or panoramic, located in the body of the roof itself.
Types of roofs consisting of four slopes
There are three main types of hipped roofs:
- Hip roofs are the easiest roofs to make due to the absence additional elements. This coating looks like a pyramid with a square or rectangle at its base. Essentially, these are four identical or two paired triangles converging at one point. As is clear, pediments are not provided for this design.
 An example of a hipped hipped roof at a cottage
- The hip roof design also does not include gables, and it consists of two pairs of sides of different shapes. From the end or on the short side of the house, the slope looks like a triangle, on the long side - like a trapezoid.
- Half-hip is perhaps the most difficult design to manufacture, since each slope is made of two parts: upper triangular and lower trapezoidal. Such a roof allows you to equip a spacious attic with panoramic windows, and, if desired, a balcony. At the same time, the strength and reliability of such a coating does not suffer at all. As a rule, such roofs are used when arranging two-story houses.
Parameters taken into account when constructing a hipped roof
Such a covering is perhaps the most difficult to manufacture, mainly due to the fact that such a roof is one of the heaviest that are used in private construction.
Therefore, before starting its construction, it is necessary to create a project that takes into account all the loads that will affect both the roof itself and the structure.
Loads mean the following impacts on the rafter system:
- The total weight of the structure itself, which consists of the mass of roofing materials and various types isolation;
- The weight of additional elements, such as windows, antennas, ladders and other equipment located directly on the roof surface;
- Loads from wind, snow and other precipitation, and for the calculation the average statistical data characteristic of the region in which construction is carried out is taken.
 Project of a cottage with an attic, veranda and hipped roof
The structure is divided into separate sections, for each of which a separate calculation is carried out. This takes into account the fact that most of the elements in the real state are in an inclined position and their dimensions on paper do not correspond to the true ones.
Also, the design of the roof takes into account the standard dimensions of the materials used, this will eliminate additional work on cutting and fitting and will significantly reduce the amount of waste. It is still better to entrust the creation of the project to a professional, since not every person can correctly calculate the design, especially if many additional elements are planned.
In the project that the specialist will provide, in addition to the drawing of the rafter system, there must be calculations for the length of the rafters, the location of the sheathing and diagrams of the connection points of all elements, both basic and additional.

What material to choose for rafters and roofing
As a rule, larch or pine wood is selected as the material for the rafter system, which is carefully checked for defects and cracks.
Certain requirements are also imposed on the moisture content of raw materials; optimally it should be at the level of 18-22%.
More wet timber It is imperative that it be dried first, since the installation of a rafter system made of wet wood will lead to deformation and distortion of the entire structure during drying.
The cross-section of the timber used in construction must be determined during the project development process. But in some cases it is permissible to use Alternative option when a board with a section of 5x10 cm and 5x20 cm is used.
 Project of a house with a garage in high-tech style
If the strength characteristics of such boards are not enough, they can be doubled.
The roofing material used for covering is selected depending on the climate zone, the purpose of the attic area and the angle of the roof.
- As a rule, for a roof located at an angle of 30-60 degrees, tiles or a roof consisting of individual elements are selected as the material;
- An angle of 15-60 degrees is preferable for a roof made of steel or asbestos sheets;
- The roof at 10-20 degrees is covered with slate or rolled material.
Return to contents
How to determine the amount of materials needed
Based on the completed project, the quantity is determined required material and its cost.
There are several factors to consider:
- First of all, it is necessary to accurately calculate the total roof area, which is calculated using the eaves overhangs.
 Project of a one-story house with an original hipped roof
- Select the material from which the roof will be made, although it is preferable to complete this stage at the design stage.
- Consider the allowances for parapets and canopies, as well as the size of the overlaps during installation.
- When cutting material for construction, a certain amount of waste is generated in any case, so building materials are purchased with a reserve of 10-15% of the total volume.
When purchasing material, do not try to save money at the expense of quality; the wood should not have defects or flaws.
Features of installing a hipped roof
The main task when arranging a roof is to correctly manufacture the rafter system; the strength and rigidity of the structure depends on it:
- First of all, the mauerlat, which is a beam laid around the perimeter, is installed and attached to anchors outer wall. In this case, the distance from the edge should be at least 5 cm.
- Next, markings are made according to the roof design for other main structural elements.
 Project of a two-story house with a hipped roof
- Racks and ridge beams are installed, which must be leveled. For these purposes, it is most convenient to use a plumb line.
- To secure the racks vertically, jibs are used (supports positioned at an angle to the rack).
- Install all necessary rafter legs and narozhniki. Moreover, if the house, and therefore the roof, has small sizes, use hanging rafters; for large buildings, an inclined version is used.
- Lathing, insulation and roofing material. Valleys (gutters that drain water from the roof surface) and a ridge are installed.
By the way, hipped roofs are excellent option for use on various gazebos. Since such a roof is very similar to a tent, it perfectly protects from bad weather and you can use the gazebo regardless of rain or heat.
In addition, such buildings look quite attractive and modern, thanks to which they fit perfectly into the surrounding landscape.
But using a hipped roof for a bathhouse is quite impractical, since the price of this structure is significantly higher than the cost of a conventional gable roof. At the same time, the bathhouse definitely does not need an attic. However, if landscape design involves the construction of all buildings in the same style, then no one bothers to make a similar roof for the bathhouse.
Projects of one-story and two-story houses with a hipped roof
Features of projects of private houses and cottages with a hipped roof. How to make such a roof with your own hands, photos and videos.
The aesthetic qualities of the roof play an important role in the image of a residential building. But much more important is the reliability and durability of its design. Careful selection of its type and shape will ensure that the roof meets the needs of the developer.
The hipped roof has excellent wind resistance. Looks best one-story houses with a 4 pitched roof, because this type is suitable for buildings with a large area and gives them solidity. Their individual feature complex design It is mandatory to have dormer and dormer windows that provide a good level of illumination and natural ventilation. With an equal area of a private house, the area of the hip roof will exceed the area of the gable roof. This causes an increase in the cost of its implementation for the developer.
In the Z500 catalog, two-story and one-story houses with a 4-pitched roof with an area of 100 m2 or more have a hip roof type. Such houses are popular among developers, so we regularly add new ones to the collection. standard projects. You can buy our projects at prices that are at the average market level in 2016.
If among those ready architectural projects, offered in the catalog, do not fully satisfy your requirements, then an original author's design can be developed for a separate payment one-story houses with 4 pitched roof. The layout of one-story houses with a 4-pitched roof can also be changed.
Project plans for one-story houses with a 4-pitched roof: features of the roof structure
Projects of one-story houses with a 4-pitched roof can have a hip or hip roof type.
Thus, projects of one-story houses with a hipped roof of a hipped type are characterized by roof slopes converging at one point. Hip roof consists of two triangular slopes and two trapezoidal ones, which are connected by means of a ridge beam.
When choosing projects of one-story houses with a 4-pitched roof (photos, videos, drawings, diagrams, sketches can be viewed in this section) for turnkey implementation, it is important to take into account such a factor as the angle of inclination of the roof.
Plans for one-story houses with a 4-pitched roof: conditions for choosing the angle of inclination of the roof
Since the angle of the slope allows the roof to easily drain precipitation, it is considered the most significant criterion for safety, practicality and aesthetic characteristics. Its value ranges from 15 to 65˚ and depends on:
- Climatic zone of construction. If it involves a large volume of precipitation, then it is advisable to provide a steep roof, the slope of which will be at least 45°. Less steep slopes are suitable for areas with a dry climate. A flat roof with an angle of inclination not exceeding 30˚ should be installed for buildings exposed to gusty, frequent winds.
- Roof covering material. For roll materials a slope angle of 2-25° should be provided, when using piece elements - from 15°, large-sized elements (metal tiles and slate) are laid on slopes with an angle of inclination from 25°.
- Availability attic floor. If the layout of projects of one-story houses with a 4-pitched roof provides for the presence of this room, then for comfortable living in it it is important to choose the slope correctly in order to prevent a decrease in the area of the attic and the height of its premises in the case of underestimation of its values, and the organization of a large unused space under the ridge due to its excessive increase. In the case of an attic cottage, the roof slope should lie within 38° - 45°. For a roof whose slopes are located at an angle of less than 30°, the best option There will be an attic design.
An increase in the angle of inclination of the slopes and, as a result, the need for more materials arises due to an increase in the length of the rafters and the area of the structure, therefore the estimate for its construction increases significantly.
Enjoy your viewing and we wish you to find projects of one-story houses with a 4-pitched roof that suit you!
The labor intensity of the work when building a hipped roof is not much higher than a regular gable roof, but this does not mean that a hipped roof can be built with your own hands as simply as a regular one, with two symmetrical slopes. The main difficulty is that a hip roof requires very precise engineering calculations and knowledge of technology, especially if you do not have good practice in building this kind of roof.
Why is a house with a hipped roof better than a gable roof?
Why regular gable roof They are installed mainly on simple outbuildings, and for residential premises they choose a hipped roof:
- The appearance of the hipped roof option looks much nicer and more elegant than the double structure;
- Even a simple hipped roof can withstand the elements much better due to smoother contours and aerodynamics. Even in the strongest winds, the rafters of the frame remain almost equally loaded, due to the correct balancing of the diagonal rafters;
- Two additional slopes shed water better, dry under the influence of the wind and thereby protect the roof of the house from flowing, as happens with straight gables. Thus, significantly higher thermal insulation and frost resistance are achieved for a hipped roof.
Important! The four-slope roof design, unlike the “kopeck piece”, has a high degree of adaptation.
For climates with high rainfall, the Danish version with steep main slopes and two hips is perfect, for steppe zone with strong winds, a low tent frame with large overhangs and an average angle of inclination.
It will be most convenient to use a hipped roof in houses where attic space is not allocated as a residential area, but is used for economic purposes. Due to the appearance of two additional slopes, the space and usable area of the attic is reduced by approximately 25%. But if desired and the size of the attic space is sufficient, you can equip it with small room, even with windows and a balcony, as in the photo.

But in this case, instead of a simple system of vertical posts on which the ridge girder rests, additional horizontal beams - crossbars - will need to be installed in the structure of the hipped roof, which will play the role of a ceiling for the attic space.
How to make a hip roof
First of all, it’s worth understanding how a 4-slope roof differs in detail from the double-slope version.

The main difference between a 4-slope rafter system and a double symmetrical roof
The differences in design will be most obvious in the diagram with a simple rectangular version hipped roof shown in the photo:
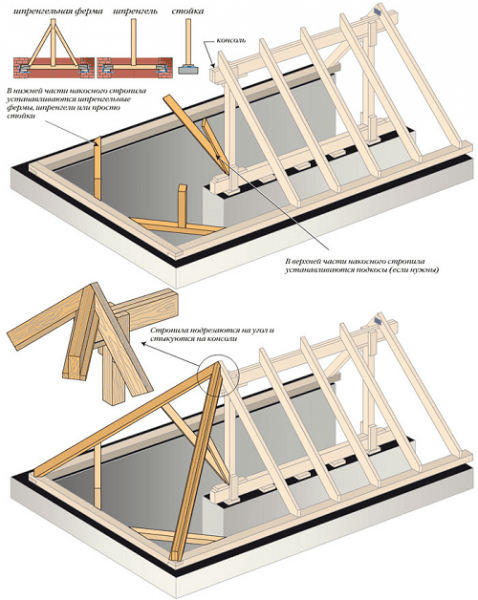
Important! Most elements of additional slopes require very careful adjustment, so often diagonal rafters and frames are assembled with a preliminary “grab” using self-tapping screws, and only after final adjustment they are replaced with a bolted connection or knocked down with nails.
Do-it-yourself hipped roof, sequence of work
The most difficult part in building a rafter system for a hipped roof is the stage of hanging the diagonal rafters. Firstly, the angle of inclination of the diagonal rafters and the pressure with which they rest on the ridge girder must be equal to the parameters of the pair of rafters on the other side. The areas of the slopes and the angles of inclination in a hipped roof must be absolutely equal.
Secondly, an imaginary line drawn between the joining points or vertices of the triangles formed by the diagonal rafters on both sides must run exactly along the axis of the ridge beam, both horizontally and vertically. The main difficulty in assembling a hipped roof is to correctly align and adjust the position of the diagonal rafters.
At the preparation stage for assembling a hipped roof, a board or mauerlat beam is laid, and it is important to carefully level the plane of the board horizontally. Preliminary markings of places for installation of side rafters, truss supports and tightening are applied to the Mauerlat. Installation of a hipped roof is greatly simplified if a reinforced concrete slab is used as the ceiling.

After laying out and fastening the tightening, the ridge frame or “bench” is assembled. Essentially, this is a ridge beam installed on vertical racks. Longitudinal and transverse struts are sewn to the posts, ensuring the stability of the frame until the hip rafters are assembled.
Before laying out the diagonal rafters, the ridge frame must be supported with a pair of temporary beams, which are attached to the mauerlat and to the outer post of the “bench”. This will prevent the ridge frame from tipping over under the pressure of the diagonal rafters on the other side.
Next comes the most difficult part. First, the actual length of each of the sloped beams is determined; for this, a nail is hammered into the fulcrum at the end of the ridge beam and the length from the nail to the fulcrum on the mauerlat is measured with a cord. Before installing the diagonals, each of the slanted rafters is measured and cut according to its cord length.

Having installed the bevel elements on the Mauerlat, determine the line of contact and the cut of the contact surface. Having trimmed the support plane of the slope beams, they are laid on the end of the ridge girder.
The lower ends of the diagonal beams are installed in the corner joint of the mauerlat beam with an undercut of the supporting surface of the beam according to the given diagram. Sometimes the shape of the cut is made according to a template, but it is safer to mark the cut line manually.
Ideally, an imaginary vertical plane drawn through any sloping rafter should be parallel to the plane of the sloping beam located on the opposite side of the hipped roof.
If everything is done correctly, the two diagonal rafters of the hipped roof will be exactly along the axis of the ridge beam. To avoid deflection, long enough braces need to be installed with struts and truss supports with the installation of temporary fasteners made of self-tapping screws. Similarly, install the rafters from the opposite slope and align the elements with maximum accuracy. To increase the rigidity of the hip slopes, several flanges are cut out and installed at the edges of the diagonal beams.

Then they move on to laying ordinary rafter beams. Fastening to the Mauerlat is carried out using a standard bolt-nut connection or using steel angles. In the upper part, the rafter board is usually sawed down according to a template and laid on the ridge beam.

Usually, after hanging the rows on the ridge girder and the mauerlat, additional crossbars are installed in the upper part, which reduce the bursting effect of the frame of the hipped roof. After installing all the rafter beams and aligning the main strength elements of the hipped frame, they proceed to the permanent fastening of all rafters on the mauerlat and ridge girder.
At the next stage, struts are installed and fastened under the ordinary rafters, and the triangular slopes are “filled” with external beams. Each of the splices is cut to its own length according to the diagram below and installed in a checkerboard pattern; this avoids weakening of the beam due to the coincidence of the cuts on opposite sides.

All elements are secured with nails, self-tapping screws and bolted connections with overhead steel plates and angles.
Final operations
After assembling the main frame of the hipped roof, fillets are stuffed onto the ends of the rafters - short boards that form a row of roof overhangs along the wall. The cut line is measured along the ends of the fillies, trimmed so that the ends are in the same plane, and the cornice board is sewn on. The lower part of the fillies is lined with clapboard or regular board.
After treating the wood of the beams with an antiseptic composition, they proceed to stuffing the sheathing boards. The thickness of the boards, the amount of material and the nailing points are chosen based on what kind of roofing they plan to lay on a given hipped roof.
Conclusion
The hipped roof is deservedly considered one of the most convenient and practical roof structures. If you are planning to build a hipped version with your own hands, except correct calculation structure, you will need experience in leveling and adjusting the position of each of the beams. Therefore, it would be right to get the necessary experience and skill in working with hipped roofs from more experienced craftsmen.
The aesthetic qualities of the roof play an important role in the image of a residential building. But much more important is the reliability and durability of its design. Careful selection of its type and shape will ensure that the roof meets the needs of the developer.
Hip roofs of private houses have excellent resistance to wind. One-story houses with hip roof, because this type is suitable for buildings with a large area and gives them solidity. An individual feature of their complex design is the mandatory presence of dormer and roof windows, providing a good level of illumination and natural ventilation. With an equal area of a private house, the area of the hip roof will exceed the area of the gable roof. This causes an increase in the cost of its implementation for the developer.
In the Z500 catalog, for two-story and one-story houses with an area of 100 m2 or more, four-pitched roofs of hip-type houses are provided. Such houses are popular among developers, so we regularly add new standard projects to the collection. You can buy our projects at prices that are at the average market level in 2017.
If among the ready-made architectural projects proposed in the catalog there are no ones that fully satisfy your requirements, then for an additional payment an original one with a hipped roof can be developed. There may also be a layout of houses with a hipped roof.
Project plans for houses with a hipped roof: features of the roof structure
A roof with four slopes can be hip or hip. A hip roof has slopes that converge at one point. The hip roof consists of two triangular slopes and two trapezoidal ones, which are connected by a ridge beam.
When choosing projects of houses with a hipped roof (photos, videos, drawings, diagrams, sketches can be viewed in this section) for turnkey implementation, it is important to take into account such a factor as the angle of the roof.
House plans with a hipped roof: conditions for choosing the roof angle
Since the angle of the slope allows the roof to easily drain precipitation, it is considered the most significant criterion for safety, practicality and aesthetic characteristics. Its value ranges from 15 to 65˚ and depends on:
- Climatic zone of construction. If it involves a large volume of precipitation, then it is advisable to provide a steep roof, the slope of which will be at least 45°. Less steep slopes are suitable for areas with a dry climate. A flat roof with an angle of inclination not exceeding 30˚ should be installed for buildings exposed to gusty, frequent winds.
- Roof covering material. For rolled materials, a slope angle of 2-25° should be provided, when using piece elements - from 15°, large-sized elements (metal tiles and slate) are laid on slopes with an inclination angle of 25°ﹾ.
- The presence of an attic floor. If the layout of house projects with a hipped roof provides for the presence of this room of this room, then for comfortable living in it it is important to choose the slope correctly in order to prevent a decrease in the area of the attic and the height of its premises in the case of underestimation of its values, and the organization of a large unused space under the ridge due to its excessive increase. In the case of an attic cottage, the roof slope should lie within 38° - 45°. For a roof whose slopes are located at an angle of less than 30°, the best option would be to design an attic.
An increase in the angle of inclination of the slopes and, as a result, the need for more materials arises due to an increase in the length of the rafters and the area of the structure, therefore the estimate for its construction increases significantly.