To the most complex types construction work This includes making a hip roof for a house with your own hands. For example, one should ideally know descriptive geometry. In general, the work requires competent construction of a spatial structure.
Unlike other types of roofs, the hip has four slopes of different configurations. In this case, a tent variety can be distinguished. However, its slopes are made in a triangular shape. There is no ridge on such a roof, since there is a single ridge unit. All four planes of the roof converge into it. Thus, the hip is the triangular slopes on both sides of the roof. At the same time, other slopes are made in a trapezoidal shape. DIY hip roofs are very suitable for the architectural style of the house. But it is also necessary to remember the practical conditions for construction.
Most often, hip roofs can be found in areas with good wind flow. This roof is very resistant to such loads, unlike conventional gable roof. The appearance of the roof is entirely related to. Trapezoid-shaped slopes are usually created using sloping or hanging rafters. The hip will require the use of sloped rafters and splices.
In Western Europe (Denmark), half-hip roofs have become widespread. Let's look at two of their varieties:
- The first one includes several gables at the ends of the roof. Trapezoidal hips fit tightly to their base. You can also find it here. This is some kind of source natural light for the attic. At the same time, the house project with hip roof may also include an attic room.
- The second one includes slopes of different lengths (the hip length is less than the length of the main slopes). Note that the hips are made in the form of a triangle. Under the roof you can find an attic with main slopes instead of side walls. There is also a horizontal ceiling. At the same time, the ends of the hips and vertical side walls are in the form of pediments.

Designing a hip roof with four slopes involves calculating its structural elements and choosing a roof covering. You can also farm out load calculations. This is done by design firms or expert bureaus. They will also provide you with photo and video materials of your home.
Hip roof project

Installing a roof: work order

Hip roof rafter system, detailed in the video:
Hip roof scheme made of metal tiles - to provide an eaves overhang, on roof trusses fillies are installed. They must be secured in the center of the composite rafter legs. Cutting tiles - in the form of pictures along the length of the slope. Then it is fastened to the lathing, which is laid in advance on top of the rafter legs.
The roof is the final structure of the building, the installation of which must be approached responsibly and competently. The design of a hip roof, also called a gable roof, has a particularly complex structure: it is distinguished by the presence of two slopes at the ends, which are made in the shape of triangles and are called hips.
Types and features
There are several types of hip roofing systems:
- A hipped hip roof is a roof that consists of hips that do not reach the bottom, but only cover the slopes and cover the upper part of the pediment.
- A hip roof, which has four slopes of the same size and design. The hips in this design diverge in all directions at the same angle. This type of roofing is used for equipping square-shaped buildings.
- The broken roof represents slopes different sizes, which combine with each other at different angles. The design is quite complex and therefore requires competent design.
Where to begin?
A house with a hip roof is a beautiful and harmonious structure. In order for it to serve for a long time and reliably, it is important to correctly approach the design of each stage of construction and, first of all, the roofing system. This design consists of the following elements:
- The ridge (ridge beam), located in the center of the structure and is its main load-bearing element, since it is to it that the rest of the wooden parts are attached.
- Corner (sloping) rafters. Each rafter is attached to the ridge at one end, and at the other it extends to the corner of the building and even beyond it. The rafters bear the main force load. For their manufacture, timber of the same thickness as in the ridge is used.
- Intermediate central rafters. They are located from the ends of the ridge and extend along the slopes and hips to the walls.
- Short rafters of varying lengths, which are attached to the corner pieces at the same angle.
Each hip roof project takes into account the accuracy of calculations, markings, and drawings. It is the numbers that underlie the design of a hip roof.
Basic calculations and information

If you want your roof to serve reliably, for a long time and not bring unpleasant surprises, you should pay close attention to the calculations:
- firstly, the center line is marked along the top of the trim from the end of the building;
- secondly, half the thickness of the ridge beam is calculated, and then it is marked where the first element will be located rafter system;
- thirdly, the location of the intermediate rafter is determined using a measuring rod;
- fourthly, the length of the rafter overhang is calculated, again using a lath.
The same actions should be performed at the other three corners - this way we will determine how and where all the elements of the rafter system will be located.
As you can see, installing a hip roof is not easy, so you need to perform each stage with special care. In order not to be mistaken in the numbers, you can use a special table, but first you need to measure the horizontal projection of the intermediate rafter with a rod. Based on the obtained figure, we select the angle of inclination in the table and multiply the two numbers. The length of the overhang is measured in the same way.
Hip roof: how is it constructed?

The hipped hip roof is a complex and unique structure. When constructing it, it is important that the material of the same thickness is used to create the ridge beam and rafters. Only this will guarantee the strength and reliability of the entire structure. Any change in thickness will sooner or later affect the deformation of the roof and its destruction. It is important that short rafters are securely attached to the corner rafters, and not to the ridge, and it is important to accurately observe all slope angles.
Hip roof (photo shows how different designs can have houses with such a roof) can be of any height, but it is worth remembering: a low roof is additional supporting elements that are necessary to hold heavy structural elements. For a hip roof to be reliable and durable, it should be constructed from dried softwood timber. In addition, finished rafters must be treated with special impregnations and compounds.
Why do you need a Mauerlat?
The design of a hip roof, as we have already said, is complex. To begin with, the mauerlat is laid - it is on this that the entire rafter system will subsequently rest. The mauerlat is laid on reinforced belt from reinforced concrete structures. This will allow you to do load-bearing walls more durable and reinforced, plus it will create a flat surface for mounting the Mauerlat. For stone and brick walls, you need to make formwork, which will be complemented by a frame made of reinforcement, and then it will be filled with concrete. The main thing is that when pouring concrete, the same horizontal level is maintained throughout the building.
Galvanized metal studs are attached to the installed reinforcement frame - their length should extend beyond the timber Mauerlat. After the concrete has hardened, the upper part is coated with bitumen, and then covered with roofing felt - this will protect the wood from rotting and other environmental influences. The studs are needed to secure the entire structure. As a rule, hip roof rafters are created on the basis of wooden beams.

Hip roof frame
A hip roof is a combination of a number of elements: a purlin, a support board, a mauerlat, sheathing, tie rods, rafters (ordinary, diagonal, slanted). The roof parts form a rafter shape, at the bases of which lie several triangles. In the structure itself, rafter legs are of great importance, which must be installed in accordance with a certain angle of inclination of the roof slope.
Mauerlat is one of the main elements, without which the design of a hip roof is impossible. It is with its help that the mass of the rafter system is evenly distributed onto the load-bearing walls of the building. So what is the role of rafters?
- Sliding supports play an important role in achieving roof reliability.
- Hanging supports make the hip roof strong and reliable, even if there is too much load on it.
If the house is built on the basis of columnar supports, then layered rafters are installed, which rest on the outer walls with their ends. It is advisable to install this type of support if the distance between the supports is no more than 6 meters. To achieve strength and reliability of the connection, additional screws and bolts are used. And to enhance the strength of slanted rafters, a sprengel is sometimes used.
How are rafters installed?

The hip roof structure is erected in several stages. First, the racks are installed in a vertical position - they should serve as support for the ridge beam. The posts holding the ridge are attached to the central beam with a special system of jibs. Only after this, diagonal rafters from edged boards are used. However, the main elements are precisely the slanted and diagonal rafters, which bear the main load of the roofing system.
Calculation is the most important thing!
If a hip roof is being erected, calculation plays an important role. In this case, certain rules must be observed:
- Firstly, the diagonal rafters must have the same length - the roof overhangs depend on these indicators.
- Secondly, overhangs should be made at a distance of 50-60 cm, and if the house is built in climatically difficult regions where wind loads are very strong, then overhangs can reach up to one meter.
- Thirdly, the diagonal and central rafters must be joined correctly and carefully.
The rafters must be secured with anchor connections, which is important to prevent the roof from being torn off by the wind. Installing racks will reduce the load on the beams. If the roof slope is not very large, then the roof will need to be strengthened using trusses and trusses. Sprengel is a beam that is laid on both sides, and with corners converging at the top.

If you need a roof with your own hands, the hip structure is quite difficult to construct, remember this. To strengthen it, a lathing is required, which is made from bars. It can be solid or with gaps. The sheathing pitch depends on the size and type of roofing material. The popularity of the hip roof is explained by its unusual appearance, reliability, durability and unusual configuration. If you are planning to build an attic floor, this design will be most ideal. The streamlined shape protects the roof from the wind.
Basic calculations
The design of the hip roof is drawn up taking into account the angle of inclination of the rafter system; in addition, the selected insulation plays an important role. In Russia, thermal insulation is most often used mineral wool: it is laid in rolls and does not require adjustment. To calculate the required amount of material, you should find out standard sizes slabs and the area of the roof itself. Often roofing materials form a smaller area than the roof. This affects the consumption of materials. To calculate the roof area, you need to take into account the total area of two hip triangles, as well as two side planes in the form of a trapezoid.
Avoiding mistakes
As we have already said, a complex design is one of the differences that characterizes a hip roof. You can do the calculation yourself, or you can use a calculator. If the construction is carried out with your own hands, then you need to take into account all the features of the hip roof rafter system. The success of construction depends primarily on the correctness of the calculations, the accuracy of the markings and the correct plan. To make the roof reliable, you need to pay attention to the following points:
- avoid possible design errors by using a measuring stick rather than a tape measure;
- mark the center line;
- Use the slats to determine the placement of the remaining intermediate rafters.
Pros and cons of the design

A hip roof (the photo shows how diverse solutions can be translated into reality) is a complex structure to install, and therefore requires a professional approach. The advantages of the hip design include:
- High resistance to natural influences, which is explained by the presence of pediments and gables - they provide high reliability and strength, protecting the house from the effects of wind.
- High rigidity of the structure is ensured by the presence of corner ribs converging to the ridge support beam.
- The facades of houses with a hip roof are protected from precipitation thanks to large overhangs along the entire perimeter of the building.
- A hipped roof is a harmonious and attractive completion of any country house, which looks solemn and presentable.
On the other hand, the hip roof has a number of disadvantages. Firstly, the complexity of the design, which discourages many from erecting a roof. Secondly, there are high costs for Construction Materials. Thirdly, slopes on four sides will make it inappropriate to use the attic space, so if you plan to build attic floor, given roofing system won't do.
What other options?

If you plan to use the second floor as a living space, then the classic hip roof will not work. In such cases, it is better to erect a half-hip roof: on top it is traditional design from two slopes, and from below - between the first and second floors - a trapezoid, which allows you to make the roof original and interesting. Moreover, a clearly defined line between floors will be visible. A broken slope is well suited for those projects where the living area is difficult to fit into a standard triangle. Experts advise erecting a half-hip roof on buildings and houses that are located in the area of strong winds.
conclusions
Whatever roofing option you choose, the main thing is that it is strong and reliable, but in order to achieve these indicators, you need (once again we emphasize) to carry out competent calculations. Only they will become the basis for a clear and correct execution all works.
A hip roof is a structure consisting of four roof slopes: two trapezoidal slopes on the sides and two triangular slopes on the ends of the roof. These slopes are called hips, hence the name of the entire roof. This decision is driven more by design and architectural taste than by construction necessity. Hip roofs have long gained popularity in Europe, and over time migrated to us. Any do-it-yourself hip roof, drawings of which you will find here or in other sources, looks very aesthetically pleasing due to the slopes of all the slopes. This same feature helps reduce wind resistance from all directions, which means... A roof with hips will become more reliable and will last longer without repair.
A hip roof can be built without the help of professionals, even with the most primitive builder skills. The only difficulty is that you can’t do it alone, you will need 2-3 assistants.
Roof structure with hips
Hip roof diagram. Which is the leader among developers, has four slopes, two of them triangular. These hips are attached to the ends of the roof of the house to connect the cornice and ridge beam. The front and rear hips are built in the form of a trapezoid (truncated triangle), they have a larger area and an increased slope. Trapezoidal hips secure the ridge and cornice on the remaining sides. 
There are also half-hip roof designs, and they are called Dutch. Half-hips are when the cornices of the side slopes are higher than the front and rear slopes. A Dutch roof is most often erected when installed in the attic of a living room.
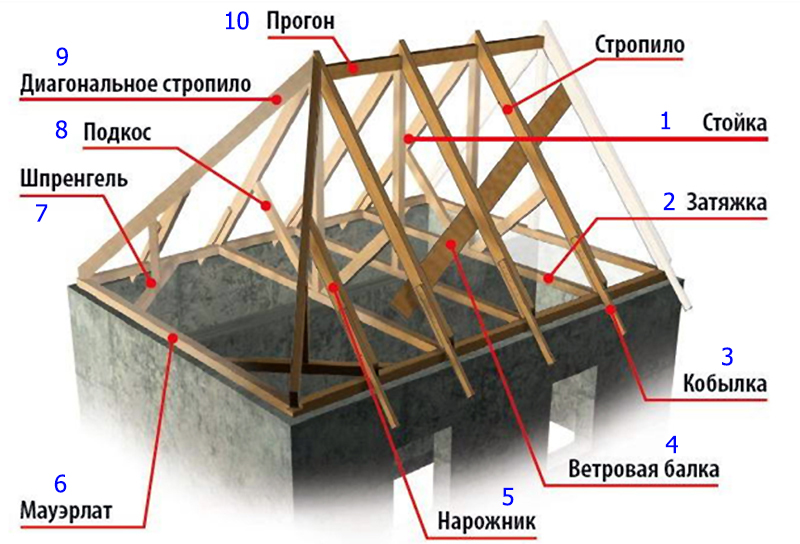
The usual hip roof consists of components and elements that are assembled into a single structure in one way, and serve as a frame for more complex structures. In the diagram below, the hip structure consists of the following elements:
- The corner rafter (position No. 1) is always installed at a smaller angle than the intermediate rafters. For intermediate and corner rafters on the sides of the roof, use a board measuring 50x15 cm;
- Short rafter beams (position No. 2) are installed on the corner rafters. The angle of inclination should be the same as the inclination of the intermediate rafters;
- The cross-section of the ridge (position No. 3) should be the same as that of the rafters themselves;
- The central intermediate rafters (position No. 4) are attached to the corners of the ridge beam on three sides;
- Intermediate rafters (position No. 5) are beams that connect the ridge beam and the trim boards laid along the top of the roof. The trim boards form a cornice.

More detailed diagram roof devices with hip elements– in the figure below:
- The ridge is supported by a stand (position No. 1), which is attached at the junction of the opposing pair of rafters and the ridge beam. Posts are not always present in the roof design, but their counterparts must be present in the design;
- Tightening (ceiling beam, position No. 2) – a beam for fastening the rafters together;
- The filly (position No. 3) serves to continue the overhang; the filly beam is attached to the rafters. An overhang is needed to protect the walls of the house from rain and snow;
- The wind beam (position No. 4) strengthens the rafters on the windward side of the house. This beam can be installed on several sides;
- The frame (short rafter, position No. 5) attach the frame to the corner rafter beam;
- Mauerlat (position No. 6) – powerful wooden beam, which serves as the basis of any roof;
- Sprengel (position No. 7) strengthens the roof structure and reduces the load on the walls. Mounted diagonally between the corners of the house on the mauerlat;
- The struts (position No. 8) can be attached to the rafters at different angles. Their number and angle of attachment depend on the presence or absence of an attic;
- Diagonal (side rafters, position No. 9) are installed from one or both ends of the roof;
- The purlin (position No. 10) is the step of attaching the rafters.
How to install a hip structure
The roof with hips must be assembled in a certain sequence:
- The first stage is the development of a scheme;
- According to the diagram, the parameters of the roof are calculated - all its dimensions will depend on the width of the dimensions of the external and internal load-bearing walls of the house;
- Tools and materials are prepared;
- Laying a layer of waterproofing on the walls for installation of rafters;
- The attachment points of the rafters on the Mauerlat are marked;
- Installation of rafters and other roof elements according to the diagram;
- Roof decking.
After processing the lumber and drying it, you can begin to install the roof - attach the Mauerlat beams to the load-bearing walls of the house. The Mauerlat is laid on the waterproofing, then the installation and fastening points of the rafter beams are marked on it. The Mauerlat beams are laid on the upper surface of the walls or on a beam that is pre-attached slightly below the walls. 
The racks are attached to the floor beam, in the upper part - to the ridge. Also, the central rafters at the ends of the roof are attached to the ridge beam. Markings are made for the installation of intermediate beams along the front and rear slopes of the roof, after which the rafters are attached, connecting the corners of the house and the ridge diagonally. It may be necessary to install reinforcing posts in this place. 
Short rafter beams or frames are attached to these rafters with the same spacing as the intermediate beams. In this fragment of the roof, trusses, wind beams, fillets and struts can be used for reinforcement (depending on the roof layout).
The roof is laid in the following sequence:
- A vapor barrier is attached to the rafters;
- The sheathing is attached to the vapor barrier;
- Insulation is placed in the space between the slats and covered with a windproof film;
- The counter-lattice is attached.
It is worth noting that the designs of private houses with a hip roof are quite varied. They may have various parameters And functionality. It all depends on the planning criteria. The hip roof is of particular importance in this building. Let's try to figure it out what it is.
Project of a house with a hip roof
This type of roofing structure is considered the most popular today. The hip roof is different:
- practicality;
- reliability;
- durability.
Quite often this roof is used to furnish an attic. This is due to the fact that its slopes are designed for excellent placement of roof windows.
The hip is the sloping edge of the roof. It is formed as a result of the correct connection of two sides of the structure, an external angle is obtained. The hips go from the eaves of the roof to its ridge.
Types of hip roof
She has different kinds and maybe:
- hipped.
Note. Some may have the impression that almost every roof can be a hip roof. This is wrong. There are various designs for such structures, but none of them provide for broken corners and surfaces.

What buildings can have a hip roof?
are made up with a roof structure. This makes it possible to correctly calculate the exact amount of materials for the construction process. The approximate mass of the entire structure is also determined, on which the depth of the foundation depends.Mostly the houses are one-story. All this is due to the fact that the roof structure can be easily converted into an attic. This is due to the large amount of usable space on the hip roof.
A two-story house with such a roof is also often found. Only in it the functionality of the structure will not be fully used, since there is already quite a lot a large number of usable space.
All this is due to the fact that the roofing structure will ultimately be expensive and can be replaced with cheaper types.
 Project one-story house with hip roof
 Characteristics of a hip roof
Firstly, there are different types of such roofs. Depending on them, the useful area of the structure can easily be converted into a residential one, due to this the house only expands its useful area. Secondly, it is quite easy to install windows on the hips, since they do not have a large angle of inclination. Thirdly, the roof itself is low and the appearance of the entire house does not suffer from this.
Thanks to the wide range of roofing materials, the cladding of such a structure can be done with your own hands not only with high quality, but also in an original way. This will make the common one even more unusual.
Main types of hip roof
It cannot be said that the types of such designs are diverse. The main difference between the roof lies in the number of hips. There are two types of roofing:

The first option is characterized by a certain arrangement of inclined parts. If the hips on the slopes do not reach the end of the eaves and break off, then this type is a half-hip roof.
For most cottages that have a wooden roof frame, this type of roof is the most the best option. The structure is attached to special braces. If, however, then the installation of the roof will be a little more complicated with reinforcements in the form wooden planks on the frame. An accurate calculation of dimensions and material is carried out in advance.
The most popular second type of hip roof is “Danish”. This design is characterized by the presence of:
- hip rafters;
- special boards for support;
- reinforcing crossbars with liner;
- simple rafters;
- spacers.
Also executed top harness walls before installing the roof.

All these parameters are needed in order to make the correct calculation of a gable hip roof. For a three-slope you will need to take into account:
- racks;
- rafters for the fronts;
- floor beams;
- special ridge runs;
- various puffs.
The last type of roofing structure is of particular interest for creating houses in a unique architectural style. You can also build rectilinear domes. All this looks very unusual, and such a hip roof, made with your own hands, always attracts attention and differs from neighboring houses.
What to consider when designing a hip roof
Since the types of such roofing structures are quite diverse, it is necessary to initially decide what exact shape the roof will be, and how many slopes are needed for a more attractive appearance dwellings.
 Another option for a house project with a hip roof
 All this affects overall design private houses.
Then the design is calculated. It takes into account:
- roof height;
- its width;
- hip angle.
In this case, the roof base can be:
- square;
- rectangular.
Why do you need a preliminary calculation of the roof of a house? Based on the data obtained, it will be possible to accurately determine the quantity necessary materials for roofing and planning correct location each element.
Although the types of hip roof may be different, you still need to follow the rules for constructing the structure.
Features of the hip roof rafter system
To make a hip roof with your own hands, you need to know some of the planning features of this component of any house.
The basis for creating such a design is wooden frame. It is for this reason that you need to select high-quality wood, which gives the roof a long service life.

It is necessary to make the correct calculation of the structure frame. In this process, it is worth considering that the steeper the roof slope, the greater the number of construction and finishing materials will be needed to improve the roof of the house.
Important. An accurate calculation of the entire system will help get rid of some unpleasant situations during the construction process and will significantly extend the life of the roof.
Immediately produced rafter frame for houses. It consists of:
- support belt;
- central beam;
- vertical posts with slopes;
- ridge beam or purlin.
The following rafters are also used:
- hip rafter legs (inclined parts);
- ordinary rafter legs;
- rafter purlins;
- rafters;
- racks;
- lying down;
- struts.
The support belt for the construction of the roof structure of private houses is otherwise called a Mauerlat.
Construction of the support belt
Initially, you need to make an accurate calculation of the materials for this. The work uses timber, which is laid along the outer walls of the house. It is considered a support for hip rafters in installation. As a rule, coniferous timber is most often used. Although metal is often used instead of wood. More precisely, a metal channel. In some cases - an I-beam.
At the same time, the house must have a high strength index so that it can withstand significant loads of the roof structure.
The main function of this support belt is to connect the roof with the walls of the house. A load calculation is made for each square meter load-bearing walls and on each side of the roof.
Important. The transverse dimensions of the Mauerlat should be 10x10 cm. During construction big houses– 25x25 cm.

Previously, a reinforcing base is made along the entire perimeter of the building at the end of the stone walls.
This creates a flat surface for correct installation support belt. The process goes like this:
- On brick wall formwork is constructed at the top.
- The fittings are laid out in it, which are tied together.
- Then it all gets poured in concrete mortar, which is prepared using purified sand, Portland cement and water. Proportions: 1 bucket of cement to 2-3 buckets of sand.
This preparatory support must dry. This will take several weeks.
Advice. In such work, it is necessary to maintain the exact horizontality of the surface. Otherwise, there may be deformations in the roofing structure of houses during the construction process.
 Hip roof installation process
 It is worth considering that special metal pins must come out of such a concrete belt. Their length is less than 10 cm. As soon as the Mauerlat is attached to them, they should stick out from it by a few centimeters.
The surface of the dried concrete is coated with bitumen. Then roofing material is applied to it. It will protect the wood of the frame from rotting processes. Then holes are drilled in the bars and placed on the studs.
Wood must be pre-treated with an antiseptic and various means that protect it from fire and moisture. Because of this, the house will be endowed with durability and safety in operation.
It is necessary to take into account that such a support belt can be made both along the entire perimeter of the building and in its individual parts: in the places where the rafter legs are installed.
 Drawing of rafter leg support
 Home is an integral part of any person’s life. And it doesn't matter where you live own home or rent.
Or maybe you are currently working on it?
For those who decide to build a house themselves, it is important to remember that Special attention should be given to the roof.
This structural element is of particular importance, both from an aesthetic and practical point of view. After all, he will have to protect the entire building from various weather conditions:
- Rain;
- Snow;
- Hail;
- Wind;
- Sun.
Therefore, before construction, it is necessary to think in advance what shape the roof will have? What roofing material is best to cover it with? Carry out the necessary work before starting construction so that no problems arise during the overlap period.
It is better to select the shape based on the climate of the region where you live. This determines how effective the protection of the entire building will be at different times of the year.
They are divided into:
- Flat;
- Pitched.
Each of them has its own advantages and disadvantages.
But in regions with frequent precipitation in the form of rain, snow or hail, it is best to install pitched options.
Thanks to the angle of inclination, precipitation does not accumulate on the plane, but flows down the slopes into special whirlpools. The tilt angles are selected according to the wishes of the developer, starting from 10 degrees.
They are also divided into several types:
- Steep angle of the gable surface;
- The flat shape of the gable plane;
- A broken line with the location of the attic;
- Hip with four sloped sides;
- Half-hip;
- In the form of a tent with four slopes.
When choosing a suitable form, it is necessary to take into account a number of factors: how heavy the rainfall is in your area; whether the winds are blowing and especially how strong and for how long, this is important for choosing a suitable angle of inclination.

Types of roofs
Hip roof - what is it and what types are there?
 The main difference between a hip roof and all others is the presence of four slopes. consists of two large parts, which are shaped like a trapezoid, and the small ones are triangle-shaped.
This species was named because of its triangular slopes located on the front side.
To build such a structure, a double screed and beams are required. It is also necessary to arrange for each slope so that moisture does not damage the walls of the house.
When planning the design of drains, you should think about where precipitation will flow; some combine drains with the general sewer system. But here It is important to consider the amount of precipitation in your area.
Hip roofing has many advantages, the main one being wind protection against strong gusts. This design is less subject to deformation and lasts much longer than a gable roof.
- For – 21 degrees;
- For – 13 degrees;
- For – 10 degrees;
- – 6 degrees;
- For – 12 degrees, it is necessary to carry out good sealing of the joints;
- For roll material, if it is laid in two layers - 15 degrees, a three-layer overlap requires 2-5 degrees;
- For membrane roofing Any angle will do.
Once you have decided on the angle, you should start calculating the gap between rafter legs. Distance depends on gravity roofing material– from 60 cm to 1 m. Afterwards the amount of material for covering is calculated.
When proceeding directly to installation, you should adhere to some rules:
- First you definitely need mark all the details future design.
- The structural parts must be fastened in a certain sequence.
- Afterwards proceed to connecting all the parts into a single design, using metal corners or plates.
- When installing, it is better to use solid rafters for structural strength. If the roof is too long, double beams should be used.
As advice:
- The structure will be stronger and more durable if well-dried coniferous beams are used.
- You will avoid inaccuracies in measurements if you use a measuring rod rather than a tape measure.
- All beams for the structure must be chosen of the same thickness.
- Take all measurements along the bottom edge of the rafters.
Pay special attention when calculating and designing a hip roof. If you doubt own strength, then consult with professionals.

Hip roof device

Tilt angles
Hip roof with attic - features
 When building a house, an attic is not so much an attribute of practicality as of aesthetics. It's nice to admire the view from the attic windows.
Designing an attic, if you have chosen the hip roof option, is quite complicated. That's why you should carefully carry out preliminary calculations on the drawing.
Markings for the future installation of a hip roof should be made along the lower part, where the attic floors will be located. The center is marked on the end side, this is where the ridge beam will pass.
The main difference in the design is the placement of the hip rafters. They do not tighten with puffs, as is done, for example, when building a gable roof.
That's why the load will fall on the ridge beam, diagonal and row rafter legs rest on it.
Building a hip roof with an attic will add sophistication to your home, but will require serious energy costs, not to mention money.

Hip roof with attic
Hip roof with non-residential attic - features
If you don't plan to settle down attic space at home, this will simplify the roof structure. Since the hip roof has a gentle slope, short rafters can be used for a structure with a smaller cross-section, which will significantly save the construction budget.
A residential attic will require a revision of the design, including changing the shape of the roof or significantly raising it beam floor. A similar solution can be used to build large cottage houses, where the dimensions of the structure allow the attic to be equipped as a room.

Hip roof with attic
Examples of house projects
For the future developer to choose from are offered different variants hip roofs:
- In the form of a tent- the simplest of all designs. It looks like a pyramid and does not require additional costs and does not cause design problems.
- With trapezoidal sides roofs. This shape suits longhouses.
- Semi-oval shape. Quite complex, both in design and financial terms. It requires additional costs. But in terms of beauty and aesthetics it is significantly higher than others.
Projects one-story houses With hipped roof:

Project wooden house with hipped roof

Project of a house with a metal roof
Conclusion
If difficulties do not frighten you, then you can start building a hip roof yourself. Thanks to the positive aspects, this roof shape will give you comfort and convenience, as well as attractiveness.