We don’t come to the dacha to sit within four walls. summer house. Only bad weather or extreme heat can force a city dweller to hide under a roof.
Is it possible to do so in order to stay under a roof and still breathe fresh air?
The answer to this question is clear - it is possible if you build a light gazebo. This structure will not only decorate the landscape suburban area, but will also become a favorite place for relaxation and communication.
Today there are quite a few ready-made options light country shelters, but it is much more interesting for a home craftsman to build a gazebo on his own.
The family budget will only benefit from such a decision, because the cost of a home-made building is on average 40-50% lower than purchasing a finished structure.
Design and material options
Wood has been and remains the traditional material for summerhouses. It is easy to process, extremely decorative, and with high-quality antiseptic impregnation and varnishing, it is very durable. Price wooden structure is minimal, and the time for its construction, even with leisurely work, does not exceed 2-3 days.

Another popular material for lightweight shelters is metal. If the frame is made of steel angle or profile pipe, then your gazebo will be used not only by your grandchildren, but also by your great-grandchildren.

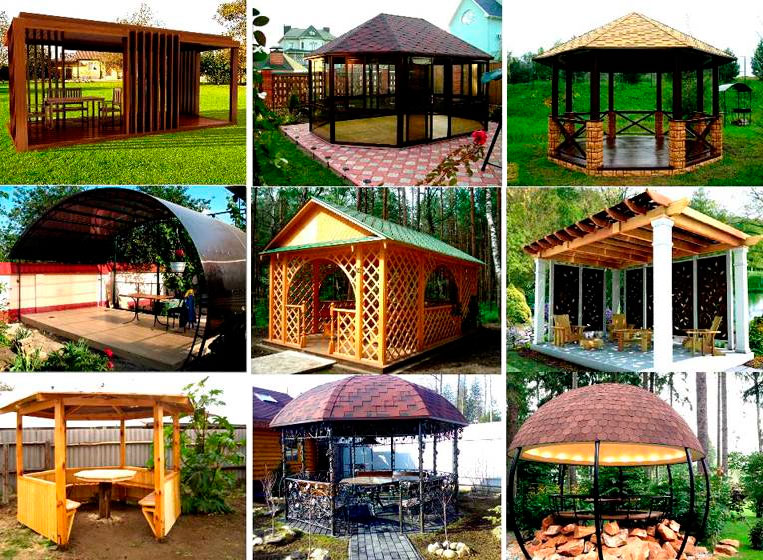
There are an incredible variety of options for country shelters. We will not cover the immensity, but will answer one question in detail - how to build the most a simple gazebo quickly and inexpensively.
To do this, you can sacrifice a wooden floor and a supporting frame made of timber, which is placed under it. Concrete screed is a cheap and easy to implement base option for a gazebo.
Before starting work you need to do detailed drawing, then select for construction appropriate place on summer cottage. Then we will have to cut the vegetation layer to a depth of 10-15 cm, while simultaneously leveling the area for concreting.
Important point! We will not use metal for the frame. Our simple gazebo will be wooden. The roof of the structure will be supported by four wooden posts.
As practice shows, insulating a wooden post with roofing felt or bitumen when it is in direct contact with concrete is ineffective. After 3-5 years, the base still rots, and the gazebo can overturn from a strong wind. Therefore, during construction, it is necessary to immediately cut off the wood from the concrete.
To do this, at the concreting stage foundation slab you need to bury pieces of round or square pipes strictly vertically in the ground suitable size so that 20-30 cm of metal comes out of the concrete. By drilling four holes in them for self-tapping screws, we will get “eternal supports” for wooden posts on which the roof will rest.

Lightweight summerhouse does not require the construction of brick fences to protect against strong winds. A simple fence made of eurolining 80-90 cm high, mounted on two longitudinal bars, will protect your back from blowing air and burning sun rays. Such a fence is fixed to wooden posts using ordinary wood screws.
Instead of eurolining, you can also use cellular polycarbonate for fencing. It transmits light well, is easily attached to the bars, and is not afraid of moisture and heat.

For the roof we use wooden beams with a section of 50x50 mm. A gable tent frame is assembled from it, which is mounted on a horizontal strapping beam. You can cover the roof with any sheet material (metal tiles, polycarbonate, ondulin or corrugated slate).
When drawing a gazebo, calculate its dimensions and make the roof width such that roofing material didn't have to cut. To do this, measure the overall dimensions of the sheet used and give a small overlap for the end and side overhangs of the roof.
For example, for 8-wave asbestos-cement slate, the length of the gazebo should be a multiple of 1 meter, and the length of the slope should be 1.75 meters. If several sheets of slate are laid along the slope, then the length of each is reduced by 10-15 cm to ensure overlap.

When considering other material options for the construction of lightweight shelters, polycarbonate should be especially noted. It can be used to make not only a fence, but also a roof. This lightweight and impact-resistant plastic combines optimally with the metal profile.
The result is an openwork translucent structure, especially appropriate in the shade of trees. You should not use slate or other light-proof materials here. The translucent roof and dense foliage will create pleasant partial shade.
It should be noted that this also applies to simple-to-execute designs. All it needs is several tens of meters of steel angle with a section of 50x50 mm, a steel strip, one standard polycarbonate sheet 2.1x6 meters and several planed boards for making a table and benches.

Having concreted 4 corner posts in the foundation, they need to be welded with a corner section of 25x25 mm. Two corner belts are welded or screwed onto self-tapping screws in the middle part of the racks and one is run along the top to create a supporting part of the roof.
Polycarbonate bends well, so it’s beautiful arched roof for a gazebo you can do it without any problems. To do this, you need to weld two steel strips 50 mm wide, bent in the form of an arch, to the racks and attach three longitudinal strips of metal to them for attaching a polycarbonate sheet.

Interesting option wooden gazebo with polycarbonate roof
The roof that covers the summer gazebo for the dacha can be made of bitumen shingles. In this case, you will have to buy several sheets of OSB, which will become the basis for this material.

Wood-oriented board, even with a thickness of 10-12 mm, is very strong and rigid. Therefore, you won’t have to make a spatial frame out of wood for it. It is enough just to attach it well to the strapping beam of the racks, and on the ridge to one of the sheets from below, attach a block with a cross-section of 5x5 cm to fix the end of the second OSB sheet.

As we have already noted, the simplest garden gazebo does not have a frame frame. The foundation and floor for it is a concrete screed reinforced with steel mesh. You can safely place a barbecue on such a surface without fear that falling coal will set the floor on fire. If the shelter is planned to be used in winter time, then it is better to make the floor wooden and raise the foundation higher.
Columnar is inexpensive and easy to build. In order not to go beyond a modest budget, you can use ordinary red brick or natural flagstone. Having dug shallow (up to 40 cm) square holes around the perimeter, posts are placed in them on the solution. You need to install anchor bolts 20 cm long with threads on the free end into the masonry.

A simple support frame made of wooden beam 50x100 mm. After laying antiseptic over it floorboard, we will get a warm floor that will be protected from snow high foundation. Three walls of the winter gazebo can be made of cellular polycarbonate.
Having done inside open hearth with an exhaust umbrella, we will get a comfortable picnic room. You can be in it even in slight frost without feeling discomfort.
Useful video
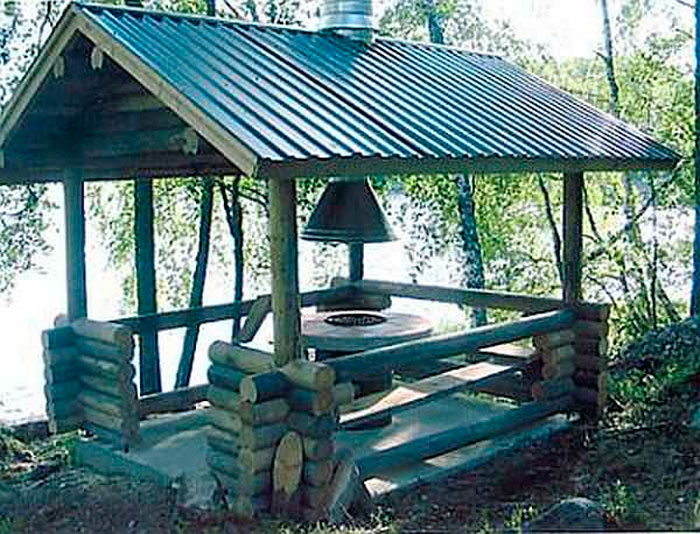
Almost all owners of dachas or private houses set up a wooden gazebo in their yard, where you can sit in summer time and relax. If you make a permanent gazebo of medium size, then you can actually install a barbecue inside it. Then here you can not just relax, but organize any celebration with your family or friends. If it is also closed on all sides, then you can spend time here in winter, especially since the grill will serve as an additional source of heat.
The decision on which gazebo is best to build is made by the owner of a summer house or private house based on his financial capabilities. In this regard, most often you can see fairly simple designs made by yourself.
The article is aimed at helping owners of summer cottages and private farms build some kind of gazebo, depending on the available capabilities.
There are summer gazebos, open-type gazebos and gazebos closed type, all-season. In addition, there are combined options, when the gazebo is opened in the summer, and with the arrival of cold weather it is insulated. But these are intermediate options that deserve attention. As a rule, such options are somewhat cheaper than completely closed ones, but they take away some of the precious time for manipulation.
Gazebos with and without floors
There are gazebos with a floor, as well as gazebos mounted on open area or a site where a concrete screed is made or laid paving slabs. If you just build a gazebo on the ground, especially a wooden one, then you need to take measures to protect wooden structures, especially in places that are in contact with the ground. If the gazebo is made of metal, you will have to protect it from rust.
 A wooden gazebo without a floor, made of wood. It has one feature: the roof is quadrangular, and the gazebo itself has beveled corners.
 Building a gazebo with a floor involves installing a foundation. Basically, they are limited to a columnar foundation, which is made of brick or rubble, poured with concrete, or mounted on foundation blocks. Alternatively, you can use large stones (boulders) and support the entire structure on them, if available. This foundation is suitable for the lungs, frame buildings made of wood or metal. If the building is capital, made of brick, then it is unlikely to be limited to a columnar foundation: you will have to pour a concrete strip foundation, albeit in a simplified version. It is enough to deepen the foundation by 20-30 cm.
 A gazebo made of wood, but with a wooden floor, mounted on supports.
 To lay tiles in the gazebo, you will have to pour the floor with concrete, but first insulate the floor with foam plastic, for example, and also lay a layer of waterproofing. After this, you can lay tiles, and frost-resistant floor tiles. At the same time, you should make sure that the floor extends 50 centimeters beyond the gazebo and these 50 cm should be laid out at a slope so that moisture does not remain on the tiles. If the gazebo is not closed, then all the tiles should have a slope. If moisture does not linger on the tiles, the tiles will last quite a long time.
Materials used

The following materials are suitable for frame buildings of this type:
- A wooden beam or round timber of small diameter.
- Steel profile pipes.
- PVC pipes.
Of these three materials, only the last does not require additional protection. Polymer materials do not rot and are not afraid of both high and low temperatures. Therefore, such structures can withstand winter quite easily. The only thing that is accompanied by a certain complexity is the selection of PVC pipes for making the frame, since they do not have such high strength as wooden beams or metal pipes. IN in this case, you will have to decide on the design of the gazebo so that the installed furniture does not load the PVC structure, and the barbecue will have to be installed away from PVC pipes.
 PVC pipes can serve not only as a frame, but also act as a decorative finish.
 In order for a wooden gazebo to delight others with its appearance for a long time, you will have to treat the wood with a protective compound more than once.
As an option, you can use impregnations such as SENEZH or ESTATE. Reviews about these protective compounds are not bad. In addition, this manufacturer supplies the market with coloring compounds.
If the frame of the gazebo is made of metal, it should also be protected from atmospheric influences. To begin with, the pipes are primed, and then the welding areas are treated with a primer. Although this option is not optimal: it is not at all difficult to coat an already welded structure with a primer. If on metal elements If rust is detected, it is better to clean it off with sandpaper. This approach will allow you to maintain the acceptable appearance of the gazebo frame for a long time, which means that it will last a long time.
 Gazebo made of plastic. Nothing to do with the environment, but there is no need for additional treatment against fungi or rust.
 You can sheathe a gazebo with any material, but wood is considered the most popular: after all, natural material. The materials used for cladding are processed boards, blockhouses, clapboards (wooden), thin round timber, as well as pallets, which are disassembled, the boards are processed (sanded) and the lower part of the gazebo is sewn up. It takes a lot of time, but it's very economical. In addition, such wood is quite dry and after additional protection can last a long time.
Gazebos of any design can be sheathed with the following materials:
- Polycarbonate, but this will be quite expensive.
- Corrugated sheeting, somewhat cheaper, but not very comfortable.
- Tempered glass is, well, very expensive.
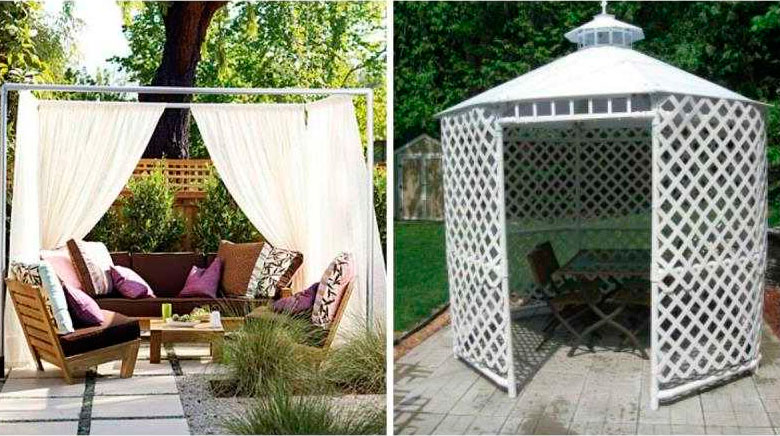
- Ordinary fabric, which is very economical, but not very modern.
- Transparent PVC film.
- Bamboo, expensive, but stylish.
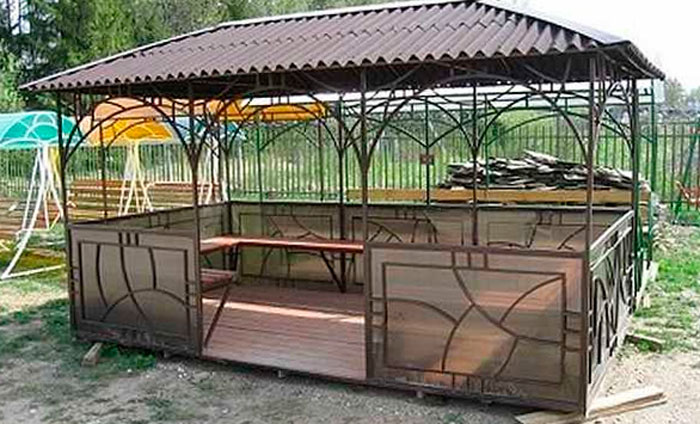 A gazebo made of metal combined with translucent polycarbonate cladding.
Frameless gazebo options
Frameless gazebos are capital buildings on strip foundation, lined with brick or foam block, lined on the outside decorative tiles or artificial stone. Moreover, building options can have all the walls up to the ceiling, or several main walls (for example, two), while the rest of the gap(s) remains open. Such designs require large capital investments. To build them, it is better to hire craftsmen or seek help from a construction company. If you do it yourself, the construction of the gazebo may take an indefinite period of time.
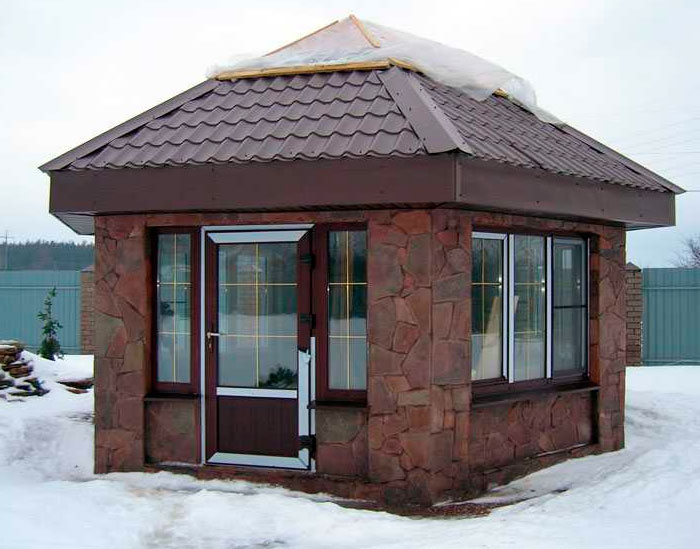 A capital gazebo, trimmed with wild stone, in combination with glazing. Both brick and other modern materials can be used as the main building material.
 If you plan to build a gazebo made of brick, then it is better to hire good masons to lay out the frame of the gazebo with high quality. Then, you may not have to spend additional money on finishing the outside of the building. Building a gazebo from foam block will require exterior finishing. There are many finishing options. In this case, you will first have to level the walls and only then start finishing. Since capital buildings are intended for use in winter, they must be warm. Alternatively, you can build it outside wooden frame, insulate with ursa and cover with siding.
Roof structure
The design of the roof depends entirely on how complex the shape of the gazebo is. If the gazebo is rectangular, then the roof structure will be quite simple: single slope option, gable or four-slope. Such forms of gazebos are also considered one of the simplest, requiring a minimum of time and money. The process of building a single-slope, double-slope or hipped roof, almost identical, technically.
 Rectangular gazebo made of round wood, equipped with a gable roof.
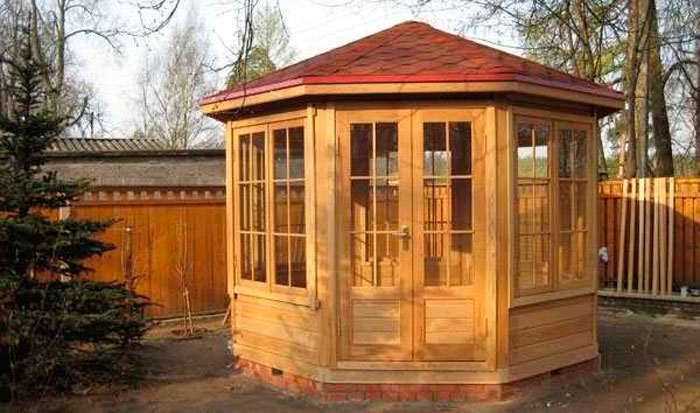
 With more complex forms of gazebos, the process of building a roof becomes more complicated. If the gazebo is pentagonal, hexagonal or octagonal, then the most suitable roof option is a tent-shaped roof (tent roof). In technical terms, this is the most complex designs, because you have to think about how to connect all the rafters at one central point.
 A dome-shaped roof is technically difficult to implement. If you have no experience working with wood, it is better to refuse this option.
 Availability of modern building materials, including roofing ones, allows you to make the roof generally round, without any edges. In this case, you need to be able to work with metal pipes and welding. The pipes are bent according to a certain pattern and the sheathing is attached to them. It is desirable that the sheathing be continuous. Flexible roofing material is installed on top of the sheathing.
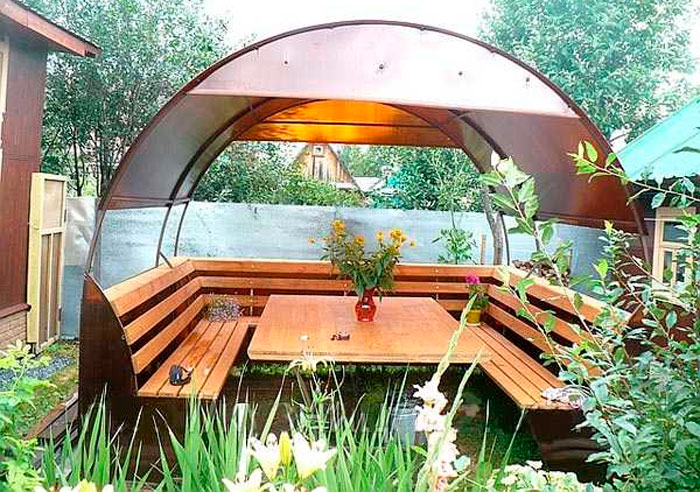 The simplest version of a garden gazebo: two curved pipes to which polycarbonate is attached.
 Simple designs of gazebos, especially recently, are very popular. Some summer residents set up gazebos under the same roof as their house. They are usually called verandas. In fact, this is also a simple and affordable option, with a minimum of costs.
There are a huge variety of gazebo designs, so it’s simply unrealistic to talk about them all. Moreover, each of them is the result of hard work and broad imagination.
How to make a gazebo with your own hands
It just so happens that most often they build gazebos with their own hands from wood. This is due to the fact that working with wood does not require special tools. The second place is occupied by metal gazebos, but their construction requires skills in working with metal. It is very rare to see gazebos made from other materials. This is associated with some difficulties, as well as increased costs, which the family budget cannot support.
If a gazebo is built from wood, first of all it will have to be treated with preparations that protect the wood from bacteria and fire. Work can begin after the impregnation has completely dried. Firstly, this is necessary for quality, and secondly, it is problematic (inconvenient) to work with wood that has not yet dried.
Availability of drawing
The presence of a drawing with dimensions significantly simplifies the process of building any structure, and a garden gazebo is no exception, despite its small size. Without a drawing, it is very easy to get confused in the parts being manufactured, although there are not many of them at all.
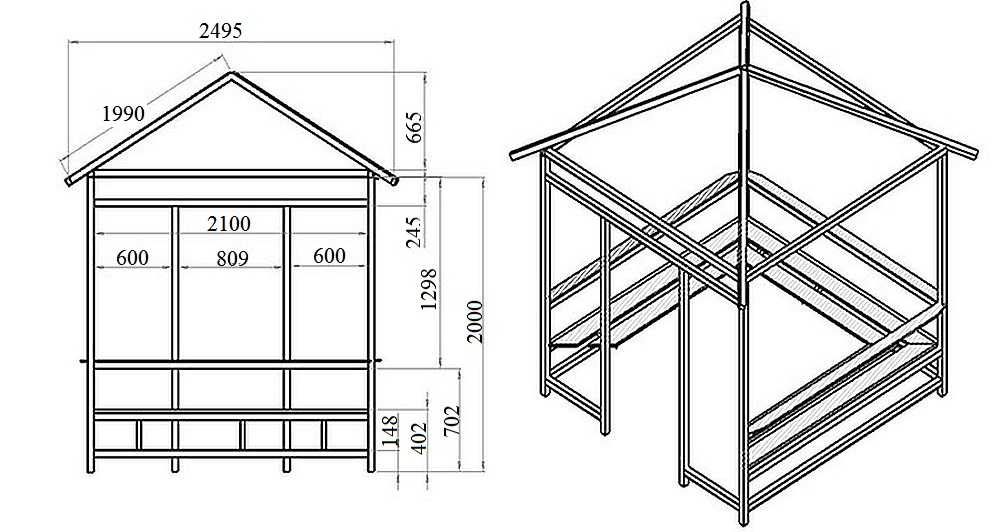
The figure below shows two options for gazebos: one of gable roof, and the other with a 4-slope roof, although both gazebos are 4-slope.
Step-by-step instructions with the presented photo
All work begins with preparing the site for the gazebo. As a rule, a certain ball of soil is removed along with the fertile layer. This is necessary so that in the future this organic matter does not rot under the floor of the gazebo. If the soil is sandy or sandy loam, then construction waste, crushed stone, broken brick, etc. are poured into the dug pit, after which everything is thoroughly compacted. After this, a layer of sand is poured on top. If the soil is clayey and there are problems with water drainage, then it is better to pour a layer of clay into the pit and compact it. If the hole is filled with something else, then moisture will accumulate in it. Under the influence of heat, the water will begin to emit bad smell, which is completely unnecessary.
Arrangement of the foundation and lower trim
The easiest way is to install it on a prepared pillow concrete blocks so as not to delay the construction of the gazebo. If you lay out brick columns, it will take a lot of time (not only work is taken into account here, but also the time to strengthen them). The distance between blocks is selected from 1.5 to 2 meters. If the gazebo is built from wooden beams 100x100 mm, then the distance is chosen to be 1.5 meters, and if from a profile pipe 60x60 mm, then 2 meters is enough.
The supports must be aligned in the same plane. To check this, you will have to use a level and a long, straight rod. After this, waterproofing is laid on top of the columns (2 layers of roofing material or bitumen mastic). And only after this the lower trim bars are mounted. The beams are connected to each other using nails 150 mm long. To strengthen the frame, each connection is duplicated with powerful metal corners. Despite the fact that this is a summer gazebo, extra strength will never hurt, since the structure will quickly become loose under the influence of wind.
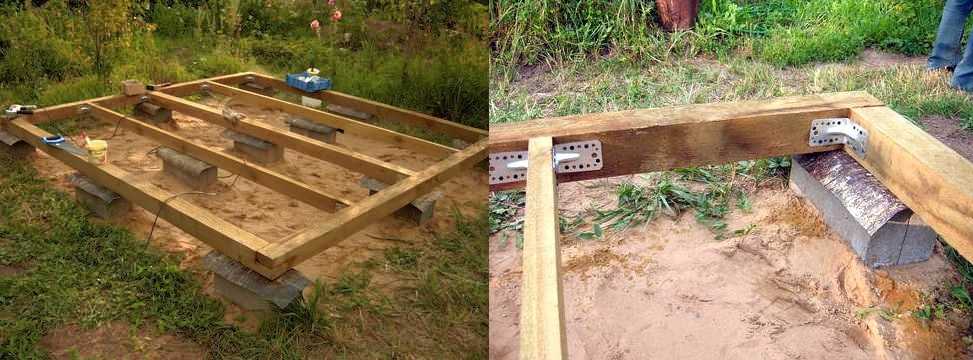 The lower harness is assembled.
 Installation of racks
The next stage is attaching the racks. Racks are provided at the corners of the gazebo, in the center, on both sides of the entrance, and also where the supports (foundation) are installed. The racks on top have the same strapping as on the bottom.
Installation of racks is carried out strictly vertically, with control of this process at the building level. Many argue that building levels have a large error. This may be true, but for the construction of a garden gazebo the error does not matter much. In addition, when purchasing a level, it is advisable to check it. Alternatively, you can use a regular plumb line, but it is very difficult to use alone. One person should use the plumb bob and the other person should attach the posts. Using a building level, you can do without outside help.
Fix the position of the racks with jibs. In the future, having fixed and secured everything thoroughly, the jibs can be removed if they interfere. If the lower part of the gazebo is not transparent, then the jibs can be left. They can simply be permanently and reliably secured using metal corners. At the same time, it is advisable to check the racks for verticality each time.
 Two options for attaching racks with bevels. On the left are temporary jibs that are planned to be removed, and on the right are permanent ones that will be used in the future.
 Installation of the top trim and floor boards
After the racks are finally secured, they are also secured from above, mounting top harness. Technically, it looks the same as when installing the lower trim. For reliability, metal corners should be used. This is especially important if the structure does not have permanent jibs.
After the frame is almost assembled, begin laying the floor boards. They, like all wooden structures, are treated with antibacterial impregnation. For such purposes, Senezh or Senezh-Ultra impregnation is suitable. They differ from each other in that “Ultra” does not color the wood, but gives it a greenish tint. If the entire structure is covered with a dark stain, the greenish tint will disappear and remain unnoticeable.
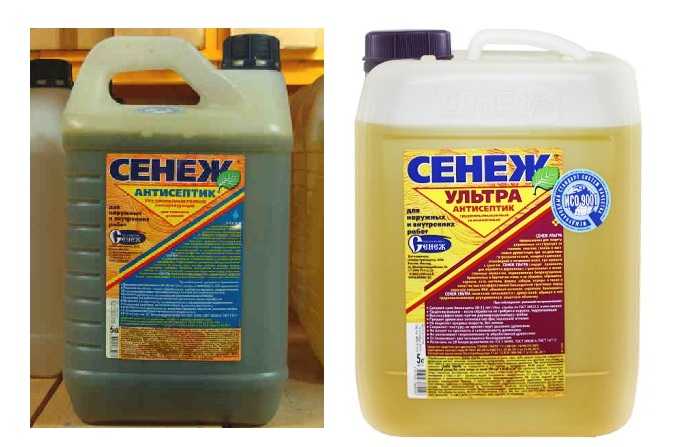 Means for impregnating wood that may come into contact with the ground.
 After the boards are secured with nails, it is better to paint the wooden floor, otherwise the wood will become dirty before construction is completed. It is better to paint outdoor wood with varnish or oil-based tinting paints. Moreover, these are not classic oil paints, but special compounds to protect wood from precipitation. The basis of these compositions is oil, to which protective elements and color pigments are added. As a result, the wood takes on a completely different shade, while maintaining its texture.
Strapping the structure in the middle of the frame
The middle frame binding, in most cases, is simply necessary, since the frame is divided into an upper and lower part, which is always (almost always) sewn up. It is better to secure the beams that need to be installed using metal corners or make recesses for them in the racks, up to 25 mm in size, if the thickness of the timber is 100x100 mm.
 Option for attaching the middle harness.
 After this, you can begin the final painting of the frame of the garden gazebo.
Roof arrangement
The next stage is assembly rafter system, as shown in the photo below. Rafters by appearance similar to triangles.
 Rafters (triangles) for arranging the roof.
 These elements are attached to the frame of the gazebo. Since there is no roof overhang, they are attached directly to the beam of the top trim. The triangles are installed vertically and secured with nails. To fix them in this position, you can use bevels.
If the structure of the gazebo has an overhang, then it is necessary to cut out seats in the rafters. The attachment points look like triangles.
 Options correct fastening rafters
 Of these two options, the first one is more suitable, since the roof is not large. In order not to adjust each rafter leg individually, it is better to use a template. To do this, you need to take a piece of regular board and cut out an opening. required size. This will not only simplify the task, but also provide the necessary accuracy. To make the work less of a burden, you can use a power tool, for example, a jigsaw.
Before final fastening of the rafters, be sure to check the correctness of their installation, both vertically and horizontally.
After the final and reliable fastening of the triangles, the sheathing is filled. The nature of the lathing depends on the nature of the roofing material. Soft types roofing materials require continuous sheathing. If it is slate or corrugated sheeting, then regular sheathing will do.
Decorative finishing
After arranging the roof, when the entire structure is closed from rain, they begin finishing the lower part.
 The gazebo with your own hands is ready.
 This design falls into the “simple, fast and cheap” category. Taking it as an example, you can experiment by doing something of your own with your own finishing elements. In the following example you can see how the gazebo, made according to the same design, has changed: the lower part is covered with a blockhouse painted in light tone. And the rest of the frame has a dark tone.
 This is another version of the same project.
 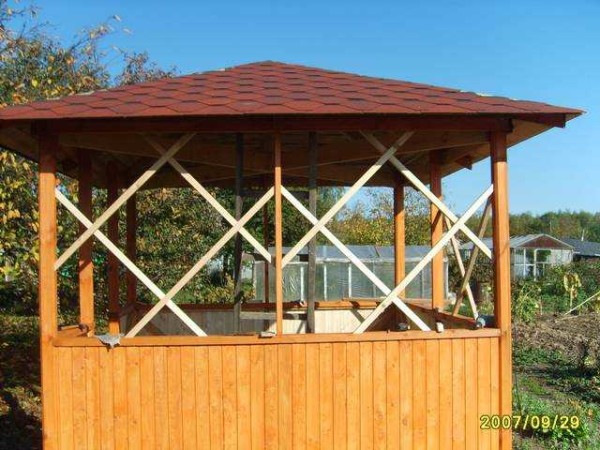 In the next photo, there is another option. Using this project as a basis, you can get many options.
 Below in the article are drawings with all dimensions. Below are interesting photos, but without drawings. There is hope that someone will use them.
Sketches of gazebos with drawings and dimensions
All dimensions indicated on the drawings can be increased or decreased to obtain the design required sizes. With a significant increase in size, the size of the wooden elements (section) should also be increased for the required strength. If everything is done correctly and in the right sequence, then you can count on a positive result.
Classic wooden gazebo
The project is almost the same, but some dimensions have been changed: the top point of the roof has been raised, making it seem lighter. The gazebo is quadrangular with a hip roof.
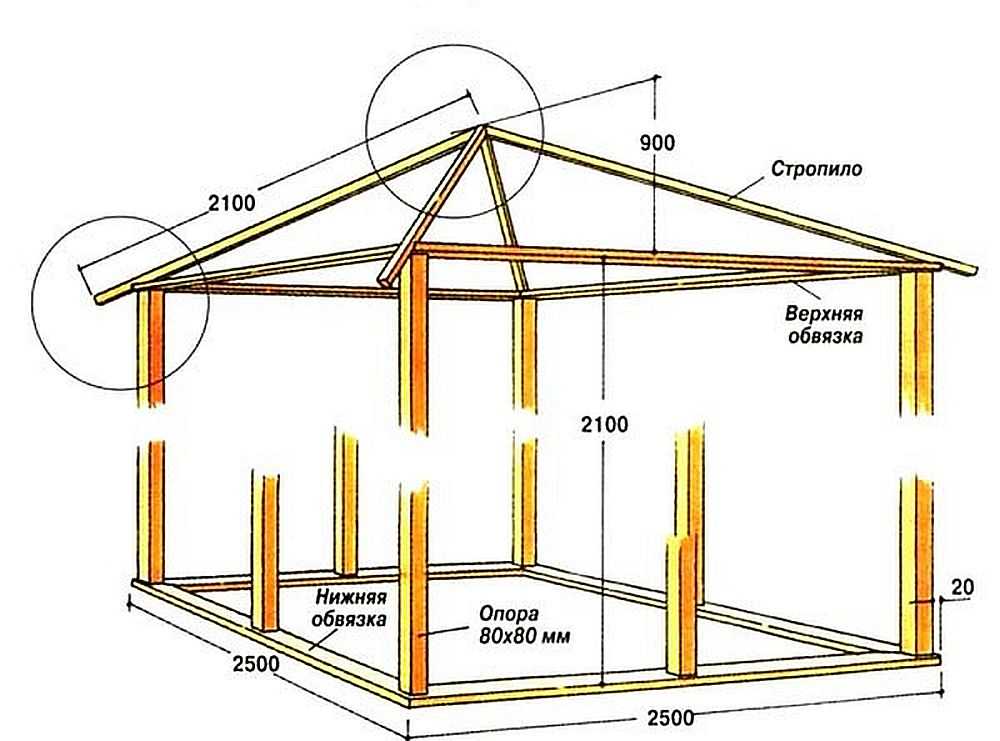 Regular square gazebo for a garden or cottage made of wood.
 The roof installation has problematic attachment points, indicated in the figure by circles. The picture below shows how to do this correctly.
 Options for fastening problem units when arranging a hip roof.
 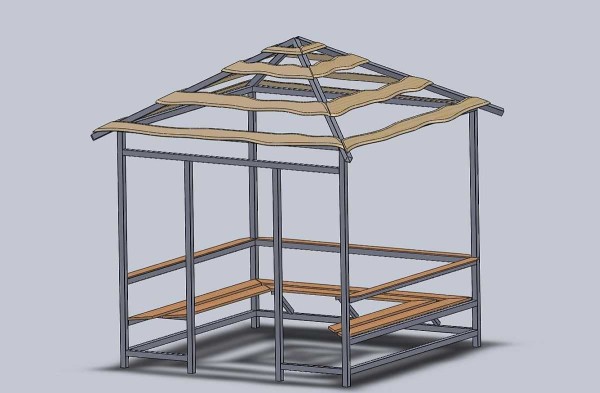 Option for distributing space in height and option for attaching the sheathing to the roof.
 Chinese style gazebo
All dimensions are indicated on the drawing, and the project includes marking for the foundation, installation of the rafter system, etc. The project is arranged in the form of a photo gallery.
We do not come to the dacha to sit within the four walls of a summer house. Only bad weather or extreme heat can force a city dweller to hide under a roof.
Is it possible to do so in order to stay under a roof and still breathe fresh air?
The answer to this question is clear - it is possible if you build a light gazebo.
This structure will not only decorate the landscape of a suburban area, but will also become a favorite place for relaxation and communication.
Today there are many ready-made options for lightweight summer cottage shelters, but building a simple gazebo with your own hands is much more interesting for a home craftsman.
The family budget will only benefit from such a decision, because the cost of self-building is on average 40-50% lower than purchasing a finished structure.
Design and material options
Wood has been and remains the traditional material for summerhouses. It is easy to process, extremely decorative, and with high-quality antiseptic impregnation and varnishing, it is very durable. The cost of a wooden structure is minimal, and the time for its construction, even with leisurely work, does not exceed 2-3 days.
Another popular material for lightweight shelters is metal. If the frame is made of a steel angle or profile pipe, then your gazebo will be used not only by your grandchildren, but also by your great-grandchildren.

There are an incredible variety of options for country shelters. We will not cover the vast, but will answer one question in detail - how to make the simplest gazebo quickly and inexpensively.
To do this, you can sacrifice a wooden floor and a supporting frame made of timber, which is placed under it. Concrete screed is a cheap and easy to implement base option for a gazebo.
Before starting work, you need to make a detailed drawing, and then choose a suitable place for construction on your summer cottage. Then we will have to cut the vegetation layer to a depth of 10-15 cm, while simultaneously leveling the area for concreting.
Important point! We will not use metal for the frame. Our simple gazebo will be wooden. The roof of the structure will be supported by four wooden posts.
As practice shows, insulating a wooden post with roofing felt or bitumen when it is in direct contact with concrete is ineffective. After 3-5 years, the base still rots, and the gazebo can overturn from a strong wind. Therefore, during construction, it is necessary to immediately cut off the wood from the concrete.
To do this, at the stage of concreting the foundation slab, you need to bury sections of a round or square pipe of a suitable size strictly vertically into the ground so that 20-30 cm of metal comes out of the concrete. By drilling four holes in them for self-tapping screws, we will get “eternal supports” for wooden posts on which the roof will rest.

A lightweight summerhouse does not require the construction of brick fences to protect from strong winds. A simple fence made of eurolining 80-90 cm high, mounted on two longitudinal bars, will protect your back from blowing air and burning sun rays. Such a fence is fixed to wooden posts using ordinary wood screws.
Instead of eurolining, you can also use cellular polycarbonate for fencing. It transmits light well, is easily attached to the bars, and is not afraid of moisture and heat.

For the roof we use wooden beams with a section of 50x50 mm. A gable tent frame is assembled from it, which is mounted on a horizontal strapping beam. You can cover the roof with any sheet material (metal tiles, polycarbonate, ondulin or corrugated slate).
When drawing a gazebo, calculate its dimensions and make the roof width such that the roofing material does not have to be cut. To do this, measure the overall dimensions of the sheet used and give a small overlap for the end and side overhangs of the roof.
For example, for 8-wave asbestos-cement slate, the length of the gazebo should be a multiple of 1 meter, and the length of the slope should be 1.75 meters. If several sheets of slate are laid along the slope, then the length of each is reduced by 10-15 cm to ensure overlap.

When considering other material options for the construction of lightweight shelters, polycarbonate should be especially noted. It can be used to make not only a fence, but also a roof. This lightweight and impact-resistant plastic combines optimally with the metal profile.
The result is an openwork translucent structure, especially appropriate in the shade of trees. You should not use slate or other light-proof materials here. The translucent roof and dense foliage will create pleasant partial shade.
It should be noted that a garden gazebo made of polycarbonate is also a simple-to-make structure. All it needs is several tens of meters of steel angle with a section of 50x50 mm, a steel strip, one standard polycarbonate sheet 2.1x6 meters and several planed boards for making a table and benches.

Having concreted 4 corner posts in the foundation, they need to be welded with a corner section of 25x25 mm. Two corner belts are welded or screwed onto self-tapping screws in the middle part of the racks and one is run along the top to create a supporting part of the roof.
Polycarbonate bends well, so you can make a beautiful arched roof for a gazebo without any problems. To do this, you need to weld two steel strips 50 mm wide, bent in the form of an arch, to the racks and attach three longitudinal strips of metal to them for attaching a polycarbonate sheet.

An interesting option for a wooden gazebo with a polycarbonate roof
The roof that covers the summer gazebo for the dacha can be made of bitumen shingles. In this case, you will have to buy several sheets of OSB, which will become the basis for this material.

Wood-oriented board, even with a thickness of 10-12 mm, is very strong and rigid. Therefore, you won’t have to make a spatial frame out of wood for it. It is enough just to attach it well to the strapping beam of the racks, and on the ridge to one of the sheets from below, attach a block with a cross-section of 5x5 cm to fix the end of the second OSB sheet.

As we have already noted, the simplest garden gazebo does not have a frame frame. The foundation and floor for it is a concrete screed reinforced with steel mesh. You can safely place a barbecue on such a surface without fear that falling coal will set the floor on fire. If the shelter is planned to be used in winter, then it is better to make the floor wooden and raise the foundation higher.
A columnar foundation for a gazebo is inexpensive and easy to construct. In order not to go beyond a modest budget, you can use ordinary red brick or natural flagstone. Having dug shallow (up to 40 cm) square holes around the perimeter of the gazebo, posts are placed in them on the mortar. You need to install anchor bolts 20 cm long with threads on the free end into the masonry.

A simple support frame made of wooden beams 50x100 mm is placed on the posts. By laying an antiseptic floorboard over it, we will get a warm floor, which will be protected from snow by a high foundation. Three walls of the winter gazebo can be made of cellular polycarbonate.
By making an open fireplace inside with an exhaust umbrella, we will get a comfortable room for a picnic. You can be in it even in slight frost without feeling discomfort.
One of the most popular options is structures with a frame made of steel angle or galvanized pipes. Build garden gazebo making your own from this material will be absolutely easy. The only thing is that you need to have a welding machine on hand.

Building a small, lightweight metal gazebo with your own hands is actually very simple.
Lightweight structures with a metal frame are usually installed in the garden near small country houses. Their walls or parapets can be wooden or polycarbonate. A device of this design will allow you to save a lot of money, since it is usually very inexpensive.
On a note: The exception in this regard is options with forged parapets and roof eaves. Such gazebos cost a lot and are usually installed in the courtyards of large residential buildings.To the advantages metal structures Among other things, we can include a variety of designs and lightness. Often the support for the frame is simply a frame welded at the bottom. Moving such a summer gazebo to another place on the site, if necessary, will be completely easy.

The metal structure can have a very beautiful unusual design
This variety has only two disadvantages. Firstly, metal rusts, and secondly, steel tends to get very hot in the sun.
Wooden buildings
Wooden gazebos are the most common type. Such a structure can be built on a timber frame. In this case, the walls are usually covered with boards. A frame gazebo is quite simple to construct and at the same time a beautiful and elegant design. You can build such a courtyard “house” both at the dacha and in the courtyard of a residential building.

The easiest way to build a garden gazebo is on a wooden frame
Homemade log gazebos are often erected near log buildings. Not bad, this thorough one massive option also looks good in concrete yards country cottages. A large cobblestone gazebo can look no less impressive.

In the courtyard of a large cottage, it is best to build a log street “house”
Using wood is a good answer to the question of how to build your own gazebo with the best performance characteristics. The main advantages of structures made from this material include, first of all, environmental friendliness and very good heat transfer.
Brick gazebos
Winter gazebos are usually built from brick. Those who are wondering how to build a beautiful gazebo should consider this option. Due to the characteristics of this material, brick structures can have the most varied shapes. Their main advantage is considered to be solidity and durability, the disadvantage is their high cost.

Building a brick gazebo means getting the most durable structure
Having decided on the material, size and shape, you can begin to actually build the gazebo. You should assemble it yourself, strictly adhering to certain technologies. Only in this case can a reliable and durable structure be built. For example, something similar to these:


Construction technology step by step
So, let's see how you can assemble this useful structure yourself.
How to make a project and drawings
First, let's figure out how to draw up a project in order to build a gazebo with your own hands. Drawings must be drawn in compliance with all proportions and indicating the dimensions of structural elements. You also need to think about what building materials will be needed and calculate their quantity.
Advice: Typically, a garden gazebo is installed behind the house, not too far from it. In this case, it will be more convenient to use. In addition, this arrangement facilitates the provision of all necessary communications.
Scheme of a rectangular structure with a hipped roof
Construction of the foundation
Since wood is a fairly light material, it is not necessary to build a very strong foundation under such a gazebo. It will be enough to build an inexpensive columnar one. The method of constructing such a structure in stages:
- At the corners of the future gazebo and along the line of the walls, holes are dug for the pillars.
- A layer of crushed stone is poured onto their bottom and compacted.
- Next, roofing material sewn into a tube is installed in the pits.
- A small reinforcing mesh is inserted into this formwork.
- Next, everything is filled with concrete.

How to build a gazebo with your own hands. Foundation pillars can be cast in roofing felt formwork
Advice: It is advisable to pour into each pillar from above anchor bolt. The lower frame frame will be attached to them.How to build a gazebo in the garden: assembling the frame
The bottom trim is made from 100*100mm timber. In the corners, the beams are connected using the “half-tree” method. Inside the frame, a joist under the floors is attached across the corners in the middle. A 100*50mm beam is suitable for it.
The assembly of the frame continues with the installation of racks. They are also made from 100*100mm timber. The corner ones are installed first. In their upper part, you need to make 50*100mm cuts for diagonally bonded boards. The latter are connected “half a tree” crosswise.

Photo of building a gazebo with your own hands. Finished timber frame
Important: In order for the bond to be strong, it is necessary to fill in small cross-section bars at the intersection of two boards (in each of the four corners).Next, the bundle is secured to the posts by inserting the boards into the cuts in the corner support posts and secured with nails. Then the top trim is installed around the perimeter. At the next stage, handrails are made of 100*50mm boards on three sides of the structure at a height of 90 cm from the bottom trim.

How to properly build a gazebo. For railings, a 100*50mm board is used
This is how the rectangular frame is assembled. By the way, the question of how to build a hexagonal gazebo or octagonal structure should not arise for those who understand the principle of its construction. In this case, everything is done in approximately the same way, only there will be more corners and, accordingly, support pillars.
Installation of the rafter system
Next, we’ll look at how to assemble the gazebo roof frame. Do-it-yourself installation of the rafter system begins with the manufacture of a central support column. A timber with a cross section of 100*100mm and a height equal to the height of the future roof is suitable for it. It needs to be cut into an octagon and a cut made in it for two rafter legs. The latter are connected “in half a tree” at the appropriate angle, inserted into a post and secured with nails.

How to properly build a gazebo with your own hands. Photo of the rafter system assembly process
Important: The length of the rafters should be such that after installation there will be a cornice overhang at least 40 cm long.The assembled structure is lifted onto the roof. It can be installed on corners and nails. At the next stage, the remaining two diagonal rafter legs are installed. Then four more intermediate rafters will need to be raised and secured to the roof.
Below we invite you to watch a video on how to build a gazebo with your own hands. Perhaps it will help someone better understand the process of assembling the frame and rafter system of a hip roof.
Railing and roof covering
The railings can be sheathed with clapboard or regular edged polished boards. On the roof under the roofing material they make continuous sheathing. It is best to stick flexible tiles on it.