Kitchen renovation should be taken most seriously, because this is the place where the housewife will spend a lot of time. Accordingly, the kitchen should be comfortable, functional and, most importantly, beautiful. It is about its design that we will now talk about, to be more precise, about the design of a small but important part of the kitchen - the apron.
What purpose does it serve and what is it? The apron is the space created between the top cabinet and the countertop. During the cooking process, this place is exposed to various contaminants: fat, water, hot steam etc. For this reason, the apron should be made of practical material that can be easily washed from any type of contamination. However, in addition to protecting against dirt, the apron is one of the main decorations in the kitchen interior. Therefore, for its manufacture it is necessary to select the most suitable type of finishing material. Before this, it is important to decide on its design, and then decide what kind of apron to make in the kitchen.
Kitchen apron design and color
Big choice building materials allows you to make an apron in a variety of designs. The selected material should be easy to clean and, most importantly, last for many years. For some, it is important to choose the color of the apron, which would be close to the color of the kitchen walls. However, according to the recommendations of leading designers, it is not at all necessary to adhere to this rule. There are two reasons why the color of the backsplash may match the wall:
- If the housewife wants to have a kitchen in a neutral tone, for example, cream, sand, light gray, light beige and the like.
- If the tone of the wall where the apron is installed differs from other walls.
Although you can select the tone of the apron based on the color of the furniture set, this is not necessary. For example, you can play with contrast, which will make this part of the kitchen more impressive. Here are some options for choosing colors and combining them with furniture.

- If you want a kitchen white, then in this case it is best to use facing material bright color. By itself, white is a boring color, but if you combine it with a bright color, the picture will change dramatically. It should be noted that a white kitchen allows you to expand your creative horizons. At the same time to create bright accent You can additionally use all possible accessories of a similar color. On the other hand, a large number of bright inserts can make the kitchen look funny and awkward.
- Kitchen beige colour, like white, allows you to play on contrast, enliven the walls and interior. Effect beige kitchen will give a panel apron that will be similar in color, texture or pattern to the countertop. In another case, you can start from the color of the cabinet facades.
- Well, what if the kitchen is blue? Then the original solution would be to use an apron gray. To “warm up”, so to speak, the cold blue color, you can use a light coffee, beige or cream color of the apron. One of these options will be the optimal solution.
- If you like green or light green tones, then the apron can be selected according to color kitchen furniture. Moreover, it is not necessary to repeat the shade. You can make it a few shades lighter. And if you want to make a discreet island in living greenery, then use cream, beige, white or gray tones.
In general, there are neutral colors that go with the entire palette. For example, it could be white, gray, cream tone. Here are just some examples of how to design an apron as part of the interior.
Mainly start from your vision. If you choose neutral tone, then even with a possible change of furniture, you will not have to replace it.
So, now let's look at seven examples of what to make an apron from in the kitchen.
7 finishing options on the way to perfection!
Option No. 1: ceramic tiles

We can say that ceramic tiles are the most common and affordable option for finishing a backsplash. What is the reason for this? Mainly - high resistance to temperature changes, chemicals and moisture. This material is durable and does not lose its shine after years. Its advantage is a large selection of shades and colors, and some manufacturers provide all kinds of collections. Thanks to this, it is possible to complement the apron with decorations and panels. There is also the option of photo printing on ceramics for more enterprising people. This allows you to make the design more sophisticated. On the other hand, installing tiles is accompanied by some complications. For example, this process may take a long time if you do not have the skills. Moreover, if after a while you want to change the interior of the kitchen, then replacing the apron will not be easy - this will entail a number of unpleasant consequences. For this reason, it's worth considering six other kitchen backsplash methods before committing to ceramic tiles.
Option No. 2: MDF panels

If you want to make an apron quickly and easily, then MDF panels come to your attention. It should be noted that this material in the price category is quite affordable for many, unlike other finishing methods. MDF panels are quick and easy to install. However, before installation, the surface of the walls should be leveled. MDF can be secured with liquid nails or using a special frame. Moreover, if after a while you want to change the apron, then replacing them will be easy.
Very quickly, persistent grease or chemicals can ruin the overall appearance of the backsplash. As a result, the panel will warp. Moreover, MDF is a flammable material.
Option No. 3: glass

Glass is rarely used as a backsplash finish. But at the same time, this is a new and developing fashion trend. There are several options for such finishing, thanks to which you can make a real work of art. For example, photo printing applied directly to glass using sandblasting technology. Thus, exquisite and varied aprons are created. The advantage of this technology is its seamless surface. This prevents the constant accumulation of dirt and grease at the joints. The glass itself is easy to clean and resistant to chemicals. Again, on the other hand, this technology is very expensive and making a glass apron with your own hands is almost impossible. And if you get tired of the image, replacing it will require a lot of labor. The obvious disadvantage is that grease and splashes of water will be clearly visible on the glass, so you will have to constantly wash the apron.
Option number 4: mosaic

Of course, mosaic is the most spectacular, rich, original method of finishing a kitchen apron. Each mosaic apron is unique in its own way. Why? It can be made from ready-made panels in the form of tiles, from pieces of broken tiles or glass. Based on this, it is almost difficult to repeat the design of a mosaic apron. It should be noted that mosaic has the same positive characteristics as ceramic tiles. But it has more advantages. From a mosaic you can make a beautiful image that will delight the eye for many years. To install it, you need to perform a series of preparatory work. A perfectly flat surface is extremely important. An apron made from mosaic will have a large number of seams, for this reason the selection of grout for the seams must be extremely serious. Otherwise, due to poor-quality grout, very soon the mosaic backsplash will turn into a gray spot in the kitchen.
Option number 5: plastic

A budget option is to use PVC panels. On the other hand, plastic has a long service life, maintaining its appearance throughout its life. As for caring for it, everything is also simple here. The plastic surface is easy to clean with conventional chemicals. However, plastic has one negative characteristic, which makes its use as an apron risky. PVC panels are flammable and can also be easily scratched. Therefore, consider these factors when choosing finishing materials.
Option number 6: mirror

Like glass splashbacks, mirrored splashbacks are original solutions finishing. It is especially practical to use a mirror in small kitchens, as the reflection visually increases the space. Moreover, specially prepared glass for the apron will last for many years, and its care is very easy. However, on the other hand, using glass can lead to other problems. The kitchen is a place with high humidity, especially during the cooking process. Therefore, the mirror may constantly fog up, and marks and stains will remain on the surface. Therefore, after each meal preparation, the housewife will have to wipe the surface of the apron.
Option No. 7: metal

One of the innovative options for finishing a kitchen apron is the use of metal. If the kitchen is decorated in a high-tech style, then a metal apron will fit perfectly into it. As for the price, it is quite understandable, and everyone knows the advantages of metal: durability, resistance to fire, chemical influences, etc. However, stains and all kinds of stains will always be visible on it, so you will have to constantly wipe it. Although this is not a big problem. The difficulty lies elsewhere. The metal is quite cold in appearance, so its use should be carefully considered.
A matter of taste or a tribute to fashion?

So, for judgment, seven options for finishing a kitchen apron are presented. Which apron for the kitchen to choose is up to you. The most important thing is to stick to the general interior of the kitchen and also rely on your taste. After all, you can make it fashionable, but in reality there will be no appearance. Therefore, analyze each type of kitchen apron directly for your case. Be spontaneous and strive for individuality. Then your kitchen will be truly functional, beautiful and moderately fashionable.

Most importantly, choose the method that will allow you to make your own apron. We will be glad to hear your opinion on this or that type of apron. You may know other finishing methods. Then share them with us by leaving your comments on this article! Perhaps your ideas will inspire someone to new achievements!
Video
From this video you will learn how to decorate an apron with decorative 3D panels.
The backsplash in the kitchen is the space between the countertop and cabinets. Its purpose is to prevent grease, splashes and other debris from getting onto the wall during cooking. At the beginning of the 21st century, the wall in the kitchen was decorated with ceramics, but technologies are improving and everything is changing, the material with which the walls are covered is also changing, and this article will be devoted to how to make a kitchen apron with your own hands.
What is a kitchen apron made of?
- Nowadays, ceramic tiles have not lost their importance, as manufacturers are trying to make them the most unusual and diverse. But if you want to make a kitchen apron with your own hands, then this option will not be for you. Working with ceramic tiles is, first of all, hard work, since removing tiles from the wall is not as easy as it might seem at first glance.
- One of the best and most colorful options is a mosaic kitchen backsplash or a living stone backsplash. It will last for many years and will perfectly decorate the interior of the kitchen. However, the big disadvantage of this option will be the high price and problematic installation.
- The next method is a medium-density MDF board, which can sometimes be seen in kitchens, because it is resistant to debris during cooking. If you decide to install this type of apron in the kitchen, you will need to place it away from the gas stove, as this is very unsafe.
- In recent years, glass kitchen splashbacks have become extremely popular. The price of such an apron is much less than an apron made of ceramics, stone and mosaic. The quality of such an apron really deserves respect.
The main advantages of a glass apron for the kitchen
Glass is a very convenient material; you can also order a solid panel that is easy to clean from various types of debris, including grease.
- as already mentioned, glass is very easy to clean;
- you can choose the pattern of your apron;
- a glass apron will give your small kitchen visual space;
- The main advantage of a glass apron is its easy installation and removal, which greatly facilitates all work.
What types of glass kitchen aprons are there?
If you have finally decided that you will install an apron made of this material, then first you need to take all the dimensions and select the design you like best, only after that contact the company that manufactures aprons. As a result, we can conclude that you did almost all the work yourself, except for making the glass. And we can rightfully be proud of this. But there are people who try to make glass themselves and apply a design, and naturally nothing comes of it; besides this, special equipment is required. You should not try to do all the work yourself, but trust a professional, this will reduce your time costs and make your work easier.
First you need to figure out the choice of apron; it comes in several types - plain, glossy, matte. The types of kitchen splashbacks are described in more detail in our article glass panels for the kitchen. There is also an apron with a pattern. The most popular to this day is glass with a photograph on it. The design is applied to the material by a professional in a special way, which uses ink that is not susceptible to exposure to sunlight and does not fade over time, the color remains natural and rich for many years. The holding temperature is quite high - 120 degrees, you will agree that this is even more than in a bathhouse, so you won’t be afraid of damage to the apron from exposure to high temperatures.


In order for the apron to serve you for as long as possible, it is best to apply the design between two glasses. If you want to change the drawing in the future, it will not be difficult, just trust the professionals, and they will do high-quality work in a short time at a price that is acceptable to you.
How to take measurements and order a kitchen apron
Many people ask the question: how to correctly take measurements and order an apron? The answer is quite simple. To get straight to work, first watch a video on how to properly make an apron yourself and how to measure the wall so that there are no misunderstandings during installation later.
Pay special attention to all the furniture that is in the kitchen, carefully measure every detail, otherwise it may turn out that the apron will be unusable.
When all the furniture is hung, start measuring, also do not forget to check the walls to ensure that there are no holes or bumps. If there are any shortcomings, you need to get rid of them. If you need a long apron, then you will need a couple of panels for it, remember about the various sockets and fasteners that require holes.
DIY drawing for an apron for the kitchen
In order to make a drawing with your own hands, you need to purchase transparent glass and first select and prepare a drawing that will be on the adhesive tape. It is strictly forbidden to make a drawing on paper, since after a while condensation will begin to collect under the glass, as a result of which the apron can simply be thrown away.
We install a glass apron for the kitchen with our own hands
Now we will talk about how to properly install the apron. In order to properly install the apron, you will first need:
- glass panels;
- pencil;
- roulette;
- drill;
- screwdriver;
- dowels
Let's move on to the installation process itself, which consists of five points.
- First, you need to cover the tabletop with film or other material so as not to stain or damage it when installing the apron.
- In order to correctly draw the boundaries, the skins will need to be installed only along the edge at the top, after which holes are cut out.
- Only after completing these steps can you proceed to the installation itself. In order to cut holes, you first need to mark the dots with a pencil and then cut along them.
- To prevent contact between iron and glass, purchase plastic spacers.
- When all the work is done, return the sockets to their original places.
How to decorate a kitchen apron with your own hands

Professionals provide them with the most diverse and unique design, which a person without a creative education cannot do on his own. But you can be sure of one thing - the choice of lighting falls entirely on your shoulders - you need to install special backlit strips, thanks to which the kitchen takes on a luxurious look.
One of the most best virtues glass apron is easy and quick to change the design. An apron will perfectly complement your kitchen interior In addition, it will protect the wall from grease.
So that readers do not have different interpretations about the word apron, the authors consider it their duty to tell dear visitors of our portal that the article will focus on the surface of the wall between the desktop and the wall cabinets, and not on a piece of clothing. Although not a single modern kitchen and not a single modern housewife can do without one or the other.
When renovating an apartment or building a house, people experience the greatest stress not from having to part with significant amounts of money, but from the incredible torment of choice. The number of proposals for materials, color and design solutions, and various services is so huge that choosing them takes much more time than the actual repair itself. This also applies to the kitchen apron. But the authors can immediately answer the main question of readers - which apron is the best? The answer is clear: best apron– this is a hand made apron, regardless of what material it is made of. Our article will be about how to make an apron in the kitchen with your own hands. And, of course, attention will be paid to “insignificant details” in the form of a review of materials and technologies for their installation.
Requirements for kitchen aprons in terms of combining functionality and beauty
If we consider the etymology of the word apron (translated from Polish and German it means apron or hem), it becomes clear that it was originally conceived as a piece of work clothing needed to protect against contamination that inevitably accompanies the cooking process. Polish and German linguists are still arguing about who rightfully owns this word, although this convenient thing was used not only by them, but by most peoples in the world. Therefore, let etymological battles pass by the world of reasonable people, that is, you and me. The main thing is to understand that the first and main purpose of an apron is protection.
However, who said that defense should be rude and ugly? It can be beautiful, it can please the eyes of its owners, without forgetting its main function. And the modern variety of materials and technologies allows both functionality and beauty to coexist harmoniously. But if you suddenly have a choice of what to sacrifice, then the clear answer is this: you can sacrifice a little beauty in favor of functionality, but you can’t do the opposite.
Why do you need a kitchen apron?
The kitchen is the most “complex”, in the good sense of the word, room in an apartment or house. This room contains the largest concentration of various household appliances: stove, oven, hood, dishwasher and possibly washing machine, various kitchen appliances and appliances. Two main “sacred” processes take place in the kitchen – cooking and eating. The kitchen is the center of attraction for all household members from the human and animal world; it is the most visited room. Each detail of the kitchen must fulfill its purpose, withstand various influences and, in addition, be in harmony with others.
The apron is one of the most “loaded” parts in the kitchen interior. Readers are encouraged to imagine what he experiences every day.
- Firstly, when you turn on a gas or electric stove, as well as an oven, microwave, dishwasher and washing machine - any appliance that heats up during operation, the apron is exposed to increased temperature, and near the stove or oven the temperature can be quite high, and near the washing machine it is much lower, and near the sink it is even lower. That is, the apron experiences thermal effects, and it can be completely different in its individual parts. This leads to very large internal mechanical stresses.

- Secondly, any work process in the kitchen is accompanied by high humidity, which can manifest itself in different ways: direct exposure to water, splashes, water vapor. Considering that the main processes in the kitchen take place near the apron, we can say that it is simultaneously affected by water, splashes and steam.
- Thirdly, when cooking food, a lot of substances are formed that pollute the air: gas combustion products, food particles, soot and the most unpleasant type of pollution - tiny aerosol droplets of fat that settle on all kitchen surfaces. Having a good kitchen hood eliminates up to 80-95% of such contaminants, but the remaining ones are quite enough to eventually cover all kitchen surfaces with a nasty and sticky film that is difficult to remove.

- And finally kitchen apron may also experience direct mechanical impacts from the fall of any heavy objects, sharp kitchen utensils, or dishes. Even the cleaning process itself can leave micro-scratches on the surface of the apron, since most cleaning compositions contain abrasive components.
Considering all of the above, you can present a set of specific requirements for an apron that will help you make the right choice.
- The apron material must withstand temperature influences. The coefficient of thermal expansion of the apron material must be minimal so that during heating or cooling there is no strong stress that can lead to destruction.
- The kitchen apron must be waterproof and moisture resistant. The appearance of water in any state of aggregation should not lead to destruction, damage, or dissolution of the apron material, as well as the adhesive mixtures on which it is mounted. If a pattern is applied to the apron (outside or inside), then water should also not affect it in any way.
- The apron must be chemically inert to all compounds that may appear during cooking, washing dishes, and cleaning. These compounds include fat, various organic acids included in food products, as well as inorganic compounds– salts, acids and alkalis included in the composition of dishwashing and cleaning products.
- The surface of the apron must be strong and wear-resistant enough to withstand mechanical stress during cooking and cleaning.
- The material of the kitchen apron should not emit any compounds that can harm living beings.
- The apron should be easy to clean from any dirt using standard cleaning products.
- The kitchen apron should be as easy to install and dismantle as possible.
- The cost of materials and work for installing the apron should be reasonable and affordable
- The apron should have an attractive appearance, no small dirt should be visible on its surface, and it should be in harmony with the interior of the kitchen as a whole.
Given the impressive list of requirements, it becomes clear that choosing a material is not an easy task. Therefore, the next step will be to review the materials used for the kitchen apron.
What types of kitchen aprons are there?
The simplest kitchen apron that was “successfully” used in new buildings during the USSR was simply painted oil paint wall. However, housewives did not limit themselves to this and often glued beautiful oilcloth to the wall, which could imitate tiles. Particularly wealthy citizens tiled the entire apron, or even the wall, or even the entire kitchen with tiles. And, by the way, this material has not lost its relevance even now, so let’s start looking at kitchen backsplashes made from tiles.
Kitchen aprons made of ceramic tiles
Ceramic tiles have been known since time immemorial and were widely used in ancient times to decorate temples, palaces and houses of wealthy citizens. With improvements in manufacturing technology, tiles have become cheaper and more accessible. It has become widely used in the decoration of all premises, both industrial and public, and residential. The advantages of kitchen aprons made of ceramic tiles are:

- The tile has high mechanical strength and is very resistant to various influences.
- Ceramic tiles are not afraid of both direct exposure to water and high humidity and hot steam.
- At correct installation for a good adhesive mixture and application good grout a tile apron will not be “afraid” of exposure to both high and low temperatures, as well as when they are unevenly distributed over the surface.
- Ceramic tiles do not enter into chemical reactions with compounds formed during cooking. It is chemically inert and environmentally friendly, and the smooth glazed surface prevents the absorption of various undesirable substances.
- Ceramic tile surfaces are very easy to clean with both special and regular household detergents.
- A kitchen apron made of ceramic tiles has a long service life. With proper care, the apron will delight its owners for 15-20 years.
- A huge selection of ceramic tiles, their sizes, textures, colors, and the presence of special decorative elements allow you to create a unique backsplash design and fit it into any interior.
Ceramic tiles also have disadvantages, we list them:
- Ceramic tiles should only be laid on a well-prepared, level surface.
- Surface preparation and installation are “wet” construction processes, therefore they are done in the absence of a kitchen set and other furniture. The processes of preparation, installation, drying and grouting take a long time.
- Laying tiles requires highly qualified tilers, so these services cost a lot.
- The weak point of the apron is the seams between the tiles, and they must be done to compensate for thermal expansion. These seams require the use of special grouts that are flexible, resist moisture penetration and prevent the appearance of mold and mildew.
- The price of good ceramic tiles is high. They are especially expensive decorative elements: friezes and borders. An apron made of ceramic tiles will cost more than one made of plastic or MDF.
Obviously, the advantages of ceramic tile backsplashes outweigh the disadvantages, and if the kitchen is undergoing a major renovation, then this option should be considered. The choice of tiles is simply huge, which has a beneficial effect on the price for the consumer. And if you don’t chase elite designer products sold at incredible prices, then you can pick up a “strong average” for a reasonable price. Even though it will be more expensive than other types of aprons, everything is compensated by its service life.
Smart and thrifty owners, when selecting tiles for a backsplash, will always ask the seller if he has any leftovers. Large stores always accumulate some part of unsold tiles that will not be bought due to the small quantity. Tiles from the same series, but from a different batch, often differ in shades, so experienced craftsmen always choose from one. Considering that the apron area is small, these leftovers may be enough.
Kitchen apron made of porcelain stoneware
Porcelain tile, although a more expensive material than ordinary ceramic tiles, is endowed with the following “abilities” that are well manifested in kitchen backsplashes:
- Firstly, porcelain stoneware is a more durable material that better withstands mechanical loads and temperature changes.
- Secondly, the structure of porcelain stoneware is such that it is painted throughout its entire volume, and not just the top layer. Therefore, it is less susceptible to abrasion. If skeptics say that this quality is not as necessary on the kitchen wall as on the floor, then they will be mistaken, since the tiles also wear out from periodic cleaning.
- Thirdly, porcelain stoneware has a denser structure and therefore its water absorption rates are much lower than those of ceramic tiles, which is very useful for a kitchen apron.
- And finally, porcelain stoneware tiles can be made in quite large sizes: 300*300 mm, 400*400 mm, 600*600 mm and even 1200*300 mm. When tiling the kitchen apron, the number of joints will be minimal, which is very good from a practicality point of view. Therefore, porcelain stoneware backsplashes are the choice for people who value reasonable minimalism combined with beauty.
When choosing porcelain stoneware, you need to be especially careful in preparing the surface for finishing, and also use special adhesive mixtures, since ordinary ones will not be suitable for it. Its denser structure does not allow ordinary adhesives on a cement base to ensure the necessary adhesion. A well-made porcelain tile backsplash looks simply amazing. Especially if it is combined, for example, glossy kitchen set and matte porcelain tiles, or vice versa.
Laying large porcelain stoneware slabs requires highly qualified craftsmen. For example, a tile 600*600 mm and 10-11 mm thick can already weigh about 10 kg. After laying porcelain tiles on the wall, there is very little time left to correct the position, since the tiles large area it “sticks” to the adhesive mixture so much that it will be very difficult to move or tear it off the wall.
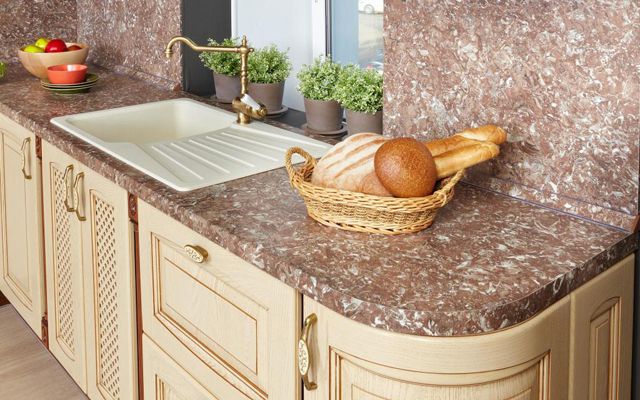
Kitchen aprons made of natural stone
A special place is occupied by kitchen aprons made of natural stone. The owner of such an apron declares to the whole world his wealth and exquisite taste. Of course, a stone apron requires you to make a stone countertop and purchase an impeccable kitchen set with facades made of valuable wood. Otherwise, it will simply be an unjustified waste of money.

In most cases, granite is used to make a backsplash. If the tabletop is made of a thick slab of stone, then 10-20 mm is enough for the apron, because it does not bear any great physical load. Granite has great view, it is very durable and dense, so it practically does not absorb water.
In addition to granite, the following are also used for wall decoration: marble, onyx, basalt, quartzite, quartz, sandstone, slate, and serpentine. The structure of these stones is less dense, so they absorb moisture better and it is more difficult to remove any dirt from their surface. This is partly solved by the fact that the stone slabs are thoroughly polished during production, but the housewife still needs to be vigilant and avoid contamination.
Stone aprons, with all their advantages and exclusivity, are rarely used for completely understandable reasons - a high price should not be paid only for beauty. Let us remember the main postulate - beauty should not interfere with functionality.
Kitchen aprons made of artificial stone
Those who intend to make an apron as similar to a natural one as possible, but are not ready to pay through the nose for this, should consider the option of using artificial stone. It is made from acrylic resin, into which various mineral fillers and coloring pigments are introduced. In appearance, unless the observer is a geologist or mineralogist, this stone is very similar to natural, but is not one. However, this is precisely what gives it its advantages:
- The structure of artificial stone does not have pores, which are characteristic of its natural “counterparts”, so it does not absorb moisture and dirt, and is easier to clean.
- Artificial stone is noticeably lighter than natural stone, it can be made to a much smaller thickness, and slabs made from it fit very well together, forming an almost monolithic surface.
- Countertops and sinks are made from artificial stone, and even monoliths from countertops together with sinks, which allows you to create very interesting compositions together with an apron.
- Products made from artificial stone are durable, in this they are in no way inferior to ceramic tiles or porcelain stoneware.
- Artificial stone is significantly cheaper than natural stone, but, however, more expensive than ceramic tiles and porcelain stoneware.
Kitchen backsplashes made of mosaic tiles
Aprons made of mosaic look the most advantageous; with their help you can create a beautiful and unique kitchen interior. It can be said that mosaic installation– this is an art that not everyone can do. But if the owners decide to make a mosaic apron and they succeed, then it will be a source of pride for the household and envy for the “best friends” of the hostess. There are several most common methods of laying mosaics:
- Monocolor (one-color) installation - made from a mosaic of one color, however, grout of a different shade or a contrasting color can be used. This mosaic goes very well in classic kitchen interiors.

- The “mix” type installation involves using the same mosaic color, but in different shades, and the more of them, the more interesting such an apron will look, although the price will also be “more interesting,” but not for the owner, but for the seller and the tiler.

- Gradient laying, also called stretching, also involves the use, as in a mix, of mosaics of the same color, but in different shades. The saturation of shades is not made randomly, but has a smooth transition from light to dark or vice versa. The transition can be done horizontally, vertically, diagonally, or along some complex curve. It all depends on the sick imagination of the designer’s decision or the artistic intention of the owners.

- Laying mosaics in the form of panels involves creating a pattern. It is often done in oriental interiors.

- Combined styling. Mosaic can be combined with ceramic tiles and decorative elements.

Mosaic tiles can be made from completely different materials:
- Ceramic mosaic no different from tiles, only it has smaller size and higher price. It looks more advantageous than its larger “brothers”.
- Glass homogeneous mosaic It can have either a smooth or matte surface, like bottle glass that has been in sea water. Also, such a mosaic may contain inclusions in the form of sparkles, some minerals, pieces of foil, which enriches the appearance.

Glass mosaic is the most common
- Glass mosaic smalt is a sintered mixture of glass and metal oxides. This composition increases strength and gives the mosaic a unique look. It seems that each tile is made by hand, since all of their shades are at least slightly different. When such a mosaic is illuminated with a light source, it appears as if it is glowing from within. The interior of the kitchen not only looks, but also costs very richly.

- – when making such a mosaic, various mineral components are introduced into the glass melt – aventurine or iridium. From such events the mosaic benefits appearance, the surface becomes shimmering, and the owners’ wallets become thinner.

- Porcelain stoneware mosaic – has all the wonderful properties of this material, perfectly imitates natural stone, but its denser structure does not allow it to absorb moisture and various chemical compounds.
- – exists for special lovers of everything natural in the interior. It is worth admitting that such a mosaic looks great, but the price will also be higher. Considering the greater porosity of natural stones, compared to artificial ones, one can argue a little about the advisability of using it in a kitchen apron.

- Metal mosaic – exists for special lovers of non-standard interiors. In this case, the base, of course, is not metal, but glass, ceramics, plastic or even rubber, onto which foil is glued. From the experience of using such aprons, it is known that dirt on them is very visible, and when cleaning, the coating wears off over time.
- Mirror mosaic – recommended for treating people suffering from excessive perfectionism, since all impurities will be immediately visible. With constant cleaning of such an apron, the perfectionist will still be able to observe the reflection of his body, which is so far from perfect.

There is no point in listing the properties of mosaic tiles and their advantages, since they are the same as their full-size “ancestors”. With proper installation, good grouting and proper care mosaic aprons can last quite a long time. With the help of mosaics you can realize all your ideas, but you will have to pay a lot more money. To make installation easier, it is better to purchase mosaics on a reinforcing mesh.
The main disadvantage of mosaic, in addition to its price and installation complexity, is the large number of seams that require only high-quality grouting. If mineral grout can be done by any person whose hands begin to grow above the waist, then with epoxy grout it is not so simple; such grout requires qualifications and the use of special tools.
Budget kitchen aprons: MDF and PVC panels
Medium Density Fiberboard - MDF ( MediumDensityFiberboard,MDF), for quite a long time and successfully used for the manufacture of furniture facades, doors, and wall decoration. These slabs have also found their application in the creation of kitchen aprons. This is the most budget solution, but this does not mean at all that it is the worst. On the contrary, MDF panels have an impressive set of advantages:
- Kitchen aprons made from MDF can be made in any color and design: imitating wood, stone and tile, with any image applied to them. This gives simply amazing opportunities for kitchen design. They look more expensive than they actually cost.

- MDF panels are not as critical to surface preparation as other aprons. They will tolerate minor irregularities and old wall coverings that would not provide the necessary adhesion for tiling or stone cladding.
- Installation of MDF panels is not a “wet” process and can occur when installed kitchen. The maximum that will need to be done is to move the set away from the wall.
- Installation of an MDF apron is very quick.
- MDF aprons are cheaper than others, so they can be replaced more often.
- With proper care and respect, they can easily last for several years.
MDF aprons are an ideal solution for kitchens where cooking occurs periodically rather than constantly. They are very suitable for neat owners who always keep the kitchen clean and immediately clean everything and wipe it dry after any activity in the kitchen. But the scope of application of such aprons is still limited, since they also have disadvantages:
- MDF aprons do not tolerate overheating, so they are best used in kitchens that have induction cookers rather than gas cookers.
- Although MDF panels have protective covering, but you still need to avoid direct contact with water and use such aprons in rooms with high humidity.
- MDF aprons cannot be cleaned with abrasive detergents or those containing solvents.
- MDF panels are relatively easy to damage.
Aprons made of PVC panels are also a good solution for budget kitchens. Their set of consumer qualities is approximately the same as that of MDF. A PVC apron can withstand high humidity more easily, but it also does not like overheating and abrasive detergents.
Installation of MDF aprons can be either end-to-end or with the help of special elements, which are always available in those organizations where panels are ordered. The authors recommend entrusting to professionals the entire range of work on taking measurements, manufacturing and installing an MDF apron. And the owners will have the choice of color, pattern and design, as well as control over the execution of the work. There are many nuances that the owners may not take into account: holes for sockets, joints of panels on the wall and in the corners, joints of the apron with the countertop and others - which have already been worked out by specialists.
Glass kitchen aprons
Most people have a subconscious fear of glass. It is associated with something extremely fragile, brittle and sharp. However, glass is different from glass. Nowadays, tabletops, chairs and even stair steps are made from it. Kitchen aprons were also included in this wonderful material.
Glass for aprons is not ordinary glass, but tempered glass, 6-8 mm thick, which is several times stronger and can withstand heating up to 300°C. Triplex glass is also used, where two layers are glued together with a special film or laminating liquid. Glass can be either glossy or matte, painted in any color, or colorless, with or without a pattern.
It is best, of course, to use all the possibilities of a glass kitchen apron and order it with a pattern. Such aprons are also called skinali. But keep in mind that it can be done in different ways:
- Firstly, transparent glass can be used, which is fixed to a wall covered with photo wallpaper. This is the most a budget option, but it should be taken into account that moisture can penetrate into the gap between the wallpaper and the glass, which will ruin the wallpaper or contaminate the glass, thereby ruining the entire look.
- Secondly, the image can be printed on vinyl film, which is glued to the back. This solution is better, but the film can also peel off over time.
- Thirdly, the image can be printed on the glass itself from the back side of the apron using UV (ultraviolet) printing technologies.
- Fourthly, the image can be printed with UV ink inside triplex glass. This is the best, but also the most expensive option.
- And finally modern technologies allow you to print three-dimensional 3D images on kitchen aprons as well. These aprons look very unusual and are very expensive.

Glass aprons can be “revitalized” by wisely using LED lighting mounted both outside and inside the glass. The backlight can be either monochrome or color. You can organize different lighting scenarios for different moods. Modern market materials for renovation and interior design offers so many options that you can implement both a beautiful and competent solution, and any design madness. If only there was enough money for everything.
The advantages of glass aprons are obvious: moisture resistance, chemical inertness, strength, ease of cleaning, beautiful and original appearance. Among the disadvantages, it is worth noting the high price and the fact that it is still glass, which can break under impact load. When broken, aprons made of tempered glass or triplex do not form sharp, traumatic fragments. But this still will not return the considerable money spent.
Glass kitchen aprons can also be attached either with through fasteners or with the help of special elements. When taking dimensions and planning the kitchen workspace, you should always take into account everything that will be installed on the apron. These could be several sockets, switches, holes for attaching rails - a hanging system for placing all kinds of kitchen utensils. Just as with MDF panels, it is better to entrust the entire range of services for measurements, manufacturing and installation to those who have done this many times, that is, to professionals.
Metal kitchen aprons
For those who intend to create for real unusual interior kitchens, metal aprons are specially offered. They look very unusual and in some cases even beautiful. Fans of the “techno” or “loft” style can easily use metal in the kitchen, but for this you really need to have a subtle artistic taste or invite a designer with such qualities, which is rare. The line between harmony, beauty and madness with metal aprons is very thin, about the same as with mirrored aprons.

Metal aprons can be made as large sheets from of stainless steel, and tiles and even mosaics. The functional qualities of the metal are questionable. With good hygiene, metal has excellent adhesiveness to all types of kitchen contaminants and is very capricious in the choice of cleaning products. He does not tolerate abrasives.
It was previously noted that it is better to completely entrust the installation of an apron made of MDF panels or glass to those who, in fact, will manufacture them. Therefore, we will consider other options that the owner can do with his own hands. But before installation, you need to decide at what stage you need to make the apron, and what requirements the room must meet.
Requirements for the room and surfaces
Installation of aprons made of MDF, glass or plastic panels can be produced already when the kitchen set is installed. Not only is it possible, but even necessary, since very high accuracy of measurements is required, which will allow the apron to fit perfectly into the workspace. The only thing is that during installation you just need to move the furniture away from the wall, and with through installation you won’t even need to do this.
If the apron is made from ceramic tiles, porcelain stoneware, mosaics, natural or artificial stone, then wet processes are indispensable. Therefore, the furniture should not be next to the walls where the apron will be, but the exact dimensions of the furniture and how it will be installed (height of the countertop, hanging height of the cabinets, distance between the working surface and the bottom plane of the cabinets) must be known.
What are the requirements for a kitchen space to install an apron?
- Windows must be installed in the kitchen.
- Electrical wiring must be installed and all sockets must be installed.
- The walls must be plastered and leveled. On the wall where the apron will be mounted, the use of gypsum-based putties is unacceptable; only polymer-cement mixtures can be used.
- The floor must be level with the finishing coating already laid. Naturally, it should be smooth and horizontal.
- The temperature in the kitchen should be no lower than +5°C and no more than +30°C, humidity no more than 60%.
In other words, the room must be completely ready for finishing– wallpapering, applying finishing decorative plaster or painting. The surface on which the apron will be mounted must be dry and perfectly flat. If glass, glass or smalt mosaic will be used for the apron, then the surface should be puttied with polymer-cement mixtures based on white cement.
Kitchen apron markings
On a wall that is completely ready for cladding, it is necessary to mark the position of the future apron. But for this there must be a clear idea of the placement of the kitchen unit. It is best if it has already been purchased and a diagram of its placement has been drawn up. What you need to consider when marking a kitchen apron.
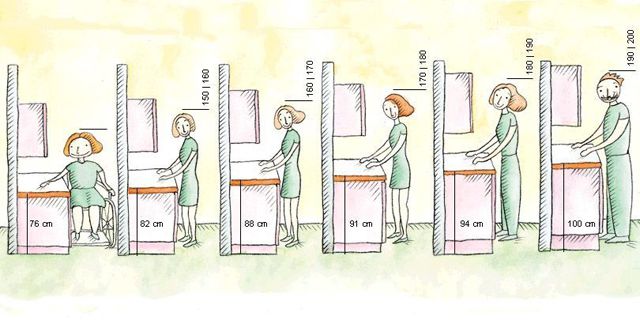
- First of all, the apron should be located in the space between the tabletop and the lower plane wall cabinets, and it is desirable that the apron extends beyond the countertop and cabinets by at least 2 cm. Most often, the distance between the countertop is 60 cm, but it is acceptable to make it in the range of 45-70 cm, it all depends on the height of the people who will use the kitchen.
- The height of the countertop of a kitchen set also depends on the height of people, but in the same family there can be people of different heights, and household appliances are often built into the set: washing and dishwashers, freezers. Therefore, in most cases, the height is set to 88-90 cm, and people with “outstanding height” (more than 200 cm and less than 150 cm) will not have to bend or jump, there will simply be a slight inconvenience to which they get used to very quickly.
- If a standard dome-type hood is used, then the apron should extend in height along its entire width and reach its lower edge, or better yet, if it extends under the hood at a distance of at least 5 cm or, even better, reaches the ceiling. At the same time, it is recommended to place the apron at a distance of at least 5 cm behind the side surfaces of the cabinets.
- The height of the lower edge of the hood dome above the countertop must be at least 65 cm for electric stoves, and 75 cm for gas stoves.
- The standard width of gas or electric kitchen stoves or hobs can be 30 cm, 45 cm, 50 cm or 60 cm. There are larger sizes, but this already applies to stoves for professional use. The most commonly used slabs are 60 cm wide. The dimensions of the hood dome should not be less than the width of the slab, but it is better if they are one step larger. For example, for a stove or hob with a width of 60 cm, you should select a hood of at least 80 cm. The distance between the wall cabinets should allow the hood to fit freely.
- The apron in the kitchen does not have to be located only between the countertop and the upper wall cabinets. Sometimes it needs to be done by approaching the side walls, this is especially true in the area where the sink or stove is located, if they are located along the edges. This can also be affected by nearby window or door openings.

To mark the position of the apron on the wall you will need either a laser or a hydraulic level. Laser ones, of course, are more convenient to work with, but hydraulic ones also provide very high accuracy. It is advisable that the kitchen set has already been purchased, but not yet installed on site. As a last resort, you can measure the future kitchen in the store where it will be purchased or have documentation indicating all dimensions. For marking you need:
- On the wall where the kitchen set will be installed, a mark is made on one of the edges for the position of the upper plane of the countertop.
- The level moves the mark to the other edge of the wall.
- Use a paint cord to mark the horizontal line of the tabletop position.
- If necessary, if the kitchen is corner or the apron will extend onto other walls, then similar markings are made on other walls.
- A mark is made on the position of the lower edge of the wall cabinets based on the size of the specific kitchen unit that will subsequently be installed in the kitchen.
- The position marks for the bottom edge of the wall cabinets are transferred to all walls where the kitchen apron will be installed.
- The marked parallel lines mark the location kitchen stove or hob.
- The position of the lower edge of the hood dome is noted (minimum 65 cm for electric stoves, 75 cm – for gas stoves from the countertop).
- The position of the side surfaces of the wall cabinets at the location of the hood dome is noted; it should fit freely into the space between the cabinets; it is better if there is a gap of 1-3 cm on each side.
- The upper edge of the apron located in the hood area is marked. The apron should extend at least 5 cm under the hood, and it is better to make it up to the ceiling.
After these steps, the location lines of the future kitchen set will be marked on the wall. But, as noted earlier, it is advisable to make the apron so that its surface extends slightly under the countertop or set. It is advisable to recess the apron behind the countertop and the lower edge of the wall cabinets at a distance of at least 20 mm, and in the area where the hood is located on the left and right, the apron should be recessed under the cabinets at a distance of at least 50 mm. Therefore, parallel to the horizontal and vertical lines of the position of the kitchen furniture, the lines of the position of the apron are broken off
When planning and marking the backsplash, you should also take into account the size of the tiles or mosaics that will be used. For example, if the tiles are 20 cm in height, then it is completely logical that it is beneficial to make three rows of 20 cm tiles, and make the gap between the table top and the bottom edge of the wall cabinets 56 cm, taking into account the fact that 2 cm from the top and bottom will go under furniture. If tiles of other sizes are used, this must also be taken into account. If decorative elements are used - friezes and borders - then it is necessary to ensure that they are visible. What's the point of using expensive elements that will be hidden from view under the furniture. Each case is individual and requires its own differentiated approach.
After drawing all the marking lines indicating the position of the kitchen furniture and the apron, you need to calculate the area of the apron. The authors of the article recommend using a calculator, in which you only need to indicate the clearance between the countertop and the bottom edge of the wall cabinets, as well as the distance between the vertical surfaces of the cabinets and the height of the apron above the bottom surface of the cabinets in the area of the hood. The calculator automatically takes into account all the penetrations of the apron under the furniture (2 cm on the horizontal section of the apron and 5 cm in the area of the hood).
Kitchen apron area calculator
An apron for the kitchen is a necessity because it protects the wall in work area kitchens from steam, splashes of grease and oil, as well as other dirt. This becomes especially true in the place where the stove is located.
To choose the most suitable option, you need to know what aprons are made of, as well as the advantages and disadvantages of these materials.
- MDF. This material is very easy to install and inexpensive. It can be any color design: plain, imitating tiles and stone, repeating the pattern of the countertop, etc.
Advantages:
- if you carefully select the color of the panel to match the tabletop or wall, you will get a complete interior;
- under the MDF panel there is no need to level the wall, and fastening is carried out using liquid nails;
- the material is resistant to temperature and mechanical damage, has a moisture-resistant coating;
- There are not many joints, due to this cleaning does not cause difficulties;
- dismantling, as well as installation, is not difficult.
Flaws:
- unfortunately, the service life is several times shorter than that of other materials;
- the material is flammable;
- If a replacement is required, then most likely it will not be possible to find exactly the same tone.
- Tiles or porcelain stoneware. A ceramic apron for the kitchen is the most common option.
Advantages:
- long service life;
- resistance to detergents, steam, moisture, strength, beauty;
- Great possibilities for imagination: you can choose any color to match the texture, as well as create your own design.
Flaws:
- the cost of material and work is significantly higher than in the previous version;
- The laying out process requires special skills, time and a lot of labor: it is necessary to move the furniture, prepare the walls, and then fill the seams with grout.
- Mosaic. This material has the same basic characteristics as ceramic tiles, but there are several additional qualities.
Advantages:
- mosaic for the kitchen on the apron allows your imagination to run wild: whole pictures or simply a beautiful and complex ornament are created from this material;
Flaws:

- the presence of many seams complicates cleaning;
- before laying the wall must be carefully prepared;
- The work is long and painstaking, requiring a lot of time and additional funds.
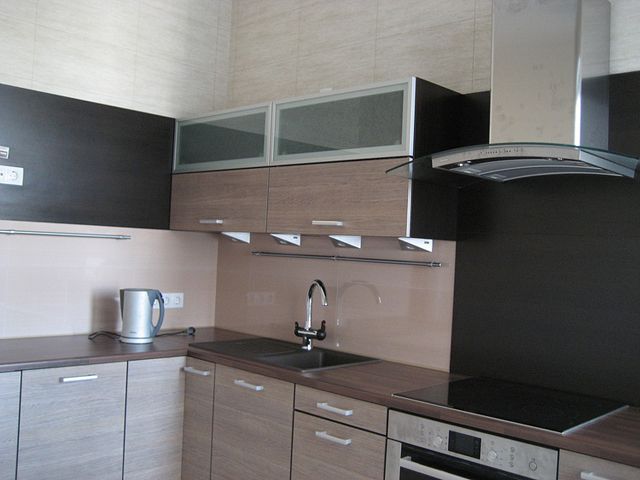
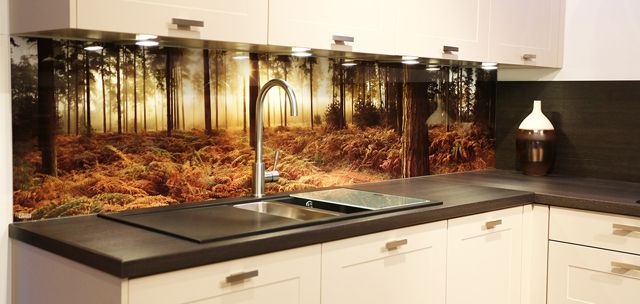
- Tempered glass. The kitchen apron made of glass is extremely beautiful and matches modern interiors. Its surface can be textured, colored, or decorated with memorable photographs. Glass apron with photo printing in the kitchen it looks very appropriate and is a fashionable trend.
Advantages:
- there are no joints between the coating elements, which greatly facilitates its maintenance;
- installation is very quick and easy using conventional fasteners;
- glass is not afraid of mechanical damage, steam, water, temperature changes.

Flaws:
- stains and fingerprints remain on the glass after wet cleaning;
- This material is very expensive and is most often made to order.
- Plastic. A plastic kitchen apron is a very good alternative to more expensive coverings. This is a budget option from the “cheap and cheerful” series.
Advantages:
- light weight and, as a result, no heavy load on the wall;
- installs quickly and easily using conventional fasteners;
- easy care, no handprints or streaks after a damp cloth;
- hardness and heat resistance;
- various designs and colors.

Flaws:
- short service life;
- susceptible to fading, this is especially true if it is exposed to sunlight from a window;
- subject to combustion;
- low-quality plastic can release toxic substances.
DIY kitchen apron
If you want to save money, everyone can try to make a kitchen apron themselves. Let's consider the option of making it from glass. The sequence of work looks like this:
1. Carefully measure the area of the wall that the apron will occupy. Its upper side may differ in length from the lower side, because the corners on the walls are generally not straight. In this case, focus on a smaller size. If the length of the apron is very long, then divide it into several parts, leaving allowances of 2 mm each on them. If the parts of the apron will be connected in a corner, then be sure to take into account which of them will rest against the wall and which against the glass - their length will depend on this.

2. Mark and make holes for fasteners. Their center should be 50 mm from the corners. If the apron is long and consists of several parts, then there will also be fastenings in the middle. The size of the mounting holes themselves depends on the type of fastener chosen, on average 6-8 mm. Holes for sockets with a diameter of 7 cm are also required.
3. Order glass required size. Its thickness should be from 6 mm. Fasteners are sold both ordinary and decorative - with colored caps. Choose the most suitable ones.
4. The picture can be anything, the main thing is that the original image has good resolution. It will be printed in any photo workshop that has equipment for large-format printing. A drawing or photograph is applied to a self-adhesive film, which is then transferred to the glass. Do not forget that the film will be slightly visible on it. To avoid this, purchase an opaque film and use it as a backing. When ordering a print, you need to be prepared for the fact that all colors will look slightly different than on a computer monitor. To adjust the shade, select the appropriate backing color or simply stick on a white one.

5. To adhere the film to the glass, place it on a hard, stable surface and wash it well to degrease and remove dust and dirt. Now wipe the surface, fill a flower sprayer with soapy water and spray it. Peel off the pattern from the backing and moisten it with the same composition. Place it on the glass and move it around until it is positioned just right. This is made possible by using soapy water. After this, carefully expel the water from the middle to the edges, while it is better to cover the surface with the backing that was just torn off so as not to scratch the film. When it dries, glue the backing in the same way, and then cut out the holes.
6. Attach the apron to the wall and mark it through the holes. Set aside the apron, make holes according to the markings, install fasteners. Lift the glass and fix it on the wall.
Mosaic kitchen apron
The kitchen apron, a photo of which is presented in the article, is often made from tiles and mosaics. The latter option is very beautiful, but also expensive, so making it yourself will result in significant savings. Actions must be performed in the following sequence:

1. To give the bottom row of the mosaic something to rest on, secure pieces of plywood to the wall using dowels. The top line of the support must be perfectly level, otherwise the mosaic will slide down before the glue sets.
2. Start gluing the mosaic row by row, inserting special crosses between the elements. They come in different thicknesses and are needed to ensure that all the spaces between the tiles are the same.

3. Remove the rosettes and glue the mosaic in the areas around them. If necessary, cut its elements into pieces. To do this, use a tile cutter. If any tile needs to be rounded, do this either with spring pliers or regular pliers.
4. When the apron is ready and the glue has dried well, fill the seams with grout of the desired color. After this, you can safely begin further finishing of the walls.
Kitchen apron in this case not a piece of clothing. We will talk about kitchen aprons, which also protect against splashes of water and grease, dirt and grime. But not the housewife’s outfit (or greasy robe, depending on who you choose), but the wall behind the kitchen table and stove. And we’ll figure out why, from what and how to make an apron on the wall with your own hands.
For what?
The wall behind the stove has been lined with durable, dense and easy-to-clean materials for a long time. The reason is clear: this is the most dirty spot in the kitchen. You shouldn’t rely on paneling, plastering and painting: everyone knows that grease and soot eat into ordinary finishing, and it’s expensive to cover all the walls with expensive, durable materials. A kitchen apron takes up a small area and is relatively inexpensive. If necessary, it can be replaced without undertaking a general repair. But at the same time, some features appear in its implementation compared to continuous finishing, because The apron actually hangs on the wall. But more on this later.
The second reason has appeared in our days along with new materials. For aprons, in particular, tempered carbonate glass. You can apply a wide variety of designs to it overall design premises, see fig. In addition, the glass apron is a solid, very hard plane that is absolutely resistant to grease, is easy to clean and lasts for decades.

In a kitchen with a glass apron, the lighting from the bottom of the hanging cabinet is especially aesthetically impressive. Carbonate glass has a high refractive index, which gives a beautiful play of light. But, of course, it is not forbidden to highlight any other apron.
Of what?
So, we already know something necessary to make an apron in the kitchen ourselves: it must be light enough to hang on the wall and not absorb splashes and fumes dirty water, fat, detergents. The last ones especially. Modern detergents can seep almost between molecules. In recent years, studies on kitchen contamination have been carried out in different countries. For walls, the conclusion is clear: they lose their appearance more from ingrained detergent residues than from traditional kitchen dirt.
Tile
The tile backsplash is literally as old as the hills. Kitchens have been tiled with ceramics since ancient times. In terms of hygiene, glazed ceramics seem to be suitable for the kitchen, but! It is not produced in sheets or slabs of large sizes and cannot be manufactured: when fired, it behaves and warps.
Tile is tile: tile cladding always has seams. Which, in terms of hygiene, immediately reduce all the advantages of tiles to nothing: they are very free for dirt, and in it for fungi and microbes. Nevertheless, ceramic kitchen aprons remain in use: modern grout mixtures make it possible to achieve proper hygiene of seams for 10 years, the technology has been proven for centuries, and the materials are inexpensive. Labor intensity, however, is tiled.
Varieties of ceramic aprons are shown in Fig. The first one on the left is a classic tiled apron, but the tiles are of modern production. The difference between this and the “good old Soviet” ones is visible without explanation.

In the center is an original apron made of . Generally speaking, such a solution is not for everyone with the means: the cost of the material is high, and the labor intensity is generally prohibitive, if you take into account the features of the apron, see below.
On the right is a mosaic apron. - an extremely complex and labor-intensive type of decorative art, but for individual small patterned panels modern manufacturers offer interesting solution: sets of ready-made fragments, size 200x200 mm or more, with elements of a mosaic seamless pattern. The drawing is developed on a computer. Having only 10-20 standard pieces at your disposal, you can get hundreds and thousands of different patterns, i.e. each of them will be almost unique, and the cost of a custom-made mosaic apron is comparable to a tiled one.
Glass
A glass apron, or skinali, is a relatively recent innovation. It appeared thanks to computer-controlled glass cutting on special machines and a sharp reduction in the cost of artificial diamond production technology in the last 10-15 years. The fact is that it is almost impossible to cut hardened carbonate: it not only breaks, but breaks up into small round fragments.
Ordinary glass, even if it is thick, is not suitable for an apron: if boiling water is accidentally splashed, it can crack, throwing out traumatic fragments. Due to fluctuations in temperature and humidity, thick glass begins to float on weight over 5-7 years (remember, glass is not a solid body, but an extremely viscous liquid), a gap forms between it and the wall, in which dirt accumulates, forming nauseating stains.
Tempered glass is free from these shortcomings, but it is expensive, and together with computer cutting to order, it is even more expensive. Therefore, ready-made factory-made aprons are more popular. Their sizes are usually consistent with those of certain types of kitchen units.
About drawings on glass
Take another look at Fig. at first. Glass allows you to get a variety of decorative effects: imitation stone (top left), a visible increase in the depth of space (top center), which is especially important for a cramped kitchen, flat and 3D images, from abstract to “delicious.” How is this achieved?
The first method is photo printing. Layers of a special high-strength photographic emulsion are applied to the base, giving additional base colors, as in slide film. Then they are exposed to ultraviolet light through mask negatives, developed and covered with a protective film of acrylic or melamine.
The photographic method allows you to obtain images that are stunningly realistic and fit exactly into the design. In addition, such panels can be permanently glued to the wall with silicone. There are two disadvantages: they are expensive, and the durability of the image, although it exceeds 5 years, is still not comparable to that of a glass base.
The second method is to stick a plastic poster with a picture on the wall, and put glass on top. The edge is sealed with silicone so that the drawing does not penetrate. Such a beautiful apron costs several times less, but you have to give up 3D: even if the poster is three-dimensional, the three-dimensionality of the image disappears under the glass. Another drawback is that you have to fasten the glass to the wall with shaped screws. The fasteners are visible, but drilling carbonate glass costs money: 4 holes add to the price the same as cutting it into a rectangle.
About plexiglass and acrylic
Wouldn't plexiglass or acrylic work for an apron? They are easy to process with ordinary tools, waterproof, and lighter than ordinary glass. Heat resistance – above 100 degrees.
Unfortunately, it won't work. Since it can be easily processed with tools, it is also easy to scratch – once again. Waterproof - yes, but splashes of grease and surfactants from detergents eat into it instantly and deeply. Heat resistance of 105-130 degrees – for softening and loss of strength, but already at a temperature “swing” of 20-45 degrees (and for a stove it can be 60) within six months for plexiglass and 3-4 years for acrylic, clouding and yellowing begin and warping. So, alas, while acrylic will still work on windows, it will not work in the kitchen. And plexiglass is neither here nor there.
Organic
However, there are easily processed organic materials suitable for laying out an apron. These are durable facing plastics and MDF.
The best material for a plastic apron is special tiles. Most often it is produced in sets under a panel of a certain size with a pattern, see fig. left. In almost all respects, such an apron is not inferior to a glass apron with a 3D pattern, and costs one and a half to two times less. True, durability is 7-10 years, but by then modern apartments there will also be a need for repairs.

MDF provides the same durability. This is a good option for kitchens in retro and country style, in the center in Fig. Assembling an MDF apron is easy, just remove the paint from the wall (as below) and walk over the plaster with an abrasive mesh on a block, controlling the evenness with a rule or level, like a slatted one. MDF weighs little, and with liquid nails it stays firmly on the wall without additional fastenings.
If you need to quickly and inexpensively make an apron for 5 years, then plastic wall panels are suitable, on the right in Fig. You just need to take panels not for living rooms, but for the bathroom; There are also special ones for the kitchen. The difference is primarily in the filler, which gives a white background. IN regular panels this is chalk, and in moisture-resistant and not prone to warping - marble powder.

In terms of price, this is not always noticeable; a “marble” board may turn out to be cheaper than a coated one. It is useless to ask sellers - at best they will repeat what is written in the specification, and that is not always true. But by wandering around and looking closely, you can learn to recognize them by eye.
On PVC with marble filler, firstly, the pattern appears to be hanging above a slightly iridescent white surface, see the figure on the right. However, this effect is weakly expressed; it is better to select it first and then examine the cut. Firstly, it will be smoother, almost smooth. Secondly, in the direct rays of the Sun, when the light falls at a certain angle, the smallest sparkling sparks will be noticeable on the cut.
Video: choosing a kitchen apron from 1 channel
How to do it?
Laying the apron begins with preparing the wall. For heavy ones - glass and ceramic - and light ones, plastic and MDF, it is produced differently. But first of all, you need to know where, to what level from the floor you need to work on the wall, because this is not an easy or clean job.
We calculate the lower limit of the apron simply: the height of the table surface (usually 850 mm) minus the thickness of the tabletop (40-60 mm) minus another 50 mm. There is no need to drive it deeper under the table; hanging cabinets may be too low. If a washing machine of greater height is built into the table, there is no point in providing a recess in the apron for it: the work or selection of the finished product becomes much more complicated. It’s easier to push the machine forward as far as possible so that there is a strip of tabletop behind it.
Further, standard height finished solid apron – 600-750 mm. This is where difficulties arise. The fact is that splashes of fat from frying pans fly 800-900 mm, and the recommended height for hanging furniture above the stove is also 900 mm. Therefore, you need to either move the hanging cabinets away from the stove and install a splash-catching hood, on the left in the figure, or choose a kitchen set with hanging compartments different heights, and arrange them with a ledge, on the right in Fig.

But such solutions are suitable if the apron is tiled. Already with wall panels, if they have a large pattern, difficulties arise. Ready-made glass aprons are produced in the form of a flat strip. Buying a very wide one means hiding a lot of money under the furniture in vain, and the cropped design will lose its expressiveness. Ordering cutting of a figured one will be even more expensive. A more or less acceptable solution is furniture from leading manufacturers with a melamine coating, but this will also have to be cleaned regularly and often before the grease and fumes from the next cooking set in.
The length of the apron is at your discretion. There are three selection conditions:
- From the stove - at least 900 mm in each direction.
- From the sink - the same, at least 600 mm.
- If the stove or sink is less than 900 mm from the adjacent wall, the overlap on it is 600 mm or more.
Preparing the wall
Under tiles or glass, you need to knock down the plaster to the base, and treat it until smooth with a strong cement primer for concrete or stone: Plitonit Grunt, Prospector. They give a rougher surface than Knauf, Ceresit and others “from there”, but in our language “oak”, and this is exactly what is needed.For light organic materials, it is enough to wash off the paint and level the plaster as described above. It is best to wash off with non-volatile detergents based on surfactants. They do not stink and do not produce toxic fumes. Surfactant removers come in two types: liquid for horizontal surfaces and gel for vertical surfaces. Naturally, we need a second one for the wall.
Next, for any apron, except perhaps MDF, you will need to install a permanent support underneath. Under the glass you need a support that is strong and at the same time not very rigid, i.e. wooden beam from 40x40 to 60x60, depending on the exit of the rear edge of the tabletop. It is attached to the wall with 6 mm screws in dowels. The length of the screws is chosen so that they extend into the wall by at least 70 mm. The fastening pitch is 150-250 mm.
For support under the tile, you can put a thin-walled perforated galvanized corner, it is cheaper than timber. And it’s easier to mount: using flea screws to the thickness of the plaster, if the tiles are plastic, and 20-25 mm into the wall under ceramics.
Laying
Tile
The most difficult part is laying the slab apron. The fact is that the sizes of tiles in the usual price category differ by 1-1.5 mm. With conventional cladding, this is hidden by the use of crosses of a standard size - 3-4 mm. By the way, who doesn’t know, crosses are inserted into the corners of adjacent tiles to maintain the width of the seams; removed before grouting.
But wide seams on the apron cannot be made. To maintain hygiene, the apron is grouted using grout mixtures with polymer additives, and for them maximum width seam - 1.5 mm, otherwise the polymer film, when dry, stretches, cracks and lets dirt into the seam. Therefore, 1.5 mm crosses are also needed for the apron.
But if you lay tiles on them, then you will see that the seams “walk” both horizontally and vertically. Therefore, you will have to immediately sacrifice a dozen or two crosses by biting off the hangers from them. For what? The shoulders of the crosses are wedge-shaped, and we will need small wedges when laying them:
- We lay the tiles on tile adhesive with a hardening time of 10-20 minutes.
- Using a notched trowel, apply a strip along the length of the apron and the width of the height of the tile to the wall from below above the stop.
- As soon as it comes unstuck (this is after 2-5 minutes), we lay the first row with support on the stop.
- We separate the tiles of the first row along the vertical seams with wedges cut from crosses, two per seam.
- Level the top edge of the tiles, driving wedges under the bottom.
- We wait until the glue has completely set and lay the second row in the same way as the first, only the top edge of the first row will now be the stop.
- We lay each subsequent row in the same way over the completely dried previous one.
With this method of laying, only the upper edges of the horizontal seams will “walk”, which is not so noticeable. And the “spill” of the seam will not increase as the apron is laid out in height.
Video: laying a kitchen tile backsplash
Mosaic
If the apron is a full-fledged mosaic panel, then they make it like a mosaic without any features. If the mosaic apron is assembled from ready-made fragments, on tiles or on fiberglass mesh, then they are laid in the same way as a slab one. The sequence of work operations is illustrated in the figure, and some features are also visible in comparison with tiles, porcelain stoneware or plastic.

Firstly, they do not place it on glue, but on a solution. As you work, you may have to move the fragments a little to adjust the borders of the pattern. The slab parts are moved with wedges or by beating with a rubber hammer; on the grid - simply pulling it with your fingers. But if it is laid on glue, it will quickly set, and even if it is plastic, it will lose strength due to mechanical stress.
Secondly, the solution you need is not cement-sand (it is too viscous, you can’t move anything on it) and not gypsum or alabaster (it is fluid, but fragile and sets too quickly), but gypsum-cement with a setting time of 2-6 hours. For the sake of greater fluidity, sand is added to it at least according to the instructions.
Glass
A one-piece glass apron, without metal fasteners, should be installed by at least three people. First of all, up from the top edge of the glass by 20-25 mm, holes are drilled into the wall for dowels with 4-5 mm self-tapping screws to a depth of 40-60 mm. Step – 300-600 mm. Dowels are driven into the holes, and claws or washers are prepared for the screws, grabbing the edge of the glass.
Next, holes are drilled in the support beam for the same screws. Diameter is the body of the self-tapping screw without thread, depth is 2/3 of the length of the self-tapping screw. The step and distance from the edge are as above. Claws or washers are also prepared in advance for the lower screws.
Then prepare (clean, degrease) the wall and glass for gluing with silicone. The silicone sausage is applied to the wall with a gun in a zigzag pattern, not with an envelope. Zigzag loops are vertical, horizontal ones will not hold well, see fig. Loop pitch is 30-40 mm.

Now two people carefully (no need to rush, the silicone hardens quite slowly) take the glass, and the third (and fourth, if the length of the apron is more than 1.5 m), crouching with both hands, places two flat screwdrivers on the support beam. The “servers” carefully place the glass on them and slowly lift the outer edge so that the apron slides into place using the screwdrivers.
When he got up, they pressed him to the wall and held him. Meanwhile, the “screwdriver” takes out, without pulling, the screwdrivers and manually screws in the self-tapping screws with tabs/washers until they lightly stop, first at the top. After this, the “servers” can relax a little and move to the sides so that the comrade below can work more conveniently. But you can release the glass only after all the screw holders have been tightened. They are removed only after the glue has completely dried twice.
Plastic and MDF
The construction of an apron made of plastic boards or MDF is no different from cladding a wall without sheathing. The apron on the sheathing not only sticks out too much on the walls. In the kitchen, under the sheathing, smoke will inevitably settle and harmful microflora and microfauna will multiply.
After installation
When the heavy apron is already in place, the wall is plastered flush with its surface and the furniture is put in place. Light and mosaic aprons are usually made along the opening, without moving the furniture. When the glue/mortar is completely dry, seal the contour at the top and sides with silicone. How to be above the countertop - more on that below.

Finishing touch
At some point the table will have to be moved, and it cannot be glued to the apron. But then there will be silk left along which the smoke and dirt will go down. How to cover it? It's possible here different variants, but the simplest is a side made of tabletop material. This is what they glue to the apron. And the gap between it and the table is plugged with a PVC edging simply tightly, without any additional fastening. The edge is driven into the slot with a blunt, wide flat screwdriver. The second option is a table top with a side, and a edging between it and the apron, see fig. This way you don’t need to glue anything to the apron and push the piping in. But if the table moves back a little, the dirt will fall down.
About sockets
Sockets dangling in the apron are a common problem in “apron” kitchens. In order for the sockets on the apron to sit securely, the wiring must be installed with some special features.
What's better?
So, what kind of apron? would be better suited for kitchen decoration? If you have money for a glass one, this is definitely it. In addition to ideal hygiene, we get wonderful aesthetics.