At the end of last summer, my son and I decided to build a sauna at our dacha ourselves. We already have it there capital house, and besides, there are no problems with electrification and water supply. The choice was made at frame building, as it is not only economical, but can also be built in a matter of days.
Having prepared a design for a 4.5 x 4.5 m bathhouse, I began purchasing timber, boards, fasteners, power tools, metal tiles, insulation, OSB, hydro- and vapor barrier. I also ordered the delivery of fireclay and regular red bricks, and refractory clay for the stove. By the way, I designed the stove for the bath myself. An experienced stove master helped me with the laying; after all, I wanted the stove to be as efficient and safe as possible. I drew up a diagram of the stove on a checkered sheet of paper; I tried to film the construction process (including the construction of the house) in as much detail as possible so that my experience would be useful to other people.
Of course, it’s quite difficult to build a bathhouse for two people, so at some points my son and I were helped by two more brave workers.

To begin with, a project for our future bathhouse was drawn up. We thought about the location of the rest room, shower room, steam room, and the location of the stove. According to the project, the location of water supply and sewer pipes, and the location of electrical cables were calculated. We decided to build a gable roof with a window on the gable. There should be space under the roof for an attic where we will store tools or bath brooms. There will be two windows in total, not taking into account what is under the roof. One is used as a light source in the relaxation room (120 x 120 cm), the other two are for additional ventilation of the steam room (60 x 60 cm) and the washing room (90 x 60 cm). We will install a metal door for greater security of property during our absence from the dacha.
The entrance group will consist of a small wooden stairs and a gable canopy, also made of wood.
It was decided to build a columnar foundation from asbestos-cement pipes. There are 24 posts in total, and 5 of them will hold the stove. In the future, a blind area will be laid around the foundation of the bathhouse and a storm drain will be installed, because I am not eager to go out into the damp, dirty yard after pleasant procedures.
We located the bathhouse in one of the corners of the site. Nearby there is a high fence and trees. An ideal place, in my opinion, for construction. Perhaps in the near future we will build a font or a small pool on the lawn near the bathhouse.
Foundation
The foundation, as I already said, under our bathhouse is columnar. First, with the help of mercenaries, we removed with shovels a layer of soil with grass growing on it. The site was leveled, after which markings began.

The first angle was marked by sticking a peg into the ground and leveling it plumb. For further marking, a square and a five-meter tape measure were useful. A cord was tied to the first peg, 450 mm was measured, the angle was checked and two more pegs were inserted, respectively indicating the second and third corners of the bathhouse. Having pulled the cord in the same way, we installed the last fourth peg.
Despite the fact that we checked the angles with a square, measuring the diagonals showed slight inaccuracies. I had to correct them by slightly moving the stakes and clearly leveling them.
The next stage of the work was marking the location of the columns, the distance between which is 112.5 cm. The location was marked by simply sticking the reinforcement rods shallowly.
The bathhouse will have one interior partition connected to the corner of the stove. Using a tape measure, my son and I measured and marked the position of one post that will hold the partition and four more posts that will later be under the stove.

After all the calculations and markings, it's time to drill holes for the foundation pillars. They will go one and a half meters underground and stick out from the ground another 30 cm. The photo shows that we removed the cords, but left the pegs. The holes were dug quite quickly - the workers drilled with a gas drill, the son helped carry the earth. By the way, the diameter of the pits was approximately 30 cm, that is, 5 cm larger than the diameter of the asbestos-cement pipes.
To ensure that the posts stood firmly, I poured a layer of gravel and sand at the bottom of the holes, and then compacted this backfill with a hand tamper. I made it myself by nailing a handle bar perpendicularly to a long birch log. The principle is simple - pour gravel, take a log, lower it into the hole and knock with it several times.

Sand and gravel were poured into each hole, pillars were compacted and placed, 5 pieces were placed under the stove
My son and I mixed the cement for the posts in a small electric concrete mixer. They poured cement, sand, and some crushed stone, mixed it and poured in water. The columns were filled according to all the rules. First, the pipe was lowered into the hole, then the first layer of solution was poured into it. We lifted the pipe so that part of the solution flowed to the bottom of the hole, after which we lowered it, leveled it and then poured it to the top in layers of 20-30 cm. Each layer had to be compacted using the same log with a crossbar. Fortunately, the diameter of the log was smaller than the diameter of the pipes. To avoid staining the pillars, concrete was poured through a narrow chute and a plastic funnel. It turned out quite neat. After pouring, we drove reinforcement bars (threaded rods) into the concrete. The upper edge was left to stick out slightly above the concrete in order to later attach the bars of the lower frame. Lastly, sand was poured into the space between the walls of the pits and the pipes. At this point, the construction work was temporarily completed.
Two days later, having had a good rest, I started working on the foundation for the furnace. I cut the chipboard sheet into 5 parts - 4 for the walls of the formwork and 1 for the bottom. I tried the largest sheet on the support posts, then went to drill holes in it for the studs, and at the same time nailed the sides with nails. I placed the resulting box with holes on the studs, prepared the nuts and washers and, leveling the sheet, slowly tightened the fasteners. The formwork was supported from below with boards.
To make the foundation under the stove stronger, I made a reinforcement frame. I found a welded mesh, cut two pieces almost to the size of the formwork and welded pieces of wire so that the frame turned out to be three-dimensional. Look at the diagram, it shows how the rods are arranged. Of course, ideally, do not use welded mesh, but tie individual reinforcement bars yourself with soft wire. Such a connection is more flexible and almost never breaks down.

Concrete mixed with a portion of small crushed stone was poured into the formwork with the reinforcement frame laid. There’s not much to say here - they poured it in, drove out air bubbles with wire, compacted it, covered it with film and left it to harden. This process is lengthy and takes a whole month. My son and I did not wait, having decided during this time to make the frame of the bathhouse, the roof and some related work.

Before I started laying the beams, I dug sewer and water supply pipes between the pillars so that later I wouldn’t have to crawl under the joists.
Bottom trim and subfloors
The bottom frame is the first layer of beams laid on the foundation columns. I took a well-dried beam, 15 x 15 cm, and treated it with Senezh antiseptic. The humidity in the bathhouse is quite high; wood without impregnation will simply begin to rot.

I connected the beams using the “claw” method. For clarity, I drew a diagram with dimensions. In the work I used a hacksaw and a grinder. First, I cut out all the ends, then laid out the beams in the clearing in front of the bathhouse and checked the correctness of the connections.

While I was doing this, my son was laying waterproofing on the foundation - he coated the tops of the pillars with bitumen mastic and glued pieces of roofing felt to it.
To lay the strapping on the foundation, we had to drill holes for the studs sticking out of the concrete. The timber was laid directly on the posts, markings were made in place, after which I drilled. Having marked the first two beams, we laid them on the supports, checked them with a square so that the angle was exactly 90 degrees, and only after that tightened the locking nuts. By the way, we didn’t drill holes for the intermediate posts; we cut down the reinforcement so it wouldn’t interfere. The timber was screwed with nuts only at the corners of the bathhouse. Two more pieces of timber were laid in the place where the interior partition would be.
Now it's time to lay the floor joists. In order not to have to worry about cutting out the bars again, I purchased plates with holes for anchors.

I took the boards with a section of 150 x 50, sawed them and fastened them to the beams using the mentioned fasteners, screws and a screwdriver.


I covered the top of the joists with OSB sheets. The result was a pretty good subfloor.

Zero is ready, subfloor - 22 mm OSB
Assembling the frame and trusses
Wall assembly
We assembled the walls from the same boards with a cross-section of 150 x 50 mm, fastening them together using metal perforated plates (corners). In theory, the distance between the racks should be from 60 cm to one meter, and this is what we did, except that the boards were installed a little closer to each other above and below the window lintels.


The walls are assembled using corners and 45 mm iron screws
We carried out the assembly on the lawn near the bathhouse, so it was much more convenient to take measurements, cut and fix. Assembly is very simple - first, the two upper and two lower boards are fastened together, then the rectangles of the windows are assembled, after which the missing lintels and supports are added. Additionally, we strengthened the wall structure with jibs. Also, in order to strengthen the structure, we attached one more board each with self-tapping screws (we used galvanized ones, 45 mm) above the three window and one door lintels (pay attention to the photo).

The walls were installed one by one, starting with the front. It is very difficult to install the structure without distortions alone or even together, so the assembly was carried out by five people - me, my son and three assistants. The walls were fastened to each other and to the floors with stainless steel nails 100 mm long, driving them in two rows every 45-50 cm. Finally, another row of strapping boards was laid and nailed on top of the walls. This method frame construction Reminds me of a children's construction set. We assembled and installed the walls in just three days.

Rafters
The roof of our bathhouse is gable with hanging rafters. In total we made 11 trusses. The photo shows how we lifted them onto the roof.

The trusses were made with a slope of 45 degrees and reinforced with two struts. Having made one truss and fastened the elements with perforated plates, I continued working, using the first triangle as a template for the rest. The rafters of the roof of my bathhouse will rest on the boards of the top trim and be attached to it with corners. Pay attention to the cuts made in those places where the rafters will come into contact with top harness, as well as at the ends of the rafters, where I cut off a corner for a more aesthetic appearance of the overhangs.

Roof trusses
The rafter truss, which serves as a pediment, was reinforced with four vertical strips, and in the center I nailed two lintels in order to later install a ventilation window.

The two outer trusses were assembled from just two boards each. We attached these trusses last. The photo shows the bars holding them in place. Thus, we created small canopies on the back side of the bathhouse and above the facade.

Frame and almost finished roof
Installation of metal tiles
I decided to cover the bathhouse with Finnish Pural matt metal tiles, because its matte finish is the most resistant to fading and mechanical damage.
Before installing the metal tiles, I laid a layer of waterproofing on the roof, which I secured with thin slats directly to the rafters. Next, with a small gap, I fastened the sheathing boards.
I nailed sheets of metal tiles onto the sheathing. Ordinary self-tapping screws are not suitable here, so I purchased special ones, painted to match the coating. I laid the metal tiles in one row, adhering to the following pattern:
- the sheet was lifted onto the roof with ropes;
- work started from the lower right corner. The first one was aligned with the cornice and attached with special screws, and they were not screwed in completely so that it was possible to correct the position of the sheet;
- the second sheet was laid with an overlap in one wave and again screwed to the sheathing with self-tapping screws;
- The last sheet of the row was secured when the second row was laid.
Immediately, so as not to have to return to the roof several times, I cut the lining and hemmed the cornices.

Installation of a drainage system
I installed the gutter with help. I chose metal gutters because they are the most durable, although plastic ones are cheaper. I bought gutters with a width of 100 mm and a diameter of 75 mm. The length of the eaves of my bathhouse is 5 meters each, the distance from the eaves to the blind area is 2.5 meters. Based on this data, I purchased two pipes 2.2 meters long, two outlet funnels suitable for the gutters, two drain elbows, 4 plugs for the gutters. Another 4 elbows were needed to connect the pipes to the funnels.
The pipes are attached to the wall with clamps every 30 cm, so I took 14 clamps, and 10 brackets, I will mount them on the cornice every meter. Four locks were also needed to secure the three-meter gutters.
I started work with markings. I took a stepladder, a tape measure, a marker, and thread and crawled under the roof. I needed to stretch the thread enough to attach the gutter with a slope of 5mm per 1m, so a total slope of 25mm.
I attached the two outermost adjustable brackets to the sheathing (15 cm from the edge) and pulled the thread. I checked the slope with a tape measure. The remaining brackets were secured so that they touched the thread. Next, I nailed the cornice strip to the sheathing.
By the way, I did all this work before installing the metal tiles, and laid the gutters directly when the entire covering was installed. I connected the pipes when the outer cladding of the walls of the house was done.
The gutters were connected with locks. I applied sealant to the rubber gasket and connected the pipes, leaving a gap of approximately 3 mm between the ends of the joined elements. This gap is needed to compensate for thermal expansion.
I used a hacksaw to cut out V-shaped holes in the gutters, took the funnels and connected each one by simply sliding the edges under the outer bend of the gutter and then bending the flange over the front edge of the gutter. I installed the funnel at a distance of 15 cm from the end of the gutter.
I installed plugs at the ends of the gutters. The drain elbow was secured to the pipe with rivets. I didn’t buy the spider that is inserted into the funnel; I bent the wire myself so that it would trap debris.
I fixed the pipe holders with dowels. The pipes are assembled very simply - they are inserted into each other and fastened with clamps, which are pre-nailed with dowels to the wall.
Bathroom wall cladding
For external cladding For the walls of the bathhouse, I chose Izoplaat slabs. They have good vapor permeability, and the material is natural. Plus, these slabs strengthen the rigidity of bathhouse walls. I took “Izoplaat” 25 mm thick, cut it with a jigsaw and fastened it to the frame with nails.

Green slabs - Isoplaate, vapor permeable. Roof - Pural Matt metal tiles
I stretched the Izospan film over the Izoplaat slabs. This material is also waterproof and windproof, but still allows steam to pass through. I secured the material with a stapler, making horizontal and vertical overlaps of approximately 10 cm.
I insulated the inside of the bathhouse with basalt wool. The slabs had to be cut in places because they did not fit into the space between the posts. Additionally, I didn’t secure the cotton wool with anything; it lay down quite tightly.
Already at this stage, my assistants began to make plumbing from polypropylene. This is clearly visible in the photo. I chose this hidden type of pipe installation for aesthetic reasons. In the future, all of them will be hidden under the finishing cladding.

The outer decorative lining of the bathhouse was made of clapboard. This material was not chosen by chance. Firstly, a bathhouse lined with wood has a presentable appearance, and secondly, wooden lining allows the walls to “breathe” and condensation does not accumulate either in the insulation or in the frame itself.
To provide the necessary air layer, I stuffed thin wooden slats 3 cm wide and only half a centimeter thick directly onto the vapor barrier.
Ebb tides for the base
By the way, it was after I filled the slats and before the installation of the lining began that I began installing the ebb for the base. I took green metal strips. The width I chose was only 50 mm - this is quite enough for a bathhouse. To secure the ebb tides evenly, I first pulled the thread, checked the line with a level, and then proceeded with installation from the far corner of the bathhouse.
I took the first plank and marked a line across the profile with a pencil in the center. I stepped back 5 cm from this line to the right and left, put points and connected them so that a triangle was formed. This triangle was cut out with metal scissors, after which I bent the strip, attached it to the wall of the house and tightened special self-tapping screws with washers. To make it clearer, I am attaching a diagram that I found on the Internet.

The rest of the profiles around the perimeter were attached in the same way - simply screwing in the screws and checking the horizontalness at the same time. All joints were coated with frost-resistant sealant. When I installed all the planks, I additionally strengthened the base ebbs with polyurethane foam - I applied it in a small amount under the planks.
Installation of lining
I decided to install the lining using clamps. Of course, you can simply nail the boards, but this is quite ugly.
My son and I simply pressed the first board against the wall, leveled it and secured it with self-tapping screws, screwing them along the edges of the plank. Then, clamps were inserted into the grooves of the first board of the lining on top (they were inserted next to the battens of the sheathing, stuffed on top of the vapor barrier) and nails were driven into the existing holes. The second board was inserted into the groove of the previous one. Both boards were tapped with a hammer through the intermediate block so that they were tightly connected. Next, we inserted the clamps again and secured them with nails. The remaining boards were fastened in the same way, sawing off the excess in the window and door openings.
I simply nailed the last triangle under the roof itself.


When I finished with the walls, I built a small canopy over front door. Later, I brought it to mind, turning it into a gable, covering it with metal tiles and installing a street lamp under the canopy.
Window
Windows are a different story. They must be installed following technology and avoiding distortions. In a bathhouse, windows should not only be a source of light and provide ventilation, but also retain heat well.

I ordered the windows themselves in advance from one company, but installed everything myself. To begin with, I took vapor barrier and waterproofing tape. The first one was secured around the perimeter window frame from the inside, the second - from the outside, that is, from the street. Later I will glue the edges of these tapes to Izospan.
I installed the frame and tapped plastic spacer wedges to create a two-centimeter gap for the foam. The windows included mounting anchor plates with holes into which I screwed long self-tapping screws. Afterwards I foamed the gaps and checked everything with a level again.
By the way, when installing the sash, I only filmed from one window – the largest. I installed small windows without removing the frames.

Door
I ordered a metal door so that ill-wishers would not get into my bathhouse in winter.
First, I took the door off its hinges to try the frame in the opening. All measurements were accurate and the box fit perfectly. I secured the box with self-tapping screws through the eyes, having previously placed wedges under it for leveling. I filled the gaps between the frame of the house and the door frame with mounting foam, when it dried, I hung the door leaf.
Bath ceiling
To arrange the ceiling, I took an ordinary edged larch board and carefully nailed it to the floor beams. In the place where there will be a hatch for access to the attic, I cut out a rectangular hole.

Further work continued in the attic and after the sauna stove was built. I laid a foil vapor barrier on the rough ceiling, and basalt wool slabs on it, tightly inserting them between the floor beams. I stretched plastic film over the cotton wool and secured it with tape. To finish, I simply nailed another layer of edged boards. All that remains is to make the hatch cover and secure the ladder. The fasteners were included, but I simply screwed all the parts to the floor beams.
I purchased a good quality ladder, retractable, equipped with a ready-made hatch cover. However, so that this cover would not stand out on the ceiling, I carefully covered it with slats. It turned out well, the hatch became almost invisible when closed.


Wiring
I dealt thoroughly with the issue of electricity, trying to do everything carefully and according to the rules. The photo shows that I made the wiring, as well as the water supply pipes, hidden, laying the wires at the stage of internal insulation of the walls of the bathhouse and before finishing.

All wiring is in metal hoses, connections are in boxes on terminals. In the panel there is a general RCD for 30 mA, then 3 circuits
Electricity was pulled from the house through the air, fortunately the distance was short. He screwed a hook into one of the walls of the bathhouse, and screwed the same one into the wall of the house (the distance from the hooks to the ground is about three meters). He pulled a strong cable between them, around which a conductive cable was wrapped.
The photo shows the clamps that are attached to the hooks. It is mounted like this:
- the SIP wire is moved apart, a place for the clamp is prepared;
- the SIP wire is inserted into the grooves of the anchor clamp;
- the wires “wedge”;
- The anchor clamp is attached to the hook - support.
I installed sockets, switches (class IP-44) and a panel in the dressing room. The distance from the floor to the sockets was 90 cm. In the steam room and washing room I ran wires only for the lamps (I tried to do everything away from the stove), because in these rooms it is too humid and sockets simply cannot be installed.
He took copper cables and pulled them through a non-flammable metal corrugation, which he secured with clamps. In some places we had to drill holes in the support beams to install the corrugation. I installed the socket boxes when I covered the walls with clapboard. And the sockets, switches and beautiful lamps themselves (for the steam room I took with a heat-resistant lamp, class IP-54) were installed last.

I'm doing grounding. The grounding was done as expected - a triangle, the vertical corners were welded with a 40 mm strip. The RCD is triggered “at once”
The grounding was done as it should be - a triangle, the vertical half-meter corners were welded with a 40 mm strip. To do this, I had to enlist the help of an electrician friend who found welding machine. A triangle trench was dug near the bathhouse. They drove the triangle welded from the corners into the ground. Then they welded another section of steel strip, which was brought above the ground near the wall of the bathhouse. An M10 bolt was welded to the end of the strip. Next, it was necessary to drill a hole in the wall of the bathhouse in order to lay a copper grounding conductor (mine was 8 mm in diameter) from the grounding to the distribution panel. We wound the conductor around the bolt, closed the whole thing with a terminal box, and a qualified electrician and part-time friend of mine worked on the panel.

Everything took about two hours. Metal strip I treated it with bitumen to prevent it from rusting. I dug the ditches, compacted them, and next summer I will sow a lawn there.

Sewerage
There will be a shower in the bathhouse, and there are also plans for a steam room water procedures, so sewerage installation is a necessity. I provided a drainage well as the final collection point for wastewater. I dug a one and a half meter hole with a diameter of about 1.2 meters, compacted the bottom, covered it with sand and small gravel. Then we installed two meter-long reinforced concrete rings into the pit. The joint of the rings was coated with cement mixed with liquid glass.

Trench for water supply. Depth - per bayonet
Pipes led from the washing room and steam room. I ran another pipe from the location of the urinal. Three holes were made in the floor and pipes were inserted into them. The three pipes were connected to each other with a suitable fitting. A common pipe was laid at a slight slope along a dug trench to the well. One pipe was not long enough, so I had to connect two straight sections with a coupling. All joints are silicone. I first added sand to the bottom of the trench, and used it to fill the pipe after installation.

The well was covered with a round reinforced concrete slab with a hole. I built the neck out of brick, and instead of the lid, I installed a metal hatch for the gas tap. It is small in diameter, but sufficient for inspecting the drainage level in the well and pumping out wastewater with a sewer truck. But there’s no need to go all the way inside, I think so.

Inspection hatch. Instead of a hatch, a hatch for the gas tap was installed. You can check the level and pump it out. There's no need to climb inside
Drains with siphons and filters were installed in the premises. Compact piece that fits directly into sewer pipe. When choosing, I preferred a product with metal grille, guided by considerations of reliability and durability. The grate itself is square with a round hole in the center; when laying the tiles, I didn’t have to spend a lot of time fiddling around with cutting. I installed the drain in parallel with pouring the floor screed and laying the tiles, which I will discuss later.

Brick cutting machine - grinder on a Chinese bed

I personally developed and designed the sauna stove myself. The laying was carried out by the stove maker, based on my sketches. The work began before the finishing floors were installed, the reasons, I think, are clear.

Roofing felt was laid on the previously poured foundation and the first row of bricks was laid. To prevent distortions, each row of bricks was first laid out without clay mortar. A level was used to check horizontality. Plumb lines were also pulled to control the verticality of the masonry.


The photo shows the second and third row of bricks that form the ash chamber and the “appendix” necessary to warm the bottom of the furnace. This design significantly exceeds the efficiency of classic stoves with an ash chamber with an area equal to the firebox.

Before installation, I wrapped the doors with asbestos cord and sealed them with masking tape. I inserted a binding wire into the existing holes and twisted it. During the process of laying bricks, the stove maker placed the long ends of twisted wire between the rows, which guaranteed reliable installation door

In the fourth row, the ash pan was covered, the doors were finally secured and part of the “appendix” was blocked. Here they laid a cast-iron grate, cutting rectangular cuts in the bricks for it. The grid (size 20 x 30 cm) lay freely, with a gap of about 2 cm necessary to compensate thermal expansion metal

To make the ceiling strong enough, the bricks were hewn down into a wedge. Metal corners were not used when arranging the ceiling.
Between the fourth and fifth rows, and then every two rows, the stove maker advised laying a reinforcing steel mesh.

Next, the master laid out the firebox, using yellow fireclay bricks for its walls. The ceilings and firebox door were arranged according to the principle described above. Detailed Process masonry is visible in the photo. Fireclay bricks with triangular cuts were also installed in the firebox. These holes are necessary for supplying secondary air, without which the afterburning of wood gases is impossible.


When laying gas (smoke) channels, asbestos cardboard was laid between the fireclay core and the outer walls of the furnace. Note the overlap of the fireclay core. The bricks are hewn and installed on edge.


Also visible in the photo are red brick ledges on which cast iron bricks will be laid. And on top there will be stove stones. To make it clearer, I drew a diagram of the fireclay core indicating the position cast iron bricks and some other furnace elements. A fireplace portal will be installed on the right side of the stove, facing the steam room. And the cleaning and fuel loading doors open into the dressing room. Thus, smoke will never penetrate into the steam room and carbon monoxide, and you can splash some water on the hot stones - “steam”.


Bath stove. Adapter frame


Bath stove. Fireplace portal
After covering the fireclay core and installing fireplace portal(see photo) masonry continued without changes. Inside, straight vertical smoke channels were still formed, which were combined into one on rows 20-21. A ceiling was formed above the far smoke channel, a valve frame (bypass view) was installed between the channels, the hole in which ensured the free movement of gases, and above the near smoke channel, instead of a ceiling, the stove maker installed a chimney valve. The part was placed in pre-prepared brick cuts and fixed fireclay clay and two dowels (holes in the bricks were drilled with a Pobedit drill).


Two rows later, another pipe valve was installed. There are three valves in total - two of them for the chimney and one bypass installed between the smoke channels (direct stroke).

Three valves - two per pipe and one bypass (direct stroke)

The photo shows a transition to a ceramic pipe, made in the form of four rows of bricks, each row partially overhanging the one below. Above the fourth overhanging row of bricks, three more rows are laid - the transition to the chimney. In the last row of this transition you can see a circular cut into which a ceramic chimney will be installed, or rather an element for collecting condensate.

Also on the side benches of the furnace there are brick protrusions necessary for further arrangement interior partitions.
The furnace was covered right up to the ceiling. Used metal corners, on which the final row of bricks was laid. Asbestos sheets were laid between the ceiling and the bricks.
Installation of the chimney itself (I took a ceramic Italian one, Effie Domus for the bathhouse) took very little time. The blocks were simply installed on top of each other, fixed with sealant and building clay mortar. A deflector was installed on top of the chimney to protect against precipitation.


A few days later they tested the sauna stove - they burned several newspapers. The traction is just great.

Later, when I was making the finishing floor, I laid a steel sheet with an ash receptacle in front of the firebox. It’s easier to sweep this way, and the floor won’t catch fire if a coal accidentally falls out.


All the bricks that are left :)
Video - Installation of a ceramic chimney
Floor
We insulated the floors in the bathhouse. The steam room and shower have tiled flooring, and the dressing room has laminate flooring. First, I’ll tell you about the steam room and shower; there are many more important nuances there.
Laying tiles
The tiles were purchased with a matte finish and rough so that they would not slip. We decided that tiles are much better than wooden floors - they don’t rot and are easy to clean. The glue was purchased with the best moisture resistance characteristics.
Waterproofing was laid on the subfloor, overlapping the walls. On top of the waterproofing, insulation was laid - EPPS (thickness 30 mm). For better adhesion of EPS to the waterproofing, assembly adhesive was used.
A screed was poured over the insulation along the beacons with a slope towards the drain funnel. Before pouring the solution, a reinforcing mesh and a set of beacons were laid. The photo shows that we attached the beacons not to the floor, but to an asbestos solution - we laid out piles and pressed profiles into them. The solution (cement with sand) was mixed in a rented concrete mixer, because... It was important to fill the entire floor in one day. The solution was spread from the bucket with a trowel onto the grid between the beacons and leveled with a wooden plank - the rule. The floor was finally leveled with a wide trowel and grout.
The tiles were laid away from the drain gutter to make it easier to maintain the slope. Each one was pre-soaked in water. The glue was applied with a notched trowel onto the dried and primed screed. In this case, glue was not applied to the entire surface of the floor at once, but only to the space for laying 1-2 tiles. The glue hardens quickly and should not be used to cover a large area of the floor at once. The thickness of the adhesive layer was kept approximately equal to the thickness of the tile. I collected the excess glue around the laid elements with a simple narrow spatula.
First, all rows of whole tiles were laid out, then parts along the walls. We cut the tiles with a manual tile cutter. By the way, for precision masonry we pulled the fishing line and used crosses for the seams. And for better contact of the tile surface with the binder, immediately after laying, I lightly tapped each square of tile with a rubber mallet.
Laminate
The laminate flooring was installed very quickly. We covered the floor with film over the insulation, nailed down moisture-resistant plywood, and rolled out the backing.
I unpacked the package with a knife. He took out the first panel and laid it down, turning it with a small protrusion towards the wall. I inserted 2 plastic wedges between the wall and the board. I took the second strip and snapped it into the end groove of the first. I leveled it and placed the wedges again. When I reached the opposite wall, I used a circular saw to cut off the extra piece of the laminate panel. The next row began from the segment. The second row was assembled in the same way as the first, after which I lifted the entire floorboard at an angle of 45 degrees and carefully connected it to the latch of the first row, and then hammered it through the block with a mallet. The last row had to be sawed lengthwise, precisely measuring the cutting line.
Walls
The walls, as can be seen in the photo report, are covered with clapboard or tiled. First things first.
Laying tiles

We sheathed the walls on top of the insulation with moisture-resistant gypsum fiber board. Self-tapping screws were used for fastening. They were screwed in in increments of 25 cm and retreating slightly from the edge. The sheets were cut so that the joints fell on the frame beams.
In the steam room, it was decided to make a plinth from tiles, so I had to purchase two sheets of moisture-resistant drywall, carefully cut them into strips and screw them around the perimeter of the walls. By the way, the drywall was already attached to the fixed foil (vapor barrier).
In the shower the first row was laid out of floor tiles. I had to cut it a little so that the top row of tiles on the wall consisted of whole tiles.
I applied glue to the wall with a spatula, applied it and tapped the tiles with a mallet. I inserted crosses between adjacent tiles so that the seams were the same. I checked the flatness and horizontality with a long water level. The second and subsequent rows were laid with tiles of a different color.
Holes had to be drilled in some tiles for further installation of pipes and electrical appliances. I made markings with a pencil, checked the accuracy of the position of the hole with a ruler and square, after which the drill went into action. First I drilled the hole with a spear drill. To prevent the tile from splitting, a piece of masking tape was glued on top. After the central hole was ready, I changed the nozzle to a circular one. I immediately purchased a crown with tungsten carbide coating for these purposes. Quite expensive, but it was enough for the entire finishing process.
Immediately during the laying process, excess glue was removed with a rag until the composition dried. The grout seams turned out smooth and neat.
A day after finishing the walls with tiles, I started working on the seams. To begin with, I pulled out all the crosses. I used two colors of grout – white and dark brown. For the bath I selected a two-component epoxy composition. It's not the cheapest, but it's ideal for wet areas. I mixed the grout components in one bucket and did not add water.
Before applying the epoxy grout, I lightly wet the wall with a spray bottle. I collected the mass onto a spatula and then spread it over the seams, making movements from left to right perpendicular to the seam. The spatula was held at an angle of approximately 30 degrees. I leveled the grout 30 minutes after its application using a rubber spatula. Well, finally, when the seams were dry, I washed the walls with soap and water.
Lining - installation
The walls in the steam room were not sheathed with GVL. We stretched the foil vapor barrier and secured it with a stapler and tape. By the way, I also taped well the joint between the ventilation air duct and the foil. On top of the foil I carefully stuffed slats - lathing.

I would like to draw the readers' attention to the horizontal position of the wooden planks of the lining. I specially positioned them so as to avoid capillary rise of moisture along wooden wall and achieve good air circulation necessary for drying the material after bath procedures. It would be very unpleasant if the constant dampness caused the lining to wilt or if it rotted after a couple of years. After all, we build a bathhouse from the heart and for a long time. I also want to say that horizontal fastening allows you to repair or change individual planks, and if the lining is located vertically on the walls, you will have to dismantle half the wall.
At first I wanted to just nail the boards, but then the choice again fell on clamps. They are not visible under the lining, and the nails can rust from high humidity, leaving black stains on the walls.
I treated all the planks with Neomid impregnation to prevent the wood from rotting. And to attach the first and last strips, I purchased copper-plated finishing nails.
Installation started from the ceiling. I stepped back 3 cm, applied the bar, and nailed the nail into the center. I drove another nail on both sides of the board, and then checked the level with a level. I assembled the lining so that the tenon was on top and the groove was on the bottom. This is important, because if you sheathe the wall differently, moisture will accumulate in the grooves, the wood will swell and move.
From below, I inserted clamps into the groove of the first board, each of them was nailed to the sheathing with three nails. I inserted the second forcing panel with a tenon into the groove. I lightly tapped it with a hammer from bottom to top so that there were no gaps left, after which I inserted the clamps and nailed them. So I collected it all the way to the floor. I cut the last bottom plank lengthwise so that there was a gap of 2 cm between the floor and the wood. I inserted the board into the tenon of the penultimate board and nailed it down. Along the way, I drilled holes for the wiring and often checked the horizontal position. I covered all the nails of the first and last panels with a wooden plinth, and installed vertical strips in the corners for beauty.
Shelves in the steam room
I told you how to make the ceiling, floor and walls, the stove is ready, all that remains is to make the shelves in the bathhouse. For work, I took linden boards and pine bars. I drew a diagram, prepared a screwdriver, long screws, metal mounting angles, a hammer and nails.

First, I marked the bars and cut them with a grinder. I cut the ends of the horizontal bars that will connect to the front vertical posts using the “tenon and groove” principle. That is, I made a “spike” on the horizontal bars, and vertical racks"groove".
The first thing I screwed to the wall was the support posts. I would like to note that these supports should not be in contact with the floor; a gap of up to two centimeters should be left. I attached cross members to the support posts. I simply took the mounting angle and nailed it under the horizontal bars at the point where they connected to the support posts. Thus, I nailed the bars on which the boards and bars will lie for stability.
Similarly, I assembled a frame for the lower bench and a small table for brooms, after which I laid boards on the frame and secured them with self-tapping screws. For convenience, I cut off the protruding sharp edges and thoroughly sanded the boards and frame so as not to plant a splinter.

Interior doors
Installation interior doors its principle is similar to the installation of an entrance door. The door in the steam room is glass, the door in the dressing room is wooden. The box in both cases is made of wood, ordered based on the size of the opening.
The box consists of several elements. The connections are sawed at an angle of 90 degrees. First, I secured the side strips and the top using nails. Then I inserted plastic wedges and several spacers between the elements of the box and blew out polyurethane foam. When it had dried a little, I carefully nailed the side strips with nails door frame, which closed the gap and a layer of foam.
I didn’t take pictures of the process itself, so I’m attaching a picture diagram for clarity.

The hinges were included; I attached them to the box and canvas with self-tapping screws. At this stage of the work, it is important to check all distances with a tape measure so that the door hangs evenly. Next, all that remains is to hang the door on its hinges and install the door handle.
Plumbing
The photo shows that we have a douche bucket hanging on the wall, a urinal, a shower and a faucet with spout. The sewerage and hot/cold water pipes were installed at the stage of laying the foundation and building the walls. Now we will talk directly about the installation of plumbing.

Shower room, urinal
Let's start with the urinal. My son and I chose a wall-mounted compact model with a faucet instead cistern, they brought it, unpacked it, and put it against the wall to make markings. The urinal has mounting holes; we marked their location, as well as the outline, on the wall with a marker after we checked whether the product was evenly attached to the wall.
Holes for dowels were drilled according to the markings.
The siphon in the urinal is solid, we tried it on the outlet of the sewer pipe, after which we connected the pipe and siphon with a special pipe. The end of the pipe, which was inserted into the sewer pipe, was wrapped with linen thread and coated with red lead.
The urinal tap is very easy to install. The part is connected to the urinal through a rubber gasket. The height of the crane is adjusted by rotating the parts. The connection to the water supply pipe is made with a nut. After connecting the urinal to the water supply and sewerage, I coated the joint between the earthenware and the wall with plumbing sealant and checked the functionality of the entire system.
A little about the dousing bucket. It's a wonderful device that spins when you pull the chain, and the float mechanism inside the bucket keeps it from overflowing. The bucket frame is secured with dowels, and water is supplied through a flexible hose.

The mixer and shower are installed according to the same principle. The package already contains everything you need, you only need an adjustable wrench and Unipack or Moment plumbing tape. I took the eccentrics out of the box, screwed them into the hot/cold water pipes, then took a level and adjusted them horizontally, while simultaneously bringing the distance between them to 150 mm (slightly turning each eccentric in turn).
The next stage was the installation of the product itself. A thread was screwed onto the eccentrics, rubber gaskets were put on, then I placed the mixer and screwed the union nuts onto the eccentrics.
I am sharing another video that I watched before installing the faucets.
Basement siding
To make the bathhouse look more pleasant and interesting, I decided to cover the foundation columns with panels basement siding. To secure it, metal strips are required to create the sheathing. Even a plasterboard profile will do. I would like to note that first I poured the blind area and made a boardwalk on the side of the facade, and only then attached the sheathing and panels. Otherwise it would be difficult to calculate the height of the panels.
To attach the sheathing (the lower starting profile at a distance of 5 cm from the blind area and flooring), I used self-tapping screws and corners (I simply cut off pieces of the plasterboard profile to make corners). With a screwdriver, the entire structure is assembled in a matter of hours; the main thing is to accurately measure the length of the vertical stiffeners and secure the horizontal profiles using a level (for convenience, I used a level and pulled a guide cord).
I fastened the panels with self-tapping screws, screwing them in approximately every half meter. Masking elements are secured in the corners in the same way. I immediately made square slots in the panels and installed ventilation grilles (fastened with self-tapping screws in the corners) - 2 grilles on each side of the bathhouse.
Blind area
I poured the blind area between the foundation of the bathhouse and the fence. Immediately laid a drainage gutter with a grate. The order is as follows:

We have plank flooring in front of the front door. They just laid boards on three parallel bars, trimmed the edges with a hacksaw and laid them at the front door.

Larch flooring. Base - plastic panels"under a stone"
Finishing touches
To give the bathhouse a finished look, we equipped the porch with a canopy and a homemade staircase. The height of the steps on the stairs is 18 cm, the parts were assembled using mounting angles and self-tapping screws.


I made a path from the gate to the entrance, and near the bathhouse I managed to collect a compost box and a decent firewood rack. We brought furniture inside the bathhouse, hung shelves, curtains, and hung brooms. In the future, I plan to arrange a front garden near the bathhouse and build an outdoor barbecue.

Many steam lovers dream of having a good, but inexpensive, private bathhouse. A place where you can wash, relax, and get a good boost of energy. One of the affordable and budget options is a do-it-yourself frame bath: step-by-step construction instructions will reveal the secrets frame technology, will become an example for independent construction from the foundation to correct selection thermal insulation materials.
Having the skill of assembling frame structures, you can quite simply and quickly with your own hands
Before building a frame bathhouse with your own hands, many people ask themselves: what material to use for its construction? After all, many associate baths with structures made of logs or bricks. But such buildings are quite expensive for their owners, and the time required to warm up, for example, a chopped bathhouse is about 6 hours.

Advantages of frame technology
Construction frame bath solves several problems at once, as these are: a simple construction method, the availability of the materials used and the fast speed of construction. The advantages of frame technology include the following:
- the most affordable construction cost;
- use of lightweight types of foundation;
- low thermal conductivity of the structure contributes to rapid heating;
- the possibility of carrying out communications inside the walls, which has a positive effect on the aesthetic component of the bathhouse structure;
- the absence of shrinkage makes it possible to operate the bathhouse immediately after its construction and finishing;
- use of environmentally friendly materials;
- there is no need to use special construction equipment;
- no special construction skills required self-construction frame bath. Videos posted online demonstrate this perfectly;
- the absence of wet construction cycles makes it possible to carry out construction regardless of air temperature and water availability;
- many ways to decorate a building.

All these advantages contribute to the increasing popularity frame baths. Reviews from owners who used this technology during construction indicate that such structures are economical and, if constructed correctly, can create excellent conditions for comfortable use.
Weaknesses of frame baths, reviews from owners
To weigh the pros and cons of the frame bath construction technology, you can ask for reviews from the owners. There is a lot of information on Internet forums from those who already have such a bathhouse and have been using it for some time. Some leave negative reviews: frame baths, in their opinion, tend to quickly lose appearance due to the formation of fungus on the walls. This occurs due to the rapid cooling of the room, no matter how well it is insulated.
This drawback can be eliminated by using only high-quality insulation materials for thermal insulation. It is necessary to approach the choice of thermal insulation material with all seriousness. After all, cheap polystyrene foam or mineral wool will not adequately perform their functions. The use of economy class foam can cause a structure fire due to the easy flammability of the insulation.

One of the negative aspects described in the reviews is the shrinkage of the bath. Many testify that over time (approximately within 1.5-2 years) frame construction gives shrinkage, the value of which reaches 8-10 cm. This, in turn, can cause deformation of the internal and exterior finishing buildings.
Helpful advice! To minimize the effects of shrinkage of a frame bath, lumber that has been kiln-dried should be used during construction.
Summarizing the above, we can conclude that the main disadvantages are the significant costs of insulating the walls of a frame bath, the need for thorough antiseptic treatment and low fire resistance. However, given the huge list of advantages, the construction of frame baths is not inferior in popularity to structures made of logs or bricks.
You can get acquainted with some of the assembly nuances and reviews from the owners by watching a video of building a frame bathhouse with your own hands.
DIY frame bath projects. Photos of the best buildings
Getting acquainted with photos and videos of frame baths with their own hands, many decide to build the structure themselves. Having some experience in construction and taking into account the good practice of constructing objects using frame technology, you can build such a bathhouse quite quickly. However, as in any construction, to avoid serious mistakes, a competent project is necessary.
Projects, photos of do-it-yourself frame baths 3x4, 4x4 m
When building a 3x4 m frame bathhouse with your own hands, you must take into account that the space inside the room should be used as ergonomically as possible. Such mini-baths can be built on small dacha or area with country house where there is a need to save territory. No more than two people can indulge in bath procedures here.
Before you can build a frame bathhouse quickly and inexpensively, you need to have a ready-made project that you can use as a guide during construction. In principle, a bathhouse can consist of one room, which will combine a steam room, shower and locker room. This is not entirely convenient, since getting dressed after taking procedures in a room with high air temperature and high humidity is not very comfortable.

Typical designs for 3x4 m frame baths provide layouts where separate rooms are allocated for a steam room, a wash room and a relaxation room. Heating of such a bath can be done with one wood stove or a boiler. Drawings of a frame bath can also take into account the presence of a modest veranda.
Do-it-yourself construction of 4x4 or 3x4 frame baths, due to their small size, has its advantages:
- decent savings on building materials- if the length of the wall of the structure is 3 m, the six-meter beam is cut in half and there is practically no waste left;
- speed of construction - having a design and drawing of a frame bath available, it is possible to erect the structure within 2 weeks;
- strength and durability - considering that a minimum of materials is required, you don’t have to skimp on the quality of wood and choose good material with good impregnation.

Helpful advice! Any new building on your site, even small sauna, is subject to mandatory registration in the cadastral register.
A review of photos of frame baths of a small area will help you get acquainted with the projects and choose an option to your liking.
Projects of 6x6 frame baths with an attic
If you are the owner of a large personal plot, it makes sense to build a beautiful and spacious bathhouse. You can steam in it yourself and invite friends - there is enough space for everyone. In projects of frame baths with an attic, a layout has been developed where the rest room, as a rule, occupies up to 20 square meters. m. In the same room there is a staircase leading to attic floor, which is usually used as a bedroom.
Many users post online photos of the stages of building a frame bathhouse with their own hands. Photo reports will help you visually familiarize yourself with the nuances of independent construction.
Insulation scheme for a frame bath
One of the important points in assembling a frame bath is its thermal insulation. Both the selection of material and its installation should be approached with all responsibility. Mineral wool can be used as insulation. This material is characterized by high vapor permeability, it is non-flammable and walls with such insulation “breathe”. This achieves the effect of a log bath.
You can lay mineral fiber formed into slabs or rolls, but it is preferable to use the first option. Insulation boards are laid between the racks. If the sheets in the corners of the frame niche are deformed and do not fit tightly, it is necessary to straighten the sheets using a knife. The insulation must be in close contact with the wooden frame elements around the entire perimeter, as well as with each other.
Helpful advice! Experts recommend insulating a frame bath with two layers of 5 cm each: the first layer is made of insulation in slabs, the second is made of rolled material. Thus, all connecting lines will be blocked.

Between the insulation boards and outer skin The frame is covered with a layer of waterproofing. For this you can use, for example, Tektoten film. The fact is that during operation, the open insulation is partially blown through the ventilation gap, which leads to a decrease in the thickness of the insulation and its deterioration. thermal insulation properties. Laying wind-waterproofing protection from a vapor-permeable membrane will guarantee the effectiveness of the thermal insulation layer.
On the inside, a vapor barrier is made of polyethylene aluminum foil. The joints of the film are glued with tape, after which they proceed to interior decoration. The process of insulating the frame is quite labor-intensive and requires careful execution. If the technology is not maintained, mineral wool may shrink over time, which will affect the thermal insulation parameters of the entire structure.
The video below will demonstrate in more detail the technology of structural insulation during the construction of a frame bath.
Roof arrangement
For a small bathhouse, a gable or hipped roof shape is suitable. Easier to implement - gable. The rafter system of such a roof is made from wooden beams 15x5 cm. For convenience and safety, all structural elements should be assembled on the ground. To avoid errors during assembly, it is recommended to make a layout, the shape of which will be repeated by all rafter elements.
In order to make a model, you need to connect the upper ends of the two rafters with a nail. The lower edges of the rafter legs are placed and secured at the points where the supports are planned. The resulting figure is secured with a transverse jumper - a crossbar. The crossbar is connected to the rafter legs using screws.
When all the roof trusses have been assembled, they begin installing them on site. The first step is to fix the front elements, between which a construction cord is pulled for reference. Its location will coincide with the line of the roof ridge. The remaining elements are mounted at its level. The pitch between trusses is usually 1.2 m, although it can be changed up or down.

Helpful advice! When taking the step of the rafter legs, it is necessary to take into account the location of the chimney. It should be centered between the rafters.
When installing each of the trusses, you should check the verticality of the installation using a plumb line. If there are deviations from the vertical, it is necessary to level their position using a lining under rafter leg pieces of board of appropriate thickness. Next, they arrange the sheathing. If ondulin or other soft material, the distance between the elements of the sheathing should be no more than 1 cm.
The roof is insulated using the materials used to insulate the frame. The roof is covered with roofing material. The ridge is protected with a corner made of galvanized sheet or a factory-made element.

Floor construction and finishing
The peculiarity of bathhouse floors is that their design can be different depending on the purpose of the room in which they are installed. In rooms that are in direct contact with water, a pouring floor is installed. Its design consists of a flooring made of boards, between which gaps are left to allow drainage to pass into the ground. There is no need to insulate such floors.
The construction of the floor of a frame bath begins with laying the logs. If the distance between support points is more than 3 m, it is recommended to erect support columns. In places where the lags come into contact with the strip base and posts, waterproofing from several layers of roofing material is used. Boards are mounted on the joists.
Helpful advice! In order to be able to dry the flooded floor, its floorboards are not fixed to the joists.

The boards in the poured floor structure are placed with a gap of 3 to 4 mm. The interval should also be between the flooring line and the bath wall (about 2 cm). If the soil under the building is sandy, you can limit yourself to filling a 25 cm layer of gravel. The distance from the surface of the gravel to the subfloor should be 10-12 cm. If the soil is clayey, it is necessary to build a tray from which water will be directed to the drainage pit.
For recreation areas, a floor with a “non-leakage” structure is installed. Its installation begins with a subfloor made of two rows of boards. A continuous flooring of pine boards is laid on top. At first they are simply baited. And only when all the interior finishing work is completed and the room is properly dried, the floor boards are finally adjusted and completely fixed.
It should be noted that the floorboards should be located with a slope towards the point where wastewater is collected and discharged into the sewer. A hole is made at the lowest point of the wooden flooring and connected to the drain siphon. A non-leakage floor requires insulation, which is placed in front of the finishing coating.

Video: do-it-yourself frame baths from foundation to roof
For those who are faced with the construction of a frame bath for the first time, it is very important not only to familiarize themselves with the step-by-step installation instructions, but also to get a visual representation of all stages of construction. On the Internet you can find dozens of training videos on how to build a frame bathhouse with your own hands. Video materials contain a lot of useful information and can become a kind of guide in the production of work.
By studying the video instructions, you can learn about the installation features and types of foundation for the construction of a bathhouse, as well as the advisability of using one or another type of foundation. Here you can get answers to all your questions regarding piping, frame installation, roofing and equipping the bathhouse with one or another heating equipment.
Watching video tutorials will help you learn useful recommendations regarding the use of insulation material and its installation. After all, the main thing for a bathhouse is heat, which must be retained inside the structure. Professional advice will help you correctly distribute and install insulation depending on the seasonal use baths, which will affect the durability and appearance of the structure.

Many videos are devoted to the finishing section of a frame bath. Here are the advantages and disadvantages various materials for decoration. Consultations experienced craftsmen will reveal the features and performance properties of each type of material. It would also be useful practical advice from those who built and use their own frame bathhouse.
Although construction using frame technology is not particularly complicated, it is worth familiarizing yourself with the basic recommendations. Some videos contain information about the most common mistakes when building a bathhouse. Reviewing the material will help you avoid them in the future. This will guarantee the rapid construction of a reliable and durable structure.
Frame house construction technology is widely used for bathhouses, garages, sheds and other outbuildings. Frame bathhouse projects (6x6, 3x4) are warm and durable buildings, and the speed of their construction is such that you can take a steam bath within 2-3 weeks after the start of construction. And, of course, the low cost of materials and work process leaves no one indifferent when planning real estate on the site.
Typical drawings of a 6x4 bath
Examples of individual projects of frame one-story baths
Below you see an individual project of a 6x4 m frame bathhouse, which shows that in addition to a steam room with an area of 7.65 m2, the building has a spacious lounge, a compact bathroom and a vestibule with a porch. The frame stands on a strip shallow foundation (MZLF) with a depth of 0.7 m, the foundation has a continuation in the form of a plinth 0.4 m high, the total height of the MZLF is 1.1 m, the layer of crushed stone or gravel under the base of the foundation is 0.2 m. Tambour does not allow cold air masses to penetrate inside when the doors are opened.
 A simple drawing of a bathhouse measuring 4x6 m
 Total area – 24 m2, room dimensions:
- Recreation room – 12 m2.
- Steam room for 7.65 m2.
- Bathroom – 4.35 m2.
What building materials is the frame made from?
- Vertical posts, upper and lower strapping – board 100 x 50 mm.
- Subfloor beams – board 150 x 50 mm.
- Rafters – board 150 x 50 mm.
This project involves a heater installed and heated in a steam room, and such a close arrangement is due solely to size. A parallel option for the location of the stove is also in the steam room, but with an elongated combustion chamber, which will allow you to lay firewood from the recreation room. This solution will allow you to heat not only the steam room, but also the relaxation room.
Bathhouse project with attic
Typical design solutions(6x6, 3x4, 5x4, etc.) they are unlikely to offer a project for a frame bathhouse with an attic. This is a purely private decision, due to the small size of the land plot and the desire to place as much usable space on it as possible. The lower floor has a standard set of premises: a relaxation room, a steam room, a terrace, a sink, a dressing room (in the project drawing there is an entrance hall) and, of course, an attic floor.
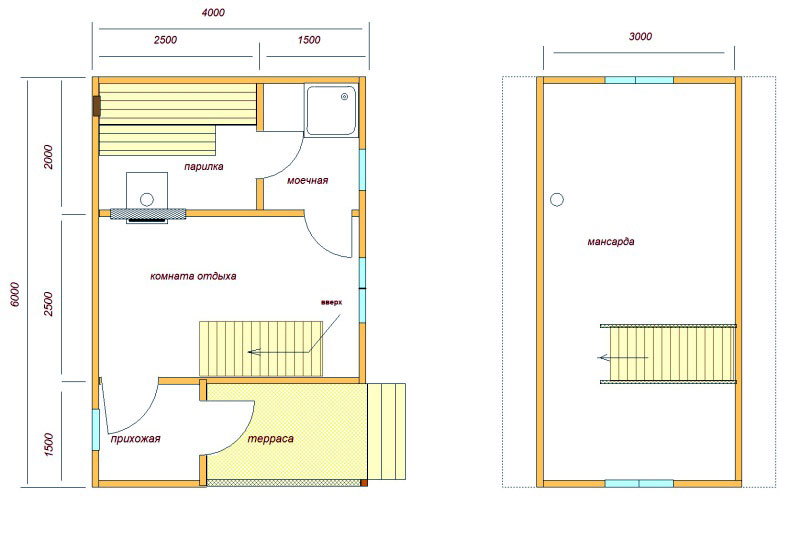 Drawings of a 6x4 bath with an attic
Such a 6x4 frame bath is also quite cramped, but the attic expands its capabilities. In addition, the size of the structure allows the use of standard 300 or 600 cm long lumber, which minimizes waste. The bathhouse can be placed on a columnar, strip or pile foundation, since its weight is insignificant due to the frame version of the frame.
The project is more functional, since after the steam room you can not only relax in separate room, but also just take a shower in the washroom. The steam room is connected to the washing room by a separate door, so the temperature and humidity in the shower room will be quite high. In addition, you can arrange a couple of beds in the washing room, which will further increase the comfort of relaxation after the steam room.
The total area of this project including the attic is 42 m2. Dimensions and area of premises:
- Rest room – 10 m2.
- Hallway – 2.25 m2.
- Washing room – 3 m2.
- Steam room – 5 m2.
- Attic – 18 m2.
Bathhouse project with terrace
Typical designs of frame baths (6x6, 3x4, 5x4, etc.) with a terrace (examples can be downloaded for free in the public domain) most often simply divide the total area in half, leaving little space for functional rooms. Therefore, custom design is preferable in this case, and one solution is shown below. The bathhouse is quite spacious (114 m2), since with dimensions of 6x4 it is very difficult to arrange a terrace.
They try to equip similar projects (can be downloaded online for free) with wider capabilities, since additional space allows this to be done. Thus, the drawings of this project show the presence of a swimming pool combined with a steam room and a corridor, as well as a sauna and a separate heating room, a living room and, of course, a spacious terrace, which is pleasant to go out onto. There are plenty of photos of similar finished buildings on the Internet. 
Since the combustion chamber is fenced off from the rest, it is possible to install not just a heater in it, but also equip small system heating, covering those rooms that are not heated by the steam room. Since there are many such rooms, heating will not be superfluous, especially for a winter terrace. According to the diagram of this project (a more detailed one can be downloaded for free on the Internet), the terrace is specifically intended for winter use, so it is separated by an entrance hall and a corridor, which also need to be connected to the heating system.
Even frame baths with a terrace can be easily erected with your own hands, without the involvement of special equipment and workers.
The total area of the bathhouse built according to the photo above is 114 m2. Area and dimensions of premises:
- Sauna – 11.74 m2.
- Shower room – 10.45 m2.
- Steam room with swimming pool – 8.22 m2.
- Terrace – 33.83 m2.
- Entrance hall (dressing room) – 3.33 m2.
- Corridor – 5.29 m2.
- Furnace room – 4.72 m2.
- Bathroom – 4.72 m2.
- Living room (rest room) – 18.88 m2.
Building materials:
- The strapping is timber 100x150 mm.
- Rafter system – board 100x50 mm.
Small bathhouse with terrace
The dimensions of this mini-bath are 4x4 m, the dimensions of the terrace are 4x1.5 m. For a family of 3-4 people, these are quite acceptable dimensions. Functionality does not suffer from the size - there is a sink, a steam room for two people, a relaxation room, while there is enough space for a veranda or terrace, in wet rooms there are windows with vents (one in the steam room, one in the washing room).
The steam room is ideal for one person, since there is only a lying shelf; on the second one you can only sit, which in the concept of a Russian bath is not quite a complete rest (Finnish ones do not count). The size of the washing room is not critical, since there will always be only one person in it. Therefore, the area of the washing room is sacrificed to the size of the terrace and rest room.
Area of all premises with calculation:
- Recreation room – 5.67 m2.
- Sink – 3.04 m2.
- Steam room – 3.61 m2.
- Terrace – 6 m2.
Construction Materials:
- Strapping beam – 100x150 mm.
- The subfloor is timber 150x100 mm.
- The ceiling is covered with boards 150x40 mm.
- Rafters - edged board with a section of 100x50 mm.
- Roofing materials – corrugated sheets, galvanized sheet metal, metal tiles, slate, ondulin.
Frame bathhouse 5x6 m
All frame baths, the projects of which are presented here, as well as Finnish ones, are designed for DIY construction with minimal labor and financial costs. For example, the plan presented below is simplified to the minimum and this attracts home owners who want to be able to take a steam bath even in a small area. But even such a small building can be equipped with an extension - a terrace measuring 2x5.4 m, along the length of the short side of the bathhouse. 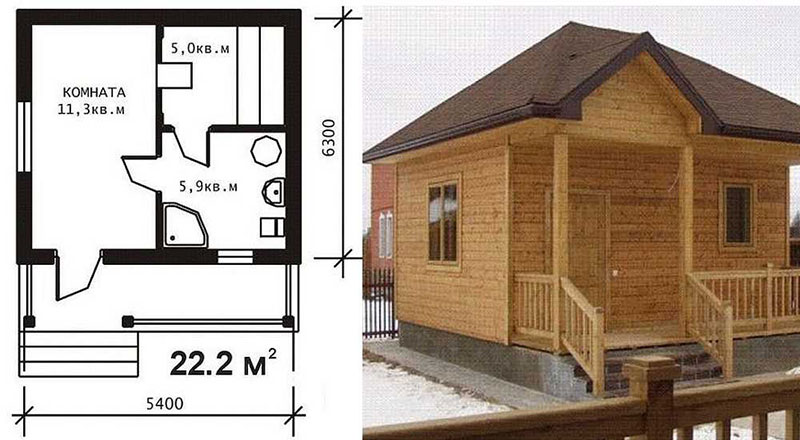 Photo and drawing of a bathhouse with minimal functionality
Options:
- Total area – 22.2 m2.
- Steam room – 5.0 m2.
- The area of the rest room is 11.3 m2.
- Washing room – 5.9 m2.
- Terrace – 10.8 m2.
Advantages of building baths on a frame basis
Frame design includes a timber frame covered with finishing lumber inside and out. All free space inside the frame is filled with layers of vapor and heat insulation. This form of construction is ideal for private developers, because it automatically falls into the low-budget category. In addition, construction can be made even cheaper if you use not industrial materials for thermal insulation, but folk insulation techniques using shavings, sawdust, etc.
Because of light weight buildings there are additional advantages. Thus, the foundation on which the frame bathhouse will stand (the projects described above) can be built lightweight - shallow or shallow, piled or columnar, which is very cheap compared to foundations of other types and capacities. Of course, if the developer wants to play it safe, then the building will work fine on both a slab and strip monolithic foundation, but the cost of the project will increase significantly.  Wall diagram
During construction, you will need a set of standard garden tools: a saw or hacksaw (can be replaced with a grinder), a hammer, wood screws or nails, a screwdriver or powerful screwdrivers, a plumb line and a building level. If it is possible to mechanize the construction process, the final result will only get closer. The main advantage of construction is that even one person can do this work with his own hands, which means saving the family budget.
Flaws
High fire hazard is the main disadvantage of a bathhouse, which is partially minimized by impregnating the wood with fire-retardant solutions. Due to the increased fire hazard, electrical wiring must be laid in a self-extinguishing corrugated hose, which will make the estimate somewhat larger. 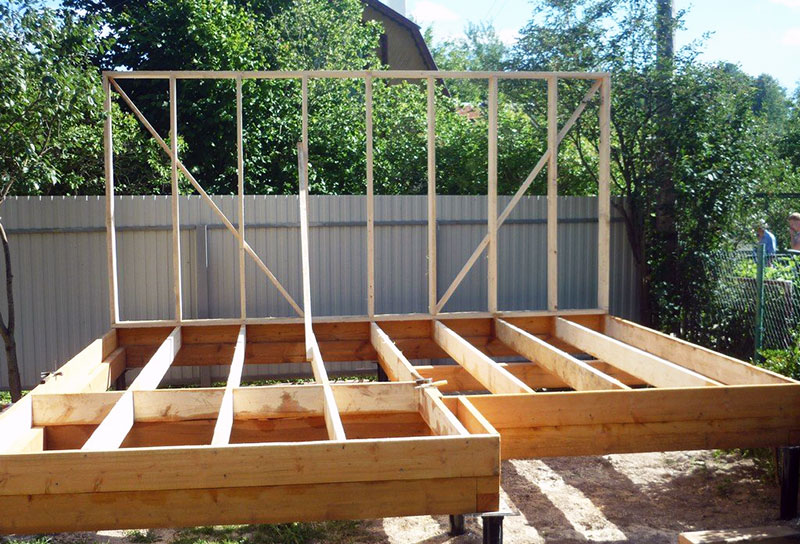 Photo of the “skeleton” of the bathhouse
Constant high humidity indoors, therefore, in addition to fire retardants, wood is also impregnated with antiseptics, which cut off the possibility of mold and other fungal diseases. In addition to antiseptic protection, layers of vapor and waterproofing are laid in the space of the frame.
Like frame house, a bathhouse using the same technique is the most economical way both in terms of labor costs and money, a way to acquire a house for healthy relaxation on your own territory. For the construction of such buildings, if you use frame bathhouse projects, wood materials are required one and a half to two times less than for analogues made of logs or beams. In addition, modern technologies make it possible to use lightweight insulation materials during the construction process, thanks to which the weight of the structure does not increase much, and shrinkage of the building occurs less significantly. If you decide to build a bathhouse with your own hands, then we invite you to get acquainted with the main stages of this work, as well as with different project options.
Where to begin
Before you start creating a frame bath project, you need to decide on some important points, which will allow you to plan everything more productively:
- The steam room can be either built-in or free-standing, so you need to decide how it will look in your bath.
- Decide on a place to build. It is important to do this on initial stage construction, since building a bathhouse involves laying the necessary communications. Often, the owner chooses a place for a bathhouse in accordance with the convenience of installing utility lines from the house there, so as not to complicate his life with autonomous circuits.
- Find out the type of soil in the area you have chosen for the bathhouse. Accordingly, you will need to choose a suitable foundation.
- Consider such points as, for example, the number of floors, the presence or absence of a veranda (terrace), attic (attic)
- As for the internal filling of the bathhouse, it is important to determine in advance the location for the heater stove, since the location and structure of the chimneys and ventilation outlets depends on this.
- Decide on the type of future roof. It can vary not only in appearance, but also in accordance with the structure of the roof. The massiveness of the floors and rafters depends on the choice of roofing.
Experts say that after determining the above-mentioned main nuances, you can begin to work on drawing up an individual project for a frame bath or choosing a project from a photo. As construction progresses, you will adjust your project, but the more accurate it is initially, the less problems will arise in the process.

If this stage seems too complicated for you, you have the opportunity to order a frame bathhouse project inexpensively from specialists. On the pages of the websites of specialized companies, there are many options for already developed frame bathhouse projects in the photo. If none of them suits you, companies will give you the opportunity to order unique project according to your tastes and preferences.
How to assemble a bathhouse yourself
As the name implies, the basis of the structure we are considering is a wooden frame. It is installed on a mandatory foundation and sewn up inside and outside with appropriate materials. Experts recommend making the frame itself from pre-prepared and assembled frames. Each of them includes straps, racks and crossbars. Depending on how thick they are, the thermal characteristics of the bathhouse walls will be higher or lower. To use additional insulation between the skins, you need to think about the thickness of the frame in advance.

The optimal distance between the racks should be about sixty centimeters, but where there will be door and window openings, as well as places where the walls join each other, this distance can be changed to a smaller extent.
The components of the frame can be connected with nails of the appropriate length. After assembly, you should check it - measure the frame diagonally on both sides. To make subsequent work easier, temporarily brace the frame.
The installation of walls should begin with the installation of the basement trim. It will require small boards (5 by 10 centimeters). They need to be laid with an edge along the marking contour from the outside and secured at all corners with nails. If necessary, you can also splice them at the joints. To ensure that the boards lie level and horizontal, use a building level.
The installed frames must be fastened both to each other and to the base frame, using the same techniques that are used when assembling buildings of the panel principle.
After this, the building is faced: on the outside with panels, and on the inside with clapboard or PVC panels.
To line the walls in a steam room, well-dried planed wood is usually used. wooden boards two to three centimeters from deciduous trees. They do not warp and have low thermal conductivity. The facing boards you choose must be nailed to the beams in two places.
Each wall and ceiling of the steam room must be equipped with a vapor barrier. But experts do not recommend using it for these purposes. roll materials from bitumen, because when the room warms up, they emit a peculiar bad smell. It is better to use materials such as glassine or foil films.
Bath insulation is applied to the vapor barrier material.

Building frame with outside can be upholstered with boards made of coniferous trees. They need to be placed in a horizontal position to ensure high rigidity for the building.
The inside of the rest room can be upholstered with any boards.
If outside the boards are nailed horizontally, then in the steam room they are nailed vertically, quite tightly to each other.
Carry out thermal insulation in parallel with the sheathing. Almost any materials can be used as insulation, the most popular being mineral wool, wood fiber boards and wood concrete.

It is important to protect it from rotting of the floors even at the construction stage of the bathhouse. To do this, before you start laying the floors, you need to treat the wood of the floor covering, as well as the logs, with a special antiseptic solution. The joists should be installed in such a way that the lowest part of the floor is in the center of the steam room, where the drain will be located.
Ready-made frame baths
If you have chosen a suitable frame bathhouse project in the photo and even watched a video on how to build frame bathhouses, but you are still not confident in your abilities and capabilities to cope with the task on your own, we recommend that you seek help from specialists. The company can provide you with a ready-made kit, which you only need to assemble, guided by some of the above recommendations.
The finished kit includes:
- Thermal frame or “sip” panels for walls;
- Roof panel;
- Floor made of wooden materials;
- Mounting beam;
- Elements for fastening;
- Documentation.
The package of documents includes the design of the frame bath itself, as well as a photo with instructions for assembly. The papers presented in the folder must comply with all safe construction rules.

Canadian technology
Nowadays, most owners of private houses who decide to acquire a good bathhouse on their site choose those buildings that are built using modern Canadian technology. This method of construction has a number of undeniable advantages, including:
- Significant length of service life;
- High maintainability;
- Good thermal insulation;
- Environmental friendliness;
- Attractive appearance;
- Affordable price (about 10 thousand rubles per 1 square meter);
- Speed of construction (about three days);
- Use of energy saving technologies;
- High resistance to external factors;
- Optimal weight, simplifying the construction process.
The Canadian technology for the construction of frame baths is based on the principle of dividing three functions - enclosing, heat-insulating and load-bearing - between the corresponding building materials.

The frame as the basis for the steam room is made of wood High Quality or stainless steel. In the process of sewing up the frame, fire-resistant mineral wool must be laid inside it. Such a structure can be compared to a thermos, which preserves in cold weather thermal energy, and in hot weather - the necessary coolness.
Bathhouse project example
We invite you to consider one of the most popular frame bathhouse projects in our country with photos. Despite its unusual and seemingly rather simple appearance, this bathhouse includes a steam room, a shower, and a room, the exit from which leads to the terrace (see Figure 1).
In accordance with the presented project, the entire room is divided into three or more small rooms, different sizes.

The entrance to the room is through a terrace, the length of which is approximately equal to the length of the building itself, and the area is about 10 square meters. meters. The roof is separate for it, but combined with the main one.
On the left side of the terrace there is a small window and a door that leads to the rest room (dressing room). The area of this room is slightly larger than the terrace - about 12 square meters. meters. The length is approximately equal to the width. The rest room is cool but warm. Thanks to her, a trip to the bathhouse can turn into regular washing for entertainment with aromatic tea and board games.
There is only one way to build a bathhouse quickly and inexpensively - frame. If you follow the basic rules, the construction will be in no way inferior to its brick and timber counterparts.
We design a bathhouse - different space options
We begin work on the bathhouse with design. At this stage, it is necessary to decide on the size and configuration of the future structure. If your requirements are minimal, you can build a 3x4 m bathhouse. It will have enough space for a steam room for several people with an area of 6 m2. The remaining space can be allocated to a rest room. If you sacrifice the rest room, there will be enough space for a locker room and a vestibule. And if you equip such a bathhouse with an attic floor, you won’t have to give up the rest room.
If the bathhouse will be used as a place to hang out with friends, it is better to make it larger, for example, 6x4. In this case, you can equip it with a fairly spacious recreation room with an area of about 14 m2, as well as a steam room of 5 m2 and a small bathroom.
And if you make a 4x6 bathhouse with an attic, then on the ground floor there can be a steam room and a washing room, as well as a relaxation room and a terrace. The entire attic floor, which is about 20 m2, can be dedicated to a recreation room.
If the size of your plot allows, and the budget is not very limited, make an attic bathhouse measuring 6x6 m so as not to deny yourself anything. There's room for everyone necessary premises, as well as for a terrace and a spacious balcony.
Large steam rooms are much more difficult to heat to the required temperature and then maintain the temperature at the same level. Therefore, if there is no need for a large steam room, it is more advisable to allocate no more than 4-5 m2 for it. This will save fuel and time for heating the room.
In order not to rack your brains over the layout, you can take as a basis finished projects offered on our website. If necessary, adjust the layout as desired. When the plan is ready, be sure to draw up a drawing diagram of the frame of the walls and roof.
The frame of the walls is quite simple - it is based on racks, which are located in increments of 600 mm, if measured from the centers, or 575 mm, if measured between the racks. The top and bottom of the racks are connected by strapping - a horizontal beam or board. In the corners, the racks are reinforced with braces. Above doorways, as well as above and below window openings horizontal jumpers are located. Floor beams are calculated and laid in the same way as in the construction of ordinary houses.
Having such a drawing in front of you will prevent you from making mistakes during the assembly process. In addition, it will allow you to calculate in advance the required amount of lumber.
Columnar foundation - building the foundation
Since a frame bathhouse is light in weight, in most cases a columnar shallow foundation is sufficient for it, provided that the soil is stable. On unstable soils it is better to make a pile-screw foundation. If you are planning a cellar or arranging other rooms, you will need strip foundation. In other cases, it is better to abandon it, since the construction of such a foundation is very expensive and labor-intensive.
Regardless of what kind of foundation you are going to build, first prepare the site - first of all, you need to properly outline it. Be sure to make sure that the diagonals of the site are the same length. Then get rid of the plant layer. To prevent plants from sprouting under the bathhouse in the future, treat the soil with fungicides.
Now you can begin building the foundation itself. If the base is columnar, you will need the following materials:
- sand;
- crushed stone;
- cement mortar;
- concrete foundation blocks (can be replaced with brick);
- bitumen mastic;
- roofing felt;
- timber 150x150 mm.
After preparing the materials, mark the area for the posts, which should be spaced in increments of 1.5–2 m. Then dig holes to a depth of about 40 cm. Cover the bottom of the holes with crushed stone and sand 10 cm thick. Compact each layer thoroughly. Level the surface of the embankment in a horizontal plane.

Place two concrete blocks in the holes, then apply the mortar and place two more blocks on top with a dressing. When laying blocks, make sure that the pillars are installed strictly vertically. Then treat the blocks with bitumen mastic on top and lay a couple of layers of roofing felt.
After this, you need to make a grillage, i.e. lay timber around the perimeter of the foundation and fasten it together. During installation, make sure that the angles of the grillage are 90 degrees. It is advisable to make the corner connection of the grillage beam “in the paw” or at least “in half a tree”. Then you need to lay the floor beams on the posts and cut them into the grillage.
A pile-screw foundation is even simpler - piles are screwed into the ground according to the principle of a conventional drill. Their depth must be at least two meters. During the deepening process, you need to ensure that the piles are positioned vertically.
The tops of the piles are then trimmed so that the edges are at the same horizontal level. After this, a grillage is welded to the piles, which is usually made from I-beams. The same beams are used for flooring.
On metal beams you need to secure the 150x150 mm beam with bolts. It will serve as a strap for the frame posts.
Assembling the frame - materials and installation
To build the wall frame you will need the following lumber:
- timber 150x150 mm;
- timber 100x150 mm;
- board 150x40 mm;
- steel corners;
- wooden dowels.
Be sure to treat all lumber with antiseptic impregnations. They will protect the tree from negative biological influences and also make it more resistant to moisture.
The work begins with the installation of racks in the corners of the building, which are made of 150x150 mm timber. At the end of each rack, drill a hole for the dowel with a depth of 80-100 mm. Make the same holes in the grillage at the corners of the building. Then hammer the dowels themselves into the grillage and place the racks on them. Additionally, strengthen the racks with steel angles and self-tapping screws.
Then the racks must be strengthened with braces, as shown in the diagram above. To make braces, use 150x40 mm boards. Cut the ends of the braces at the angle at which they will adjoin the frame and posts. To fix the boards, use self-tapping screws and corners.

Next, install intermediate wall posts with a pitch of 600 mm, made of 150x40 mm boards. To attach the racks, use steel corners, which should be located on both sides of the brace. In addition, connect the intermediate posts to each other, as well as to the corner posts, using jumpers made from the same boards. Place the jumpers in a checkerboard pattern, i.e. at different levels.
Tie all the racks from above with a strapping, which is made from 100x150 mm timber, it will also serve as a Mauerlat for the roof. Then install horizontal strips above and below the openings. For the slats, use the same board as for the racks.
Then, using the same principle, install the racks of the interior partitions - connect them at the top and bottom with strapping, and also strengthen them with braces and jumpers. This completes the construction of the frame.
Now you need to lay the floor beams, for which you can use 100x150 mm timber. Place them with the edge on the harness and secure with the corners. The pitch of the beams must correspond to the pitch of the rafters - this is usually 900–1000 mm.
Installing an attic roof
As an example, let's consider a roof, since it allows you to get almost full second floor. If you are interested in or, check out other articles on our portal.
For the attic roof you will need the following materials:
- timber 100x150 mm for racks;
- boards 150x50 mm for rafters;
- boards 150x20 mm;
- slats;
- superdiffuse membrane;
- roofing material.
The work begins with the installation of the supporting structure. For each truss, two racks are installed, which are connected at the top by beams. Those. under each roof truss there is a U-shaped supporting structure.
When installing the supporting structure, it is necessary to correctly determine the position of the racks. Since the rack with the lower rafter and mauerlat (floor beam) forms a rectangle, the distance from the wall to the rack depends on the height of the attic and the angle of inclination of the lower rafter. Knowing the angle of inclination of the rafters and the height of the rack (determines the height of the attic room), you can calculate at what distance from the edge the rack is installed using the Pythagorean theorem, i.e. you need to find out the length of the smaller leg.

Secure the posts to the frame and floor beams with self-tapping screws and angles. Additionally, reinforce them with braces. Then connect both posts with beams. Using this principle, install U-shaped parts on all floor beams. Connect all the resulting load-bearing elements at the edges with purlins, as shown in the diagram above.
Now you can install lower rafters. They are cut from below and attached to the harness, and from above - to the purlin, in which the grooves are pre-cut. Next, you need to secure the racks in the center of the jumpers of the U-shaped parts. The height of the racks determines the angle of inclination of the upper rafters. Connect all the posts with a ridge girder.
To complete the attic frame, install the upper rafters, which rest on the lower and ridge purlins. First, cut the grooves for the rafters in the purlins. Immediately waterproof the roof - secure the super-diffuse membrane to the rafters with a stapler. Place a special self-adhesive tape over the staples to ensure a tight connection. Please note that the membrane sheets should overlap each other by 20–25 centimeters.
A superdiffuse membrane is capable of transmitting moisture in one direction. Therefore, it should be located on the roof with the smooth side outward and the rough side inward. If it is not secured correctly, moisture can penetrate deep into the insulation, as a result of which it will lose its thermal insulation properties.
Be sure to secure the slats on top of the rafters, which will serve as a counter-lattice. Then attach 150x20 mm boards perpendicular to the slats. As for the sheathing pitch, follow the manufacturer’s recommendations roofing material, which you purchased for the bath.
Mounted on top of the sheathing roof covering according to the standard scheme - sheets of material must overlap each other lengthwise and crosswise. Screws or nails are located at the crest of the wave.
We insulate the walls, roof and floor of the bathhouse
To insulate the walls you will need:
- basalt wool 150 mm thick and density 25-35 kg/m 3;
- vapor barrier film;
- moisture-windproof membrane (super-diffuse);
- wooden slats.
To vapor barrier a steam room, it is more advisable to use foil vapor barrier material. It will not only protect the structure from moisture, but will also reflect heat into the room.
Let's start with insulating the walls from the inside. To do this, apply self-adhesive double-sided sealing tape to the racks. Then glue the waterproofing film to the tape. Be sure to place the canvases with an overlap of at least 15 centimeters. Seal the joints with double-sided sealing tape. Additionally, secure the foam with a stapler. The result must be an absolutely sealed circuit, otherwise moisture will penetrate inside the walls and the frame will quickly become unusable.

Then lay the slabs into the frame space mineral wool. Make sure that the insulation fits tightly to the structural elements and to each other. Carefully fill all the resulting cracks with cotton wool scraps.
Next, you need to secure a moisture-windproof membrane on the outside of the walls. It is installed according to the same principle as a vapor barrier - a sealant is glued to the racks, then the membrane itself is attached using a stapler. On top of the film on the racks it is necessary to fix slats with a thickness of at least 20 mm. Place the same slats on the racks on the inside of the walls; they will serve as lathing for the lining.
The same technology is used to insulate the roof - mineral wool is laid between the rafters, then covered from the inside with a vapor barrier. A lathing for lining or other finishing materials is mounted on top of the vapor barrier.
The floor is insulated a little differently - first of all, you need to make a rough flooring between the floor beams from the boards. Then it is laid on the beams and flooring waterproofing film(you can use a regular vapor barrier). Logs are laid on top of the film as when installing a regular floor.
Insulation is placed in the space between the joists. You can use any material, both slab and loose, such as ecowool or expanded clay. Another layer of film is laid over the logs and then the flooring is made of boards.
To insulate the ceiling, attach a vapor barrier on the side of the first floor, and then make a rough ceiling from the boards. Then, on the second floor side, you need to fill the space between the beams with insulation. A vapor barrier and plank flooring are laid on top of the beams.
Sheathing the walls - the final stage
For exterior wall cladding, it is best to use OSB-4 with a thickness of 12-15 mm. The sheets need to be cut so that the edges fit on the rack. There should be no hanging edges. In the locations of window and door openings, it is necessary to make cutouts using a jigsaw or hacksaw.
To fasten the sheets, use phosphated self-tapping screws 60-70 mm long. The distance from the edge of the sheet to the screw should be 10 mm. The fastener spacing along the edges should not exceed 150 mm. In the center of the sheets, the screw pitch can be increased to 300 mm.

Be sure to provide a distance of about 5 mm between the edges of the sheets, i.e. the so-called expansion joint. If this is not done, the sheathing sheets may become deformed as a result of thermal expansion. All seams must be filled with foam.
Cover the gables of the building in the same way. Then the walls can be finished with any “dry” façade finishing materials, such as lining, siding, thermal panels, etc. Line the walls with clapboard on the inside. If you do not know how, dedicated to this topic.
That's all the main points. Even if you are a beginner, you can build a small sauna box in one to two weeks.